ThermoPro TP-20 Thermometer Manual
- User manual (7 pages) ,
- Instruction manual (39 pages) ,
- Instruction manual (17 pages)
Advertisement
- 1 Components
- 2 Receiver Features
- 3 Buttons
- 4 LCD Screen
- 5 Transmitter Features
- 6 Button
- 7 Installing batteries
- 8 Turn On/Off Unit
- 9 Synchronize/Pair Transmitter and Receiver
- 10 Loss link alert
- 11 Auto Off Feature
- 12 Measure meat temperature to USDA doneness temperature range
- 13 Measure meat temperature set to your specific taste
- 14 How to Monitor BBQ/Oven Temperature
- 15 Procedure for typical use on an outdoor grill
- 16 Using the Timer
- 17 Helpful Hints
- 18 Cautions
- 19 Cleaning
- 20 FCC Compliance Information to user
- 21 LIMITED TWO-YEAR WARRANTY
- 22 CUSTOMER SERVICE
- 23 Videos
- 24 Documents / Resources
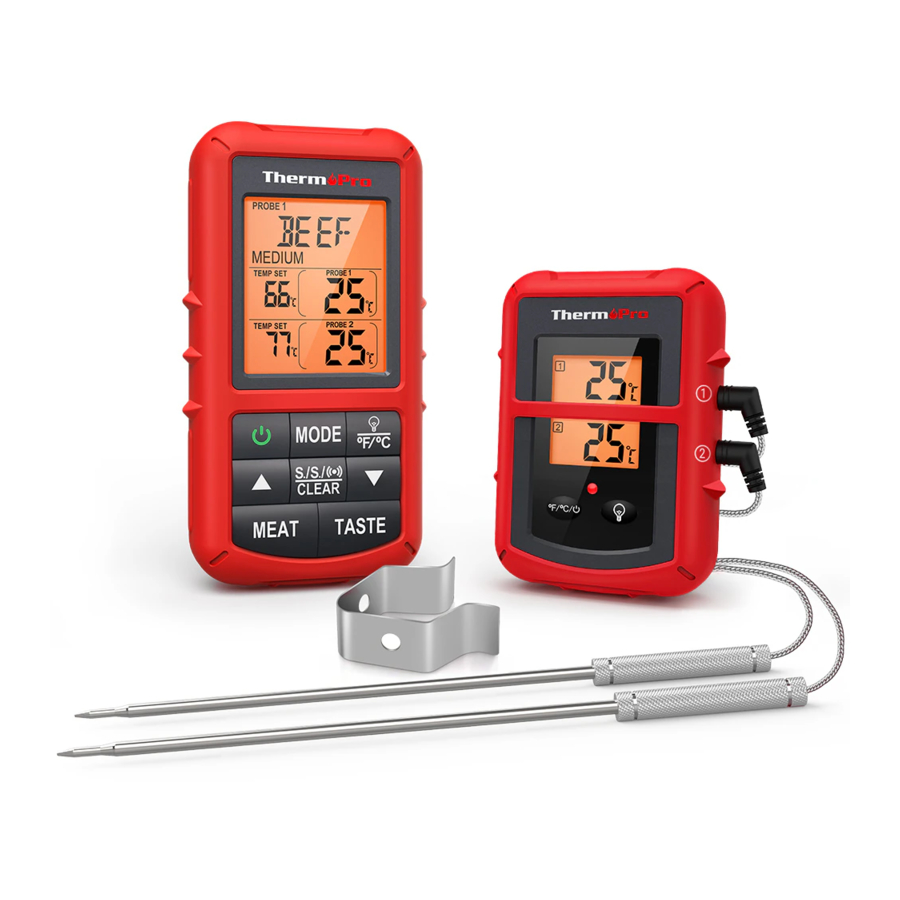
Components
- One receiver unit.
- One transmitter unit.
- Two detachable stainless steel probes with steel mesh cable.
- Four AAA batteries.
Receiver Features

- LCD (Liquid Crystal Display) – Displays all icons, temperature and time.
- Dual probe temperature display.
- Programmable alert with preset temperatures for specific foods.
- 99-hour, 59-minute countdown timer and count up timer
- Temperature range of probe: 32˚F to 572˚F (0˚C to 300˚C).
- Temperature tolerance of internal food reading: +/-1.8˚F (+/-1.0˚C).
- Battery compartment – Holds 2 AAA batteries.
- Belt clip/Stand – Belt clip allows you to be mobile. Clip the receiver unit to belt. Swings out and allow you to stand the receiver on tabletop as well.
Buttons
- MODE – Press to select Thermometer Probe 1, Thermometer Probe 2 or Timer mode. Press and hold for 2 seconds to enter Synchronization/Pairing mode.
- ▲ – In thermometer mode (Probe 1 or 2), press once to increase the temperature value. Press and hold for 2 seconds and the temperature value will increase at a faster pace. In timer mode, press once to increase Hour, Minute or Second setting. Press and hold for 2 seconds, the hours, minutes or seconds will increase at a faster pace.
- ▼ – In thermometer mode (Probe 1 or 2), press once to decrease the temperature value. Press and hold for 2 seconds, the temperature value will decrease at a faster pace. In timer mode, press once to decrease Hour, Minute or Second setting. Press and hold for 2 seconds, the hours, minutes or seconds will decrease at faster pace.
- S./S./
![]() /CLEAR – When setting the timer, press to confirm the setting. When the timer setting is set, press once to start the timer. When the timer is running, press once to pause the timer. Press and hold for two seconds to clear timer setting. Press it to turn ON/OFF the alarm in BBQ mode.
/CLEAR – When setting the timer, press to confirm the setting. When the timer setting is set, press once to start the timer. When the timer is running, press once to pause the timer. Press and hold for two seconds to clear timer setting. Press it to turn ON/OFF the alarm in BBQ mode. - MEAT – In thermometer mode, press to select the meat type: PROG (program – User Self-Defined), GBEEF (Ground Beef), GPOUL (Ground Poultry), BEEF, VEAL, CHCKE (Chicken), PORK, POULT (Poultry), LAMB, FISH, HAM and BBQ. In Timer mode, press to select Hour, Minute mode or Minute' second" mode.
- TASTE – In thermometer mode, press to select the meat taste level: RARE, MED RARE, MEDIUM, MEDIUM WELL and WELL DONE. In BBQ mode, press it to display HI or LO BBQ temperature.
![]() /ºF/ºC–Press once to turn on or off the backlight, Press and hold for 2 seconds to select temperature readings in Celsius or Fahrenheit.
/ºF/ºC–Press once to turn on or off the backlight, Press and hold for 2 seconds to select temperature readings in Celsius or Fahrenheit.![]() – Press once to turn ON/OFF the receiver.
– Press once to turn ON/OFF the receiver.
 /ºF/ºC–Press once to turn on or off the backlight, Press and hold for 2 seconds to select temperature readings in Celsius or Fahrenheit.
LCD Screen

Transmitter Features

- LCD (Liquid Crystal Display) – displays temperatures of both probe 1 and probe 2. It will automatically switch between probe 1 and probe 2 displays.
- Wire Stand – Allows you to stand the transmitter on tabletop or it can be reversed and used as a hanger.
- Battery Compartment – holds 2 AAA batteries.
- Sensor socket hole – Plug-in for stainless steel probe 1 and probe 2.
Button
ºF/ºC/ – Press once to turn on or off the transmitter. Press and hold for 2 seconds to select the transmitter temperature display in ºC or ºF.
Installing batteries
Open the battery compartment of the receiver and insert two "AAA" batteries with correct polarity. Open the battery compartment of the transmitter and insert two "AAA" batteries with correct polarity.
Turn On/Off Unit
Press button on the receiver to turn on/off the receiver;
Press ºF/ºC/ button on the transmitter to turn on/off the transmitter.
Synchronize/Pair Transmitter and Receiver
The transmitter and receiver were already paired at our manufacturing facility. Usually you do NOT need to re-synchronize or re-pair the units. You just plug in the probes, insert batteries, turn on the receiver and the transmitter and wait for a few seconds, you will see the temperatures shown on both receiver and transmitter and the units are ready for use.
However, in some unusual cases, the transmitter and receiver are no longer paired, then you may need to re-synchronize them by following the below steps:
- Insert the stainless steel probes into the corresponding plugs in the transmitter.
- Turn on the transmitter by pressing the ºF/ºC/
![]() button. The transmitter will show the current temperatures on its LCD display.
button. The transmitter will show the current temperatures on its LCD display. - Turn on the receiver by pressing the
![]() button.
button. - Press and hold Mode button on receiver for 2~3 seconds to enter the synchronization mode which will last for 60 seconds. The display shows "---" and it is flashing.
- Wait for a moment until the temperature reading shows on the receiver display, it means the synchronization/Pairing is complete. Your professional remote cooking thermometer is now ready for use.
Note: The synchronization between the transmitter and the receiver won't be lost even if you replace the batteries.
Loss link alert
If the receiver is taken out of range or there is abnormal external interference or after shutting off the transmitter, the receiver may not be able to receive the transmission from the transmitter. If this happens for over 4 minutes, the unit will alert you the signal is lost. Pressing any button on Receiver will stop the Loss Link beep.
To regain transmission signal, move the receiver closer to the transmitter, the link should be automatically restored and the temperatures should appear on the receiver display.
Auto Off Feature
The receiver will turn off automatically if it hasn't received the temperature signal from the transmitter for more than 30 minutes, a beep will sound for one minute before it shuts down. However, the Auto Off feature will be automatically disabled if the timer is running.
Measure meat temperature to USDA doneness temperature range
- You can use two probes (Probe 1 and Probe 2) to measure and monitor temperatures of two pieces of meat or two sections of the same large piece of meat at the same time.
- Press MODE to select Thermometer Mode, Probe 1 or Probe 2, represented by a small icon (PROBE 1 or PROBE 2) on the upper display.
- Press MEAT to select meat type: PROG (Program - User self-defined), GBEEF (Ground Beef), GPOUL (Ground Poultry), BEEF, VEAL, CHCKE (Chicken), PORK, POULT (Poultry), LAMB, FISH & HAM.
- Press TASTE to select the level of doneness for the meat type selected: RARE, MED RARE, MEDIUM, MEDIUM WELL and WELL DONE.
Note: The temperature displayed to the left of the actual meat temperature will show the preset temperature TEMP SET according to USDA doneness levels. Example: Beef will be Well Done at 165 ºF. - Once the temperature of meat (Probe 1 or Probe 2) reaches the preset doneness level, the receiver will beep and the LCD backlight will be turned on. Press any button to stop the beep.
| MEAT | Rare | Med Rare | Medium | Med Well | Well Done |
| Ground Beef | 160ºF/71ºC | ||||
| Ground Poultry | 165ºF/74ºC | ||||
| Beef | 125ºF/52ºC | 140ºF/60ºC | 150ºF/66ºC | 160ºF/71ºC | 170ºF/77ºC |
| Veal | 125ºF/52ºC | 140ºF/60ºC | 150ºF/66ºC | 160ºF/71ºC | 165ºF/74ºC |
| Chicken | 165ºF/74ºC | ||||
| Pork | 160ºF/71ºC | 165ºF/74ºC | 170ºF/77ºC | ||
| Poultry | 165ºF/74ºC | ||||
| Lamb | 140ºF/60ºC | 145ºF/63ºC | 160ºF/71ºC | 165ºF/74ºC | 170ºF/77ºC |
| Fish | 145ºF/63ºC | ||||
| Ham | 160ºF/71ºC | ||||
| Program | 145ºF/63ºC |
Measure meat temperature set to your specific taste
- Press MODE to select Thermometer Mode, Probe 1 or Probe 2.
- Press ▲ or ▼ to raise or lower the set temperature. As you press ▲ or ▼ the display changes to PROG (program). Press and holding the button will raise or lower the temperature setting rapidly. Pressing MEAT will return you to the preset USDA ranges.
- Once the temperature of meat reaches the preset doneness level, the receiver will beep and the LCD backlight will be turned on. Press any button to stop the beep.
How to Monitor BBQ/Oven Temperature
- You can use probe 2 to measure and monitor the temperature inside the BBQ, smoker or barbeque. Clip the probe to grill rack of BBQ, or oven rack.
- Press MODE to select Probe 2.
- Press MEAT repeatedly until the display shows BBQ.
- Press ▲ or ▼ to set your desired temperature of the HI BBQ setting. Press and hold the ▲ or ▼ button to make the adjustment faster. The HI BBQ temperature range is 140 ºF – 572 ºF and the default setting is 250 ºF.
- Press the TASTE button to switch to the LO BBQ setting. Press ▲ or ▼ to set your desired temperature of LO BBQ setting. Press and hold the ▲ or ▼ button to make the adjustment faster. The LO BBQ temperature range is 32 ºF – 554ºF and the default setting is 225 ºF.
- Press the S./S./
![]() /CLEAR button to turn on/off the alarm function.
/CLEAR button to turn on/off the alarm function. - Press the TASTE button to display the High or Low temperature setting.
(Note: the HI BBQ setting will not allow you to set the temperature below the LO BBQ setting. LO BBQ temperature is always lower than the HI BBQ temperature by 2ºF)
Note: The LO BBQ temperature alarm will not be activated until the actual BBQ temperature goes above the set LO temperature.
Procedure for typical use on an outdoor grill
The following typical example will go through the steps to have the Professional Remote Cooking Thermometer alert you when you cook two pieces of beef steak at the same time with one piece of beef steak to be cooked to medium (USDA doneness level) and the other piece of beef steak to be cooked to medium well (USDA doneness level).
- Turn on the grill.
- Place two pieces of beef steak on grill rack.
- Insert probe sensor 1 into the center of thickest portion of first piece of steak. Avoid touching bone or heavy fat areas. Insert probe sensor 2 into the second piece of steak. Assume you would like to cook first piece of steak to medium and the second piece to medium well.
- Position the probe sensor wire so they will not come into contact with flames and exit the grill surface area without being pinched/crushed by the grill cover.
- Stand the transmitter away from heat source of grill. DO NOT put transmitter on the closed cover or under the cover. The transmitter is not waterproof. DO NOT use in the rain.
- Press Mode to select Thermometer Probe 1. Press MEAT so BEEF is displayed.
- Press TASTE so MEDIUM is displayed and 150 ºF will be shown as the TEMP SET.
- Press MODE to change Thermometer Probe 2. Press MEAT so BEEF is displayed.
- Press TASTE so MEDIUM WELL is displayed and 160 ºF will be shown as the TEMP SET.
- You may take the receiver up to 300 feet away from the outdoor grill. Go indoors if desired.
- When the temperature of first piece of steak reaches 150 ºF MEDIUM, the receiver will beep and the LCD backlight will be turned on.
- Press any button to turn off the alert.
- Take the first piece of steak out of grill.
- When the temperature of second piece of steak reaches 160 ºF MEDIUM WELL, the receiver will beep and the LCD backlight will be turned on.
- Press any button to turn off the alert.
- Turn off grill. Remove the probe sensors from both steaks. Always wear a heat resistant glove to touch the stainless steel probe sensor or wire during or just after cooking. Do not touch with bare hands.
- Clean the stainless steel probe and dry thoroughly after each and every use.
- Turn off the transmitter and receiver.
Using the Timer
Count down
- Press the MODE button to select the TIMER mode. The timer 00:00 with a small icon TIMER will be shown in the upper part of the display.
- Press MEAT to switch between Hour: Minute timer to a minute' second" timer and back.
- Press ▲ or ▼ to adjust timer setting. Press and hold ▲ or ▼ to adjust setting at a faster pace. Press S./S./
![]() /CLEAR to confirm the setting. The maximum countdown timer setting is 99 hours and 59 minutes.
/CLEAR to confirm the setting. The maximum countdown timer setting is 99 hours and 59 minutes. - Press and hold S./S./
![]() /CLEAR to clear the setting back to 00:00
/CLEAR to clear the setting back to 00:00 - After setting, press S./S./
![]() /CLEAR to start the timer. TIMER ▼ will blink indicating the countdown timer is running.
/CLEAR to start the timer. TIMER ▼ will blink indicating the countdown timer is running. - To pause the countdown process, press the S./S./
![]() /CLEAR button. The TIMER ▼ becomes solid. Press the S./S./
/CLEAR button. The TIMER ▼ becomes solid. Press the S./S./![]() /CLEAR button to continue the timer.
/CLEAR button to continue the timer. - When countdown timer reaches 00:00, an alarm will sound and backlight will be on for one minute.
Note: When the timer counts down below 1 hour 1:00, the display will automatically change to 59'59" to indicate, 59 minutes 59 seconds. The seconds will be shown counting down then. When the countdown reaches 0'00" the timer starts counting up and it will beep for 60 seconds. Press any button to stop the timer.
Count up
- Press the MODE button to select the TIMER mode, The timer 00:00 with a small icon TIMER will be shown in the upper part of the display. If the timer setting is not 00:00, press and hold S./S./
![]() /CLEAR to clear the setting to 00:00.
/CLEAR to clear the setting to 00:00. - Press the S./S./
![]() /CLEAR button to start count up. The TIMER ▲ will blink indicating count up timer is running. The maximum count up that can be reached is 99 hours and 59 minutes.
/CLEAR button to start count up. The TIMER ▲ will blink indicating count up timer is running. The maximum count up that can be reached is 99 hours and 59 minutes. - To stop the count up process, press the S./S./
![]() /CLEAR button. The ▲ TIMER ▲ becomes solid.
/CLEAR button. The ▲ TIMER ▲ becomes solid. - Press and hold S./S./
![]() /CLEAR to clear the setting back to 00:00.
/CLEAR to clear the setting back to 00:00. - When count up timer reaches 59 minutes and 59 seconds, it will automatically change to Hour: Minute display format.
Helpful Hints
- If the receiver and / or the transmitter display LLL or HHH instead of the probe temperature, wait for probe to reach room temperature. If LLL or HHH is still displayed or you get a false temperature, squeeze the probe jacks harder into the transmitter and twist them back and forth so they make good contact. If the problem still persists, it is likely the internal probe wire has shorted out either through moisture or heat damage.
- Do not immerse the probe in water while cleaning.
- Do not allow the probe or probe wire to come into contact with flames.
- Within the warranty period return defective probe to address below along with a return address and we will send you a replacement probe at no charge.
- If the temperature displayed seems to read too high or the temperature seems to increase too quickly, check to make sure the probe tip is not poking through the food. Reposition the probe tip in the center of the thickest part of food. Avoid touching bone or heavy fat areas.
Cautions
- Always wear a heat resistant glove to touch the stainless steel probe sensors or wires during or just after cooking. Do not touch with bare hands.
- Keep the stainless steel probe sensors and wires away from children.
- Clean the stainless steel probes and dry thoroughly after each and every use.
- Do not use the unit in the rain. It is NOT rain proof.
- Do not expose the plugs of the stainless steel probes or the plug in holes of the transmitter to water or any liquid. This will result in a bad connections and faulty readings.
- Do not expose the receiver or transmitter to direct heat.
- Do not use stainless steel probes in a microwave oven.
- The Probe Thermometer registers temperatures as low as 32 ºF (0 ºC) and as high as 572 ºF (300 ºC). LLL will be displayed below 32 ºF and HHH will be displayed above 572 ºF. Do not use the stainless probe sensor above 572 ºF. Doing so will deteriorate the wire.
- Not Intended for use by persons aged 12 and under.
Cleaning
- Always wear a heat resistant glove to touch the stainless steel probe sensors or wires during or just after cooking. Do not touch with bare hands.
- Keep the stainless steel probe sensors and wires away from children.
- Wash the metal probe tips with hot soapy water and dry thoroughly. Do not immerse the probe in water while cleaning.
- Wipe the transmitter and receiver with damp cloth. Do not immerse either in water.
FCC Compliance Information to user

Changes or modifications to this unit not expressly approved by the party responsible for compliance could void the users' authority to operate the equipment.
Note: This equipment has been tested and found to comply with the limits for a Class B digital device, pursuant to part 15 of the FCC Rules. These limits are designed to provide reasonable protection against harmful interference in a residential installation. This equipment generates, uses and can radiate radio frequency energy and, if not installed and used in accordance with the instructions, may cause harmful interference to radio communications.
However, there is no guarantee that interference will not occur in a particular installation. If this equipment does cause harmful interference to radio or television reception, which can be determined by turning the equipment off and on, the user is encouraged to try to correct the interference by one or more of the following measures:
- Reorient or relocate the receiving antenna.
- Increase the separation between the equipment and receiver.
- Connect the equipment into an outlet on a circuit different from that to which the receiver is connected.
- Consult the dealer or an experienced radio/TV technician for help.
This device complies with part 15 of the FCC Rules. Operation is subject to the following two conditions:
(1) this device may not cause harmful interference, and
(2) this device must accept any interference received, including interference that may cause undesired operation.
LIMITED TWO-YEAR WARRANTY
ThermoPro warrants this product to be free of defects in parts, materials and workmanship for a period of two years, from date of purchase. Should any repairs or servicing under this warranty be required, contact Customer Service by phone or email for instructions on how to pack and ship the product to ThermoPro. This warranty gives you specific legal rights and you may also have other rights which vary from state to state.
CUSTOMER SERVICE
Telephone: 44-203-769-1321
Email: service@buythermopro.com
Hours: Weekdays 1:00 PM - 11:00 PM CET

VideosThermoPro TP-20 Review Video
Documents / ResourcesDownload manual
Here you can download full pdf version of manual, it may contain additional safety instructions, warranty information, FCC rules, etc.
Advertisement


Need help?
Do you have a question about the TP-20 and is the answer not in the manual?
Questions and answers