Table of Contents
Advertisement
Available languages
Available languages
Quick Links
manière d'emballer et d'envoyer le colis à ThermoPro.
Cette garantie vous donne droit à des dispositions
légales et certains droits supplémentaires selon l'État
où vous êtes domicilié.
SERVICE CLIENT
FR
1-877-515-7797 (uniquement aux États-
Téléphone :
Unis et au Canada)
33-975-129-576
Email :
service@buythermopro.com
Heures :
Tous les jours ouvrés de la semaine de 8h00
à 20h00 EST
Tous les jours ouvrés de la semaine de 1:00
PM -12:00 PM CET(France)
(France)
-28-
Cook Like A Pro Every Time!
Digital Food Thermometer
English............ 2
Français.......... 14
Model No.: TP-06S
V20181009 EN FR
Advertisement
Table of Contents

Related Manuals for ThermoPro TP-06S


Summary of Contents for ThermoPro TP-06S
- Page 1 à ThermoPro. Cette garantie vous donne droit à des dispositions légales et certains droits supplémentaires selon l'État où vous êtes domicilié. SERVICE CLIENT 1-877-515-7797 (uniquement aux États- Téléphone : Unis et au Canada) 33-975-129-576...
-
Page 2: Key Definition
Key Definition Buttons 1. MODE – Press to select thermometer or timer mode. ▲ 2. HR – In timer mode, press to set hour. Press & hold for 2 seconds, the hours will increase 10 hours per second. In thermometer mode, press to increase the temperature value. -
Page 3: Installing Batteries
6. START STOP– In timer mode, press to start or stop 3. Press TASTE to select the level of doneness for the the timer. meat type selected. RARE, MED RARE, MEDIUM, MED WELL and WELL DONE. 7. TASTE – In thermometer mode, select the meat taste level, RARE, MED RARE, MEDIUM, MED WELL Note: The temperature displayed to the right of the actual meat temperature PROBE TEMP will show... -
Page 4: Using The Timer
doneness level the unit will beep and the LCD back the display will turn to 0:00, the unit beeps and “▲▼” light will turn red. will blink for 60 seconds. Count up Using the Timer 1. Press MODE to select timer mode. The upper display Count down will show a small TIMER and 0:00. -
Page 5: Helpful Hints
fat areas. Assume the meat temperature is 45 ºF. 14. Remove the probe sensor from steak. Always wear a heat resistant glove to touch the stainless steel 4. Position the probe sensor wire so they will not probe sensor or wire during or just after cooking. come into contact with flames and exit the grill Do not touch with bare hands. -
Page 6: Declaration Of Conformity
after cooking. Do not touch with bare hands. Cautions: Keep the stainless steel probe sensor and wire Always wear a heat resistant glove to touch the away from children. stainless steel probe sensor or wire during or just Wash the metal probe tip with hot soapy water and after cooking. -
Page 7: Limited One-Year Warranty
LIMITED ONE-YEAR WARRANTY This will contribute to the recycling ThermoPro warrants this product to be free of and other forms of reutilisation of defects in parts, materials and workmanship for a electrical and electronic equipment. -
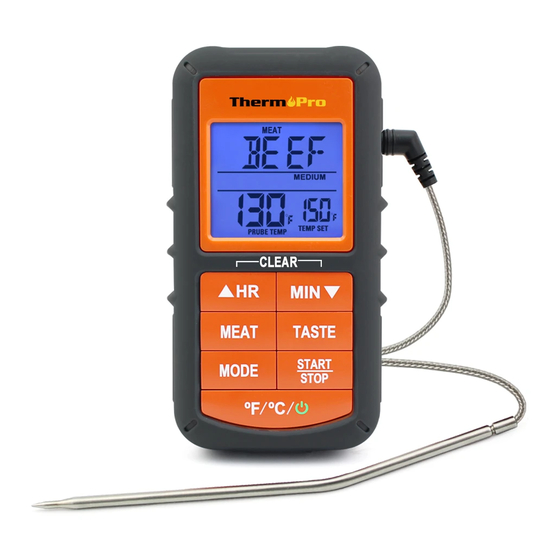
Page 8: Aperçu De L'appareil
Clip Ceinture 06 TASTE LCD (Écran à cristaux liquides) – Écran pour toutes Modèle No.: TP-06S les icônes, la température et le minuteur. La lumière s'allumera en bleu une fois que la température aura atteint 5,5°C (10°F), deviendra verte quand elle sera à... -
Page 9: Installation Des Piles
baisser la valeur de la température. Appuyez et Entrée du Capteur – Trou contenant le câble de la tige maintenez enfoncé pendant 2 secondes,la valeur de COMPARTIMENT DES PILES - pour deux piles AAA. la température baissera de 10 degrés par seconde. Boutons 5. - Page 10 Mesurer la température de la viande selon Mesurer la température de la viande en les critères sanitaires de l'USDA fonction de vos goûts 1. Appuyez sur MODE pour sélectionner le mode 1. Appuyez sur MODE pour sélectionner le mode thermomètre. L'écran affichera en haut VIANDE en thermomètre.
- Page 11 2. Appuyez sur le bouton START/STOP pour démarrer minuteur. Appuyez sur le bouton START/STOP pour le minuteur. Le « ▲ » clignotera toutes les secondes. commencer le compte à rebours. « ▼ » va clignoter toutes les secondes. 3. Pour arrêter le minuteur, appuyez sur le bouton START/STOP.
- Page 12 sans être coincé/écrasé par le couvercle de celui-ci. capteur en acier inoxydable de la tige ou le fil pendant ou juste après la cuisson.Ne les touchez 5. Appuyez sur VIANDE pour que BOEUF apparaisse. pas à mains nues. 6. Appuyez sur GOÛT pour qu'A POINT apparaisse et 15.
- Page 13 Ne pas utiliser la tige en acier inoxydable dans un viande. Évitez de toucher les os ou les zones de four micro-ondes. graisse. Nettoyage Attention: Portez toujours des gants résistant à la chaleur Portez toujours des gants résistant à la chaleur pour pour toucher le capteur en acier inoxydable de la toucher le capteur en acier inoxydable de la tige, ou...
- Page 14 Vous contribuez aussi au recyclage GARANTIE UN AN LIMITÉE sous toutes ses formes des appareils ThermoPro garantit que ce produit est exempt de électriques et électroniques usagés. défaut de pièce, de matériaux et de fabrication Vous trouverez toutes les informa- pendant une durée d'un an à...
Need help?
Do you have a question about the TP-06S and is the answer not in the manual?
Questions and answers