Table of Contents
Advertisement
Advertisement
Table of Contents

Subscribe to Our Youtube Channel
Related Manuals for Flashforge Guider


Summary of Contents for Flashforge Guider
- Page 1 Flashforge Guider 3D Printer User Guide Guider User Guide | www.ff3dp.com...
-
Page 2: Table Of Contents
Content........................... 1 Preface..........................2 Introduction........................4 Notice..........................5 Chapter 1: 3D Printing Technology................8 Chapter 2:About Guider.................... 10 2.1 About Your Guider..................10 Chapter 3: Unpacking....................19 Chapter 4: Hardware Assembly..................24 4.1 Filament Installation..................24 4.2 Printer Start-up....................25 4.3 Loading Filament................... 26 4.4 Unloading Filament..................27... -
Page 3: Preface
Flashforge Guider. Even if you are familiar with earlier Flashforge devices or 3D printing technology, we still recommend that you read through this guide, as there is lots of important information about the Guider for you to get a better 3D experience. - Page 4 Flashforge software, firmware, device maintenance and so on. Uses are also able to get the contact information from there. Guider User Guide | www.ff3dp.com...
-
Page 5: Introduction
Flashforge, the framework of this User Guide and the safety notices and warnings. The second part will take you to overview the Guider 3D printer, how to unbox safely, how to get set up and how to use the device. -
Page 6: Notice
① Always use the Guider with a properly grounded outlet. Do not modify Guider plug. ② Do not use Guider in damp or wet locations. Do not expose Guider to burning sun. ③ Do not abuse the cord. ④ Avoid using the device during an electric storm. - Page 7 ⑩ Do not remove the models with force. · Environment Requirements Temperature: RT 15-30℃ Moisture: 20%-50% · Filament Requirements Do not abuse the filament. Please make sure you use the Flashforge filament or the filament from the brands accepted by Flashforge. Guider User Guide | www.ff3dp.com...
- Page 8 IMPLIED WARRATIES OF MERCHANTA- BILITY AND FITNESS FOR A PARTICULAR PURPOSE. Flashforge shall not be liable for errors contained herein for incidental consequential damages in connection with furnishing, performance or use of this material This document contains proprietary information protected by copyright.
-
Page 9: Chapter 1: 3D Printing Technology
Fused Filament Fabrication(FFF) is the most common method of 3D printing. It is also the method that the Guider uses. It works by melting plastic material called filament onto a print surface in high temperature. The filament solidifies after it cools down, which happens instantaneously after it is extruded from the nozzle. - Page 10 Guider via USB cable, USB stick or Wi-Fi. ③Build the 3D Model: Once the output file has been transferred to your Guider, it will start to turn the 3D model into a physical object by laying down layers of filament.
-
Page 11: Chapter 2:About Guider
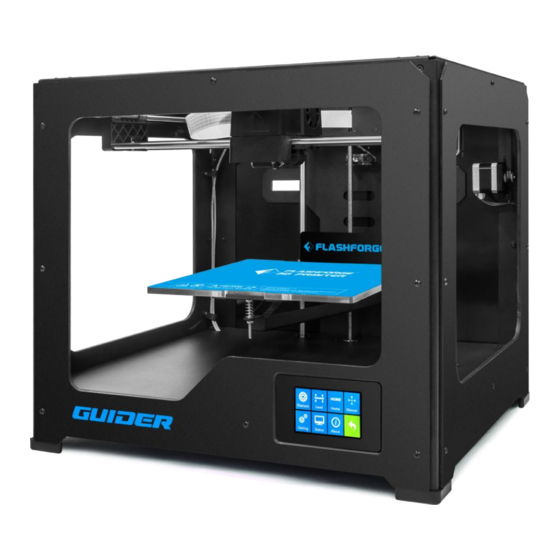
11.Quadrangular Opening 7. USB Cable Input 2. Y Axis Guide Rod 12. Power Input 8. Power Switch 3. X Axis Guide Rod 9. USB Flash Disk Input 4. Extruder 10. R-shape Buckle 5. Build Plate Guider User Guide | www.ff3dp.com... - Page 12 2.1.2 Terms The glass surface on which the Guider builds an object. Build Plate The blue tape that covers Guider’s build plate so that Build Tape the object can adhere to the build plate well. Build Volume The three dimensional amount of space that an object will use once it is completed.
- Page 13 Z axis 0.0025mm; XY axis 0.011mm Filament Diameter 1.75mm Nozzle Diameter 0.4mm Build Speed 24CC/hr Software FlashPrint Support Formats stl,obj Windows/Mac OS Device Size 499*440*451.5mm AC Input 100-240V, 50-60Hz, 100W Connectivity USB cable, USB stick Guider User Guide | www.ff3dp.com...
- Page 14 ) ◆Delete: To delete the print file Print interface ◆Abort: To abort the print job. ◆Pause/Resume: To suspend or resume the print job. ◆Tools: To change filament and set up auto shutdown during printing. Guider User Guide | www.ff3dp.com...
- Page 15 The default temperature is 230℃. Tap the temperature display bar to set the temperature. To set the preheat temperature. Tap [Yes] to save the setting while tap [No] to cancel the setting. Guider User Guide | www.ff3dp.com...
- Page 16 ◆X+: The extruder moves to the zero points, that is, to the right direction ◆X-: The extruder moves to the direction opposite to the X+. ◆Z+: The build plate elevates. ◆Z-: The build plate descends. ◆Return arrow Guider User Guide | www.ff3dp.com...
- Page 17 Actually, the present servo status is on. And the servo’s swing arm withdraws. Tap ‘+’ or ‘-’ to adjust the status of swing arm. Tap ‘+’, the arm swings down while tap ‘-’ , the arm swings up. Guider User Guide | www.ff3dp.com...
- Page 18 Status: It displays the real-time status of the extruder temperature, fan and filament About: It displays the basic information about the device. Guider User Guide | www.ff3dp.com...
- Page 19 2.2 Accessories PLA Filament(1) Power Cable USB Cable Acrylic Cover USB Stick Quick Start Guide Allen Wrench(M1.5,M2.0,M2.5) Screwdriver Spool Holder Filament Guide Tube Guider User Guide | www.ff3dp.com...
-
Page 20: Chapter 3: Unpacking
Chapter 3: Unpacking This chapter will show you the unpacking process of Guider 3D printer. (Please make sure you’ve read the unpacking guide before unpacking.) (3-1) Open the packaging carton and then take out an accessory box and two PE foam pieces. - Page 21 (3-3) Remove the bubble bag. (3-4) Take out the top FE foam piece, which contains a USB stick, a Quick Start Guider and a spool holder. (3-5) Remove and discard the tape on the extruder. Guider User Guide | www.ff3dp.com...
- Page 22 (3-6) Use strong scissors or a wire cutter to cut off the four zip ties for keeping the X-axis guide rods in place. (3-7) Take down the build plate. Guider User Guide | www.ff3dp.com...
- Page 23 (3-8) Elevate the build platform. (3-9) Take out the PE foam piece under the build platform. 3-10 (3-10) Then take out the side PE foam piece. 3-11 (3-11) Take out the filament. Guider User Guide | www.ff3dp.com...
- Page 24 (3-12)Finally, take out the two PE foam pieces, which contains a filament guide tube, a USB cable and a power cable. 3-13 (3-13) You’ve finished unpacking your Guider. Next we will move on to the hardware assembly. Guider User Guide | www.ff3dp.com...
-
Page 25: Chapter 4: Hardware Assembly
Chapter 4: Hardware Assembly Your Guider has been installed before leaving factory, you can start up the Guider for printing after mounting the filament spool and completing leveling. 4.1 Filament Installation (4-1) Level the spool holder and insert it end into the opening. -
Page 26: Printer Start-Up
(4-4) To lock the filament guide tube with R-shape buckles, and thread the filament through the tube. Ensure that the filament is fed from the bottom of the spool to the top. 4.2 Printer Start-up Guider User Guide | www.ff3dp.com... -
Page 27: Loading Filament
(4-3) Insert the power supply into the power input on the back of the Guider and plug the power cord into an electrical outlet. (4-4) Press the power switch to launch the device. 4.3 Loading Filament Next, we will load the Flashforge filament.(Note: Please lower the build plate... -
Page 28: Unloading Filament
(4-10) Back to the main interface, tap [Preheat]-[Start] and the extruder starts heating up. After the extruder reaches 220℃, the printer will sound a beep to prompt you to unload the filament from the extruder. Press the spring presser and gently pull the filament out. Guider User Guide | www.ff3dp.com... - Page 29 Note: Do not pull out the filament with force as it will damage the gears. If the melted filament has cooled down in the extruder, please repeat the steps above. Guider User Guide | www.ff3dp.com...
-
Page 30: Chapter 5: Build Plate Leveling
Chapter 5: Build Plate Leveling Guider creatively adopts three-point intelligent leveling system, which will give clear and comprehensive feedback to the users. There are three spring-loaded knobs under the build platform. The distance between the plate and nozzle increases while tightening the knobs. - Page 31 (5-4) If the distance is appropriate, tap [OK] to second point leveling. If still not, please follow the prompts to adjust again till you see [OK] button. (5-5) Repeat steps 2 through 4 above to complete second and third points leveling and Guider User Guide | www.ff3dp.com...
- Page 32 Tap [Finish] to exit. Guider User Guide | www.ff3dp.com...
-
Page 33: Chapter 5: About Software
5.2 Exploring FlashPrint 5. 2.1 Machine Type Selection ! After starting FlashPrint, you need to select the target machine type first. When you start FlashPrint, a dialog box will pop up. Just need to select Flashforge Guider User Guide | www.ff3dp.com... - Page 34 Guider in the machine type list and click [OK]. You can also change the machine type via clicking [Print]--[Machine type]. Please see graphic 5-2: 5.2.2 Software Introduction Guider User Guide | www.ff3dp.com...
- Page 35 Load one or multiple files. Enter the support edit mode Print it directly with your Guider or export to your USB Stick View FlashPrint home screen from one of six viewing angles Move model around on xy-plane; shift+click to move along z axis...
- Page 36 Bottom thickness: For tube, canister and lamp to set up bottom thickness Top diameter: For tube, canister and lamp to set up the top diameter Bottom diameter: For tube, canister and lamp to set up the bottom diameter Guider User Guide | www.ff3dp.com...
- Page 37 5.1.4 Views ①Changing views Change model views by moving, rotating, scaling. ● Drag Click the [View] icon and then you can move the object by the following three methods: Guider User Guide | www.ff3dp.com...
- Page 38 Allow users to reset views by the following two methods: Method 1: Click the [View] menu and select [Home View] Method 2: Click the [View] button on the left, click it again and you will see the viewing options, you can click [Reset]. Guider User Guide | www.ff3dp.com...
- Page 39 If a specified position is needed, only to click Platform]. 5.1.6 Rotate Select the target object and rotate the object by the following two methods: Method 1: Click the [Rotate] icon on the left and three mutually Guider User Guide | www.ff3dp.com...
- Page 40 5.1.8 Left-click on the model to select it and double-click on the Cut icon to set the cut plane. The direction and position are available for setting. ①Draw with Mouse Guider User Guide | www.ff3dp.com...
- Page 41 5.1.9 Supports After loading the model, click [Edit]--[Supports] or click the Supports icon directly, then you will enter the support edit mode(as shown in the picture below). Click [Back] to exit when you finish editing. Guider User Guide | www.ff3dp.com...
- Page 42 Guider User Guide | www.ff3dp.com...
- Page 43 ).Loosen the left mouse button, if support column doesn’t meet with model, then support will be generated on origin and terminal point(the highlighted preview support won’t generate support structure ) Guider User Guide | www.ff3dp.com...
- Page 44 5.1.10 Print ①Preview: Choose to enter preview interface or not ②Print when slice done: Print or not when slice done ③Material type: Choose according to the type of model Guider User Guide | www.ff3dp.com...
- Page 45 Top Solid Layer: Maximize is 10, minimum is 1. b. Bottom Solid Layer: Maximize is 10, minimum is 1. ● Infill a. Fill Density means fill rate. b. Fill Pattern is the pattern of filling shape which effects printing duration. Guider User Guide | www.ff3dp.com...
- Page 46 ● Others Pause At Heights: Allows users to pre-set a height in which the print will suspend automatically. The function usually applied when you want to change the filament at a certain point. Guider User Guide | www.ff3dp.com...
- Page 47 If click [Cancel] or close tool tip, then will cancel the new project. ②Saving After finishing the model edit and adjustment, there are two ways below to save all models in the scene. Method 1: Guider User Guide | www.ff3dp.com...
- Page 48 Guider User Guide | www.ff3dp.com...
- Page 49 Method 1: Click [Edit]--[Select All]. Method 2: Press the shortcut Ctrl+A. ⑤ Duplicate Select the object and duplicate the object through the following two methods: Method 1: Click [Edit]--[Duplicate] Method 2: Press the shortcut Ctrl+D Guider User Guide | www.ff3dp.com...
- Page 50 (Surface to Platform) ⑧Auto Layout All Click [Edit]--[Auto Layout All] after loading one or more than one models, all models will be placed automatically as automatic placement rule. Guider User Guide | www.ff3dp.com...
- Page 51 5.1.13 Print Menus ① Connect Machine You can connect the Guider with your PC via a USB cable. Note: The machine icon on the bottom right displays the connection status: Connected Disconnected a. Connect your Guider with your PC via an USB cable.
- Page 52 5.1.14 Tool Menus ①Control Panel After connecting PC with Guider, click [Tools]--[Control Panel] to open the control panel. ● Jog Controls a. Jog Mode: Select the distance that extruder/build plate move a single time (that is, the distance extruder/build plate move upon your single click).
- Page 53 X/Y Speed and Z Speed: Set the move speed of extruder/ build platform. ● Limit Switch: In order to protect your Guider, three limit switches are equipped to control the maximum position, and the three limit switches corresponding to X/Y/Z axis limit switch.
- Page 54 Step 2: Choose corresponding printer type and firmware version and click [OK] the firmware updating box. After confirming the printer is in free state, the software will automatically update the firmware. Guider User Guide | www.ff3dp.com...
- Page 55 Step 3 : Reboot you Guider and wait for 4-5 seconds, then you can see the update process bar. When the update finishes, it will go back to the main interface. Step 4:Tap[Tools]--[About] to check] to check whether the updated version is right.
- Page 56 ③ About FlashPrint: Click [Help]--[About Flashprint], the software information box will pop up. The contents include the current software version and copyright information. Guider User Guide | www.ff3dp.com...
-
Page 57: Chapter 6: Basic Printing
6.1 Generate a Gcode (6-1)Double-click the icon of Flashprint to start the software. (6-2)Click[Print]--[Machine Type] to select Flashforge Guider (6-3)Click the [Load] icon to load a .stl model file and the object will display on the build area. Guider User Guide | www.ff3dp.com... - Page 58 Note:If you’ve place your model in a right place, you can skip the step above. (6-5) Click the Print icon on the top, you should make some setups for your print job. Guider User Guide | www.ff3dp.com...
- Page 59 Supports: If you print a model with supports, you should click the inverted triangle and select [Enable]. Raft: You are suggested to select [Enable]. Resolution: You are suggested to select [Standard] More Options: You are suggested to keep them default. Guider User Guide | www.ff3dp.com...
- Page 60 Gcode file. Note: .gx files are available for preview while the .g files are not. They are displaying as follows: G. Files GX. Files Next, we are going to print the model. Guider User Guide | www.ff3dp.com...
-
Page 61: Print Methods
6.2 Print Methods After generating the Gcode file, you can transfer it to your Guider. You can transfer the file through USB cable and USB stick. 6.2.1 Print from Computer (USB connection) ①用Connect your Finder with your PC via a USB cable.(Please refer to 5.1.13) ②Turn on your Guider, level the build plate and load the filament. - Page 62 Flashprint at the status of USB connection,then click the [Print] button on the top-right. ● Load the target Gcode file into FlashPrint. ● Click the [Print] button, the PC will transfer the Gcode file to the printer. Guider User Guide | www.ff3dp.com...
- Page 63 6.2.2 Print from USB Flash Disk ①Insert your USB flash disk with target .g or .gx file to your Guider. . ②Turn on the Guider. Make sure the build plate has been leveled and the filament is loaded. [Print]...
-
Page 64: Chapter 7: Advanced Printing
Chapter 7: Advanced Printing When you get familiar with your Guider, you will definitely want to accomplish some advanced prints. This chapter will take you to get to know the advanced printing skills. 7.1 Skills on Supports Support structures enable the printing of models with steep overhangs and cantilevered sections. - Page 65 Treelike Support Structure:Suitable for models with small area overhang(s).(You are suggested printing a raft) Features:Treelike support structure is proprietary to Flashforge Corporation. And this structure can save support material and can be easily removed. However, compared with the linear support structure, it’s of less stability. So you are suggested to manually add more supports after auto-generating treelike supports.
- Page 66 Auto-supports Eg:1) Model with Large-area Overhang Treelike support structure× Linear support structure√ Guider User Guide | www.ff3dp.com...
- Page 67 2) Model with Small-area Overhang Treelike support structure√ Guider User Guide | www.ff3dp.com...
- Page 68 Linear support structure× Manual Modification For the experienced 3D printer users, the [Add] and [Delete] buttons are suggested using for manually adding or deleting supports. Guider User Guide | www.ff3dp.com...
- Page 69 1)Manual Add You can add the support structure manually to according to the actual shape of the model. Left click [Add] on the left, and then click on the position when support structure is Guider User Guide | www.ff3dp.com...
- Page 70 7.3 Skills of Model Placement Not all the models are in the right positions after being loaded. Therefore, you need to place it in an appropriate position for better print quality. Such as the models below, Guider User Guide | www.ff3dp.com...
- Page 71 5.1.12-⑦Surface to Platform) ① Improper Proper ② Improper Proper ③ Improper Proper Further Reading:Cut Function Guider User Guide | www.ff3dp.com...
- Page 72 Look at the model below: Picture 7-4 is the preview of the model’s original placement and Picture 7-5 is the preview of the model with support structure. 7—4 (7-5) Model with support structure Guider User Guide | www.ff3dp.com...
- Page 73 (7-6) Looking at the Picture 7-5, we will definitely find that the complex supports will influence the smoothness of the model. By analyzing the model’s feature, cutting from the Y plane will be suitable. (7-7) The model preview after cutting. Guider User Guide | www.ff3dp.com...
- Page 74 (7-8) Click [Edit]--[Surface to Platform] to put the flat surfaces onto the platform. 7-10 Comparison Guider User Guide | www.ff3dp.com...
- Page 75 Guider User Guide | www.ff3dp.com...
-
Page 76: Chapter 8: Supports And Service
Flashforge team is on standby and ready to help you with any challenges you may have with your Guider. If the issues or questions are not covered in this User Guide, you can seek for solutions on our office website or contact us via telephone.
Need help?
Do you have a question about the Guider and is the answer not in the manual?
Questions and answers