Table of Contents
Advertisement
Available languages
Available languages
Quick Links
Advertisement
Table of Contents

Subscribe to Our Youtube Channel
Related Manuals for FS TA2110-8GP


Summary of Contents for FS TA2110-8GP
- Page 1 TA 21 10 -8 GP Lin k/A ct/ Sp PW R ee d PO E PO N Re set PO N CL I TA2110-8GP GPON/EPON MDU ONU GPON/EPON MDU ONU GPON/EPON MDU ONU Quick Start Guide V1.0 Quick-Start Anleitung Guide de Démarrage Rapide...
- Page 2 Introduction Thank you for choosing TA2110-8GP GPON. This guide is designed to familiarize you with the layout of the GPON and describes how to deploy it in your network. Link/Act/Speed 100M 1000M Link/Act/Speed Reset TA2110-8GP TA2110-8GP Accessories CLI Cable x1...
-
Page 3: Hardware Overview
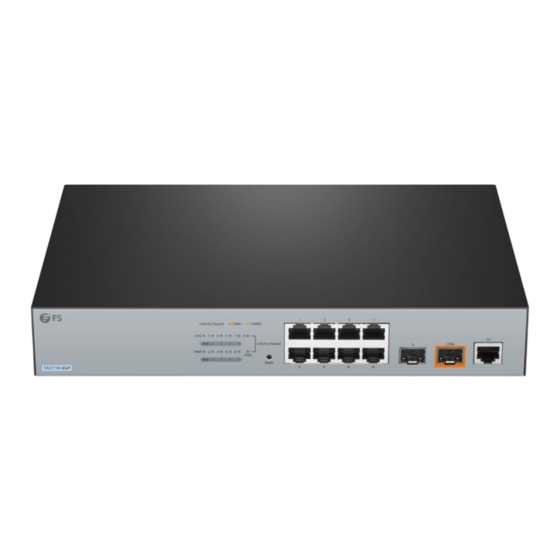
Bolt Ethernet Cable Hardware Overview Front Panel Link/Act/Speed 100M 1000M Link/Act/Speed Reset TA2110-8GP LEDs State Description Power indicator: If the device is powered on, the indicator is on. System indicator: If the device is started, Blinking the system indicator flickers. -
Page 4: Button Description
State Description Solid Orange Link/Act/Speed indicator of each port: 10/100M. Gigabit TX Solid Green Link/Act/Speed indicator of each port: 1000M. (1-8) Off No signal transmission. The PD is connected and the PoE power supply Solid Yellow is normal. Off The PD is not connected or PoE power is not provided. Solid Green Link/Act/Speed indicator of GSFP port: 1000M. -
Page 5: Back Panel
Back Panel 100-240V AC 50/60HZ Description Grounding point. AC power socket: AC100-240V. -
Page 6: Installation Requirements
Installation Requirements Safety Recommendations Keep clean and dust-free during or after the installation. Put the cover of the GPON at a safe place. Put tools at a right place where they will not easily fall down. Pay attention to the dress code when installing. Avoid damage to the GPON caused by improperly dressed. -
Page 7: Installation
Installation Desk Mounting Link /Act /Spe 100M 1000 M TA2 110 -8G Link /Act /Spe Rese t Put the GPON on a smooth and safe desk directly. Rack Mounting 1. Fix the mounting bracket to both sides of the GPON with screws. - Page 8 Lin k/A ct Lin k/A ct 2. Mount the GPON on a rack by fixing the mounting bracket to the rack. RE SE T Po E PW R SY S Po E+ 4T 4F -P S2 80 0S -2 Connecting the CLI Port Lin k/A ct 1.
- Page 9 Connecting the GSFP Port Link /Ac t/Sp 100 M 100 0M TA 21 10 -8G Link /Ac t/Sp PW R Res et 1. Insert a GSFP optical module into the GSFP port of the GPON. 2. Connect the optical module to a switch or other Ethernet terminal devices with a fiber cable. Connecting Gigabit Ethernet TX Port Link /Ac t/Sp 100 M...
-
Page 10: Troubleshooting
Connecting PON Port Link/ Act/S peed 100M 1000 M TA2 110 -8G Link/ Act/S peed Reset 1. Insert a Stick ONU module into the PON port of the GPON. 2. Connect the Stick ONU module to an optical splitter with a single-mode SC optical fiber cable. 3. -
Page 11: Online Resources
Contact Us Product Warranty FS ensures our customers that any damage or faulty items due to our workmanship, we will offer a free return within 30 days from the day you receive your goods. This excludes any custom made items or tailored solutions. - Page 12 Einführung Vielen Dank, dass Sie sich für TA2110-8GP GPON entschieden haben. Diese Anleitung soll Sie mit dem Aufbau vom GPON vertraut machen und beschreibt, wie Sie es in Ihrem Netzwerk einsetzen können. Link/Act/Speed 100M 1000M Link/Act/Speed Reset TA2110-8GP TA2110-8GP Zubehör...
- Page 13 Optional (nicht im Lieferumfang enthalten) Schraubendreher Statiksicheres Handgelenkband Bolzen Ethernet-Kabel Hardware-Übersicht Vorderseite Link/Act/Speed 100M 1000M Link/Act/Speed Reset TA2110-8GP LEDs Status Beschreibung Stromanzeige: Wenn das Gerät eingeschaltet ist, leuchtet die Anzeige. Systemanzeige: Wenn das Gerät gestartet wird, Blinkt blinkt die Systemanzeige.
- Page 14 Status Beschreibung Durchgehend Link/Act/Speed-Anzeige für jeden Port: 10/100M. Orange Gigabit TX Durchgehend (1-8) Link/Act/Speed-Anzeige für jeden Port: 1000M. Grün Keine Signalübertragung. Durchgehend Der PD ist angeschlossen und die PoE-Stromversorgung ist normal. Gelb Der PD ist nicht angeschlossen oder PoE-Strom ist nicht vorhanden.
- Page 15 Back Panel 100-240V AC 50/60HZ Beschreibung Erdungspunkt AC-Steckdose: AC100-240V.
- Page 16 Installationsvoraussetzungen Sicherheitsempfehlungen Halten Sie das Gerät während und nach der Installation sauber und staubfrei. Legen Sie die Abdeckung des GPON an einen sicheren Ort. Legen Sie die Werkzeuge an einem Ort ab, an dem sie nicht leicht herunterfallen können. Achten Sie bei der Installation auf die Kleiderordnung. Vermeiden Sie Schäden am GPON, die durch unsachgemäße Kleidung verursacht werden.
-
Page 17: Montage Auf Einem Tisch
Installation Montage auf einem Tisch Link /Act /Spe 100M 1000 M TA2 110 -8G Link /Act /Spe Rese t Stellen Sie den GPON direkt auf einen glatten und sicheren Tisch. Rack-Montage 1. Befestigen Sie die Halterung mit Schrauben an beiden Seiten des GPONs. - Page 18 Lin k/A ct Lin k/A ct 2. Montieren Sie den GPON auf einem Rack, indem Sie die Montagehalterung am Rack befestigen. RE SE T Po E PW R SY S Po E+ 4T 4F -P S2 80 0S -2 Anschließen des CLI-Ports 1.
- Page 19 Anschließen des GSFP-Ports Link /Ac t/Sp 100 M 100 0M TA 21 10 -8G Link /Ac t/Sp PW R Res et 1. Stecken Sie ein optisches GSFP-Modul in den GSFP-Port des GPON. 2. Schließen Sie das optische Modul mit einem Glasfaserkabel an einen Switch oder andere Ethernet-Endgeräte an.
-
Page 20: Fehlersuche
Anschließen des PON-Ports Link/ Act/S peed 100M 1000 M TA2 110 -8G Link/ Act/S peed Reset 1. Stecken Sie ein ONU-Stick-Modul in den PON-Port des GPON. 2. Verbinden Sie das ONU-Stick-Modul mit einem optischen Splitter über ein Singlemode-SC-Glasfaserkabel. 3. Verbinden Sie dann den Splitter über ein Glasfaserkabel mit einem OLT. Fehlersuche Wenn das GPON-Zugangsgerät zu heiß... - Page 21 Kontakt Produktgarantie FS garantiert seinen Kunden, dass wir bei Schäden oder fehlerhaften Artikeln, die auf unsere Verarbeitung zurückzuführen sind, eine kostenlose Rückgabe innerhalb von 30 Tagen nach Erhalt der Ware anbieten. Dies gilt nicht für Sonderanfertigungen oder maßgeschneiderte Lösungen.
- Page 22 Introduction Nous vous remercions d'avoir choisi le GPON TA2110-8GP. Ce guide est conçu pour que vous puissiez vous familiariser avec la configuration du GPON et décrit comment procéder à son déploiement. Link/Act/Speed 100M 1000M Link/Act/Speed Reset TA2110-8GP TA2110-8GP Accessoires Câble CLI x1 Câble d'Alimentation x1...
-
Page 23: Aperçu Du Matériel
Câble Ethernet Aperçu du Matériel Panneau Frontal Link/Act/Speed 100M 1000M Link/Act/Speed Reset TA2110-8GP Indicateurs LEDS N° Statut Description Indicateur d'alimentation : Si l'appareil est sous tension, Allumé le voyant est allumé. Indicateur de système : Si l'appareil est mis en marche, Clignotant l'indicateur du système clignote. - Page 24 N° Statut Description Orange Indicateur Link/Act/Speed de chaque port : 10/100M. Gigabit TX Vert Indicateur Link/Act/Speed de chaque port: 1000M. (1-8) Éteint Aucun signal de transmission. Jaune Le PD est connecté et l'alimentation PoE est normale. Le PD n'est pas connecté ou l'alimentation PoE n'est pas Éteint fournie.
-
Page 25: Panneau Arrière
Panneau Arrière 100-240V AC 50/60HZ N° Description Point de mise à la terre. Prise d'alimentation CA : AC100-240V. -
Page 26: Exigences D'installation
Exigences d'Installation Recommandations de Sécurité Gardez les lieux propres et sans poussière pendant ou après l'installation. Placez le couvercle du GPON dans un endroit sûr. Placez les outils à un endroit où ils ne risquent pas de tomber. Faites attention au code vestimentaire lors de l'installation. Évitez d'endommager le GPON en raison d'une tenue vestimentaire inadéquate. -
Page 27: Montage Sur Support
Installation Montage sur Support Link /Act /Spe 100M 1000 M TA2 110 -8G Link /Act /Spe Rese t Posez directement le GPON sur un support lisse et sécurisé. Montage en Rack 1. Fixez le support de montage sur les deux côtés du GPON à l'aide de vis. - Page 28 Lin k/A ct Lin k/A ct 2. Montez le GPON sur un rack en fixant le support de montage au rack. RE SE T Po E PW R SY S Po E+ 4T 4F -P S2 80 0S -2 Connexion du Port CLI Lin k/A ct 1.
- Page 29 Connexion au Port GSFP Link /Ac t/Sp 100 M 100 0M TA 21 10 -8G Link /Ac t/Sp PW R Res et 1. Insérez un module optique GSFP dans le port GSFP du GPON. 2. Connectez le module optique à un switch ou toute autre dispositif terminal Ethernet avec un câble en fibre.
-
Page 30: Dépannage
Connexion du Port PON Link/ Act/S peed 100M 1000 M TA2 110 -8G Link/ Act/S peed Reset 1. Insérez un module Stick ONU dans le port PON du GPON. 2. Connectez le module Stick ONU à un répartiteur optique avec un câble à fibre optique SC monomode. -
Page 31: Garantie Du Produit
Contactez-Nous Garantie du Produit FS garantit à ses clients que tout article endommagé ou défectueux dû à sa fabrication pourra être retourné gratuitement dans un délai de 30 jours à compter de la date de réception de la marchandise. Ceci exclut les articles fabriqués sur mesure ou les solutions personnalisées.
Need help?
Do you have a question about the TA2110-8GP and is the answer not in the manual?
Questions and answers