Table of Contents
Advertisement
Available languages
Available languages
Quick Links
Instruction Manual For Induction Hob
Manuale di istruzioni per piano cottura a induzione
Bedienungsanleitung fü r Induktionskochfeld
Instrukcja obsługi płyty indukcyjnej
Thank you for purchasing the Candy induction hob. Please read this instruction manual
carefully before using the hob and keep it in a safe place for future reference.
MODEL: CIFS85MCTT
ENGLISH
ITALIAN
DEUTSCH
POLSKI
Advertisement
Table of Contents

Subscribe to Our Youtube Channel
Related Manuals for Candy CIFS85MCTT


Summary of Contents for Candy CIFS85MCTT
- Page 1 DEUTSCH Bedienungsanleitung fü r Induktionskochfeld POLSKI Instrukcja obsługi płyty indukcyjnej MODEL: CIFS85MCTT Thank you for purchasing the Candy induction hob. Please read this instruction manual carefully before using the hob and keep it in a safe place for future reference.
-
Page 2: Safety Warnings
Safety Warnings Your safety is important to us. Please read this information before using your cooktop. Installation Electrical Shock Hazard • Disconnect the appliance from the mains electricity supply before carrying out any work or maintenance on it. • Connection to a good earth wiring system is essential and mandatory. -
Page 3: Health Hazard
placed on this appliance at any time. • Please make this information available to the person responsible for installing the appliance as it could reduce your installation costs. • In order to avoid a hazard, this appliance must be installed according to these instructions for installation. - Page 4 • This appliance complies with electromagnetic safety standards. • However, persons with cardiac pacemakers or other electrical implants (such as insulin pumps) must consult with their doctor or implant manufacturer before using this appliance to make sure that their implants will not be affected by the electromagnetic field.
- Page 5 cuts. Important safety instructions • Never leave the appliance unattended when in use. Boilover causes smoking and greasy spillovers that may ignite. • Never use your appliance as a work or storage surface. • Never leave any objects or utensils on the appliance.
- Page 6 limits their ability to use the appliance should have a responsible and competent person to instruct them in its use. The instructor should be satisfied that they can use the appliance without danger to themselves or their surroundings. • Do not repair or replace any part of the appliance unless specifically recommended in the manual.
- Page 7 WARNING: The appliance and its accessible • parts become hot during use. Care should be taken to avoid touching heating elements. Children less than 8 years of age shall be kept away unless continuously supervised. This appliance can be used by children aged •...
- Page 8 The appliance is not intended to be operated by • means of an external timer or separate remote-control system. CAUTION: The cooking process has to be supervised. A short term cooking process has to be supervised continuously. WARNING: In order to prevent tipping of the appliance, this stabilizing means must be installed.
-
Page 9: Product Overview
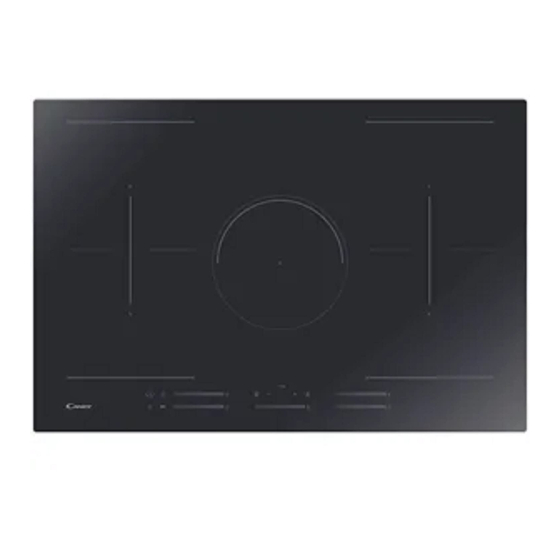
Product Overview Top View 1.2000 W zone, boost to 2600W 2.1500 W zone, boost to 2000W 3.2000 W zone, boost to 2600W 4.1500 W zone, boost to 2000W 5. 2000 W zone, boost 2600W 6. Flex zone, 2800W boost 3500W 7. -
Page 10: A Word On Induction Cooking
A Word on Induction Cooking Induction cooking is a safe, advanced, efficient, and economical cooking technology. It works by electromagnetic vibrations generating heat directly in the pan, rather than indirectly through heating the glass surface. The glass becomes hot only because the pan eventually warms it up. iron pot magnetic circuit ceramic glass plate... -
Page 11: Choosing The Right Cookware
Choosing the right Cookware • Only use cookware with a base suitable for induction cooking. Look for the induction symbol on the packaging or on the bottom of the pan. • You can check whether your cookware is suitable by carrying out a magnet test. -
Page 12: Pan Dimensions
Pan dimensions The cooking zones are up to a limit, automatically adapted to the diameter of the pan. However the bottom of this pan must have a minimum of diameter according to the corresponding cooking zone. To obtain the best efficiency of your hob, please place the pan in the centre of the cooking zone. -
Page 13: When You Have Finished Cooking
a. If you don’t set the power within 1 minute, the induction hob will automatically switch off. You will need to start again at step 1. b. You can modify the heat setting at any time during cooking. c. If slide along the “—”, power will vary from stage 1 to stage 9. If the display flashes alternately with the heat setting... - Page 14 ‘H’ will show which cooking zone is hot to touch. It will disappear when the surface has cooled down to a safe temperature. It can also be used as an energy saving function if you want to heat further pans, use the hotplate that is still hot.
- Page 15 If total power exceeds the limitation of 2.5kw, 3.0kw, 4.5kw, 6.5kw,7.4kw (depending on which level you’ve set), you are not able to increase power stage of any zone. If you increase it, the cooktop will beep 3 times and indicator will show a flashing ‘Pn’.
-
Page 16: Restrictions When Using
lasting for 5 minutes. Thus you can get a more powerful and faster cooking. Using the Boost to get larger power 1. Touch the control panel button that you wish to boost, then hold the “b” for 3 second. The power display will show “P” to indicate that the zone is boosting. 2. -
Page 17: Using The Pause Function
Using the Keep warm Keep warm is the function that one zone keep a lower power to make the temperature stable. Using the Keep warm to get stable temperature 1. Touch the slider of the heating zone that you wish to keep warm, then touch the keep warm button he cooking zone indicator will display “A”. -
Page 18: As Two Independent Zones
Flex Zone • This area can be used as a single zone or as two different zones, accordingly to the cooking needs anytime. • Flexible area is made of two independent inductors that can be controlled separately. • Important: Make sure to place the cookwares centered on the single cooking zone. -
Page 19: Locking The Controls
button will disappear. Locking the Controls • You can lock the controls to prevent unintended use (for example children accidentally turning the cooking zones on). • When the controls are locked, all the controls except the ON/OFF control are disabled. To lock the controls Touch the keylock control. -
Page 20: Using The Timer As A Minute Minder
for various power levels are shown in the below table: Power level Default working timer (hour) When the pot is removed, the induction hob can stop heating immediately and the hob automatically switch off after 2 minutes. People with a heart pace maker should consult with their doctor before using this unit. -
Page 21: Setting The Timer To Turn One Cooking Zone Off
5. When the time is set, it will begin to count down immediately. The display will show the remaining time and the timer indicator will flash for 5 seconds. 6. Buzzer will bips for 30 seconds and the timer indicator shows “- - “... - Page 22 6. When cooking timer expires, the corresponding cooking zone will be automatically switch off and show “H”. Other cooking zone will keep operating if they are turned on previously. Setting the timer to turn more than one cooking zone 1. If use this function to more than one heating zone, the timer indicator will show the shortest time.
-
Page 23: Care And Cleaning
Care and Cleaning What? How? Important! Everyday soiling on 1. Switch the power to the • When the power to the cooktop is glass (fingerprints, cooktop off. switched off, there will be no ‘hot marks, stains left by 2. Apply a cooktop cleaner surface’... -
Page 24: Hints And Tips
Hints and Tips Problem Possible causes What to do The induction hob No power. Make sure the induction hob is cannot be turned on. connected to the power supply and that it is switched on. Check whether there is a power outage in your home or area. -
Page 25: Failure Display And Inspection
The above are the judgment and inspection of common failures. Please do not disassemble the unit by yourself to avoid any dangers and damages to the induction hob. Technical Specification Cooking Hob CIFS85MCTT Cooking Zones 5 Zones Supply Voltage 220-240V~, 50-60Hz... -
Page 26: Selection Of Installation Equipment
Installed Electric Power 2.5kw:2250-2750W or 3.0 kw:2700-3300W or 4.5kw:4050-4950W or 6.5kw:5850-7150W or 7.4kw:6600-7400W Product Size L×W×H(mm) 770X520X60 Building-in Dimensions A×B (mm) 740X490 Weight and Dimensions are approximate. Because we continually strive to improve our products we may change specifications and designs without prior notice. - Page 27 A(mm) B(mm) C(mm) 50 mini 20 mini Air intake Air exit 5mm Before you install the hob, make sure that • the work surface is square and level, and no structural members interfere with space requirements • the work surface is made of a heat-resistant material •...
-
Page 28: Before Locating The Fixing Brackets
• the isolating switch is easily accessible by the customer Before locating the fixing brackets The unit should be placed on a stable, smooth surface (use the packaging). Do not apply force onto the controls protruding from the hob. Adjusting the bracket position Fix the hob on the work surface by screw 4 brackets on the bottom case of hob (see picture) after installation. -
Page 29: Connecting The Hob To The Mains Power Supply
Connecting the hob to the mains power supply This hob must be connected to the mains power supply only by a suitably qualified person. Before connecting the hob to the mains power supply, check that: 1. the domestic wiring system is suitable for the power drawn by the hob. 2. - Page 30 This appliance is labelled in accordance with European Directive 2012/19/EU regarding electric and electronic appliances (WEEE). The WEEE contain both polluting substances (that can have a negative effect on the environment) and base elements (that can be reused). It is important that the WEEE undergo specific treatments to correctly remove and dispose of the pollutants and recover all the materials.
- Page 31 Product Information for Domestic Electric Hobs Compliant to Commission Regulation (EU) No 66/2014 Position Symbol Value Unit Model identification CIFS85MCTT Type of hob: Electric Hob zones Number of cooking zones and/or areas areas Induction cooking zones Heating technology (induction cooking...
- Page 32 Central central Central right 20,0 Front left 20,0 Front central 20,0 Front right 20,0 ECelectric Rear left 186,5 Wh/kg cooking ECelectric Rear central Wh/kg cooking ECelectric Rear right 187,3 Wh/kg cooking ECelectric Central left Wh/kg cooking ECelectric Energy consumption for cooking zone Central central 186,6 Wh/kg...
-
Page 33: Avvertenze Di Sicurezza
Avvertenze di sicurezza La sua sicurezza è estremamente importante per noi. Legga sempre queste istruzioni prima di utilizzare il piano di cottura. Installazione Rischio di elettrocuzione • Staccare l'elettrodomestico dalla rete di alimentazione elettrica principale prima di effettuare lavori o operazioni di manutenzione sullo stesso. - Page 34 Importanti istruzioni di sicurezza • Leggere attentamente le istruzioni prima di installare ed utilizzare questo elettrodomestico. • Non appoggiare mai materiale o prodotti combustibili sull'elettrodomestico. • Comunicare queste informazioni alla persona responsabile dell'installazione dell'elettrodomestico in quanto potrebbe ridurre i costi di installazione. •...
- Page 35 del piano di cottura si rompe o crepa, spegnere l'elettrodomestico immediatamente nell'alimentazione principale (interruttore a parete) e contattare un tecnico qualificato. • Spegnere il piano di cottura tramite l'interruttore a parete prima di qualsiasi operazione di pulizia o manutenzione. • Il mancato rispetto di queste precauzioni implica il rischio di elettrocuzione o addirittura di morte.
-
Page 36: Importanti Istruzioni Di Sicurezza
• Oggetti metallici come coltelli, forchette, cucchiai o coperchi non devono essere posti sulla superficie del piano di cottura perché possono scaldarsi. • Mantenere a distanza i bambini. • I manici delle pentole possono surriscaldarsi. Controllare che i manici delle pentole non sporgano su altre zone di cottura accese. - Page 37 • Non mettere o lasciare oggetti magnetizzabili (ad esempio carte di credito, schede di memoria) o dispositivi elettronici (ad esempio computer, lettori MP3) vicino all'elettrodomestico, in quanto potrebbero essere influenzati dal campo elettromagnetico. • Non utilizzare mai l'elettrodomestico per riscaldare la stanza. •...
- Page 38 competente. La persona che fornisce le istruzioni deve essere convinta di averli istruiti in modo tale da potere utilizzare l'elettrodomestico senza rischio per se stessi o per le persone che si trovano nelle aree circostanti. • Non riparare o sostituire parti dell'elettrodomestico a meno che ciò...
- Page 39 • Questo elettrodomestico è destinato ad essere utilizzato in applicazioni domestiche e simili, come ad esempio: - in cucine per il personale in negozi, uffici e altri ambienti di lavoro; - in agriturismi; - da clienti in alberghi, motel e altri ambienti di tipo residenziale;...
- Page 40 • AVVERTENZA: La cottura senza sorveglianza su un piano di cottura in presenza di grasso o olio nella pentola può essere pericolosa, con rischio di incendi. NON cercare MAI di spegnere un incendio con acqua, bensì spegnere l’elettrodomestico e coprire la fiamma con un coperchio o una coperta antifiamma.
- Page 41 dell'elettrodomestico nelle istruzioni d'uso come adatte, o ancora protezioni incorporate nell'elettrodomestico. L'utilizzo di protezioni non adatte può provocare incidenti. Questo elettrodomestico incorpora un collegamento a terra solo per scopi funzionali. Desideriamo ringraziarla per l'acquisto del nuovo piano di cottura a induzione. Si consiglia di leggere attentamente questo manuale di istruzioni e di montaggio per comprendere pienamente come montarlo correttamente e farlo funzionare al meglio.
-
Page 42: Panoramica Del Prodotto
Panoramica del prodotto Vista dall’alto 1. Zona 2000 W, aumento a 2600 W 2. Zona 1500 W, aumento a 2000 W 3. Zona 2000 W, aumento a 2600 W 4. Zona 1500 W, aumento a 2000 W 5. Zona 2000 W, aumento a 2600 W 6. - Page 43 Come funziona la cottura a induzione La tecnologia della cottura a induzione è un metodo sicuro, tecnologicamente avanzato, efficiente ed economico. Funziona tramite vibrazioni elettromagnetiche che generano il calore direttamente nella pentola invece che indirettamente riscaldando la superficie in vetro. Il vetro si surriscalda perché si riscalda anche la pentola.
- Page 44 Scelta dei recipienti di cottura più appropriati • Utilizzare solamente recipienti di cottura adatti per la cottura a induzione. Verificare che sia presente il simbolo di induzione sull'imballaggio o sul fondo della pentola. • È possibile verificare se il recipiente di cottura è adatto effettuando una prova magnetica.
- Page 45 Dimensioni pentola Le zone di cottura vengono adattate automaticamente, fino ad un limite massimo, al diametro della pentola. Tuttavia, il fondo di questa padella deve avere un diametro minimo in funzione della zona di cottura corrispondente. Per ottenere la massima efficienza dal piano cottura, posizionare la pentola al centro della zona cottura.
- Page 46 a. Se entro 1 minuto non si sceglie un'impostazione di riscaldamento il piano di cottura a induzione si spegnerà automaticamente. In questo caso è necessario ripartire dalla fase 1. b. L'impostazione di riscaldamento si può modificare in qualsiasi momento durante la cottura. c.
- Page 47 In caso di interruzione di corrente mentre il simbolo “H" è attivo, prestare attenzione a non toccare la superficie di cottura anche se "H" non viene più visualizzato a seguito del ripristino dell'alimentazione. Uso della gestione della potenza Utilizzando la gestione della potenza si può impostare la potenza totale a 2,5 kW/ 3,0 kW/ 4,5 kW/ 6,5 kW e 7,4 kW.
- Page 48 zona. Se la si aumenta toccando "+", il piano di cottura emette 3 segnali acustici e l'indicatore lampeggia 'Pn'. Quindi è necessario diminuire la potenza di altre zone prima di aumentare la potenza della zona richiesta. Limitazione di potenza nelle zone centrale e destra •...
- Page 49 Utilizzo della funzione boost Boost è la funzione che permette l'aumento di una zona ad una potenza maggiore in un secondo e dura 5 minuti. In questo modo è possibile ottenere una cottura più potente e più veloce. Utilizzo della funzione boost per ottenere una potenza maggiore 1.
- Page 50 Uso della funzione mantenimento temperatura Keep Warm è la funzione che mantiene una zona ad una potenza inferiore per rendere stabile la temperatura. Utilizzo della funzione Keep Warm per ottenere una temperatura stabile 1. Toccare il cursore della zona di riscaldamento che si desidera mantenere calda, quindi tenere premuto il pulsante Keep Warm , l'indicatore della zona di cottura visualizzerà...
-
Page 51: Zona Flessibile
Utilizzo della funzione Pausa La funzione Pausa può essere utilizzata in qualsiasi momento durante la cottura. Permette di disattivare il piano cottura a induzione e poi riattivarlo. Accertarsi che la zona di cottura sia in funzione. Toccare il tasto Pausa l'indicatore della zona di cottura mostrerà... -
Page 52: Come Zona Grande
Come zona grande 1. Toccare il cursore della zona di riscaldamento (lato sinistro) che si desidera passare in zona flessibile, quindi toccare il pulsante di selezione della zona flessibile per attivare la zona flessibile come una singola grande zona, il pulsante vicino all'indicatore successivo sarà... -
Page 53: Protezione Contro Il Surriscaldamento
Protezione contro il surriscaldamento Un sensore di temperatura controlla la temperatura all'interno del piano di cottura a induzione. Se la temperatura supera il livello di sicurezza, il piano di cottura ad induzione si spegne automaticamente. Protezione contro le fuoriuscite La protezione da fuoriuscite è una funzione di protezione di sicurezza. Spegne automaticamente il piano cottura entro 10 secondi se l'acqua scorre verso il pannello di controllo, mentre l'avvisatore acustico si attiva per 1 secondo. -
Page 54: Utilizzo Del Timer
Utilizzo del timer Il timer si può utilizzare in due modi diversi: • Si può utilizzare come contaminuti. In questo caso, il timer non spegne alcuna zona di cottura quando il tempo impostato è attivo. • Si può impostare per spegnere una zona di cottura al termine del tempo impostato. - Page 55 Impostazione del timer per spegnere una zona di cottura Le zone di cottura impostate per questa funzione funzionano come segue: 1. Toccare il cursore di selezione della zona di riscaldamento per la quale si vuole impostare il timer. 2. Toccare "-" o "+" del timer, l’indicatore del contaminuti inizia a lampeggiare e il display del timer"...
-
Page 56: Cura E Pulizia
Impostazione del timer per spegnere più di una zona di cottura 1. Se si utilizza questa funzione per più di una zona di riscaldamento, l'indicatore del timer mostrerà il tempo più breve. (es. tempo di impostazione della zona 1# di 2 minuti, tempo di impostazione della zona 2# di 5 minuti, l'indicatore del timer mostra "2".) NOTA: Il punto rosso lampeggiante accanto all'indicatore del livello di potenza significa che l'indicatore del timer indica l'ora della zona di riscaldamento. - Page 57 Schizzi di acqua Toglierli immediatamente con • Togliere al più presto possibile le bollente, ingredienti una paletta per pesce, un macchie lasciate da ingredienti fusi, fusi e schizzi coltello a paletta o un raschietto cibo zuccherino o schizzi. Se questi zuccherini caldi sul a lama adatti al piano di cottura residui vengono lasciati seccare sul...
- Page 58 I tasti a sfioro si Potrebbe esserci una sottile Accertarsi che la zona dei tasti a sfioro attivano a fatica. pellicola di acqua sui comandi, sia asciutta e utilizzare il polpastrello oppure state utilizzando la punta delle vostre dita per attivare i delle dita per attivare i comandi.
-
Page 59: Specifiche Tecniche
Le considerazioni di cui sopra derivano dalla valutazione e dal controllo delle anomalie comuni. Non smontare da soli l'elettrodomestico per evitare rischi e danni al piano di cottura ad induzione. Specifiche tecniche Piano cottura CIFS85MCTT Zone di cottura 5 zone Tensione di alimentazione 220-240 V~, 50-60 Hz Potenza elettrica installata... -
Page 60: Installazione
Il peso e le dimensioni sono approssimativi. Le specifiche e il design potranno variare senza preavviso in quanto siamo sempre impegnati nella ricerca di continue innovazioni dei nostri prodotti. Installazione Scelta delle attrezzature di installazione Tagliare la superficie di lavoro rispettando le misure indicate sul disegno. Per l'installazione e l'uso è... - Page 61 Prima di montare il piano di cottura, assicurarsi che • il supporto sia squadrato e livellato e che non ci siano elementi strutturali che possano interferire con i requisiti di spazio • il supporto sia realizzato in materiale resistente al calore •...
- Page 62 Vite Staffa Foro per vite Fondo vetro staffa di fissaggio vite ST3. 5x8 Piano di lavoro/mobiletto della cucina Fondo Avvertenza 1. Il piano di cottura a induzione deve essere montato da personale o tecnici qualificati. La nostra società ha un team di professionisti a disposizione dei clienti.
- Page 63 Il cavo di alimentazione elettrica non deve entrare in contatto con componenti surriscaldati e deve essere collocato in modo tale che la sua temperatura non superi mai, in nessun punto, i 75° C. Verificare con un elettricista se l'impianto di cablaggio dell'abitazione è corretto senza necessità...
- Page 64 Informazione prodotto per piani di cottura elettrici conformi al Regolamento della Commissione (UE) nº 66/2014 Unità di Posizione Simbolo Valore misura Identificativo del modello CIFS85MCTT Piano cottura Tipologia di piano cottura: elettrico zone Numero di zone e/o aree di cottura aree...
- Page 65 Centrale sinistra Centrale centrale Centrale destra Anteriore 20,0 sinistra 20,0 Anteriore Centrale Anteriore 20,0 destra 20,0 Posteriore ECelectric Peso/kg 186,5 sinistra cooking Posteriore ECelectric Peso/kg centrale cooking Posteriore ECelectric Peso/kg 187,3 destra cooking Centrale ECelectric Peso/kg sinistra cooking Consumo energetico per zona o area Centrale ECelectric Peso/kg...
-
Page 66: Wichtige Sicherheitsanweisungen
Sicherheitshinweise Ihre Sicherheit ist uns wichtig. Bitte lesen Sie diese Informationen, bevor Sie Ihr Kochfeld benutzen. Installation Gefahr von Stromschlä gen • Trennen Sie das Gerä t von der Stromversorgung, bevor Sie Arbeiten oder Wartung an dem Gerä t vornehmen. •... - Page 67 zur Verfü gung, dadurch kö nnen Installationskosten gespart werden. • Um Gefahren zu vermeiden, muss dieses Gerä t entsprechend den vorliegenden Installations- anweisungen installiert werden. • Dieses Gerä t sollte nur von einer entsprechend qualifizierten Person ordnungsgemä ß installiert und geerdet werden. •...
- Page 68 oder anderen elektrischen Implantaten (wie z.B. Insulinpumpe) vor der Benutzung dieses Gerä ts ihren Arzt oder den Hersteller ihres Implantats um Rat fragen, um zu gewä hrleisten, dass ihre Implantate nicht vom elektromagnetischen Feld beeinträ chtigt werden. • Die Nichtbeachtung dieses Hinweises kann den Tod zur Folge haben.
- Page 69 bewahren Sie ihn sicher und auß erhalb der Reichweite von Kindern auf. • Nichtbeachten von Vorsichtsmaß nahmen kann zu Verletzungen oder Schnittwunden fü hren. Wichtige Sicherheitsanweisungen • Lassen Sie das Gerä t nicht unbeaufsichtigt, wenn es gerade in Betrieb ist. Ü berkochen verursacht rauchende und fettige Spritzer, die sich entzü...
- Page 70 kö nnten schwer verletzt werden. • Lassen Sie Kinder nicht allein oder unbeaufsichtigt in Rä umen, wo das Gerä t in Betrieb ist. • Kinder oder Personen mit einer Behinderung, die ihre Fä higkeiten zur Bedienung des Gerä ts mindert, sollten von einer verantwortlichen und kompetenten Person in der Bedienung des Gerä...
- Page 71 • Dieses Gerä t ist ausschließ lich fü r den Haus- gebrauch und vergleichbare Verwendungen bestimmt. -Personalkü chen in Geschä ften, Bü ros und anderen Arbeitsumgebungen; -Bauernhö fe; -von Kunden in Hotels, Motels und ä hnlichen Unterkü nften - Bed & Breakfasts (B&B) und ä...
-
Page 72: Herzlichen Glü Ckwunsch
Stromschlag zu vermeiden. Kochfeldoberflä chen aus Glaskeramik oder ä hnlichem Material decken spannungsfü hrende Teile ab. • Keinen Dampfreiniger verwenden. • Das Gerä t ist nicht dazu bestimmt, ü ber einen externen Timer oder eine gesonderte Fernsteuerung betrieben zu werden. VORSICHT: Der Garvorgang muss ü... -
Page 73: Ansicht Von Oben
Produktü bersicht Ansicht von oben 1,2000 W-Zone, Boost auf 2600W 2,1500 W-Zone, Boost auf 2000W 3,2000 W-Zone, Boost auf 2600W 4,1500 W-Zone, Boost auf 200W 5,2000 W-Zone, Boost auf 2600W 6, Flex-Zone, 2800W Boost 3500W 7,Glasplatte 8,Bedienfeld Bedienfeld Timer-Steuerung 2. EIN/AUS-Steuerung 3. - Page 74 Ein Wort zum Induktionskochen Induktionskochen ist eine sichere, moderne, effiziente und kostengü nstige Kochtechnologie. Durch elektromagnetische Schwingungen wird die Wä rme direkt im Topf erzeugt und nicht indirekt ü ber die Erhitzung der Glasflä che. Das Glas des Kochfeldes wird nur deshalb heiß , weil es vom Topf oder der Pfanne erwä rmt wird. Eisentopf Magnetkreis Keramikglasplatte...
- Page 75 Auswahl des richtigen Kochgeschirrs • Verwenden Sie ausschließ lich Kochgeschirr mit einem fü r das Induktionskochen geeigneten Boden. Achten Sie auf das Induktionssymbol auf der Verpackung oder am Boden des Topfes oder der Pfanne. • Ob ein Topf fü r das Kochen mit Induktion geeignet ist, kö nnen Sie auch mit dem so genannten Magnettest herausfinden.
- Page 76 Topfgrö ß e Die Kochzonen werden bis zu einer Obergrenze automatisch dem Topfdurchmesser angepasst. Der Topfboden muss jedoch einen Mindestdurchmesser haben, der dem der entsprechenden Kochzone entspricht. Um die maximale Effizienz des Kochfeldes zu erzielen, platzieren Sie den Topf in die Mitte der Kochzone. Der Bodendurchmesser von Induktionskochgeschirr Kochzone Minimum (mm)
- Page 77 a. Wenn Sie innerhalb von 1 Minute keine Temperatureinstellung auswä hlen, wird das Induktionskochfeld automatisch ausgeschaltet. Sie mü ssen wieder mit Schritt 1 beginnen. b. Sie kö nnen die Temperatureinstellung jederzeit wä hrend des Kochens ä ndern. c. Beim Entlangleiten auf der Steuerleiste „—“ variiert die Leistung von Stufe 1 bis Stufe 9.
- Page 78 Verwenden Sie die noch heiß e Kochplatte, um zusä tzliche Tö pfe oder Pfannen aufzuheizen. Achten Sie bitte darauf auch im Falle einer Stromunterbrechung wä hrend das Kochfeld “H” anzeigt das Kochfeld nicht zu berühren auch wenn das “H” nicht lä...
- Page 79 7,4kw ü bersteigt (je nach eingestellter Stufe), kann die Leistungsstufe keiner Zone erhö ht werden. Wenn Sie diese durch Berü hren von „+“ erhöhen, piept das Kochfeld dreimal und die Anzeige blinkt „Pn“. Daher mü ssen Sie die Leistungsstufe der anderen Zonen verringern, bevor Sie die Leistung der gewü nschten Zone erhö...
- Page 80 Verwendung der Boost-Funktion fü r mehr Leistung 1. Berü hren Sie die Bedienfeldtaste, die verstä rkt werden soll, und halten Sie dann das „b“ 3 Sekunden lang gedrückt. Die Leistungsanzeige zeigt „P“ als Hinweis darauf an, dass die Leistung der Zone verstä rkt wird. 2.
- Page 81 Gruppe a Gruppe b Benutzung der Warmhaltefunktion Die Warmhaltefunktion sorgt dafü r, dass eine Zone mit geringerer Leistung arbeitet, um die Temperatur konstant zu halten. Konstante Temperatur mit Hilfe der Warmhaltefunktion 1. Berü hren Sie den Schieberegler der Heizzone, die Sie warmhalten wollen, und berü...
- Page 82 Verwendung der Funktion zum Pausieren und Fortsetzen Die Pausenfunktion kann jederzeit wä hrend des Garvorgangs genutzt werden. Mit ihr wird das Induktionskochfeld aus- und wieder angeschaltet. 1. Prü fen Sie, ob die Kochzone angeschaltet ist. 2. Berü hren Sie die Taste Pausieren und Fortsetzen, und die Anzeige der Kochzone zeigt „ll“...
- Page 83 Beispiele fü r gute und schlechte Topfplatzierungen: Als groß e Zone Berü hren Sie den Schieberegler der Heizzone (linke Seite), die zur Flexzone werden soll, und berü hren Sie dann die Flexzonenauswahltaste, um den flexiblen Bereich als einzelne groß e Zone zu aktivieren. Die Anzeige neben der Flexzonentaste leuchtet auf.
- Page 84 So werden die Bedienelemente gesperrt Berü hren Sie die Tastensperre. Auf der Timer-Anzeige wird der Schriftzug „Lo“ angezeigt. So wird die Tastensperre fü r die Bedienelemente aufgehoben 1. Stellen Sie sicher, dass das Induktionsfeld eingeschaltet ist. 2. Berü hren Sie die Tastensperre und halten Sie sie eine Weile gedrü ckt 3.
- Page 85 Personen mit Herzschrittmachern sollten vor der Benutzung dieses Gerä ts ihren Arzt um Rat fragen. Verwendung der Timer-Funktion Sie kö nnen den Timer auf zwei verschiedene Arten verwenden: • Sie kö nnen ihn als Minute-Minder verwenden. In diesem Fall schaltet der Timer nach Ablauf der eingestellten Zeit die jeweilige Kochzone aus.
- Page 86 Einstellung des Timers zum Ausschalten einer Kochzone Auf diese Funktion eingestellte Kochzonen: 1. Berü hren Sie den Schieberegler der Heizzone, fü r die Sie den Timer einstellen mö chten. 2. Berühren Sie „-“ oder „+“ der Timer-Steuerung. Die Minder-Anzeige fä ngt an zu blinken und das Timer-Display zeigt „30“...
- Page 87 Einstellung des Timers zum Ausschalten mehr als einer Kochzone Wenn Sie diese Funktion fü r mehr als eine Kochzone verwenden, zeigt die Timer-Anzeige die kü rzeste Zeit an. (z.B. Zone 1# Einstellzeit von 2 Minuten, Zone 2# Einstellzeit von 5 Minuten, die Timeranzeige zeigt „2“.) HINWEIS: Der blinkende rote Punkt neben der Leistungsstufe bedeutet, dass die Timeranzeige die Zeit der Kochzone anzeigt.
-
Page 88: Pflege Und Reinigung
Pflege und Reinigung Was? Wie das geht? Wichtig! Alltä gliche 1. Den Netzschalter auf dem • Wenn die Stromversorgung auf dem Verschmutzungen auf Kochfeld ausschalten. Kochfeld ausgeschaltet ist, gibt es dem Glas 2. Einen Kochfeld-Reiniger keine Anzeige für „heiße Oberfläche“, (Fingerabdrü... -
Page 89: Hinweise Und Tipps
Hinweise und Tipps Problem Mö gliche Ursachen Was zu tun ist Das Induktionskochfeld Kein Strom. Stellen Sie sicher, dass das Induktions- kann nicht kochfeld an die Stromversorgung eingeschaltet werden. angeschlossen und eingeschaltet ist. Ü berprü fen Sie, ob ein Stromausfall in Ihrem Haus oder Wohnbereich vorliegt. - Page 90 Technische Stö rung. Das Induktionskochfeld Bitte notieren Sie die Buchstaben und oder die Kochzone hat Zahlen des Fehlers, schalten Sie das sich selbst unerwartet Induktionskochfeld an der Wand aus ausgeschaltet, ein und kontaktieren Sie einen Signalton ertö nt und ein qualifizierten Techniker.
-
Page 91: Technische Merkmale
Technische Merkmale Kochfeld CIFS85MCTT Kochzonen 5 Kochzonen Versorgungsspannung 220-240V~, 50-60Hz Installierte elektrische Leistung 2,5kw:2250-2750W oder 3,0 kw:2700-3300W oder 4,5kw:4050-4950W oder 6,5kw:5850-7150W oder 7,4kw:6600-7400W Produktgrö ß e L×B×H(mm) 770X520X60 Einbaugrö ß e A×B (mm) 740X490 Gewicht und Abmessungen sind ungefä hre Angaben. Wir sind stä ndig bemü ht, unsere Produkte zu verbessern, sodass Spezifikationen und Gestaltung ohne vorherige Ankü... - Page 92 Stellen Sie sicher, dass das Induktionskochfeld in jedem Fall gut belü ftet wird und dass der Lufteintritt und -austritt nicht behindert werden. Stellen Sie sicher, dass das Induktionskochfeld in einem guten Betriebszustand ist. Wie unten dargestellt Hinweis: Der Sicherheitsabstand zwischen der Kochplatte und dem darü...
- Page 93 Nachdem Sie das Kochfeld installiert haben, stellen Sie sicher, dass • das Stromversorgungskabel nicht durch Schranktü ren oder Schubladen zugä nglich ist. • eine ausreichende Frischluftzufuhr von auß erhalb der Schrä nke zur Unterseite des Kochfeldes vorhanden ist. • wenn das Kochfeld ü ber einer Schublade oder einem Schrankraum installiert ist, ein Hitzeschutz unterhalb des Kochfeldes installiert wurde.
- Page 94 Vorsicht 1. Die Induktionskochplatte muss von qualifiziertem Personal oder Technikern installiert werden. Unsere Kundendienstmitarbeiter stehen Ihnen zu Diensten. Bitte fü hren Sie den Vorgang nie selbst aus. 2. Das Kochfeld darf nicht direkt ü ber einem Geschirrspü ler, Kü hlschrank, Gefrierschrank, Waschmaschine oder Wä...
- Page 95 • Wenn das Kabel beschä digt ist oder ersetzt werden muss, mü ssen die Arbeiten von einem Kundendienst-Vertreter mit den entsprechenden Werkzeugen durchgefü hrt werden, um mö gliche Unfä lle zu vermeiden. • Wenn das Gerä t direkt an das Stromnetz angeschlossen wurde, muss ein allpoliger Leistungsschalter installiert werden, mit einer Mindestö...
- Page 96 Informationen zu Haushaltskochfeldern gemä ß der Verordnung (EU) Nr. 66/2014 Stellung Symbol Wert Einheit Modellkennung CIFS85MCTT Elektrisches Art des Kochfeldes: Kochfeld Zonen Anzahl der Kochzonen und/ oder Bereiche Bereiche Induktionskochzonen Heiztechnik (Induktions- und Induktionskochfelder Kochzonen, abstrahlende abstrahlende Kochzonen, Kochzonen Festplatten)
- Page 97 Zentral Mitte rechts 20,0 Vorne links 20,0 Vordere Mitte 20,0 Vorne rechts 20,0 ECelectric Hinten links 186,5 Wh/kg cooking Hinten in der ECelectric Wh/kg Mitte cooking ECelectric Hinten rechts 187,3 Wh/kg cooking ECelectric Mitte links Wh/kg cooking Energieverbrauch pro Kochzone oder ECelectric Zentral Wh/kg...
-
Page 98: Ważne Instrukcje Dotyczące Bezpieczeństwa
Ostrzeżenia związane z bezpieczeństwem Państwa bezpieczeństwo jest dla nas ważne. Przed użyciem płyty kuchennej należy przeczytać poniższe informacje. Instalacja Zagrożenie porażenia prądem • Przed przystąpieniem do wykonywania jakichkolwiek prac lub konserwacji urządzenia należy odłączyć je od zasilania elektrycznego. • Podłączenie do prawidłowo uziemionej instalacji elektrycznej jest niezbędne i obowiązkowe. - Page 99 • Nigdy nie umieszczać na urządzeniu żadnych łatwopalnych materiałów ani produktów. • Proszę udostępnić niniejsze informacje osobie odpowiedzialnej za instalację urządzenia, ponieważ może to obniżyć koszty instalacji. • Aby uniknąć zagrożenia bezpieczeństwa, urządzenie należy zainstalować zgodnie z niniejszą instrukcją instalacji. •...
- Page 100 Zagrożenie dla zdrowia • To urządzenie spełnia wymagania norm bezpieczeństwa elektromagnetycznego. • Niemniej jednak osoby z rozrusznikami serca lub innymi implantami elektrycznymi (takimi jak pompy insulinowe) przed użyciem tego urządzenia muszą skonsultować się z lekarzem lub producentem implantu, aby upewnić się, że pole elektromagnetyczne nie będzie miało szkodliwego wpływu na ich implanty.
- Page 101 • Nieprzestrzeganie tego zalecenia może spowodować poparzenia i oparzenia. Niebezpieczeństwo skaleczenia • Ostre jak brzytwa ostrze skrobaka do płyty kuchennej jest odsłonięte, gdy osłona zabezpieczająca jest cofnięta. Używać z najwyższą ostrożnością, zawsze przechowywać bezpiecznie i w miejscu niedostępnym dla dzieci. •...
- Page 102 • Po użyciu zawsze wyłączać strefy grzewcze i płytę kuchenną zgodnie z opisem w niniejszej instrukcji (np. za pomocą przycisków dotykowych). Nie polegać na funkcji wykrywania patelni w celu wyłączenia strefy grzewczej podczas zdejmowania patelni. • Nie pozwalać dzieciom na zabawę z urządzeniem, siadanie, stanie na nim lub wspinanie się...
- Page 103 • Nie umieszczać ani nie upuszczać ciężkich przedmiotów na płytę kuchenną. • Nie stawać na płycie kuchennej. • Nie używać patelni z wyszczerbionymi krawędziami ani nie przesuwać takich patelni po powierzchni szkła indukcyjnego, ponieważ może to porysować szkło. • Do czyszczenia płyty kuchennej nie używać szczotek drucianych ani innych szorstkich środków ściernych, ponieważ...
- Page 104 • Urządzenie to może być obsługiwane przez dzieci powyżej 8 roku życia oraz osoby o ograniczonej zdolności fizycznej, czuciowej lub psychicznej bądź nieposiadające doświadczenia i wiedzy, jeśli są one pod nadzorem lub poinstruowano je w zakresie bezpiecznej obsługi urządzenia i zrozumiały one potencjalne zagrożenia.
- Page 105 PRZESTROGA: Proces gotowania powinien przebiegać pod nadzorem. Krótki proces gotowania powinien być stale nadzorowany. OSTRZEŻENIE: Aby zapobiec przewróceniu się urządzenia, należy zainstalować elementy stabilizujące – patrz instrukcja instalacji. OSTRZEŻENIE: Należy korzystać wyłącznie z osłon płyty kuchennej zaprojektowanych przez producenta urządzenia lub wskazanych przez niego w instrukcji obsługi jako odpowiednie bądź...
- Page 106 Widok produktu Widok z góry 1. Strefa 2000 W, z funkcją Boost do 2600 W. 2. Strefa 1500 W, z funkcją Boost do 2000 W. 3. Strefa 2000 W, z funkcją Boost do 2600 W. 4. Strefa 1500 W, z funkcją Boost do 1800 W. 5.
- Page 107 A Opis gotowania indukcyjnego Gotowanie indukcyjne to bezpieczna, zaawansowana, wydajna i ekonomiczna technologia gotowania. Do działania urządzenia wykorzystywane są wibracje elektromagnetyczne generujące ciepło bezpośrednio na patelni, a nie pośrednio poprzez nagrzewanie powierzchni szklanej. Szkło staje się gorące tylko dlatego, że patelnia nagrzewa się. żelazny garnek obwód magnetyczny szklana płyta ceramiczna...
- Page 108 Wybór odpowiedniego naczynia do gotowania • Używać tylko naczyń z podstawą odpowiednią do gotowania indukcyjnego. Znaleźć symbol indukcji na opakowaniu lub na dnie patelni. • Aby sprawdzić, posiadane naczynia są odpowiednie, wystarczy przeprowadzić test magnetyczny. Przesunąć magnes w kierunku podstawy patelni. Jeśli jest przyciągany, patelnia jest odpowiednia do gotowania indykcyjnego.
-
Page 109: Obsługa Płyty Indukcyjnej
Wymiary patelni Pola grzejne do pewnego stopnia automatycznie dopasowują się do średnicy patelni. Jednakże dno tej patelni musi mieć minimalną średnicę dostosowaną do odpowiedniego pola grzejnego. W celu uzyskania najlepszej wydajności płyty należy umieścić patelnię na środku pola grzejnego. Średnica podstawowa naczyń do gotowania indukcyjnego Pole grzejne Minimum (mm) 1,2, 3, 4 (180 mm) - Page 110 Jeśli wyświetlacz miga naprzemiennie z ustawieniem mocy Oznacza to że: • nie postawiono garnka na właściwej strefie grzewczej lub • używany garnek nie nadaje się do gotowania indukcyjnego lub • garnek jest zbyt mały albo nie jest odpowiednio wyśrodkowany na strefie grzewczej. Grzanie nie nastąpi, jeśli na strefie grzewczej nie znajduje się...
- Page 111 1. Upewnić się, że płyta grzewcza jest wyłączona. Uwaga: z funkcji zarządzania mocą można korzystać jedynie wówczas, gdy płyta grzewcza jest wyłączona. 2. Dotknąć przycisk „Pauzy” i przytrzymać przez 5 sekund. Zostanie wyemitowany jednokrotny dźwięk. 3. Po usłyszeniu dźwięku dotknąć jednocześnie przycisków „+” i „-” i przytrzymać przez 3 sekundy –...
- Page 112 W grupie a obie strefy mogą pracować jednocześnie na poziomie 9, ponieważ w sumie obciążenie wynosi 3500 W. W grupie b, jeśli pracują 3 strefy, maksymalny poziom mocy, jaki może osiągnąć każda strefa, wynosi 7. Jeśli tylna strefa grupy b jest wyłączona, pozostałe dwie strefy mogą...
- Page 113 Ograniczenia podczas użytkowania Pięć stref podzielono na dwie grupy. W jednej grupie, jeżeli używana jest funkcja zwiększania mocy w jednej strefie, należy najpierw sprawdzić, czy inna strefa pracuje co najwyżej na poziomie 5. W grupie b, jeśli jedna strefa działa w trybie Boost, jednocześnie może działać tylko jeszcze jedna inna strefa.
-
Page 114: Jako Duża Strefa
Zostanie wstrzymane działanie płyty indukcyjnej we wszystkich strefach, oprócz funkcji „Pauzy”, wł./wył. i przycisków blokady. 3. W celu wyjścia ze stanu wstrzymania należy dotknąć przycisku „Pauzy” – strefa grzewcza powróci do poprzedniego poziomu mocy. Strefa Flex • Strefę tę można traktować jako pojedynczą strefę lub jako dwie różne strefy, w zależności od wymogów związanych z gotowaniem. - Page 115 Dotknąć suwaka wzdłuż kontrolki „—” lub dotknąć dowolnego punktu „—”, aby ustawić poziom mocy. Jako dwie niezależne strefy 1. Jeśli zamierza się anulować strefę elastyczną, należy dotknąć suwaka strefy grzewczej ponownie, a następnie dotknąć przycisku wyboru strefy elastycznej. Wskaźnik obok przycisku strefy elastycznej zgaśnie. Blokowanie elementów sterowania •...
- Page 116 Zabezpieczenie w postaci automatycznego wyłączania się Automatyczne wyłączanie się to funkcja zabezpieczająca płytę indukcyjną. Płyta wyłącza się automatycznie, jeśli użytkownik zapomni ją wyłączyć po gotowaniu. Domyślne czasy pracy dla różnych poziomów mocy pokazane są w poniższej tabeli: Poziom mocy Domyślny regulator czasowy działania (godzina) Po zdjęciu garnka płyta indukcyjna może natychmiast zatrzymać...
- Page 117 5. Po ustawieniu odliczanie czasu rozpocznie się natychmiast. Wyświetlacz pokaże pozostały czas, a wskaźnik regulatora czasowego będzie migać przez 5 sekund. 6. Nastąpi sygnał dźwiękowy trwający 30 sekund, a wskaźnik regulatora czasowego pokaże „- -”, gdy zakończy się ustawiony czas. Ustawianie regulatora czasowego w celu wyłączenia jednej strefy grzewczej Ustawienie stref grzewczych przy użyciu tej funkcji:...
- Page 118 6. Po upływie czasu grzania, odpowiednia strefa grzewcza zostanie automatycznie wyłączona i wyświetlony zostanie symbol „H”. Pozostałe strefy grzewcze będą nadal działać, jeśli zostały wcześniej włączone. Ustawianie regulatora czasowego w celu wyłączenia więcej niż jednej strefy grzewczej. 1. W przypadku użycia tej funkcji do więcej niż jednej strefy grzewczej, wskaźnik regulatora czasowego wyświetli najkrótszy czas (np.
- Page 119 Dbałość i czyszczenie Ważne! Jak? 1. Wyłączyć zasilanie płyty • zasilanie płyty kuchennej Codzienne zabrudzenia zostanie wyłączone, nie będzie na na szkle (odciski kuchennej. palców, ślady, plamy „gorąca 2. Zastosować środek do niej wskazania powierzchnia”, pole grzejne pozostawione przez czyszczenia płyty kuchennej, jedzenie lub niesłodkie może nadal być...
- Page 120 Porady i wskazówki Co należy zrobić? Problem Potencjalne przyczyny Nie można włączyć płyty Upewnić się, że płyta indukcyjna jest Brak zasilania. podłączona zasilania jest indukcyjnej. włączona. Sprawdzić, czy w domu lub okolicy nie wystąpiła przerwa w dostawie energii elektrycznej. Jeśli wszystko sprawdzono i problem nadal występuje, należy skontaktować...
- Page 121 Co należy zrobić? Problem Potencjalne przyczyny Płyta indukcyjna lub pole Zanotować litery i cyfry błędu, Usterka techniczna. wyłączyć zasilanie płyty indukcyjnej grzewcze niespodziewanie się od gniazdka ściennego i wyłączyły, rozlega się skontaktować się z wykwalifikowanym sygnał dźwiękowy i technikiem. wyświetlany jest kod błędu (zwykle na przemian z jedną...
- Page 122 Dane techniczne Płyta indukcyjna CIES55MCTT Strefy grzewcze 5 stref Napięcie zasilania 220–240 V~, 50–60 Hz Zainstalowana moc elektryczna 2,5 kW: 2250–2750 W lub 3,0 kW: 2700–3300 W lub 4,5 kW: 4050–4950 W lub 6,5 kW: 5850–7150 W lub 7,4 kW: 6600–7400 W Wymiary produktu 590 X 520 X 55 dł.
- Page 123 dł. (mm) szer. (mm) gł. (mm) wys. (mm) A (mm) B (mm) X (mm) 50 mini W każdym przypadku należy upewnić się, iż indukcyjna płyta grzejna jest dobrze wentylowana oraz że wlot i wylot powietrza nie są zablokowane. Upewnić się, że płyta indukcyjna jest w dobrym stanie.
- Page 124 czyszczenia elementy wykończeniowe (np. płytki ceramiczne). Po zainstalowaniu należy upewnić się, że: • kabel zasilający nie jest dostępny przez drzwi szafki lub szuflady; • istnieje odpowiedni przepływ świeżego powietrza od zewnętrznej części zabudowy do podstawy płyty; • jeśli płyta jest zainstalowana nad szufladą lub szafką, pod podstawą płyty zainstalowana jest odpowiednia bariera cieplna;...
- Page 125 zamrażarką, pralką lub suszarką, ponieważ wilgotność może uszkodzić elementy elektroniczne płyty. 3. Indukcyjna płyta grzejna powinna być zainstalowana w taki sposób, aby zapewniać jak lepsze odprowadzanie ciepła w celu zwiększenia jej niezawodności. 4. Ściana i indukowana strefa grzewcza nad powierzchnią blatu powinny być odporne na ciepło.
- Page 126 • Kabel nie może być zgięty ani ściśnięty. • Kabel musi podlegać regularnym sprawdzeniom i wymianie, dokonywanej wyłącznie przez odpowiednio autoryzowanych techników. Urządzenie jest oznakowane zgodnie z dyrektywą europejską 2012/19/WE w sprawie zużytego sprzętu elektrycznego i elektronicznego (WEEE). Kategoria WEEE obejmuje zarówno substancje zanieczyszczające (któ...
- Page 127 Informacja o produkcie (domowa płyta grzejna elektryczna) zgodnie z rozporządzeniem Komisji (UE) nr 66/2014 Wartość Pozycja Oznaczenie Jednostka Identyfikator modelu CIFS85MCTT płyta grzejna Typ płyty grzejnej: elektryczna Liczba pól i/lub pola obszarów grzejnych obszary Indukcyjne pola grzejne Technologia grzejna (indukcyjne pola i...
- Page 128 Środkowa Środkowa prawa Przednia 20,0 lewa 20,0 Przednia środkowa Przednia 20,0 prawa 20,0 ECelectric Tylna lewa 186,5 Masa/kg cooking Tylna ECelectric Masa/kg środkowa cooking Tylna ECelectric 187,3 Masa/kg prawa cooking Środkowa ECelectric Masa/kg lewa cooking Zużycie energii dla każdego pola lub każdego obszaru grzejnego w ECelectric Środkowa...
Need help?
Do you have a question about the CIFS85MCTT and is the answer not in the manual?
Questions and answers