Table of Contents
Advertisement
Available languages
Available languages
Quick Links
Instruction Manual For Induction Hob
Bedienungsanleitung für Induktionskochfeld
Mode d'emploi de la table de cuisson à induction
Руководство по эксплуатации индукционной варочной панели
Thank you for purchasing the CANDY induction hob. Please read this instruction manual
carefully before using the hob and keep it in a safe place for future reference
CI642CTTWIFI
ENGLISH
DEUTSCH
FRANÇAIS
РУССКИЙ
Advertisement
Table of Contents

Related Manuals for Candy CI642CTTWIFI


Summary of Contents for Candy CI642CTTWIFI
- Page 1 Mode d’emploi de la table de cuisson à induction РУССКИЙ Руководство по эксплуатации индукционной варочной панели CI642CTTWIFI Thank you for purchasing the CANDY induction hob. Please read this instruction manual carefully before using the hob and keep it in a safe place for future reference...
-
Page 2: Safety Warnings
Hereby, Candy Hoover Group Srl declares that the radio equipment is in compliance with Directive 2014/53/EU and with the relevant Statutory Requirements (for the UKCA market). The full text of the EU declaration of conformity is available at the following internet address: www.candy-group.com... - Page 3 • Take care - panel edges are sharp. • Failure to use caution could result in injury or cuts. Important safety instructions • Read these instructions carefully before installing or using this appliance. • No combustible material or products should be placed on this appliance at any time.
-
Page 4: Health Hazard
technician. • Switch the cooktop off at the wall before cleaning or maintenance. • Failure to follow this advice may result in electrical shock or death. Health Hazard • This appliance complies with electromagnetic safety standards. • However, persons with cardiac pacemakers or other electrical implants (such as insulin pumps) must consult with their doctor or implant manufacturer before using this... -
Page 5: Important Safety Instructions
Cut Hazard • The razor-sharp blade of a cooktop scraper is exposed when the safety cover is retracted. Use with extreme care and always store safely and out of reach of children. • Failure to use caution could result in injury or cuts. - Page 6 • Do not store items of interest to children in cabinets above the appliance. Children climbing on the cooktop could be seriously injured. • Do not leave children alone or unattended in the area where the appliance is in use. •...
- Page 7 -staff kitchen areas in shops, offices and other working environments; -farm houses; -by clients in hotels, motels and other residential type environments; -bed and breakfast type environments. WARNING: The appliance and its accessible • parts become hot during use. Care should be taken to avoid touching heating elements.
- Page 8 shock, for hob surfaces of glass-ceramic or similar material which protect live parts A steam cleaner is not to be used. • The appliance is not intended to be operated by • means of an external timer or separate remote-control system. CAUTION: The cooking process has to be supervised.
-
Page 9: Product Overview
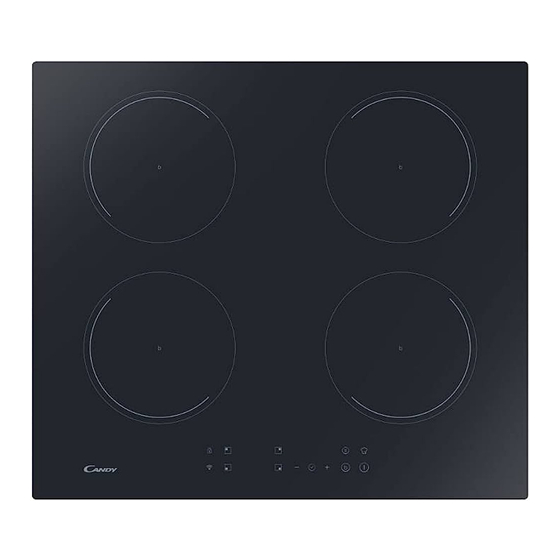
Product Overview Top View 1.2000 W zone, boost to 2600W 2.1500 W zone, boost to 2000W 3.2000 W zone, boost to 2600W 4.1500 W zone, boost to 2000W 5. Glass plate 6. Control panel Control Panel 1. Heating zone selection controls 2. -
Page 10: A Word On Induction Cooking
A Word on Induction Cooking Induction cooking is a safe, advanced, efficient, and economical cooking technology. It works by electromagnetic vibrations generating heat directly in the pan, rather than indirectly through heating the glass surface. The glass becomes hot only because the pan eventually warms it up. iron pot magnetic circuit ceramic glass plate... -
Page 11: Choosing The Right Cookware
Choosing the right Cookware • Only use cookware with a base suitable for induction cooking. Look for the induction symbol on the packaging or on the bottom of the pan. • You can check whether your cookware is suitable by carrying out a magnet test. -
Page 12: Using Your Induction Hob
please place the pan in the centre of the cooking zone. The base diameter of induction cookware Cooking zone Minimum (mm) 1, 2 , 3, 4(180mm) The above may vary according to the quality of the pan used. Using your Induction Hob To start cooking 1. -
Page 13: When You Have Finished Cooking
setting This means that: • you have not placed a pan on the correct cooking zone or, • the pan you’re using is not suitable for induction cooking or, • the pan is too small or not properly centred on the cooking zone. No heating takes place unless there is a suitable pan on the cooking zone. - Page 14 Using the Power Management Using power management you can set the total power to 2.5kW/ 3.0kW/ 4.5kW/ 6.5kW and 7.4kW. The default total power setting is the maximum power level. Setting the total power level to fit your requirement 1. Make sure the cooktop is turned off. Note: you can only set power management when the cooktop is turned off.
- Page 15 Power management Rules Using power management you can set the total power to 2.5kW/ 3.0kW/ 4.5kW/ 6.5kW and 7.4kW. The default total power setting is the maximum power level. If you increase it by touching ‘+’, the cooktop will beep 3 times and indicator will show a flashing ‘Pn’.
- Page 16 a. WIRELESS PARAMETERS Technology Wi-Fi Standard 802.11 b/g/n v4.2 BR/EDR &BLE Frequency Band(s) [MHz] 2400 ~ 2500 2400 ~ 2500 Maximum Power [mW] b. PRODUCT INFORMATION FOR NETWORKED EQUIPMENT Product information for networked equipment power consumption of the product in networked standby if all wired network ports are connected and all wireless network ports are activated:...
-
Page 17: Restrictions When Using
Using the Boost Boost is the function that one zone rising to a larger power in one second and lasting for 5 minutes. Thus you can get a more powerful and faster cooking. Using the Boost to get larger power Touch the heating zone selection button that you wish to boost, an indicator next to the key will flash. -
Page 18: Using The Pause Function
Using the Pause function Pause function can be used at any time during cooking. It allows to stop the induction cooktop and come back to it. 1. Make sure the cook zone is working. 2. Touch the button , the cooking zone indicator will show “ll”. And then the operation of the induction cooktop will be deactivate within the scope of all cooking zones, except the Pause function, on/off and lock keys. -
Page 19: Over Temperature Protection
Touch the keylock control. The timer indicator will show “ Lo “ To unlock the controls 1. Make sure the Induction hob is turned on. 2. Touch and hold the keylock control for a while 3. You can now start using your Induction hob. When the hob is in the lock mode, all the controls are disable except the ON/OFF you can always turn the induction hob off with the ON/OFF control in an emergency, but you shall unlock the hob first in the next operation. -
Page 20: Using The Timer As A Minute Minder
Using the Timer You can use the timer in two different ways: • You can use it as a minute minder. In this case, the timer will not turn any cooking zone off when the set time is up. • You can set it to turn one cooking zone off after the set time is up. •... - Page 21 Cooking zones set for this feature will: 1. Touching the heating zone selection control that you want to set the timer for. (e.g. zone 1#) Touch timer control , The minder indicator will start flashing and “30” will show in the timer display.
- Page 22 Other cooking zone will keep operating if they are turned on previously. Setting the timer to turn more than one cooking zone 1. If use this function to more than one heating zone, the timer indicator will show the shortest time. (e.g.
-
Page 23: Care And Cleaning
Care and Cleaning What? How? Important! Everyday soiling on 1. Switch the power to the • When the power to the cooktop is glass (fingerprints, cooktop off. switched off, there will be no ‘hot 2. Apply a cooktop cleaner marks, stains left by surface’... -
Page 24: Hints And Tips
Hints and Tips Problem Possible causes What to do The induction hob No power. Make sure the induction hob is cannot be turned on. connected to the power supply and that it is switched on. Check whether there is a power outage in your home or area. -
Page 25: Failure Display And Inspection
The induction hob or a Technical fault. Please note down the error letters and numbers, switch cooking zone has turned itself off the power to the induction hob off at the wall, and contact a unexpectedly, a tone sounds and an error qualified technician. -
Page 26: Technical Specification
Technical Specification Cooking Hob CI642CTTWIFI Cooking Zones 4 Zones Supply Voltage 220-240V~, 50-60Hz Installed Electric Power 2.5kw:2250-2750W or 3.0 kw:2700-3300W or 4.5kw:4050-4950W or 6.5kw:5850-7150W or 7.4kw:6600-7400W Product Size 590X520X60 L×W×H(mm) Building-in Dimensions 560X490 A×B (mm) Weight and Dimensions are approximate. Because we continually strive to improve our products we may change specifications and designs without prior notice. - Page 27 L(mm) W(mm) H(mm) D(mm) A(mm) B(mm) X(mm) 50 mini Under any circumstances, make sure the Induction cooker hob is well ventilated and the air inlet and outlet are not blocked. Ensure the Induction cooker hob is in good work state. As shown below Note: The safety distance between the hotplate and the cupboard above the hotplate should be at least 760mm.
-
Page 28: Before Locating The Fixing Brackets
• a suitable isolating switch providing full disconnection from the mains power supply is incorporated in the permanent wiring, mounted and positioned to comply with the local wiring rules and regulations. The isolating switch must be of an approved type and provide a 3 mm air gap contact separation in all poles (or in all active [phase] conductors if the local wiring rules allow for this variation of the requirements) •... -
Page 29: Connecting The Hob To The Mains Power Supply
Cautions 1. The induction hotplate must be installed by qualified personnel or technicians. We have professionals at your service. Please never conduct the operation by yourself. 2. The hob will not be installed directly above a dishwasher, fridge, freezer, washing machine or clothes dryer, as the humidity may damage the hob electronics 3.The induction hotplate shall be installed such that better heat radiation can be ensured to enhance its reliability. - Page 30 The power supply should be connected in compliance with the relevant standard, or a single-pole circuit breaker. The method of connection is shown below. 220-240V~ 220-240 V~ 400V~ Input Input Input Input 400V~ 220-240V~ L1 L2 N1 N2 L1 L2 N Pow er Cord Pow er Cord Power Cord...
- Page 31 Product Information for Domestic Electric Hobs Compliant to Commission Regulation (EU) No 66/2014 Position Symbol Value Unit Model identification CI642CTTWIFI Type of hob: Electric Hob Number of zones cooking zones and/or areas areas Induction Heating cooking zones technology (induction Induction...
- Page 32 Central central Central right Front left Front central Front right ECelectric Rear left 193,5 Wh/kg cooking Rear ECelectric Wh/kg central cooking ECelectric Rear right 197,2 Wh/kg cooking ECelectric Central left Wh/kg cooking Energy consumption for cooking Central ECelectric Wh/kg zone or area calculated per kg central cooking Central...
- Page 33 Hiermit erklärt die Candy Hoover Group Srl, dass die Funkanlage mit der Richtlinie 2014/53/EU und den entsprechenden gesetzlichen Anforderungen (für den UKCA- Markt) übereinstimmt. Der vollständige Text der Konformitätserklärung ist unter der folgenden Internetadresse verfügbar: www.candy-group.com Sicherheitshinweise Ihre Sicherheit liegt uns am Herzen. Lesen Sie vor der Benutzung des Kochfelds bitte diese Hinweise.
- Page 34 Schnittgefahr • Seien Sie vorsichtig – die Platten haben scharfe Kanten. • Bei Unvorsichtigkeit besteht Schnitt- oder Verletzungsgefahr. Wichtige Sicherheitshinweise • Lesen Sie aufmerksam diese Hinweise, bevor Sie das Gerät installieren oder benutzen. • Unter keinen Umständen dürfen brennbare Materialien oder Gegenstände auf diesem Gerät abgestellt werden.
- Page 35 aus und wenden sich an einen Elektriker. • Schalten Sie das Kochfeld aus, bevor Sie Reinigungs- oder Instandhaltungsarbeiten durchführen. • Andernfalls besteht Stromschlag- oder sogar Lebensgefahr. Gesundheitsgefahr • Dieses Gerät erfüllt die Sicherheitsvorschriften für elektromagnetische Vorrichtungen. • Personen mit Herzschrittmachern oder anderen elektrischen Implantaten (wie Insulinpumpen) müssen vor der Verwendung dieses Geräts mit ihrem Arzt oder Implantathersteller Rücksprache...
-
Page 36: Wichtige Sicherheitshinweise
darauf, dass Kochtopfgriffe nicht auf andere, eingeschaltete Kochfelder überstehen. Achten Sie darauf, dass sich Griffe außerhalb der Reichweite von Kindern befinden. • Andernfalls besteht die Gefahr von Verbrennungen und Verbrühungen. Schnittgefahr • Wenn die Schutzkappe eines Kochfeldreinigers zu- rückgeschoben ist, liegt dessen rasiermesser- scharfe Klinge frei. - Page 37 • Schalten Sie die Kochzonen und das Kochfeld wie in dieser Anleitung beschrieben ab (d. h. mit Hilfe der Berührungstasten). Verlassen Sie sich nicht auf die Topferkennungsfunktion, um die Kochzonen auszuschalten, nachdem Sie die Töpfe entfernt haben. • Achten Sie darauf, dass Kinder weder mit dem Gerät spielen noch darauf sitzen, stehen oder klettern.
- Page 38 • Achten Sie darauf, keine schweren Gegenstände auf dem Kochfeld abzustellen oder darauf fallen zu lassen. • Stellen Sie sich keinesfalls auf das Kochfeld. • Achten Sie darauf, weder scharfkantige Töpfe auf dem Kochfeld zu benutzen noch Töpfe über die Induktionsglasfläche zu ziehen, weil dadurch das Glas verkratzen kann.
- Page 39 sensorischen oder geistigen Fähigkeiten oder ohne Erfahrung und Wissen nur benutzt werden, wenn sie beaufsichtigt werden oder Anweisungen für den sicheren Gebrauch des Geräts erhalten und die damit verbundenen Gefahren verstanden haben. • Kinder dürfen keinesfalls mit dem Gerät spielen. Kinder dürfen das Gerät nur unter Beaufsichtigung reinigen und instandhalten.
-
Page 40: Herzlichen Glückwunsch
WARNUNG: Um ein Kippen des Gerätes zu verhindern, muss diese Stabilisierungseinrichtung installiert werden. Beachten Sie die Installationsanleitung. WARNUNG: Verwenden Sie ausschließlich einen Kochfeldschutz, der vom Hersteller des Kochgeräts entwickelt wurde, vom Gerätehersteller in der Bedienungsanleitung als geeignet genannt wird oder Bestandteil des Kochfelds ist. - Page 41 Produktübersicht Draufsicht 1. 2000-W-Zone, Verstärkung auf 2600 W 2. 1500-W-Zone, Verstärkung auf 2000 W 3. 2000-W-Zone, Verstärkung auf 2600 W 4. 1500-W-Zone, Verstärkung auf 2000 W 5. Glaskeramikfläche 6. Bedienfeld Bedienfeld 1. Kochzonenauswahl 2. Timer-Steuerung 3. Leistungs-/Zeiteinstellung 4. Tastensperre 5. EIN/AUS 6.
- Page 42 Hinweise zum Induktionskochen Induktionskochen ist eine sichere, moderne, effiziente und ökonomische Art des Kochens. Anstatt indirekt über die Glaskeramikfläche, wird bei dieser Technologie die Hitze durch elektromagnetische Schwingungen direkt unter dem Kochtopf erzeugt. Das Glas wird nur deswegen heiß, weil es letztlich durch den Topf erhitzt wird.
- Page 43 Wahl des geeigneten Kochgeschirrs Benutzen Sie ausschließlich Kochgeschirr mit einem für das Induktionskochen geeigneten Boden. Achten Sie auf das Induktionssymbol auf der Verpackung oder am Boden des Kochtopfes. Um zu prüfen, ob Ihr Kochgeschirr für das Induktionskochen geeignet ist, können Sie einen Magnettest machen. Dazu führen Sie einen Magneten in Richtung Kochtopfboden.
-
Page 44: Kochfeld Einschalten
Kochgeschirrabmessungen Die Kochzonen werden bis zu einem Grenzwert automatisch an den Durchmesser des Kochgeschirrs angepasst. Der Boden des Kochgeschirrs muss jedoch, entsprechend der entsprechenden Kochzone, einen Mindestdurchmesser aufweisen. Um die beste Effizienz Ihres Kochfelds zu erreichen, platzieren Sie das Kochgeschirr bitte in der Mitte der Kochzone. Der Basisdurchmesser des Induktionskochgeschirrs Kochzone Minimum (mm) - Page 45 Wenn auf dem Display abwechselnd mit der Leistungseinstellung blinkt bedeutet dies: • dass sich kein Topf auf der entsprechenden Kochzone befindet oder • dass der verwendete Kochtopf ist für das Induktionskochen ungeeignet ist oder • dass der Kochtopf ist zu klein ist oder sich nicht mittig auf der Kochzone befindet.
- Page 46 Nutzung des Leistungsmanagements Mit dem Leistungsmanagement können Sie die Gesamtleistung auf 2,5 kW / 3,0 kW / 4,5 kW / 6,5 kW und 7,4 kW einstellen. Standardmäßig ist die Gesamtleistungseinstellung die maximale Leistungsstufe. Anpassen der Gesamtleistung an Ihre Anforderungen 1. Vergewissern Sie sich, dass das Kochfeld ausgeschaltet ist. Hinweis: Sie können das Leistungsmanagement nur einstellen, wenn das Kochfeld ausgeschaltet ist.
- Page 47 Leistungsmanagementregeln Mit dem Leistungsmanagement können Sie die Gesamtleistung auf 2,5 kW / 3,0 kW / 4,5 kW / 6,5 kW und 7,4 kW einstellen. Standardmäßig ist die Gesamtleistungseinstellung die maximale Leistungsstufe. Wenn Sie sie durch Berühren von „+“ erhöhen, piept das Kochfeld 3 Mal und die Anzeige zeigt ein blinkendes „Pn“...
- Page 48 a. DRAHTLOS-PARAMETER Technologie Wi-Fi Standard 802.11 b/g/n v4.2 BR/EDR &BLE Frequenzband [MHz] 2400 ~ 2500 2400 ~ 2500 Maximale Leistung [mW] b. PRODUKTINFORMATION FÜR VERNETZTE GERÄTE Produktinformationen für vernetzte Geräte Leistungsaufnahme des Produkts im Nicht verfügbar vernetzten Bereitschaftsbetrieb, wenn alle kabelgebundenen Netzwerk-Ports mit dem Netzwerk verbunden und alle drahtlosen Netzwerk-Ports aktiviert sind;...
- Page 49 Boost-Funktion Mit der Boost-Funktion wird die Leistung einer Zone innerhalb von einer Sekunde erhöht und für 5 Minuten beibehalten. Dies ermöglicht ein schnelleres Kochen mit höherer Leistung. Nutzung der Boost-Funktion 1. Berühren Sie die Taste der Kochzone, die Sie verstärken möchten. Neben der Taste beginnt eine Anzeige zu blinken.
- Page 50 Benutzungsbeschränkungen Die vier Zonen sind in zwei Gruppen unterteilt. Wenn Sie die Boost-Funktion in einer Zone verwenden, müssen Sie in einer Gruppe zunächst sicherstellen, dass die andere Zone maximal mit Leistungsstufe 5 arbeitet. Gruppe a Gruppe b Pausenfunktion Die Pausenfunktion kann jederzeit während des Garvorgangs verwendet werden.
- Page 51 Bedientastensperre • Sie können die Bedientasten sperren, um eine unbeabsichtigte Benutzung zu verhindern (beispielsweise das Einschalten der Kochzonen durch Kinder). • Bei aktivierter Sperre sind bis auf die Funktion EIN/AUS alle Berührungstasten funktionslos. Sperre aktivieren Drücken Sie auf die Tastensperre. Der Timer zeigt „Lo“. Sperre deaktivieren 1.
-
Page 52: Benutzung Des Timers
Benutzung des Timers Der Timer bietet zwei verschiedene Nutzungsmöglichkeiten: • Sie können ihn als Erinnerungsfunktion nutzen. In diesem Fall schaltet der Timer nach Ablauf der eingestellten Zeitdauer keine Kochzone aus. • Oder Sie benutzen ihn, um eine Kochzone nach Ablauf der eingestellten Zeitdauer auszuschalten. - Page 53 Abschaltung einer Kochzone per Timer Für diese Funktion eingerichtete Kochzonen werden: 1. Drücken Sie auf die Leistungseinstellung der Kochzone, für die Sie die Zeitschaltuhr einstellen wollen. (z. B. Zone #1) 2. Drücken Sie auf die Taste „Timer“. Die Erinnerungsanzeige beginnt zu blinken, und im Display wird „30“...
- Page 54 Abschaltung mehr als einer Kochzone per Timer 1. Wenn Sie diese Funktion für mehr als eine Kochzone verwenden, zeigt die Timer-Anzeige die kürzeste Zeit an. (z.B. Zone 1# Einstellzeit von 3 Minuten, Zone 2# Einstellzeit von 6 Minuten, die Timer-Anzeige zeigt „3“ an). HINWEIS: Der blinkende rote Punkt neben der Leistungspegelanzeige bedeutet, dass die Timer-Anzeige die Zeit der Kochzone anzeigt.
-
Page 55: Instandhaltung Und Reinigung
Instandhaltung und Reinigung Was? Wie? Wichtig! Normale 1. Schalten Sie das Kochfeld • Wenn das Kochfeld ausgeschaltet ist, Gebrauchsspuren auf aus. gibt keinen Hinweis „Heiße 2. Reinigen Sie das noch Glas Oberfläche“, obwohl die Kochzone (Fingerabdrücke, warme (aber nicht zu heiße!) noch heiß... -
Page 56: Hinweise Und Tipps
Hinweise und Tipps Problem Mögliche Ursache Abhilfe Das Induktionskochfeld Kein Netzstrom. Kontrollieren Sie, ob das lässt sich nicht Induktionskochfeld an der einschalten. Netzstromversorgung angeschlossen und eingeschaltet ist. Überprüfen Sie, ob ein Stromausfall vorliegt. Falls Sie alles kontrolliert haben und das Problem fortbesteht, wenden Sie sich an einen Elektriker. - Page 57 Das Induktionskochfeld Technische Störung. Notieren Sie sich bitte den Fehlercode, oder eine Kochzone hat unterbrechen Sie die sich unerwartet Stromversorgung des abgeschaltet; es ist ein Induktionskochfelds, und wenden Sie Piepton zu hören und sich dann an einen Elektriker. ein Fehlercode wird angezeigt (normalerweise abwechselnd mit ein...
-
Page 58: Technische Daten
Technische Daten Kochfeld CI642CTTWIFI 4 Zonen Kochzonen Versorgungsspannung 220-240 V~ 50-60Hz 2,5 kW: 2250-2750 W oder Installierte elektrische 3,0 kW: 2700-3300 W oder Leistung 4,5 kW: 4050-4950 W oder 6,5 kW: 5850-7150 W oder 7,4 kW: 6600-7400 W Abmessungen L×B×H (mm) 590X520X60 Einbaumaße A×B (mm) - Page 59 Achten Sie unbedingt darauf, dass das Induktionskochfeld ausreichend belüftet ist und weder Lufteinlass noch Luftauslass blockiert sind. Stellen Sie sicher, dass sich das Induktionskochfeld in einem guten Betriebszustand befindet. Wie unten gezeigt. Hinweis: Der Sicherheitsabstand zwischen dem Kochfeld und einem darüber befindlichen Küchenschrank...
- Page 60 Nach der Montage des Kochfelds zu beachten: • Das Netzkabel darf nicht durch Schranktüren oder Schubladen zugänglich sein. • Es gelangt ausreichend Frischluft von außen an die Unterseite des Kochfelds. • Wenn das Kochfeld über einer Schublade oder einem Unterschrank montiert wird, muss an der Unterseite des Kochfelds eine Wärmeschutzbarriere angebracht werden.
- Page 61 Vorsicht 1. Das Induktionskochfeld muss von einem qualifizierten Fachmann montiert werden. Wir können über unseren Kundendienst Fachpersonal bereitstellen. Versuchen Sie keinesfalls, die Montage selbst durchzuführen. 2. Das Kochfeld darf nicht direkt über einem Geschirrspüler, Kühlschrank, Gefrierschrank, einer Waschmaschine oder einem Wäschetrockner montiert werden, weil es durch die Feuchtigkeit zu Schäden an der Elektronik kommen kann.
- Page 62 • Sollte das Kabel beschädigt sein oder ersetzt werden müssen, muss dies von einem Kundendienstmitarbeiter mit entsprechenden Werkzeugen vorgenommen werden, um Unfälle zu vermeiden. • Falls das Gerät direkt an die Netzstromversorgung angeschlossen wird, muss ein omnipolarer Trennschutzschalter mit einer Kontaktöffnung von mindestens 3 mm installiert werden.
- Page 63 Produktinformationen für Haushalts-Elektrokochfelder gemäß der Verordnung (EU) der Kommission Nr. 66/2014 Position Symbol Wert Einheit Modellbezeichnung CI642CTTWIFI Kochfeldtyp: Elektrokochfeld Anzahl der Zonen Kochzonen und/oder - Bereiche bereiche Induktions- kochzonen Heiztechnologie (Induktionskoch Induktionsko- zonen und - chen Kochbe- kochbereiche, reiche Strahlungskoch...
- Page 64 Vorn Mitte Vorn rechts Hinten EC Elekt- 193,5 Wh/kg links rokochen Hinten EC Elekt- Wh/kg Mitte rokochen Hinten EC Elekt- 197,2 Wh/kg rechts rokochen EC Elekt- Mitte links Wh/kg rokochen Leistungsaufnahme pro Kochzone Mitte, EC Elekt- Wh/kg oder -bereich pro kg Mitte rokochen Mitte...
-
Page 65: Risque De Choc Électrique
Par la présente, Candy Hoover Group Srl déclare que l'équipement radio est conforme à la directive 2014/53/UE et aux exigences légales pertinentes (pour le marché UKCA). Le texte intégral de la déclaration de conformité est disponible à l'adresse internet suivante : www.candy-group.com... - Page 66 Risque de blessure par coupure • Faites attention - les bords des panneaux sont tranchants. • Le non-respect de cette précaution peut entraîner des blessures ou des coupures. Consignes importantes de sécurité • Veuillez lire les instructions avant d’installer ou d’utiliser cet appareil.
- Page 67 immédiatement l’appareil en coupant l’alimentation électrique du réseau (interrupteur mural) et contactez un technicien qualifié. • Coupez l’alimentation réseau de la table de cuisson avant le nettoyage ou l’entretien. • Le non-respect de ces consignes peut entraîner un choc électrique ou la mort. Risque pour la santé...
-
Page 68: Consignes Importantes De Sécurité
• Tenir les enfants à l’écart. • Les poignées des casseroles peuvent être chaudes au toucher. Vérifiez que les poignées des casseroles ne dépassent pas des autres zones de cuisson qui sont en fonction. Tenir les poignées hors de portée des enfants. •... - Page 69 • N’utilisez jamais votre appareil pour réchauffer ou chauffer la pièce. • Après utilisation, éteignez toujours les zones de cuisson et la table de cuisson comme décrit dans ce manuel (c’est-à-dire en utilisant les touches tactiles). Ne comptez pas sur la fonction de détection de casserole pour éteindre les zones de cuisson lorsque vous retirez les casseroles.
- Page 70 • Ne placez pas ou ne laissez pas tomber d’objets lourds sur votre table de cuisson. • Ne vous tenez pas debout sur votre table de cuisson. • N’utilisez pas de casseroles avec des bords dentelés et ne traînez pas de casseroles sur la surface du verre à...
- Page 71 les capacités physiques, sensorielles ou mentales sont réduites ou par des personnes dénuées d’expérience et de connaissances, mais qui ont été informées sur la manière d’utiliser l’appareil en toute sécurité, si elles comprennent les risques impliqués. • Les enfants ne doivent pas jouer avec l’appareil. L’entretien et le nettoyage ne doivent pas être effectués par des enfants sans surveillance.
- Page 72 AVERTISSEMENT : Pour éviter tout basculement de l’appareil, ces éléments de stabilisation doivent être installés. Consultez les instructions d’installation. AVERTISSEMENT : Utilisez uniquement le dispositif de protection de votre table de cuisson conçu par le fabricant de votre appareil ou un dispositif indiqué par celui-ci comme étant compatible ou bien utilisez le dispositif de protection fourni avec l’appareil.
-
Page 73: Vue D'ensemble Du Produit
Vue d’ensemble du produit Vue de dessus 1. Foyer 2000 W, augmenté pour atteindre 2600 W 2. Foyer 1500 W, augmenté pour atteindre 2000W 3. Foyer 2000 W, augmenté pour atteindre 2600 W 4. Foyer 1500 W, augmenté pour atteindre 2000W 5. - Page 74 Un mot sur la cuisson à induction La cuisson à induction est une technologie sûre, innovante, efficace et économique. Elle fonctionne au moyen de vibrations électromagnétiques qui génèrent de la chaleur directement dans la casserole plutôt qu’indirectement en chauffant la surface vitrée. La vitre devient chaude uniquement parce que la casserole la chauffe.
- Page 75 Choisir une bonne batterie de cuisine Utilisez uniquement une batterie de cuisine adaptée à la cuisson à induction. Recherchez le symbole de l’induction sur l’emballage ou sur le fond de la casserole Vous pouvez vérifier si votre batterie de cuisine est adaptée ...
- Page 76 Dimensions de la casserole Les zones de cuisson s’adaptent automatiquement, jusqu’à une certaine limite, au diamètre de la casserole. Cependant, le fond de cette casserole doit avoir un diamètre minimum en fonction de la zone de cuisson correspondant. Pour obtenir la meilleure efficacité de votre table de cuisson, placez la casserole au centre de la zone de cuisson.
- Page 77 clignote en alternance avec l’indication du réglage de cuisson Cela signifie que : • vous n’avez pas posé votre casserole sur la bonne zone ou • que la casserole que vous utilisez n’est pas prévue pour la cuisson à induction •...
- Page 78 Utilisation du réglage de la puissance Grâce à la gestion de la puissance, vous pouvez régler la puissance totale sur 2,5 kW/3,0 kW/4,5 kW/6,5 kW ou 7,4 kW. Le réglage par défaut de la puissance totale est le niveau de chauffe maximal. Réglage du niveau de chauffe total pour répondre à...
- Page 79 Direct Cook Tout d’abord, téléchargez l’application hOn et installez-la sur votre appareil portable. Ensuite, veuillez enregistrer votre table à induction. Allumez votre la table de cuisson, appuyez sur la touche Wi-Fi et maintenez-la enfoncée pendant 3 secondes et la table de cuisson affichera « rr ». Le voyant du Wi-Fi clignotera et vous pourrez commencer à...
- Page 80 a. PARAMÈTRES DU SANS-FIL Technologie Wi-Fi Standard 802.11 b/g/n v4.2 BR/EDR &BLE Bande(s) de fréquence [MHz] 2400 ~ 2500 2400 ~ 2500 Puissance maximale [mW] b. INFORMATIONS SUR LE PRODUIT POUR LES ÉQUIPEMENTS EN RÉSEAU Informations sur le produit pour les équipements en réseau Consommation de puissance du produit en mode veille en réseau quand tous les ports de réseau câblés sont connectés et tous les...
- Page 81 Utilisation de la fonction Boost La fonction Boost permet d’augmenter la puissance d’un foyer en une seconde et ce pendant 5 minutes. De cette façon, la cuisson sera plus vive et plus rapide. Utilisation de la fonction Boost pour augmenter la puissance 1.
- Page 82 Restrictions pendant l’utilisation Les quatre zones ont été divisées en deux groupes. Dans un groupe, si vous utilisez le mode Boost sur un foyer, assurez-vous d’abord que l’autre foyer fonctionne au maximum au niveau 5. Groupe a Groupe b Utilisation de la Fonction de mise en pause La fonction Pause peut être utilisée à...
-
Page 83: Verrouillage Des Touches De Commande
Verrouillage des touches de commande • Vous avez la possibilité de verrouiller les touches de commande pour éviter leur utilisation inappropriée (par des enfants, par exemple). • Quand la touche de verrouillage est activée, toutes les touches de commande sont verrouillées, sauf la touche Marche/Arrêt. Verrouillage des touches de commande Appuyez sur la touche de verrouillage. -
Page 84: Utilisation Du Temporisateur
Lorsque la casserole est retirée, la table de cuisson à induction s’arrête immédiatement de chauffer et elle s’éteint automatiquement au bout de 2 minutes. Les personnes porteuses d’un stimulateur cardiaque doivent consulter leur médecin avant d’utiliser cet appareil. Utilisation du temporisateur Vous pouvez utiliser le temporisateur de deux manières différentes : •... - Page 85 Réglage du temporisateur pour éteindre un foyer de cuisson Les foyers de cuisson dotés de cette fonction permettront : 1. Appuyez sur la touche de la zone de cuisson dont vous souhaitez régler le temps de cuisson. (par ex. foyer 1#) 2.
- Page 86 Réglage du temporisateur pour éteindre plusieurs foyers de cuisson 1. Si vous utilisez cette fonction pour plusieurs foyers de cuisson, l’indicateur du temps affichera le temps restant le plus court. (par ex. temps de 3 minutes réglé sur le foyer 1#, temps de 6 minutes réglé...
-
Page 87: Entretien Et Nettoyage
Entretien et nettoyage Quoi ? Comment ? Important ! Salissure quotidienne 1. Mettez la table de cuisson • Lorsque la table de cuisson est sur le verre (traces hors tension. éteinte, il n’y a plus d’indication de doigts, marques, 2. Appliquez un nettoyant pour «... -
Page 88: Conseils Et Astuces
Conseils et astuces Problème Cause possible Solution La table de cuisson à Pas d’électricité. Assurez-vous que la table de cuisson induction ne peut pas à induction est branchée à être allumée. l’alimentation électrique et qu’elle est allumée. Vérifiez s’il y a une panne d’électricité dans votre maison ou votre région. - Page 89 Les casseroles ne La table de cuisson à induction Utilisez une batterie de cuisine chauffent pas et ne peut pas détecter la casserole adaptée à la cuisson à induction. Voir apparait sur la touche. car elle n’est pas adaptée à la la section «...
-
Page 90: Spécifications Techniques
Spécifications techniques Table de cuisson CI642CTTWIFI Zones de cuisson 4 zones Tension d’alimentation 220-240 V ~ 50-60 Hz Puissance électrique installée 2,5 kW : 2250-2750 W ou 3,0 kW : 2700-3300 W ou 4,5 kW : 4050-4950 W ou 6,5 kW : 5850-7150 W ou... - Page 91 JOINT L (mm) L (mm) H (mm) P (mm) A (mm) B (mm) X (mm) 50 minimum Assurez-vous que la table de cuisson à induction est correctement ventilée et que l’entrée et la sortie d’air ne sont pas obstruées. Assurez-vous que la table de cuisson à...
- Page 92 • un interrupteur sectionneur de déconnexion complète du réseau d’alimentation est inclus dans le circuit électrique et installé conformément aux règles et réglementations locales en vigueur. L’interrupteur sectionneur doit correspondre à la typologie requise et prévoir 3 mm d’air de séparation sur tous les pôles (ou sur tous les conducteurs actifs [phase] si la réglementation électrique locale l’autorise) •...
- Page 93 Verre Patte de fixation ST3. 5*8 Plan de travail/meuble de cuisine Face inférieure Attention 1. L’installation de la table de cuisson à induction doit être effectuée par du personnel qualifié. Nous avons des professionnels à votre service. N’effectuez en aucun cas cette installation vous-même. 2.
- Page 94 L’alimentation électrique doit être branchée conformément à la norme applicable ou à un disjoncteur unipolaire. La méthode de connexion est illustrée ci-dessous. Entrée Entrée Entrée Entrée Câble Câble Câble Câble d’alimentation d’alimentation d’alimentation d’alimentation • Si le câble est endommagé ou s’il doit être remplacé, l’intervention doit être réalisée par un technicien après-vente munis des outils appropriés, pour éviter tout accident.
- Page 95 Informations sur le produit pour les plaques électriques domestiques conformes au règlement de la Commission (UE) N°= 66/2014 Position Symbole Valeur Unité Identification du modèle CI642CTTWIFI Table de Type de table de cuisson : cuisson électrique Nombre de foyers foyers et/ou de...
- Page 96 Avant gauche Avant centre Avant droite Cuisson Arrière électrique 193,5 Wh/kg gauche Cuisson Arrière électrique Wh/kg centre Cuisson Arrière électrique 197,2 Wh/kg droite Cuisson Centre électrique Wh/kg gauche Consommation d’énergie par zone Cuisson Centre ou foyer de cuisson calculée par électrique Wh/kg centre...
- Page 97 Настоящим Candy Hoover Group Srl заявляет, что данн ое радиооборудование соответствует Директиве 2014/53/EU и соответствующим Законодательным треб ованиям (для рынка Великобритании). Полный текст де кларации о соответствии доступен по следующему инт ернет-адресу: www.candy-group.com Меры предосторожности Ваша безопасность очень важна для нас. Перед...
-
Page 98: Правила Техники Безопасности
Правила техники безопасности • Перед установкой и использованием прибора внимательно прочтите настоящее руководство. • Запрещается размещать горючие материалы или продукты на данном приборе в любое время. • Доведите данную информацию до сведения лиц, выполняющих установку прибора. Это может уменьшить ваши затраты. •... -
Page 99: Опасности Для Здоровья
Опасности для здоровья • Данный прибор отвечает требованиям стандартов по электромагнитной безопасности. • Тем не менее, лица с кардиостимуляторами или другими электронными имплантами (такими как инсулиновые помпы) должны проконсультироваться со своим врачом или производителем импланта перед использованием данного прибора, чтобы убедиться, что на их импланты не повлияет электромагнитное... - Page 100 Правила техники безопасности • Никогда не оставляйте работающую варочную панель без присмотра. Выплескивание пищи может приводить к появлению дыма. Попавшие на горячую поверхность масло и жир могут воспламениться. • Не используйте варочную панель в качестве стола или места для хранения. •...
- Page 101 • Не допускается использование отпаривателей и паровых щеток для очистки варочной панели. • Запрещается класть или бросать тяжелые предметы на панель. • Запрещается залезать на варочную панель. • Во избежание повреждения панели в результате царапанья запрещается использовать посуду с острыми углами. •...
- Page 102 • ВНИМАНИЕ! Приготовление блюд с жиром или маслом на варочной панели без присмотра может быть опасным и может привести к возгоранию. КАТЕГОРИЧЕСКИ ЗАПРЕЩАЕТСЯ тушить огонь водой. Отключите панель от сети, после чего накройте пламя крышкой или негорючим материалом. • ВНИМАНИЕ! Опасность воспламенения! Запрещается класть на...
- Page 103 Об зор прод ук та Вид сверху 1. Конфорка 2000 Вт, в режиме повышения мощности до 2 600 Вт 2. Конфорка 1500 Вт, в режиме повышения мощности до 2 000 Вт 3. Конфорка 2000 Вт, в режиме повышения мощности до 2 600 Вт 4.
- Page 104 Приготовление пищи на индукционной варочной панели Приготовление пищи на индукционной панели безопасно, эффективно и экономично. Создаваемое электромагнитное поле нагревает утварь непосредственно, проходя через стеклянную поверхность практически без потерь. Стекло нагревается только от нагретой кухонной утвари. металлическая утварь магнитный контур стеклокерамическая плита индукционная...
- Page 105 Выбор посуды Используйте только кухонную утварь с основанием, пригодным для готовки на индукционной варочной панели. На днище или упаковке такой утвари должен быть соответствующий знак. Можно проверить пригодность утвари простым методом с помощью магнита. Поднесите магнит к днищу утвари. Если магнит примагнитится, значит, утварь...
- Page 106 Диаметры конфорок Вплоть до максимального размера конфорки автоматически подстраиваются к диаметру дна утвари. Однако диаметр дна утвари не должен быть меньше минимально допустимого диаметра для используемой конфорки. Для достижения максимальной эффективности нагрева утварь необходимо ставить строго по центру конфорки. Диаметры индукционных конфорок Конфорка...
- Page 107 Если на дисплее попеременно мигает индикатор и уровень нагрева. Это означает следующее: • вы установили посуду не на ту конфорку; • посуда, которую вы используете, не подходит для индукционного приготовления пищи, либо • посуда слишком маленькая или поставлена не по центру конфорки. Нагрев...
- Page 108 Управление мощностью С помощью управления мощностью вы можете установить общую мощность 2,5 кВт/3,0 кВт/4,5 кВт/6,5 кВт и 7,4 кВт. Стандартный общий уровень мощности является максимальным. Выбор подходящей мощности 1. Убедитесь в том, что панель отключена Примечание: мощность можно изменять только на выключенной панели. 2.
- Page 109 Прямое приготовл ение Сначала загрузите приложение hOn и установите его на свое портативное устройство. Затем зарегистрируйте в нем вашу индукционную варочную панель. Включите варочную панель, нажмите кнопку WiFi и удерживайте в течение 3 секунд, на варочной панели отобразится «rr» и начнет мигать индикатор WiFi, после чего вы сможете начать...
- Page 110 Ф ункции п овышения мощнос ти Повышение мощности — функция позволяющая увеличить мощность конфорки на 5 минут одним касанием. Это позволит быстрее приготовить или подогреть пищу. Использование функции повышения мощности 1. Коснитесь кнопки конфорки, мощность которой необходимо увеличить. Индикатор кнопки замигает. 2.
- Page 111 Использование функции «Пауза» Данной функцией можно воспользоваться в любое время. Функция позволяет приостановить готовку и продолжить ее позже. 1. Убедитесь в том, что конфорка работает. 2. Коснитесь кнопки, на дисплее загорится индикатор «ll». А затем работа индукционной варочной панели будет деактивирована в пределах всех зон приготовления...
- Page 112 Обнаружение мелких предметов При использовании утвари недостаточного размера или с немагнитным основанием (например, алюминиевой), или оставлении на поверхности посторонних мелких предметов (столовых приборов), варочная панель автоматически переключится в дежурный режим через 1 минуту. После этого вентилятор продолжит охлаждение панели примерно ещё 1 минуту. Автоматическое...
- Page 113 5. После ввода времени сразу же начнется обратный отсчет. На дисплее будет показано оставшееся время, а индикатор таймера будет мигать 5 секунд. 6. По истечении времени таймера на 30 секунд загудит зуммер, а на дисплее будет отображаться «- -». Настройка таймера для отключения конфорок Для...
- Page 114 Настройка таймера для отключения нескольких конфорок 1. При использовании таймера для отключения нескольких конфорок на дисплее будет отображаться меньшее время отключения. (Например, для конфорки 1 таймер настроен на 3 минуты, для конфорки 2 - на 6 минут; на дисплее будет «3».) ПРИМЕЧАНИЕ.
- Page 115 Очис тка и уход Что? Как? Важно! Ежедневная очистка При отключении питания на Выключите варочную • стекла (отпечатки панель. варочной панели не будет пальцев, разводы, Нанесите немного моющего индикации «H», хотя стекло может пятна от пищи и средства на стекло, когда быть...
- Page 116 Полезные советы Код ошибки Возможная причина Способ устранения Индукционная Отсутствует напряжение. Убедитесь в том, что варочная панель варочная панель не подсоединена к электрической сети и включается её настенный выключатель включен. Убедитесь в наличии напряжения в сети. Если после всех проверок панель...
- Page 117 Варочная панель или Техническая неисправность. Запишите код ошибки, отключите конфорка неожиданно варочную панель от электрической отключились, раздался сети и обратитесь в сервис. звуковой сигнал и на дисплее появился код ошибки (обычно чередующийся с одной или двумя цифрами). Определение причин неполадок в рабо те по кода м ошибок При...
- Page 118 Технические характеристики Индукционная варочная панель CI642CTTWIFI Конфорки 4 зоны Напряжение питания 220-240 В~, 50-60 Гц Установленная электрическая 2,5 кВт: 2250-2750 Вт или 3,0 кВт: 2700-3300 Вт или мощность 4,5 кВт: 4050-4950 Вт или 6,5 кВт: 5850-7150 Вт или 7,4 кВт: 6600-7400 Вт...
- Page 119 Следите за тем, чтобы входное и выходное вентиляционные отверстия индукционной варочной панели никогда не закрывались. Убедитесь в том, что варочная панель находится в хорошем состоянии. Как показано ниже: Примечание. Безопасное расстояние от рабочей поверхности панели до ящика или вытяжки сверху должно быть не менее 760 мм. A (мм) B (мм) C (мм)
- Page 120 После установки варочной панели необходимо проверить следующее: • кабель питания не должен быть поврежден дверьми или выдвижными ящиками мебели; • к основанию варочной поверхности с внешней стороны мебели есть достаточный приток свежего воздуха; • если варочная поверхность установлена над ящиком или мебелью, под основанием варочной...
- Page 121 Внимание! 1. Индукционная варочная панель должна устанавливаться квалифицированным персоналом. У нас есть такие специалисты. Никогда не выполняйте эту работу самостоятельно. 2. Не допускается установка варочной панели рядом с раковиной, холодильником, морозильником, посудомоечной машиной, сушилкой белья, т.к. влага может привести к выходу...
- Page 122 • Ремонт или замена поврежденного кабеля питания должны проводиться только специалистами сервисного центра. • Если электроприбор подключается прямо к электрической линии, должен быть установлен автоматический выключатель, расстояние между контактами в котором должно быть не меньше 3 мм. • Специалист, выполняющий установку варочной поверхности, должен обеспечить правильное...
- Page 123 Информация о бытовых электрических варочных панелях в соответствии с регламентом ЕС № 66/2014 Единица Положение Обозначение Значение измерения Модель CI642CTTWIFI Тип варочной панели: Электрическая зоны Количество конфорок области Индукционные зоны нагрева Способ нагрева (индукционные Индукционные конфорки, конфорки излучательные Излучательные зоны нагрева, зоны...
- Page 124 Задняя 197,2 Втч/кг правая электроплита Центральная Втч/кг левая электроплита Центральная Втч/кг посередине электроплита Центральная Втч/кг электроплита правая Передняя 192,3 Втч/кг левая электроплита Передняя Втч/кг центральная электроплита Передняя 195,6 Втч/кг правая электроплита Энергопотребление варочной панели на 194,7 Втч/кг кг электропанель Применимый стандарт: EN 60350-2 Приборы электрические кухонные – Часть 2: Варочные панели – Методы...
Need help?
Do you have a question about the CI642CTTWIFI and is the answer not in the manual?
Questions and answers