Table of Contents
Advertisement
Advertisement
Table of Contents

Related Manuals for Bertin Technologies Precellys 24


Summary of Contents for Bertin Technologies Precellys 24
-
Page 2: Table Of Contents
TABLE OF CONTENTS ® Precellys Table of contents 1 Introduction....................3 Safety Information......................... 3 Warranty ..........................5 ® Precellys 24’s Reference ...................... 5 Manufacturer Information....................... 5 Technical Support ......................... 5 ® 2 Description of the PRECELLYS 24.............. 6 Product Overview........................6 Tube Motion ......................... -
Page 3: Introduction
White Earth / Ground Yellow & Green Green Bertin Technologies is not responsible for any damage or injury that may occur as a result of operating the instrument in a different way to that stated in this document. Page 3/35... - Page 4 Introduction ® Precellys 1.1.3 F u s e s The equipment contains one replaceable external fuse located on the rear panel. If the fuse is to be replaced, please use the following fuse 5x20 – T 10 A – H 250 V. It can easily be replaced by the user with a screwdriver (see §8.2).
-
Page 5: Warranty
Precellys Warranty Bertin Technologies certifies that this product is free of defects at the time of shipment. This warranty is limited to a period of one (1) year and it does not apply to the following parts: fuses, toric joint, containment seal and indented plate. -
Page 6: Description Of The Precellys 24
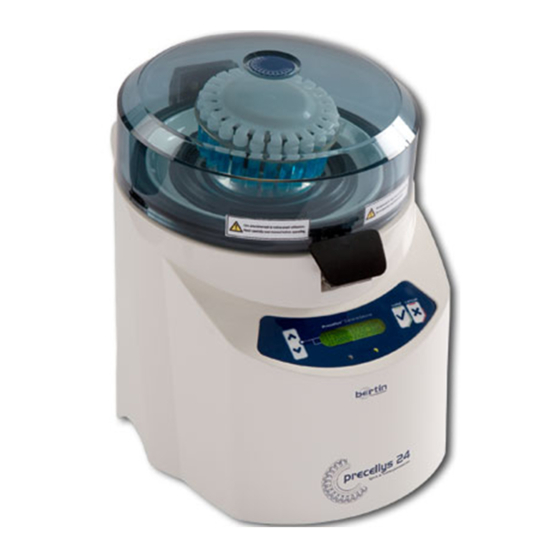
Description of the PRECELLYS®24 ® Precellys ® D e s c r i p t i o n o f t h e P R E C E L L Y S Product Overview ® The PRECELLYS 24 lyser / homogeniser has been designed to lyse and to homogenise biological samples contained in grinding tubes, at variable speeds. -
Page 7: Tube Motion
Description of the PRECELLYS®24 ® Precellys Tube Motion Due to the equipment’s design and symmetry, the 24 tubes strictly follow the same motion. This ensures the same level of lysis and homogenisation for each sample. The centre of gravity of the tubes follows a complex path on a sphere’s surface. While the mixture contained in grinding tubes moves in all directions, it moves primarily in the vertical axis to allow ®... -
Page 8: Presentation Of The Keypad
Description of the PRECELLYS®24 ® Precellys Presentation of the Keypad ® The LCD screen lights up when the PRECELLYS 24 equipment is switched on. These messages guide you for programming and controlling the cycles. The keypad (see diagram below) consists of a LCD screen, 4 buttons and 2 lights (green, red). LCD Screen Button High / Plus Cancel button... -
Page 9: Technical Features
Description of the PRECELLYS®24 ® Precellys Technical Features Technical characteristics 230 V – 50 Hz (standard Europe) Power requirements 110 V – 60 Hz (standard US) Power consumption <1 kVA Fuse specifications 5x20 – T 10 A – H 250 V Safety Class I apparatus Physical / Environmental conditions... -
Page 10: Transport / Storage
Transport / Storage ® Precellys Transport / Storage Transport Avoid violent shocks that may damage the equipment. Before transporting the equipment, it is necessary to: 1- Place the protection foam under the cover. 2- Close the cover. 3- Block the cover with adhesive tape. Storage The unit must be stored in a dry area at a temperature ranging from +0°C to +50°C. -
Page 11: Installation
Installation ® Precellys I n s t a l l a t i o n WARNING: Do not connect the unit to the main supply before the installation is over. ® Do not turn the unit upside down: the PRECELLYS 24 must always rest on its 4 feet for fear of damaging internal components or breaking plastic casing. -
Page 12: Installation And Connecting The Power Supply
Installation ® Precellys Installation and Connecting the Power Supply 1. Remove the protective foam located around the holder under the cover. WARNING : Save this protective foam, as it must ABSOLUTELY be put back in place before shipping the unit. If the unit is returned to the distributor or manufacturer without this protection in place, the warranty will be void. -
Page 13: Instructions For Use
Precellys Instructions for Use Preparing Samples The samples have to be prepared in the tubes recommended by Bertin Technologies (see § 2.5). WARNING : Each tube has to be filled with 1,4 ml of the sample . Starting a Run 5.2.1... - Page 14 Instructions for Use ® Precellys 5.2.3 M a i n M e n u After starting the unit, a menu displays program 1 and program 2: Session duration (s) Number of sessions Delay time between Speed (rpm) 2 sessions (s) >1:6500-2x20-005 2:6500-2x45-020 Selection cursor...
- Page 15 Instructions for Use ® Precellys 5.2.4 O p e n i n g t h e C o v e r WARNING: Never open the cover while the unit is running. To open the cover, push the locking handle and raise the cover until you reach a stop. 5.2.5 L o a d i n g G r i n d i n g T u b e s Grinding tubes (filled with samples) are placed on the holder, and are held down with the indented...
- Page 16 Instructions for Use ® Precellys 5.2.7 R u n n i n g a P r o g r a m When starting a program by pressing the “Valid” button, the unit puts the indented plate in depression; during this phase, the following message is displayed: PLEASE WAIT LOCKING Red light is off / green light is on...
- Page 17 Instructions for Use ® Precellys 5.2.8 E n d i n g a R u n WARNING : Wait until the complete stop of the unit before opening the cover. At the end of a run, the holder is stopped and the unit displays the main menu. The depression under the indented plate stops about 5 seconds after the unit stops.
- Page 18 Instructions for Use ® Precellys 5.2.9 I n t e r r u p t i n g a R u n WARNING : Wait until the complete stop of the unit before opening the cover. The user can stop a run by pressing the Cancel button at any time. The unit displays the CANCEL information until the run has completely stopped.
-
Page 19: Adjusting Parameters
Adjusting Parameters ® Precellys A d j u s t i n g P a r a m e t e r s Accessing the Parameter Adjustment Menu From the sub-menu, the user can adjust the settings of program 1 and program 2, by moving the cursor to the line 1 with the “Up”... - Page 20 Adjusting Parameters ® Precellys 6.2.2 A d j u s t i n g t h e N u m b e r o f C y c l e s Once the speed is adjusted, the following message displays on the screen and the number of cycles flashes: 2 x45-020 6200-...
- Page 21 Adjusting Parameters ® Precellys 6.2.4 A d j u s t i n g o f W a i t i n g T i m e b e t w e e n 2 C y c l e s Once the cycle’s duration is adjusted, the following message displays on the screen and the waiting time between 2 cycles flashes: 6200-3x35-...
-
Page 22: Operating Ranges For Parameter Adjustments
Adjusting Parameters ® Precellys Operating Ranges for Parameter Adjustments In order to assure the optimal operation of this device, it is possible to use the parameters indicated in the table below: Run Number Run Time Pause (s) Waiting time between 2 cycles Speed (rpm) 5000 to 6200 1 to 3... -
Page 23: Alarms
Alarms ® Precellys Alarms WARNING: Do not open the cover when the sample holder is moving. Alarm Messages before Starting a Run When the user presses the “Valid” button to start a run, the system checks information from the different sensors before allowing a run to start: Pressure sensor, Cover sensor. -
Page 24: Run Interruption By Alarm Messages
Alarms ® Precellys The alarm display lasts 5 seconds, then the unit returns to the sub-menu: 6500-2x20-005 >>START (1) Red light is off / green light is on Actions to be done in case of alarm are described in § 7.3. In case of a pressure alarm, the vacuum pump keeps running for 10 seconds, in order to allow the user to reposition the indented plate properly. - Page 25 Alarms ® Precellys 7.2.2 C o v e r A l a r m If the cover is opened while a run is in progress, the cover alarm sets off and the run stops immediately. The following message is displayed on the screen: TOP ALARM PUSH VALID Red light is flashing / green light is off...
- Page 26 Alarms ® Precellys 7.2.4 E n g i n e T e m p e r a t u r e A l a r m If the engine temperature reaches the safety limit before overheating the instrument, the engine temperature alarm sets off and the run stops immediately.
-
Page 27: What To Do When An Alarm Message Occurs
Alarms ® Precellys What to Do When an Alarm Message Occurs Alarm message Possible cause Action(s) 1. Reposition the grinding tubes on the Tubes (recommended by Bertin holder. Technologies, see § 2.5) are not 2. Press in the middle of indented plate positioned properly. -
Page 28: Maintenance
Maintenance ® Precellys M a i n t e n a n c e Troubleshooting Guide Common problem Possible cause Action(s) 1. Check main voltage. 2. Check the voltage of the unit matches that No power on the main plug. delivered by the main power supply. -
Page 29: Replacing Spare Parts
Maintenance ® Precellys Replacing Spare Parts This paragraph lists the maintenance actions to be done by user on a regular basis, to ensure ® PRECELLYS 24 runs properly. Wearing parts are: Frequency of Wearing parts Reference Why? replacement 1 year or to Necessary to maintain tubes during Indented plate 03119.810.NC002... - Page 30 Maintenance ® Precellys 8.2.2 R e p l a c i n g T o r i c J o i n t The toric joint located on the holder can show signs of wear over time. It should be replaced when the “Pressure Alarm”...
- Page 31 Maintenance ® Precellys 8.2.4 R e p l a c i n g f u s e A screwdriver is required to replace the fuse. WARNING: Turn off the system and unplug power cord before replacing the fuse Page 31/35...
-
Page 32: Service Menu
Maintenance ® Precellys Service Menu 8.3.1 I n f o r m a t i o n A v a i l a b l e The unit firmware gives access to a “Service” menu presenting the following information, useful for maintaining the system: VERSION : Firmware version. -
Page 33: Cleaning And Decontamination
Maintenance ® Precellys Cleaning and Decontamination 8.4.1 R e c o m m e n d a t i o n s The casing of the unit can be cleaned up with a sponge or a damp cloth, moistened with water or alcohol. - Page 34 Manufactured by: BERTIN TECHNOLOGIES Parc d’activités du Pas du Lac 10 bis, avenue Ampère - BP 284 78053 Saint Quentin en Yvelines Cedex France Tel : + 33 (0)1 39 30 60 00 User Manual code : 03720-800-DU004 D Revised : AGUST 2005 – English Printed : AGUST 2005 Code: PRECELLYS 03119.200.RD000...
Need help?
Do you have a question about the Precellys 24 and is the answer not in the manual?
Questions and answers