
Subscribe to Our Youtube Channel
Related Manuals for Logik LGHOBX16


Summary of Contents for Logik LGHOBX16
- Page 1 Instruction Manual 4 Burner Gas Hob LGHOBX16 LGHOBX16_IB.indd 1 11/07/2016 15:15...
-
Page 2: Table Of Contents
Contents Safety Warnings ..........................4 Unpacking ............................. 6 Product Overview ......................... 7 The Main Unit ................................7 Control Panel ................................7 Before Using Your New Hob ......................8 Lighting the Hob ........................... 8 Flame Failure Safety Feature ....................... 9 If the Burner Does Not Light ......................9 If the Flame is Irregular ........................ - Page 3 To Adjust the Gas Rate ....................... 22 Minimum Setting or Turn Down ....................23 Burner Configuration ......................... 23 LGHOBX16_IB.indd 3 11/07/2016 15:15...
-
Page 4: Safety Warnings
Safety Warnings IMPORTANT SAFETY INSTRUCTIONS READ CAREFULLY AND KEEP FOR FUTURE REFERENCE • This appliance must be installed by a qualified Gas Safe registered engineer. The manufacturer is not responsible for any damage caused by incorrect installation. • Check whether there is any damage to the appliance after you have unpacked it. - Page 5 • This appliance can be used by children aged from 8 years and above and persons with reduced physical, sensory or mental capabilities or lack of experience and knowledge if they have been given supervision or instruction concerning use of the appliance in a safe way and understand the hazards involved.
-
Page 6: Unpacking
Thank you on the purchase of your new Logik 4 Burner Gas Hob. You must read this manual in order to fully understand how to operate it correctly. This unit MUST be installed by a competent and registered engineer (Gas Safe in the UK). -
Page 7: Product Overview
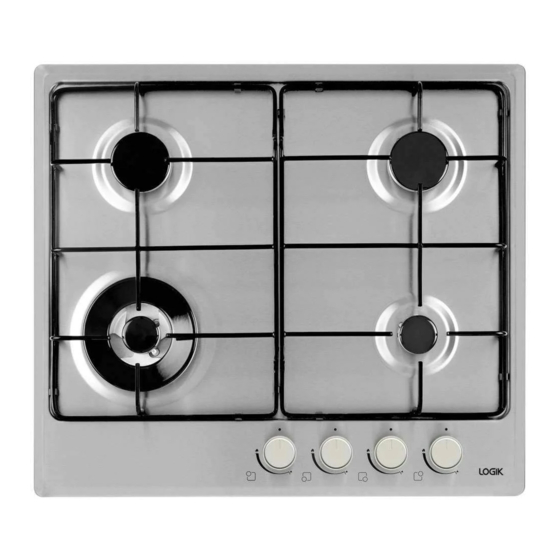
Product Overview The Main Unit Standard Burner (70 mm) Large Burner (130 mm) Small Burner (50 mm) Control Panel Control Panel To select To select lower To select lower To select upper left left burner right burner upper right burner burner * All images are for indication only;... -
Page 8: Before Using Your New Hob
Before Using Your New Hob Before using your new hob, please: • Read this manual fully taking special note of the ‘Safety Warnings’ section. • Plug the hob into the electricity supply and turn it on so that the ignition circuit will work. This appliance is for cooking purposes only. -
Page 9: Flame Failure Safety Feature
Flame Failure Safety Feature The flame supervision device (FSD) probe cuts off the gas supply to the burner within one minute if the flame is extinguished. Gas will flow out of the burner until the FSD cools down and activates, so you may notice the smell of gas, this is normal. -
Page 10: Cookware Guidelines
Cookware Guidelines To get the best out of your hob, follow these simple suggestions: • Use saucepans with thick flat bottoms. Food in a saucepan with an uneven bottom will take longer to cook. • Do not use large saucepans or frying pans that overlap the edges of your hob as this can deflect heat onto your worktop and damage the surface, and may also cause a hazard. -
Page 11: Cleaning And Maintenance
Cleaning and Maintenance Cleaning and Maintenance Steam Cleaners must not be used to clean this product. To avoid shock hazard, always disconnect the hob from the electrical supply. Cooking Part Cleaning Important Trivets/pan supports, • Hot soapy water and nylon scourer. • Always allow hob parts to cool burner caps and enamel completely before cleaning them. -
Page 12: Burner Parts And Pan Supports
Burner Parts and Pan Supports You can remove and clean these parts with hot soapy water or non-abrasive detergents. Clean spills regularly before they become burnt on. Do not wash these parts in a dishwasher. After cleaning, check that the burner rings and burner caps are dry before replacing correctly. It is very important to check that the burner rings and burner caps have been correctly positioned. -
Page 13: Hints And Tips
Hints and Tips Problem Possible Solutions My burner does not • Check the hob is plugged in and the electricity is switched on. light • Check the gas supply valve is turned on and the gas supply to the house is working. -
Page 14: Specifications
Specifications Brand Logik Model LGHOBX16 Supply Voltage 220-240 V~ 50 Hz Power Consumption(W) Gas Type NG or LPG (Default set to NG) Net Weight (kg) Product Dimensions (cm) External Width External Depth Product Dimensions (cm) Internal Width Internal Depth 48-49... - Page 15 Table for the Choice of the Injectors Natural Gas Burner Injector Values G 30/31 G 20 According To The Gas Type 28-30/37 mBar 20 mBar Injector 0.92 1.32 Large Burner (130mm) Power 3.30 3.30 Injector 0.66 0.97 Standard Burner (70mm) Power 1.75 1.75...
-
Page 16: Installation
Installation The hob must be installed by a Gas Safe Registered engineer in accordance with the Gas Safety (Installation and Use) Regulations and to the relevant standards. Please, ensure that, once the hob is installed, it is easily accessible for the engineer in the event of a breakdown. • Prior to installation, ensure that the local distribution conditions (nature of gas and pressure) and the adjustment of the product are compatible. -
Page 17: Ventilation Requirements
Ventilation Requirements • This appliance is not connected to a combustion products evacuation device. It should be installed and connected in accordance with current installation regulations. Particular attention should be given to the relevant requirements regarding ventilation. • The appliance should be installed in a room or space with an air supply in accordance with the latest edition of BS5440-2. -
Page 18: Location
Location The hob should be located in a kitchen or kitchen/diner, but not in a bathroom, shower room, garage or a bed sitting room with a volume less than 20 cubic metres. Do not install this appliance in a room below ground level unless it is open to ground level on at least one side. Before making the cut out in the worktop ensure that there is a minimum distance of 60 mm between the rear edge of the hob and the wall. -
Page 19: When The Hob Is First Installed
When the Hob is First Installed Once the hob has been installed, it is important to remove any protective materials, which were put on in the factory. Any gas installation must be carried out by a Gas Safe Min. 15mm Min. -
Page 20: Cut Out Dimensions
Cut Out Dimensions The dimensions of the cut-out are given in the diagram. Width: 560mm Depth: 480-490mm 480-490 All measurements given in millimetres (mm) and cutout dimensions are given as: ‘nominal measurement’ Product Overall Dimensions Width: 580mm Depth: 510mm Fitting the Hob into the Worktop • Run the sealant around the rim of the hob. -
Page 21: Attaching The Fixing Brackets
Attaching the fixing brackets Your hob is supplied with 4 fixing brackets and 4 screws. You can attach the fixing brackets to any of the fixing positions. If you worktop is not thick enough for the fixing bracket to make contact with add a separate piece of wood (as shown below) to make up the thickness. -
Page 22: Conversion From Ng To Lpg Or From Lpg To Ng
Conversion from NG to LPG or from LPG to NG The replacement / conversion of the gas hob should only be undertaken by Gas Safe Registered Engineer. The hob is supplied for use with Natural Gas only and cannot be used on any other gas without modification. - Page 23 Minimum Setting or Turn Down This unit has been set at the factory for NG but can be checked after the correct pressure has been reached. To adjust the minimum setting you will need a Ø 2.5mm x 45mm screwdriver. Ignite the burner and set the control to its minimum position.
- Page 24 For more information about where you can drop off your waste for recycling, please contact your local authority, or where you purchased your product. DSG Retail Ltd. (co. no. 504877) 1 Portal Way, London, W3 6RS, UK IB-LGHOBX16-160711V1 LGHOBX16_IB.indd 24 11/07/2016 15:15...
Need help?
Do you have a question about the LGHOBX16 and is the answer not in the manual?
Questions and answers
Resetting clock