
Related Manuals for Logik LINDHOB10


Summary of Contents for Logik LINDHOB10
- Page 1 Built-in Induction Hob Instruction / Installation Manual LINDHOB10 LINDHOB10_IB_final110415.indd 1 15/04/2011 2:16 PM...
- Page 2 LINDHOB10_IB_final110415.indd 2 15/04/2011 2:16 PM...
-
Page 3: Table Of Contents
Contents Unpacking ............................. 4 Product Overview ......................... 5 Top View ..................................5 Control Panel ................................5 A Word on Induction Cooking ..................... 6 Before Using Your New Induction Hob ..................6 Choosing the Right Cookware ..................... 6 Using the Touch Controls ......................7 Using Your Induction Hob ...................... -
Page 4: Unpacking
Thank you for purchasing your new Logik Built-in Induction Hob. We recommend that you spend some time to read this manual in order to fully understand how to install and operate it correctly. Read all the safety warnings carefully before use and keep this manual for future reference. -
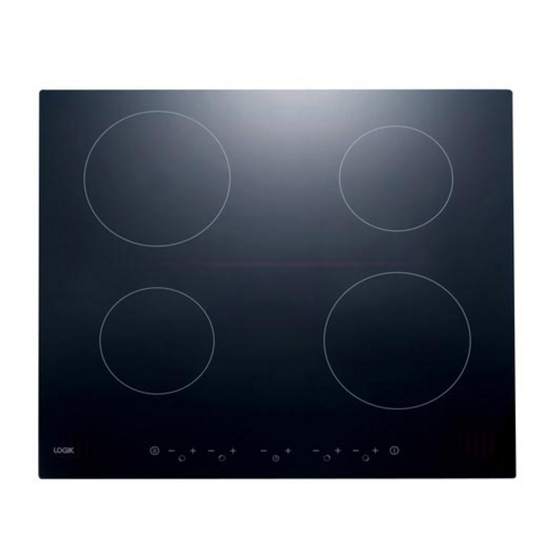
Page 5: Product Overview
Product Overview Top View Max. 1500 W Zone Max. 2000 W Zone Max. 1500 W Zone Max. 2000 W Zone Control Panel Control Panel Keylock Control Power Regulating Controls Timer ON/OFF Controls LINDHOB10_IB_final110415.indd 5 15/04/2011 2:16 PM... -
Page 6: A Word On Induction Cooking
A Word on Induction Cooking Induction cooking is an advanced cooking technology. It is safe, efficient and economical as it works by electromagnetic vibrations generating heat directly in the pan, rather than indirectly through heating the glass surface. The glass becomes hot only because the pan eventually warms it up. This technology has a number of advantages over traditional radiant energy cooking: • Heat-up times are much faster. -
Page 7: Using The Touch Controls
Make sure that the base of your pan is smooth, sits flat against the glass, and is the same size as the cooking zone. Always centre your pan on the cooking zone. Always lift pans off the induction hob – do not slide, or they may scratch the glass. Using the Touch Controls • The controls respond to touch, so you don’t need to apply any pressure. -
Page 8: Using Your Induction Hob
Using Your Induction Hob To Start Cooking Touch the ON/OFF control. After turning on, you will hear an audible tone and all the displays will show “ – “ or “ – – “, indicating that the induction hob has entered standby mode. Place a suitable pan on the cooking zone that you wish to use. -
Page 9: When You Have Finished Cooking
When You Have Finished Cooking Turn the cooking zone off by scrolling down the corresponding zone to or touching controls together. Make sure the display shows Or, turn the whole induction hob off by touching the ON/OFF control. Beware of hot surfaces will display to show which cooking zone is too hot to touch. -
Page 10: Over- Temperature Protection
Over- Temperature Protection A temperature sensor monitors the temperature inside the induction hob. When an excessive temperature is monitored, the induction hob will stop operation automatically. Detection of Small Articles When an unsuitable size or non-magnetic pan (e.g. aluminium), or some other small item (e.g. knife, fork, key) has been left on the hob, the hob automatically goes into standby mode in 1 minute. -
Page 11: Using The Timer
Using the Timer You can use the timer in two different ways: • You can use it as a minute minder. In this case, the timer will not turn any cooking zone off when the set time is up. • You can set it to turn one cooking zones off after the set time is up. You can set the timer for up to 99 minutes. Timer Overview Minute display shows the number of minutes set/... -
Page 12: Setting The Timer To Turn Cooking Zones Off
To cancel the timer, touch the controls together, and will show in the minute display. When the time is set, the timer will begin to count down immediately. The display will show the remaining time and the timer indicator will flash for 5 seconds. When the set time has elapsed, an available tone will sound for 30 seconds and the –... - Page 13 Touch the controls together to cancel the timer. will show in the minute display. When the time is set, the timer will begin to count down immediately. The display will show the remaining time and the timer indicator will flash for 5 seconds. When the set time has elapsed, the corresponding cooking zone will switch off automatically.
-
Page 14: Cooking Guidelines
Cooking Guidelines Take care when frying as oil and fat heat up very quickly. At extremely high temperatures oil and fat will ignite spontaneously and this presents a serious fire risk. Cooking Tips • When food comes to the boil, reduce the temperature setting. • Using a lid will reduce cooking times and save energy by retaining the heat. -
Page 15: Heat Settings
Heat Settings The settings below are guidelines only. The exact setting will depend on several factors, including your cookware and the amount you are cooking. Experiment with the induction hob to find the settings that best suits you. Cooking zone 1, 3 Cooking zone 2, 4 Heat setting Heat Setting... -
Page 16: Cleaning And Maintenance
Cleaning and Maintenance What? How? Important! Everyday soiling on Switch the power to the induction • When the power to the induction hob glass (fingerprints, hob off. is switched off, there will be no ‘hot marks, stains left by surface’ indication but the cooking Apply an induction hob cleaner food or non-sugary zone may still be hot! -
Page 17: Hints And Tips
Hints and Tips Problem Possible Causes What to Do The induction hob cannot be No power. Make sure the induction hob is turned on. connected to the mains power supply and that it is switched on. Check whether there is a power outage in your home or area. -
Page 18: Failure Display And Inspection
Bad induction hob heat radiation Please restart after the induction hob cools down. Never attempt to disassemble the unit by yourself. Specification Model LINDHOB10 Rated Voltage 230 –240 V~ Rated Frequency 50 Hz Overall Dimension (W x D X H) -
Page 19: Installation
Installation Preparing the Worktop Cut out the work surface following the dimensions shown in the drawing below. For the purpose of installation and use, a minimum distance of 5cm space must be left around the cut out. Be sure the thickness of the work surface is at least 20mm. Use a heat-resistant work surface material to avoid deformation caused by the heat from the hob. -
Page 20: Fastening The Fixing Brackets
Fastening the Fixing Brackets The unit should be placed on a stable, smooth surface (use the packaging). Turn the hob upside down, place it on a soft surface and fasten the brackets to the appropriate holes. DO NOT tighten the screws at this stage. Apply sealing strips around the edge of the hob. -
Page 21: Connecting The Induction Hob To The Mains Power Supply
Connecting the Induction Hob to the Mains Power Supply Remove the 2 screws A and push the top plate Insert the mains cable at the connection. back and then lift it up. screw A • The induction hob must be connected to the mains power only by a suitably qualified electrician. Check with an electrician whether the domestic wiring system is suitable without alterations. -
Page 22: Safety Warnings
Safety Warnings Your safety is important to us. Please read this Operation and Maintenance information before using your induction hob. Electrical Shock Hazard Installation • Do not cook on a broken or cracked induction hob. If the induction hob surface should break or crack, Electrical Shock Hazard switch the appliance off immediately at the mains power supply (wall switch) and contact a qualified... - Page 23 Cut Hazard • Do not leave children alone or unattended in the area where the appliance is in use. • The razor-sharp blade of a induction hob scraper is exposed when the safety cover is retracted. • Do not repair or replace any part of the appliance Use with extreme care and always store safely and unless specifically recommended in the manual.
- Page 24 There are separate collection systems for recycling in the EU. For more information, please contact the local authority or your retailer where you purchased the product. DSG Retail Ltd. • Maylands Avenue • Hemel Hempstead Herts • HP2 7TG • England P.N.: LINDHOB10-004 LINDHOB10_IB_final110415.indd 24 15/04/2011 2:16 PM...
- Page 25 LINDHOB10_IB_final110415.indd 25 15/04/2011 2:16 PM...
- Page 26 LINDHOB10_IB_final110415.indd 26 15/04/2011 2:16 PM...
- Page 27 LINDHOB10_IB_final110415.indd 27 15/04/2011 2:16 PM...
- Page 28 LINDHOB10_IB_final110415.indd 28 15/04/2011 2:16 PM...
Need help?
Do you have a question about the LINDHOB10 and is the answer not in the manual?
Questions and answers