Table of Contents
Advertisement
Quick Links
1. Check to make sure solar panels are not damaged and everything is
connected properly. Also measure height of DRX base to ground.
2. Lower tripod extension by crank and telescoping unit (if present).
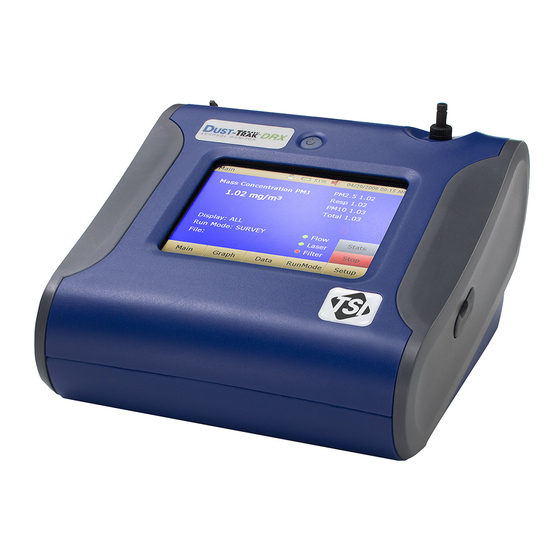
3. First we will connect to the DRX and stop it running.
4. Connect the DRX to the PC using the USB cable on outside of the case.
5. Start TrakPro and under "Instrument Setup" menu select "Logging Control".
6. Click on "Discover Instrument".
7. Once connected, if the "Status" is "Running", click "Stop Logging".
8. "Status" will change to "Idle" if executed successfully. Then click "Close".
9. Under "File" -> "Receive", select the one file and click "Receive".
10. Once the file is received exit to the main page.
11. To inspect the data we can graph using "Graph" -> "New" -> "Graph logged"
12. Select the box under the test name and select "OK" to graph the data.
13. The graph will show all 5 channels over the entire recording time. Make sure
that the test length corresponds with the duration of deployment and that
the max/min seems appropriate for the channels.
14. Now we will save the data as both a TKP file and a txt file.
15. To save the TKP file click "File" -> "Save As...", choose the correct folder for
the station and name the file based on the date as "YYYYMMDD".
16. To save as a txt file click "File"->"Export"->"Export Test Data...", select the
test and click "Export". Name file based on the date as "YYYYMMDD".
17. Now delete the test files by going to "File"->"Receive" & select "Delete All".
18. Correct the time of the DRX through "Setup"->"Parameters"->"Clock".
19. Note the time difference between the PC and DRX and then sync the clocks.
20. Now replace the filter cartridge with a new one by opening up the enclosure,
lifting up the DRX, and removing the autozero module & tube.
21. Open the panel on the back right of the DRX and squeeze the bottom support
so that the filter cartridge can be removed.
22. If the conditions are dusty be sure to change the filter very quickly.
23. Note the filter number of the new & old cartridges on the download sheet.
24. Place the filter plugs from the new cartridge onto the old cartridge and insert
the new cartridge into the DRX, replace the panel & autozero module.
25. To check the flow rate with the new filter, connect the tube from the top of
the flow meter to the autozero module top.
26. Using the DRX screen interface, select "SETUP" and then "FLOW CAL".
27. Using the up & down buttons adjust the flow to 3 LPM on the flow meter
(line to bottom of ball), select "SAVE" once correct, & go back to "MAIN".
28. Replace the black tube from the enclosure onto the DRX autozero module
and close the enclosure. Place the old cartridge in its own Ziploc bag.
29. To start the DRX again, in TrakPro select "Setup"->"Logging Setup".
30. Set a start date/time on a 10 min interval 20 min ahead & hit "SEND".
31. Once sent, go to "SETUP"->"Logging Control", click "Discover" and click
"Start Logging".
32. Remove the USB cable and put the DRX back up to the correct height.
TSI DustTrak DRX Desktop SOP v1.1
DRX DustTrak Statement of Procedure
1 |
P a g e
Advertisement
Table of Contents

Subscribe to Our Youtube Channel
Related Manuals for TSI Instruments DustTrak DRX


Summary of Contents for TSI Instruments DustTrak DRX
- Page 1 TSI DustTrak DRX Desktop SOP v1.1 DRX DustTrak Statement of Procedure 1. Check to make sure solar panels are not damaged and everything is connected properly. Also measure height of DRX base to ground. 2. Lower tripod extension by crank and telescoping unit (if present).
- Page 2 TSI DustTrak DRX Desktop SOP v1.1 Auto-Zero Unit Background Info: The DRX can be powered by battery (up to two battery packs inserted in the rear of the unit) or by DC voltage supplied by a battery/solar panel system or inverter from a 120V or 240V source through the power connector on the right side of the unit when it is facing towards you.
- Page 3 TSI DustTrak DRX Desktop SOP v1.1 Statement of Procedure: DRX Device Options Here we describe how to navigate the options found on the device through the touch screen interface that are of interest when in the field. 1. Starting the unit: 1.
- Page 4 TSI DustTrak DRX Desktop SOP v1.1 TrakPro Software This interesting bit of software is finicky and the communication between it and the DRX device is slow – so be patient! I will split this section up into three different parts. The first is starting from scratch: this can be because the DRX device is being turned on for the first time or when you showed up to download the device it has turned off.
- Page 5 TSI DustTrak DRX Desktop SOP v1.1 b. For the 2 format go to File -> Export -> Export Test Data… In the new window select the test with the mouse and then select “Export”. In the new window go to the appropriate folder and name the file based on the present day in the format MMDDYYYY 10.
- Page 6 TSI DustTrak DRX Desktop SOP v1.1 b. To update the clock, set the “Instrument Time” to a time in the future by 10-20 seconds (also be sure that the date is correct). And then 3 – 4 seconds ahead of reaching that time press the “Send” button.
- Page 7 TSI DustTrak DRX Desktop SOP v1.1 16 minutes to elapse and make sure that there are no issues with the device. If it tests out ok change the RunMode test back to the original and start the logging again. D. Flow error: This error occurs when there is blockage in the flow system.
Need help?
Do you have a question about the DustTrak DRX and is the answer not in the manual?
Questions and answers