ALFAMATIC Press-Right User Manual
For electric press
Hide thumbs
Also See for Press-Right:
- User manual (53 pages) ,
- Installation manual (21 pages) ,
- User manual (47 pages)
Table of Contents
Advertisement
Quick Links
Advertisement
Table of Contents

Related Manuals for ALFAMATIC Press-Right


Summary of Contents for ALFAMATIC Press-Right
- Page 1 U S E R M A N U A L RESS IGHT FOR ELECTRIC PRESS User manual...
-
Page 3: Table Of Contents
Introduction to the monitoring theory..................5 Characteristics of the device..................... 5 Device operating principle......................5 Installation of Press-Right....................8 Getting started ........................9 The keyboard of Press-Right..................... 9 First approach ........................10 Set visualization ........................11 Using the menus ........................11 The main menu........................11 The JOB..........................13... - Page 4 10.4 Firmware version........................33 11 Password..........................34 12 Computer connection ......................35 12.1 Connection via USB port ......................35 12.3 Connection via LAN port (Ethernet)..................37 13 Specifications and troubleshooting ..................39 13.1 Troubleshooting ........................39 13.2 The tool does not communicate via the USB port ..............39 13.4 The tool does not communicate via the LAN port (Ethernet)..........
-
Page 5: General Information
1 General information Press-Right is a monitor and measuring device that is connected to a press and monitors the quality of productive processes. Being interfaced with a displacement transducer and a load cell, it continuously monitors its positions and instantaneous force. - Page 6 Right may set both the absolute and the relative positions. In order to measure the contact point on the manufactured piece, Press-Right use the force transducer: when the force measured exceeds the planned value, the relative zero point is set. This zero point is called conctact START FORCE position.
- Page 7 The piece is good only if the analysis of the minimum/maximum limits and the tolerance range have a positive result. Press-Right also monitors the cylinder return at the end of the production process. Such return may result from the exertion of a specific force (stop force) or at a specific position (final position).
-
Page 8: Installation Of Press-Right
2 Installation of Press-Right For the installation of the device on the machine, please refer to the specific manual. -
Page 9: Getting Started
3 Getting started This chapter provides information on how to set up basic operations and using the Press-Right device. To better describe the operations, run practical tests. Figure 2 To turn the device on use the key on the rear side. When it is pressed, after a few seconds, the... -
Page 10: First Approach
First approach First of all, get acquainted with the press by performing a number of manual motions. To do so, proceed as follows: press the press the item TOOLS press the item MANUAL MOVING press the item ENABLE JOG By using the keys, the cylinder may be moved. -
Page 11: Set Visualization
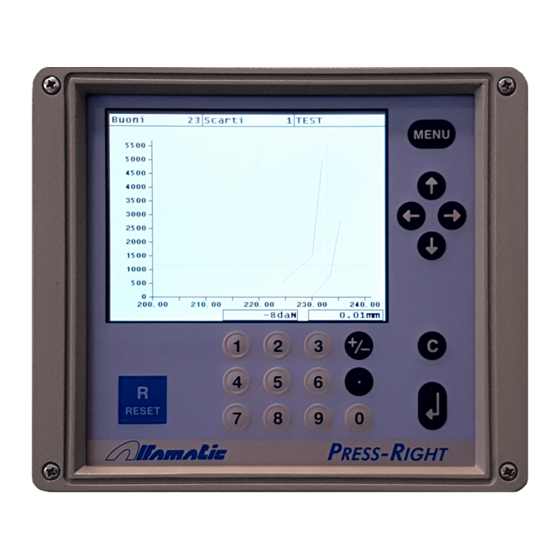
PRE-STOP SPEED Speed at which the cylinder runs the last stroke starting from the . During PRE-STOP POSITION the pre-stop stroke, the cylinder regulates the speed according to the force value measured. Now, before continuing, make sure that there is At least a 50mm free space in the stroke of the cylinder. - Page 12 In Figure 4 it is possible to see the status of both channels in a Press-Right equipped with two force transducer: the curve of channel 1 is not visible, while the curve of channel 2 is visible. Even...
-
Page 13: The Job
4 The JOB Press-Right stores all settings (parameters, range and counters) referring to the Job. There may be at least 100 of them, each of which with its own name. The main menu also includes the item. By means of this sub-menu, it is possible JOBS MANAGEMENT to create a new job, select one among those present, change the current job or delete it. -
Page 14: Edit The Job Name
To unlock the device, use the unlock password. Managing the automatic selection of jobs as an external user When the automatic selection of job is enabled, Press-Right prepares the selectable jobs. These jobs are initially empty. To use an empty job, access the menu and JOBS MANAGEMENT >... -
Page 15: The Graph
It is possible to create additional jobs by using the unlock password. It is possible to select a job other than the one automatically selected by using the unlock password. The graph In the menu, the item is available, allowing for the editing of the graph axes. EDIT JOB SET GRAPH Note that it is not possible to edit these values and fully or partly hide the range. -
Page 16: Scraps Options And Management
As shown in both figures, it is possible to select the following values: GRAPH ORIGIN It is the origin value of the horizontal axis of the heights; this parameter allows to hide the undesired part of the stroke, such as the approach stroke. If the relative heights are used, the origin is usually set to zero. -
Page 17: Channel Management
For every job the self-verification function can be excluded. It is managed by Press-Right as follows: Whenever the device is switched on or the self-verification is managed by Press-Right as follows: Whenever the device is switched on or every N1 pieces, N2 sample pieces must be processed. - Page 18 4.14.1 Additional monitoring options The monitoring options are as follows: DO NOT RUN THE ADDITIONAL MONITORING SESSION The additional monitoring session is not performed. MEASURE AT START The additional monitoring is carried out when the device receives a STARTcommand. MEASURE AT SHUTDOWN The additional monitoring is carried out when the device commands the shutdown and the piece is good.
-
Page 19: Parameters
5 Parameters In the jobs, all parameters set to zero will be ignored by the device. Motion management Once a new job is created, define the motion parameters: JOBS MANAGEMENT > EDIT JOB > . In this sub-menu, the motion parameters CHANGE JOB >... -
Page 20: Check Points
5.2.1 How to choose the limits The initial height limits allow to monitor the dimensions of the components before they are processed. They may be useful to monitor the dimensions of the pieces to assemble or to monitor whether all components necessary for the processing are present. The selection mode of the limits which monitors the maximum force and height reached, also in this case, by the type of production. - Page 21 EXCLUDE PRESS SELF-VERIFICATION It disables the self-verification of the press during job execution. EXLUDE TEST SELF-VERIFICATION 1 It disables the self-verification of the additional test during job execution. SAVE GOOD PIECE CURVE It saves the good piece curves on the SD memory card. SAVE SCRAP PIECE CURVE It saves the scrap piece curves on the SD memory card.
-
Page 22: The Tolerance Range
6 The tolerance range The tolerance range is used to monitor the curve and, as a result, it monitors the quality of the piece. The range consists of two lines called upper edge and lower edge. In order to classify the piece as good, the motion-force points representing the curve must not appear above the upper edge or below the lower edge. - Page 23 SET THE GRAPH It allows to change the graph axes. EXIT It ends the range change. To ends the range change, it is possible also to use the key. Figure 13 Figure 14...
-
Page 24: Delete The Range
The range may be changed by moving the dots at the end of each edge. When the range is changed, only one of the dots of the edges is highlighted; this dot is the active dot, that is, the one that may be moved. -
Page 25: Scrap Piece
If the job includes multiple stages, the Press-Right may require confirmation for the scrap materials. If the range is not reached by the curve and there is no minimum height limit, the scrap is reported... -
Page 26: Scrap Management
For instance, it is possible to sort reusable scraps from not recyclable materials. When a special scrap is detected, Press-Right activates the second scrap port ad count the piece separately. This way, it is possible to know whether the pieces are rejected by mistake by the operator. -
Page 27: Measured Values
8 Measured values Press-Right stores the motion-force curve and it measures the some parameters which may be monitored thanks to the limits. The curve stored can be analyzed with the analysis cursor (chapter 8.2). The vales measured may be visualized at the end of each process (chapter 8.1) and may be measured by an external controller by means of a serial code. -
Page 28: Analysis Cursor
MIN-MAX CHECK POINT These are the minimum and the maximum values measured within the whole check point reported. CHECK POINT VARIATION It is the force variation measured at a specific check point. CHECK POINT FORCE It is the force value measured at a specific check point. CHECK POINT HEIGHT It is the height value measured at a specific check point. -
Page 29: The Tools Menu
9 The Tools menu By selecting the menu, the Press-Right device may be set up. When Press-Right is provided TOOLS already connected to the machine, setting it up is not necessary. Figure 17 This menu includes the following sub-menus: DISPLAY MANAGEMENT It allows to change visualization (chapter 0). -
Page 30: Counters And Self-Verification
Counters and self-verification Press-Right can be set up so that, at fixed intervals, the tool must be replaced, the transducers calibrated and the self-verification system monitored. The self-verification function is described in chapter 4.13. Manual cylinder movement It allows the manual handling of the press. -
Page 31: Device Configuration
CONFIGURATION paragraphs: GENERAL OPTIONS It allows to set up Press-Right based on the type of press connected and activate additional functions. See chapter 10.1. JOBS PHASES CHANNELS It allows to set up the job selection mode, the multiple-phase operation and the multiple load-cell operation. -
Page 32: Job, Phase And Channel Configuration
In this case, enter how many jobs can be selected from the outside. NUMBER OF CHANNELS Press-Right can be connected up to six load cells. This command is used to indicate how many load cells are connected. To connect the load cells, an optional card is required. OPTIONS These options determine how Press-Right must manage the selection of jobs and phases;... -
Page 33: Diagnosis
If the tool is connected to multiple load cells, by activating this option a different cell will be used for each phase. This option allows to connect up to four identical presses working in sequence one after the other to a single Press-Right. 10.3... -
Page 34: Password
11 Password Press-Right can store a list of users with their identification codes. The identification code is a four or five-digit code. The last three digits are never displayed, and serve as a password. Each user can define permissions, that is, the functions that can be accessed to. -
Page 35: Computer Connection
12 Computer connection Press-Right can be connected to a computer. It is possible to connect the tool to the computer via USB or the Ethernet port (optional). The tool is provided together with the Winscope software, enhancing the tool capabilities. - Page 36 Select "No, not this time" and click Next. The following window appears: Select the "Install from a specific folder" option and press Next. In the next window, specify the path where the drivers are saved. Use browse to search for the driver.
-
Page 37: Connection Via Lan Port (Ethernet)
After entering the path, press Next and wait. If the following window appears, click continue: 12.3 Connection via LAN port (Ethernet) In order to use the Ethernet port (optional), first assign a unique IP address to the tool. To do so, it is necessary to use the Press Right-Setup software saved in the CD provided with the tools. - Page 38 Select the tool to which the IP address is to be assigned in the list that is shown. If the list is empty, monitor the status of the firewall in your computer, if any. The firewall can be disabled in the Windows monitor Panel. If you cannot find the tool to be set up, just turn it off, reload the list and see which one is missing.
-
Page 39: Specifications And Troubleshooting
100BaseT yellow light should be on. Make sure that the IP address of the tool is reached using, for example, the PING command. 13.5 Messages In particular conditions, Press-Right can display the following messages: Message Description Wait for the transfer of curves The "remote enabling"... - Page 40 0004 ERR_CALC_PRE_ARRESTO 0005 ERR_CALC_VEL_TOCCO 0006 ERR_CALC_VEL_RETURN 0020 ERR_CALC_AUTO_ACC_MAX 0021 ERR_CALC_AUTO_ACC_MIN 0022 ERR_CALC_AUTO_DEC_MAX 0023 ERR_CALC_AUTO_DEC_MIN 0024 ERR_CALC_MANU_ACC_MAX 0025 ERR_CALC_MANU_DEC_MAX 0026 ERR_CALC_VEL_MANU 0028 ERR_CALC_ABS_VMAX 0029 ERR_CALC_PASSIMM 00F0 ERR_CALC_UNEXPECTED 00FF ERR_CALC_FIRMWARE Major errors: Figure 19 Figure 20...
-
Page 41: Technical Data
13.7 Technical data The list of the technical features follow: Subject Features Power supply DC version 24VDC 1A Absorption (excluding transducer, input and output absorption) SAMPLING FREQUENCY 700 samplings/second Dimensions Width: 205 mm Height: 175 mm Depth: 240 mm...
Need help?
Do you have a question about the Press-Right and is the answer not in the manual?
Questions and answers