
Related Manuals for Axxera AVM1209S


Summary of Contents for Axxera AVM1209S
- Page 1 AVM1209S INSTALLATION/OWNER’S MANUAL Media Receiver with Android Auto™ and CarPlay™ featuring a 9" digital TFT Display...
- Page 2 The SAFETY NOTICE is reminder to drive responsibly and safely while using your mobile phone device, or any APP’s that are compatible with this unit. It is highly recommended that your Axxera AVM1209S is installed by a professional installer or an authorized dealer. This product is only for use in vehicles with 12VDC negative ground only.
-
Page 3: Table Of Contents
AVM1209S OPERATION Table of Contents Page Warning Statement .......... -
Page 4: Warning Statement
AVM1209S OPERATION WARNING Upon installation of this monitor/media player (“unit”) into a vehicle, the driver of the vehicle must not operate this unit by watching videos or playing video games while driving. Failure to follow this instruction could lead to driver distraction which could result in serious injury or death to the vehicle’s occupants or persons outside the vehicle and/or... -
Page 5: Safety Information/Precautions
Please read all instructions carefully before attempting to install or operate. Due to its technical nature, it is highly recommended that your DUAL AVM1209S is installed by a professional installer or an authorized dealer. This product is only for use in vehicles with 12VDC negative ground only. -
Page 6: Preparation/Mounting
AVM1209S OPERATION Preparation Before You Start • Disconnect negative battery terminal. Consult a qualified technician for instructions. • Avoid installing the unit where it would be subject to high temperatures, such as from direct sunlight, or where it would be subject to dust, dirt or excessive vibration. -
Page 7: Screen Rotation
AVM1209S OPERATION Screen Rotation Screen angle can pivot side to side Screen height adjusts up to 1.5“ down Screen depth can be adjusted from 0” to 0.5“ to Screen tilts forward and back 1“ forward... -
Page 8: Wiring Diagram
AVM1209S OPERATION Wiring Diagram - Inputs/Outputs CarPlay and Android Auto Note: When replacing a fuse, make sure to use the correct type and amperage. Using an incorrect fuse could cause damage. The unit uses (1) 15 amp ATC mini style fuse located on the power connector. -
Page 9: Control Locations
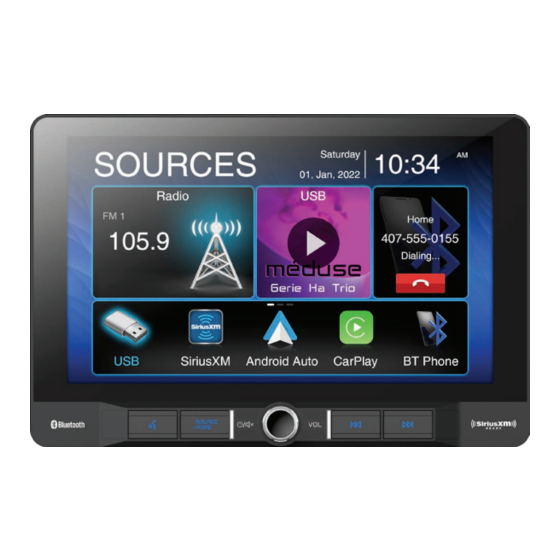
AVM1209S OPERATION Control Locations The radio display features the following functions and displays: VOICE ACTIVATION BUTTON SOURCE/HOME POWER/VOLUME/MUTE PREVIOUS BUTTON NEXT BUTTON RESET / USB PORT... -
Page 10: General Operation
AVM1209S OPERATION General Operation Power On/Off Momentarily press to turn the unit on. Press and hold to turn the unit off. Volume Rotate the volume knob to increase or decrease the volume level. Mute Momentarily press MUTE to silence the audio. Momentarily press MUTE again to return to the previously selected volume. - Page 11 AVM1209S OPERATION General Operation To resolve abnormal operation or if the unit is inoperable, Press the RESET Reset button located behind the front panel directly under USB port. The unit will reset the main processor to the default settings, Note: Use the tip of a pen to access the reset button. To restore the factory default software settings.
-
Page 12: Audio Operation
AVM1209S OPERATION Audio Operation From the Main Menu screen, Press the Equalizer icon on the main menu Equalizer Menu screen to adjust Fader and Balance controls, Equalizer (8-Band Tone Control and 8 Presets EQ Settings). Time Alignment Menu Surround Presets... -
Page 13: Am/Fm Tuner Operation
AVM1209S OPERATION AM/FM Tuner Operation From the main menu, touch Radio icon on the screen to select AM/ Radio Operation FM tuner mode. Main Menu Press icon to return to Main Menu screen. Current Mode Indicator Display status of various tuning functions including Auto. -
Page 14: Usb Operation
AVM1209S OPERATION USB Operation From the main menu, touch the USB icon on the main screen. Press icon to return to Main Menu screen. Main Menu Displays source currently playing. Current Mode Indicator List Press icon to access a list of all files and folders on the device. -
Page 15: Media Compatibility
AVM1209S OPERATION Media Compatibility File Type FAT 12 File System FAT 16/FAT 32 .mp3/.MP3/.Mp3/.mP3/.flac/ogg File Extension .rmp/.m4a MPEG 1 MPEG MPEG 2 Format MPEG 2.5 MPEG 1 32/44.1/48kHz Sampling MPEG 2 12/16/22.05/24kHz Frequency MPEG 2.5 8/11.025/12kHz... - Page 16 AVM1209S OPERATION Media Compatibility Media Compatibility The following types of files are not compatible: • MP3 PRO format, MP3 playlists • RMP format • AAC, protected AAC, M4A format Playback Order MP3 playback sequence begins in the root folder of the USB device. Any empty folders or folders that do not include MP3 files are skipped.
-
Page 17: Bluetooth Operation
Complete the pairing sequence from your Bluetooth device. Refer to the owner's manual for your device for more details. The device name is "AVM1209S". The unit can be in any mode of operation when pairing is performed. On certain phones, pairing may need to be done more than once. - Page 18 AVM1209S OPERATION Bluetooth Operation Bluetooth Music Press MUSIC to transfer audio between the unit and mobile phone. Setup Press "SETUP" to access Bluetooth settings. Call Dial a number and touch the Phone icon to call. Phone Keypad Use the keypad to dial a phone number.
-
Page 19: Siriusxm ® Satellite Radio Operation
AVM1209S OPERATION SiriusXM Satellite Radio Operation ® SiriusXM Radio ® ® Only SiriusXM Satellite Radio brings you more of what you love to listen to, all in one place. Get over 140 channels, including commercial-free music plus the best sports, news, talk, comedy and entertainment. - Page 20 AVM1209S OPERATION SiriusXM Satellite Radio Operation ® Main Menu Press icon to return to Main Menu screen. Band Touch to select a band of preset channels. Three bands are available:SXM1, SXM2, and SXM3. Each band can store up to six pre- set channels.
- Page 21 AVM1209S OPERATION SiriusXM Satellite Radio Operation ® Additional Options Press to display/adjust the options Mode, Tune Scan and Go to Live: Additional Options Mode - Press to access and adjust the following options: • Parental Code - When enabled, the Parental Control feature requires you to enter a passcode to tune to the locked channels.
- Page 22 AVM1209S OPERATION SiriusXM Satellite Radio Operation ® Press and hold any preset button (1-6) to save the current station as Preset Buttons a preset. Press the desired preset button to begin playback of the corresponding preset channel. Direct Press to display screen for direct channel access. Press the desired channel number, then press Enter.
-
Page 23: Siriusxm ® Radio Advisory Messages
AVM1209S OPERATION SiriusXM Radio Advisory Messages ® SiriusXM ® Recommendation Advisory Message 1. The radio has detected a fault with the SiriusXM ® antenna. The antenna cable may be either disconnected or damaged. 2. Verify that the antenna cable is connected to the SiriusXM ®... -
Page 24: Apple Carplay
AVM1209S OPERATION Apple CarPlay Operation Apple CarPlay™ is a smart interface for iPhone, allowing you to voice-control (via Siri) music, navigation, phone and messaging apps - significantly reducing driver distraction. Phone - Use Siri to make calls, return missed calls, listen to voicemail messages, and view the caller ID on the receiver’s screen. - Page 25 AVM1209S OPERATION Apple CarPlay Operation When the CarPlay menu is displayed, the home button in the lower left corner work just like the home button on your iPhone. Press and hold it to summon Siri and begin your voice commands.
-
Page 26: Android Auto
AVM1209S OPERATION Android Auto™ Operation Android Auto™ brings the most useful apps to your phone screen or your compatible car display, in a format that makes it easy for you to keep your main focus on driving. You can control things like navigation and maps, calls and text messages, and music. - Page 27 AVM1209S OPERATION Android Auto™ Operation Using Android Auto™ The Android Auto™ home screen displays personalized information, like time to your destination, reminders, recent calls incoming messages, the song you're listening to, and Google Now cards. When the Android Auto™ menu is displayed, you can say "OK Google" or select the microphone in the upper right corner to talk to Google.
-
Page 28: Auxiliary Inputs/Rear Camera Operation
AVM1209S OPERATION Rear RCA A/V Input A/V Input Connect an optional audio/video source into the RCA (rear) input. Adjust volume on the external audio source as needed (if connected to the headphone output of the device). Rear Camera Operation - (Optional) Rear Camera Input Connect an optional rear camera to the Camera Input (Black RCA connector). -
Page 29: Steering Wheel Interface(Swi) Operation
AVM1209S OPERATION Steering Wheel Interface(SWI) Operation In main screen please press SETUP and select SWC. It will show as below. Description 1.Functions 2.Reset to default 3.Press to return to auto save after programming Steering Wheel learning Process Before learning, press to reset Reset icon to remove any previous settings. -
Page 30: Troubleshooting
AVM1209S OPERATION Troubleshooting General Problem Cause Action Yellow wire not connected or incorrect voltage Check connections for proper voltage (11~16VDC) Unit will not turn on Red wire not connected or incorrect voltage (no power) Black wire not connected Check connection to ground... -
Page 31: Specifications
AVM1209S OPERATION Specifications FM Tuner Tuning range: 87.5MHz-107.9MHz Usable sensitivity: 10dBf 50dB quieting sensitivity: 20dBf Stereo separation @ 1kHz: 38dB Frequency response: 30Hz-13kHz AM Tuner Tuning range: 530kHz-1710kHz Usable sensitivity: 24uV Frequency response: 30Hz-2.3kHz Front USB Compatibility: High Speed USB 2.0... -
Page 32: Warranty
AVM1209S OPERATION Limited One Year Warranty This warranty gives you specific legal rights. You may What to do? also have other rights which vary from state to state. 1. Before you call for service, check the troubleshooting guide in your owner’s manual. - Page 33 Dual Electronics Corp. Toll Free: 1-866-382-5476 Monday-Friday, 9AM-5PM EST www.axxeraaudio.com ©2022 Dual Electronics Corp. All rights reserved. NSC0122...
Need help?
Do you have a question about the AVM1209S and is the answer not in the manual?
Questions and answers