Advertisement
Quick Links
Installation, Operation & Maintenance Manual
AirButler/AirButler2
Table of Contents:
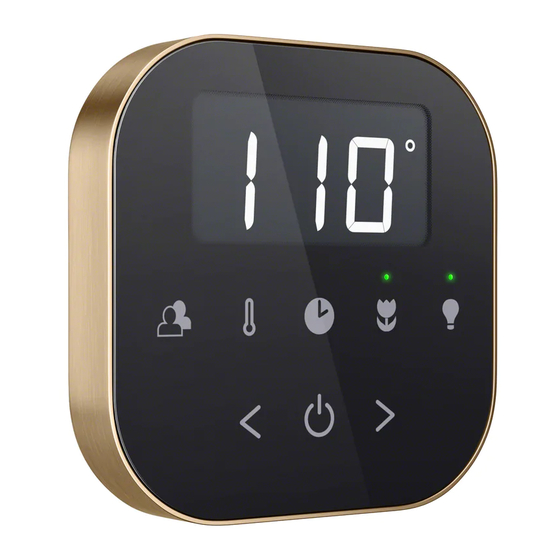
AirTempo Wireless Control
AromaSteam SteamHead
Linear Steamhead
SteamLinx Mobile App
MS/Super AutoFlush
MX Autoflush
Condensation Pan
mr
AirButlerX/Linear
PUR100503
PUR100421
PUR103936
PUR100518
PUR100200E
PUR100532
.
steam
TS0012
®
Feel Good Inc.
1-11pg
12-13pg
14-24pg
26-27pg
18-30pg
31-33pg
34-35pg
Rev 5.2022
Advertisement

Related Manuals for mr. steam AirTempo


Summary of Contents for mr. steam AirTempo
- Page 1 Installation, Operation & Maintenance Manual AirButler/AirButler2 AirButlerX/Linear Table of Contents: AirTempo Wireless Control PUR100503 1-11pg AromaSteam SteamHead PUR100421 12-13pg Linear Steamhead PUR103936 14-24pg SteamLinx Mobile App PUR100518 26-27pg MS/Super AutoFlush PUR100200E 18-30pg MX Autoflush PUR100532 31-33pg Condensation Pan TS0012 34-35pg steam ®...
- Page 2 Installation, Operation & Maintenance Manual AirTempo ® Wireless Touch Control with Steamhead steam ® Feel Good Inc. PUR100474 5.22...
- Page 3 Remote Temperature Probe ... . .9-11 AirTempo Operating Instructions ..12-14 Indicates a potentially hazardous situation, which Battery Replacement .
- Page 4 The control can be located up to 60 feet from the wireless receiver. Construction materials affect the communication between the control and receiver. Test the range of the AirTempo. It may be necessary to change the location of the wireless receiver to improve the range.
- Page 5 All drawings for illustrative purposes only. Installation Instruction Mounting on Glass When installing AirTempo on glass a peel and stick film is provided on pages 20-21 and may be used as a mask for a clean look from behind the glass. Wireless Receiver Installation...
- Page 6 CAUTION steam generator are located accordingly. AirTempo control is installed outside the steam room. Failure to install the probe, or failure to install the probe correctly will result in an inoperable control and result in excessive temperatures and a hazardous condition.
- Page 7 Sectional View exposed to steam room air Diagram 2 Diagram Installation Instruction AirTempo Operating Instructions Diagram 1 The AirTempo features programmable temperature ON/OFF control, programmable time duration, AromaSteam Diagram 1 ON/OFF, ChromaSteam control and two personal ® Press the ON/OFF key for 1 second to start the settings.
- Page 8 Press it twice to program PROG2. The selected setting will be displayed. Enter the preferred time and temperature settings. User Preset The AirTempo will store the following settings: Set point, Time duration & Aroma state. To select PROG1 or PROG2: Press ON/OFF key then press key once to select PROG1, press it twice to select PROG2.
- Page 9 Immedi- ately see a doctor. Remove the AirTempo from the wall by sliding it up and off the bayonet holder. Replace the battery door and lock in place. Use a soft cloth to dry off the control.
- Page 10 Instead, it is the user’s responsibility to dispose of their waste equipment by AirTempo Control and Wireless Receiver handing it over to a designated collection point for the recycling of The objects of the declaration described here are in conformity with the waste electrical and electronic equipment.
- Page 11 Dimensions 90.0 x 90.0 x 19.0 mm (without decorative bezel) (AirTempo Surface) (specify finish) (3.625 x 3.625 x 0.75 in.) 104220 AirTempo Control Cable (3ft) All Operating frequencies 865 ~ 868 MHz (European Version) 104117-30 30 ft Control Cable Optional...
- Page 12 ® Place the electronic assembly into the decorative Template bezel as shown. The retention ring snaps onto the For Flush Mount Kit Installation assembly from behind. The 3 piece assembly can then in the box that will hold the control in place. www.mrsteam.com Products, information and specifications are subject to change without notice.
- Page 13 Installation, Operation & Maintenance Manual AromaSteam SteamHead steam ® Feel Good Inc. PUR100421 5.22...
- Page 14 steam ® S T E A M H E A D ___________________________________________________________________________________________________________________________________________ I N S TA L L AT I O N I N S T R U C T I O N S 1/8" minimum clearance required when Acrylic Shield is used. See installation instructions Use Teflon ®...
- Page 15 Installation, Operation & Maintenance Manual Linear Steam Head Residential Model: 104480 IMPORTANT: Leave this material with the homeowner. steam ® Feel Good Inc. PUR103936 5.22...
- Page 16 Linear Steam Head ® ® Installer Section Model 104480 READ ME FIRST! This highlights information that is especially As you follow these instructions, you relevant to a problem free installation. will notice symbols. This information is important for the proper, safe and trouble free All information in these instructions is based on the latest installation of the Linear Steam Head.
- Page 17 Linear Steam Head ® ® Installer Section Model 104480 accessories...etc.). If the installation and operation manuals are Steambath controls feature an integral or remote temperature sensor that senses room temperature. not available go to www.mrsteam.com for an online copy, or contact MrSteam Customer or Technical Services at 800-767- Install the linear steam head in a location where steam 8326 or 800-727-8326 for free copies.
- Page 18 Linear Steam Head ® ® Installer Section Model 104480 Bracket Adjustment Screws Adjustable Brackets P104481 - Linear Steam Head 104483 - Faceplate BOX CONTENTS: 104484 - Diverter • Linear Steam Head • AromaTray • Faceplate • Silicone Sealant 104482 - AromaTray •...
- Page 19 Linear Steam Head ® ® Installer Section Model 104480 Steam Head Installation Linear SteamHead shown without the optional faceplate STEP 1. Confirm proper stud spacing: The studs or diverter. must have a minimum spacing of 14-1/8” and a maximum spacing 19". If the stud spacing is outside Copper Tubing the required range then shim or otherwise reposition or Brass Pipe...
- Page 20 Linear Steam Head ® ® Installer Section Model 104480 Optional Faceplate Installation Thin Set The steam head is supplied with an optional faceplate. It is not required for the functional operation of the steam head. The faceplate is a decorative accessory and is Vapor Barrier Finished available in (8) finishes.
- Page 21 Linear Steam Head ® ® Installer and Home Owner Section Model 104480 Steam Emission Zone The Steam Emission Zone is the area in front of the steam head that contains dense, hot steam as it exits the steam head. Steam dissipates as it moves away from the steam head, and becomes less hot. The steam zone is the area where contact with steam presentees a scalding hazard.
- Page 22 Linear Steam Head ® ® Installer and Home Owner Section Model 104480 Diverter The Linear SteamHead is supplied with an optional steam diverter. The steam diverter is used to reduce the steam emission zone as required to avoid contact between a steam bather and direct steam emissions.
- Page 23 Linear Steam Head ® ® Installer and Home Owner Section Model 104480 AromaTray The AromaTray is for use with MrSteam Essential Oils. Place a few drops of Rubber Portion for secure placement Essential Oils in the AromaTray as shown to provide a fragrant steam bath experience.
- Page 24 Linear Steam Head ® Linear Steam Head ® ® ® Using MrSteam Essential Oils Model 104480 Using MrSteam Essential Oils Model 104480 Enjoy Mr.Steam essential oils by placing a drop or two, into your Mr.Steam AromaTray as shown in the illustration. Only use Enjoy Mr.Steam essential oils by placing a drop or two, into your Mr.Steam AromaTray as shown in the illustration.
- Page 25 : 1 800 72 STEAM 2020 © MrSteam and des., A Lifetime of Pleasure, AirTempo, AromaFlo, AudioWizard, AutoFlush, AutoSteam, Butler Package, ChromaSteam, Clean Steam...Every Time, Club Therapy, CT Day Spa, Digital 1, Express Steam, Feel Good Inc., From Bathroom to Spa, HomeWizard, iButler, iGenie, iSpa Package, iSteam, iTempo, iTempo/Plus, Linear Steamhead, Making Wellness a Way of Life, Music Therapy, My Steam, SmartSizing, Spa Package, Steam Genie, Steam on Demand, Steam in a Box, Steam@Home, SteamStart, SteamTherapy, Tala, Tala Bath &...
- Page 26 Installation, Operation & Maintenance Manual SteamLinx steam ® Feel Good Inc. PUR100518 5.22...
- Page 27 Generator Cover Knock-out in the Generator Circuit Jacket Board Cover Screws...
- Page 28 Home Router Power Supply 3’ Cable Ethernet Cable (3’) PUR100518 5.22 PUR 100518 5.22...
- Page 29 Installation, Operation & Maintenance Manual S Su e Auto u ® steam ® Feel Good Inc. PUR100200E 5.22...
- Page 30 mr . steam ® ® Optional AutoFlush System ____________________________________________________________________________________________________________________________________________ INSTA LLATION INSTRUCTIONS BOX CONTENTS: • AutoFlush System Valve with Cord • Installation Instructions. ® ASSEMBLY OF OPTIONAL AUTOFLUSH SYSTEM 3 Pin Connector for AutoFlush AutoFlush Cord Connector AutoFlush Cord Steam Generator AutoFlush Valve End "B"...
- Page 31 AutoFlush Shown Fully Assembled INSTALLATION INSTRUCTIONS ® 1. Plumbing to be performed by a qualified plumber and shall be in accordance with applicable National and Local codes. Unit drains by gravity. A drain line that is lower than the AutoFlush assembly must be available.
- Page 32 Installation, Operation & Maintenance Manual MX AutoFlush steam ® Feel Good Inc. PUR100532 5.22...
- Page 33 mr . steam ® Optional AutoFlush ® System ____________________________________________________________________________________________________________________________________________ INSTA LLATION INSTRUCTIONS BOX CONTENTS: • AutoFlush System Valve with Cord • Installation Instructions. ® ASSEMBLY OF OPTIONAL AUTOFLUSH SYSTEM 3 Pin Connector for AutoFlush AutoFlush Cord Connector AutoFlush Cord Steam Generator AutoFlush Valve Drain Valve Nipple...
- Page 34 AutoFlush Shown Fully Assembled INSTALLATION INSTRUCTIONS ® 1. Plumbing to be performed by a qualified plumber and shall be in accordance with applicable national and local codes. Unit drains by gravity. A drain line that is lower than the AutoFlush assembly must be available.
- Page 35 Installation, Operation & Maintenance Manual Condensation Pan steam ® Feel Good Inc. TS0012 5.22...
- Page 36 steam ® Technical Specifications Condensation Pan 103867 & 104402 Mr.Steam strongly recommends the use of a condensation pan in the unlikely event of a plumbing leak. Locate the condensation pan on a solid level surface and place the steam generator inside the condensation pan. Insure the steam generator is level.
- Page 37 1 800 767 8326 I 1 800 72 STEAM 2017 © MrSteam and des., A Lifetime of Pleasure, AirTempo, AromaFlo, AudioWizard, AutoFlush, Butler Package, ChromaSteam, Clean Steam...Every Time, Club Therapy, Digital 1, Express Steam, Feel Good Inc., From Bathroom to Spa, iButler, iGenie, iSizing, iSteam, Making Wellness a Way of Life, Music Therapy, Spa Package, Steam on Demand, Steam@Home, iTempo, iTempo/Plus, SmartSizing, SteamStart, SteamStop, SteamTherapy, Tala, Bath &...
Need help?
Do you have a question about the AirTempo and is the answer not in the manual?
Questions and answers