Table of Contents
Advertisement
Quick Links
Advertisement
Table of Contents

Related Manuals for Holland Green Science 10301001


Summary of Contents for Holland Green Science 10301001
- Page 1 User Manual 10301001/10301002 Thermotita Water Bath User Manual Version 1.0...
-
Page 2: Table Of Contents
User Manual Table of Contents Disclaimer & Warranty ....................3 LIMITED WARRANTY & DISCLAIMER ..................3 LIMITATION OF LIABILITY ....................... 6 Safety ..........................7 III. Water Bath Introduction ....................9 Proper Use ........................9 After Sales Support ...................... 9 Technical Specifications....................10 Standards and Conformity. -
Page 3: Disclaimer & Warranty
User Manual Disclaimer & Warranty • The intellectual property rights for this manual belongs to Holland Green Science Corporation (hereinafter referred to as “the Company”). • Products of the company are under the patent protection of China and other countries and regions (inclusive of obtained patents and patents currently under application). - Page 4 User Manual Company in writing upon the discovery of any defect, which notice shall include the product model and serial number (if applicable) and details of the warranty claim; and (b) after the Company's review, the Company will provide Buyer with service data and/or a Return Material Authorization ("RMA"), which may include biohazard decontamination procedures and other product-specific handling instructions, then, if applicable, Buyer may return the defective Products to the Company with all costs prepaid by Buyer.
- Page 5 User Manual DEFECTIVE PRODUCT. EXCEPT AS EXPRESSLY PROVIDED IN THIS WARRANTY STATEMENT, THE COMPANY DISCLAIMS ALL OTHER WARRANTIES, WHETHER EXPRESS OR IMPLIED, ORAL OR WRITTEN, WITH RESPECT TO THE PRODUCTS, INCLUDING WITHOUT LIMITATION ALL IMPLIED WARRANTIES OF MERCHANTABILITY OR FITNESS FOR ANY PARTICULAR PURPOSE OR USE.
-
Page 6: Limitation Of Liability
User Manual LIMITATION OF LIABILITY NOTWITHSTANDING ANYTHING TO THE CONTRARY CONTAINED HEREIN, THE LIABILITY OF THE COMPANY UNDER THESE TERMS AND CONDITIONS (WHETHER BY REASON OF BREACH OF CONTRACT, TORT, INDEMNIFICATION, OR OTHERWISE, BUT EXCLUDING LIABILITY OF THE COMPANY FOR BREACH OF WARRANTY (THE SOLE REMEDY FOR WHICH SHALL BE AS PROVIDED UNDER THIS SECTION) SHALL NOT EXCEED AN AMOUNT EQUAL TO THE LESSER OF (A) THE TOTAL PURCHASE PRICE THERETOFORE PAID BY BUYER TO THE COMPANY WITH RESPECT TO THE PRODUCT(S) GIVING RISE... -
Page 7: Safety
User Manual Safety IMPORTANT Safety Items to be Observed. Safety Warnings ! DANGER (may cause serious damage to property and or casualties) 1. Please carefully read this User Manual prior to operating the instrument and observe the instructions on safe operation. 2. - Page 8 User Manual 16. When pulling the power plug out from a power source, do not pull out using the power cord directly. 17. Only accredited and qualified professional repair technicians can open the instrument or conduct required repairs. Persons performing repairs on the instrument other than those selected or approved by the Company shall operate to void any warranty contained hereinabove for the product.
-
Page 9: Water Bath Introduction
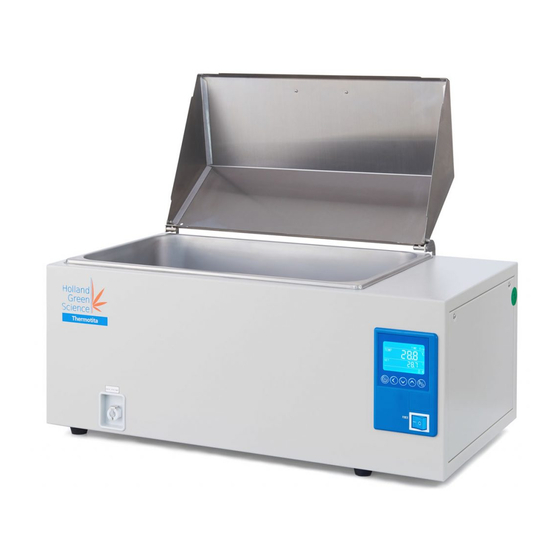
User Manual III. Water Bath Introduction • The outer shell of bath’s water tank is made of high-quality steel plates and the surface is polymer coated. • The internal liner, top cover and shelf are all made of optimal corrosion-resistant stainless steel. -
Page 10: Technical Specifications
For claims under the warranty please contact your local supplier. You may also send the instrument directly to manufacturer, enclosing the invoice copy and by giving reasons for the claim. Technical Specifications. Models 10301001 10301002 Product Name Thermotita 12 Thermotita 27... -
Page 11: Standards And Conformity
User Manual Standards and Conformity. Construction in Accordance with the following Safety Standards: UL 61010-1:2012 C22.2#61010-1-12:2012 UL 61010-2-010:2019 CSA C22.2#61010-2- 010:2019 Construction in Accordance with the following EMC Standards: EN 61326-1 Inspection. Packing List Unpack the equipment carefully and check for any damage which may have arisen during transport. -
Page 12: Installation Requirements
User Manual VII. Installation Requirements The Water bath should be installed as per the following conditions: 1. Set up only on a bench-top or worktable that is dry, clean and stable with a flat horizontal surface. 2. Ensure the required ventilation clearance space surrounding the instrument is 30-50 cm. (minimum). -
Page 13: Operating Instructions
User Manual VIII. Operating Instructions Display introduction ① TEMP area (PV): Showing measured temperature. ② SET area(SV): Showing set temperature. ③ Heating Lamp: It lights up when it has heat output. ④ TIME: Time display window, it will display running time or parameter value. ④... -
Page 14: Temperature Controller Detailed Operation
User Manual Temperature Controller Detailed Operation 8.3.1 Switch On 1. Connect power according to the power outlet 2. Turn ‘ON’ the instrument by pressing the ‘ON/OFF’ button and the screen will light up. Display shows the ‘initialization sequence’ prior to the instrument being ready for use. -
Page 15: Start / Stop Operation
User Manual Start / Stop Operation 1.After setting the operating parameters, press button for (about 4-5 seconds) to start the heating cycle/cooling process with defined time in hh:mm or continue the process for (00:00). When the word “END” disappears on the right corner of the screen, the message “RUN”... -
Page 16: Alarm / Faults
User Manual Alarm / Faults The oven has a built-in over temperature protection circuit. If the oven’s temperature overshoots, the controller will enter an alarm mode that disables all heating elements to protect your samples. When in alarm mode, a red alarm indicator will display on the screen. The oven will automatically resume operation when the temperature has dropped back below the overshoot threshold. -
Page 17: Calibration
User Manual Calibration Probe Calibration Follow the instructions below to adjust the temperature readout. These steps are only necessary in the event there is a discrepancy between the display and measurements taken with an alternate device. For Example: A thermometer placed inside the oven with a different measurement than the controller. Please Note: Laser probe measurements will be inaccurate without compensating for emissivity. -
Page 18: Other Parameters Function In Menu
User Manual Other Parameters Function in Menu Below are the passwords and access sequence to various parameters/ functions: PASSWORD DESCRIPTION FUNCTION / PARAMETER 0000 Delay of heating cycle start Safety temperature limiter for samples protection Restart mode after absence of power supply Temperature range for over temperature alarm 0003 Temperature offset on single point... -
Page 19: Faults Diagnosis
User Manual Faults Diagnosis Problem Possible Cause Solution Check the power plug is No Power The power plug is not plugged in or inserted, and power switched power not switched ‘ ‘ON Fuse has failed. Replace the fuse. The set temperature is low. Adjust the set temperature. -
Page 20: Maintenance And Cleaning
User Manual Maintenance and Cleaning Please operate and maintain the instrument properly and in accordance with this manual’s instructions so, that it remains in a good working state, which can extend the service life of the instrument. During a routine service, keep the product dry and clean, removing spilled liquid quickly, clean the outer surface with a non-grinding cleaner, and do not connect the power supply until all surfaces are dry.
Need help?
Do you have a question about the 10301001 and is the answer not in the manual?
Questions and answers