
Related Manuals for Godex AP16-F


Summary of Contents for Godex AP16-F
- Page 1 USER MANUAL AP16-F AP16-F SEMI-AUTOMATIC BOTTLE APPLICATOR User Manual Version: 1.2 Issued: July 2022...
-
Page 2: Table Of Contents
3. Safety ..............................3 3.1 Applied harmonized standards and the safe use of electrical appliances ........3 3.2 The possible risk of electric shocks whilst working with the AP16-F ..........4 3.3 Precautions to ensure a safe operation ..................4 4. -
Page 3: Introduction
Once you push the start-button or activate the foot pedal, the device will peel off the label(s) and apply them to the rotating product. After the label has been fully applied, the AP16-F will stop rotating. You can then remove the product and repeat the procedure. Any other use than the one described here is considered improper and may generate significant risk of accident as well as void the warranty. -
Page 4: The Possible Risk Of Electric Shocks Whilst Working With The Ap16-F
• Do not use labels which are not in accordance with the specifications of the AP16-F. • Do not apply labels to items which are not in accordance with the specifications of the AP16-F. • Keep your workplace in order. Clutter in the work area can lead to accidents. -
Page 5: Specifications
AP16-F User Manual V1.2 • Keep bystanders, especially children, away from the appliance when operating it. • Take a secure posture, keep balance. • Carefully maintain your appliances. • Treat your work with caution. Do not use the device if you are not concentrated enough. -
Page 6: Ap16-F Configuration
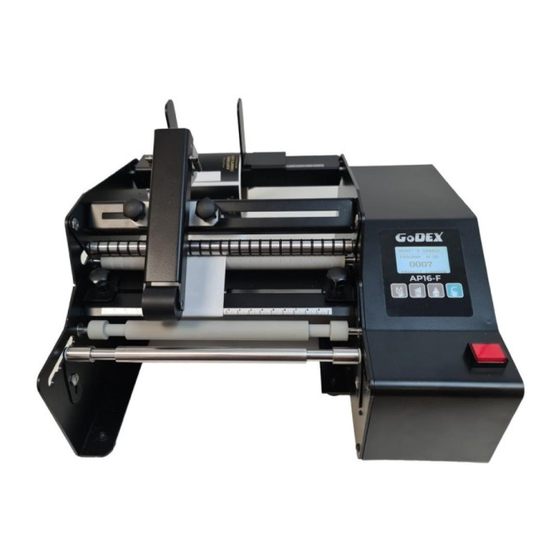
AP16-F User Manual V1.2 6. AP16-F Configuration Picture 1.0 Product support roller. Product drive roller. Product positioners. Liner drive roller. Liner pressure roller. Product pressure arm. Label roll positioners. Label roll holder. Label roll brake. Control panel. Start button. Page 6 of 20... - Page 7 AP16-F User Manual V1.2 Picture 2.0 Product pressure arm. Label roll positioners. Label sensor. Power switch. Power connector. Label guide rod. Label guides. Foot pedal connector. Page 7 of 20...
-
Page 8: Preparation Of The Device
(Pic. 2, no. 14), and connect it with a 220V-240V AC mains socket. In case you wish to use the foot pedal, plug its connector into the socket on the back side of the AP16-F as well (Pic. 2, no. 17). Then install the media. -
Page 9: Operation Of The Device
You now select the language, the application mode (one or two labels), and you enter the label settings according to the instructions in chapter 8. The AP16-F automatically stores the settings you have applied in so-called “programs”. When you start the AP16-F again, the display will automatically show the last “program” you have used. - Page 10 AP16-F User Manual V1.2 Label sensor values: After measuring the gap, you must measure the Picture 5.0 labels. Place the sensor over the label as shown in picture 5.0. Make sure that line “B” is in the middle of the label and that line “A”...
-
Page 11: Label Settings (1-Label Mode)
AP16-F User Manual V1.2 8.3 Label settings (1-Label Mode) Selecting 1-Label mode: -Hold the “ ” button to enter the AP16-F menu -Select the program you want to use or edit with the buttons -hold the “M” button to open the settings -Select your language with the buttons and confirm with the “M”... - Page 12 AP16-F User Manual V1.2 Picture 7.2: in scenario B the correct stop position is 100mm. Picture 7.3: in scenario C the correct stop position is 100mm minus the label length minus ½ gap length Picture 7.4: in scenario D the correct stop position is 100mm minus the combined length of all the labels and all the gaps, plus ½...
-
Page 13: Label Settings (2-Label Mode)
8.4 Label settings (2-Label Mode) Selecting 2-Label mode: -Hold the “ ”button to enter the AP16-F menu -Select the program you want to use or edit with the the buttons -hold the “M” button to open the settings -Select your language with the buttons and confirm with the “M”... - Page 14 AP16-F User Manual V1.2 Calculating the stop positions: The label sensor is located exactly 100mm from the peeling edge and its position is fixed. It is position “S” in below pictures. Because labels have different lengths, we need to calculate the correct stop position, which we enter in the display menu.
- Page 15 AP16-F User Manual V1.2 Picture 8.3: in n scenario C the correct stop position of the back label is 100mm minus the label length minus ½ gap length Picture 8.4: in n scenario D the correct stop position of the back label is 100mm minus the combined length of all the labels and all the gaps, plus ½...
- Page 16 AP16-F User Manual V1.2 Picture 9.2: in scenario B the correct stop position of the front label is 100mm. Picture 9.3: in scenario C the correct stop position of the front label is 100mm minus the label length minus ½...
- Page 17 AP16-F User Manual V1.2 III. Setting the distance between front and back label on the product: Go to “label spacing” in the display menu: 2. Calculate the circumference of the product by multiplying its diameter D with 3,14 3. Deduct the the front label length (L1) and the back label length (L2) from the circumference 4.
-
Page 18: Product Loading
AP16-F User Manual V1.2 Setting the rotation time: After confirming the correct stop positions 1 and 2 in the menu, you enter the rotation time in seconds and confirm. The rotation time is the time the product rotates after the label sensor has detected the end of the label. -
Page 19: Saving Settings For Later Usage
By entering settings for a particular label and product, you automatically create a “program” which is saved in the memory. When you use the AP16-F the next time the device will take you to the program used the last. To add more programs or edit them, you scroll up and down the list with the buttons and select the number of your choice. -
Page 20: Warranty
AP16-F User Manual V1.2 10. Warranty The AP16-F must be used for its intended purpose only, under the specified climatic conditions, in an environment without aggressive liquids and gases that might damage paint or parts. In case you need to announce a warranty claim, contact your certified GoDEX supplier.
Need help?
Do you have a question about the AP16-F and is the answer not in the manual?
Questions and answers