Advertisement
Quick Links
Advertisement

Related Manuals for Turbolock TL111 PRO


Summary of Contents for Turbolock TL111 PRO
- Page 1 V P V V I P P V V P V 9 V...
- Page 2 ZZZ WXUERORFN FRP XVWRPHU 6HUYLFH...
-
Page 3: Maintenance
7D O RI &R W 6 FWLR 6 FWLR SS 8VD H , IRUPDWLR 6DI W :DU L Using the Lock HQHUDWLQ .H SDG 3DVVFRGHV 0DQD LQ .H V ,QWURGXFWLRQ 6 FWLR 6DIHW :DUQLQ V Section 10 Keypad Passcodes QG RI /LIH LVSRVDO KDQ LQ WKH GPLQ 3DVVFRGH 6 FWLR GGLQ .H SDG 3DVVFRGHV... - Page 4 6 FWLR , IRUPDWLR 6DI W :DU L , WURG FWLR 7KLV XVHU PDQXDO ZLOO XLGH RX WKURX K WKH IXQFWLRQV DQG XVD H RI RXU 7XUER/RFN 7/ 352 OXHWRRWK HQDEOHG 6PDUWORFN ,W LV LPSRUWDQW WKDW RX IROORZ DOO LQVWUXFWLRQV DQG UH DUG DOO QRWHV WKDW DSSHDU WKURX KRXW WKLV PDQXDO RQVXOW WKLV PDQXDO EHIRUH RX DWWHPSW WR XVH RXU ORFN ,I RX KDYH TXHVWLRQV QRW DQVZHUHG E WKLV PDQXDO RU DUH LQ QHHG RI UHSDLU RU QRQ URXWLQH VHUYLFH FRQWDFW FXVWRPHU VHUYLFH DW...
- Page 5 • Never submerge the lock or any of the lock’s components. • Hanging objects on the lock is not recommended. • The lock may be used with the TurboLock Plus app. The lock will function without the app but full functionality may DFKL WK DSS L 1.3 End-of-Life Disposal...
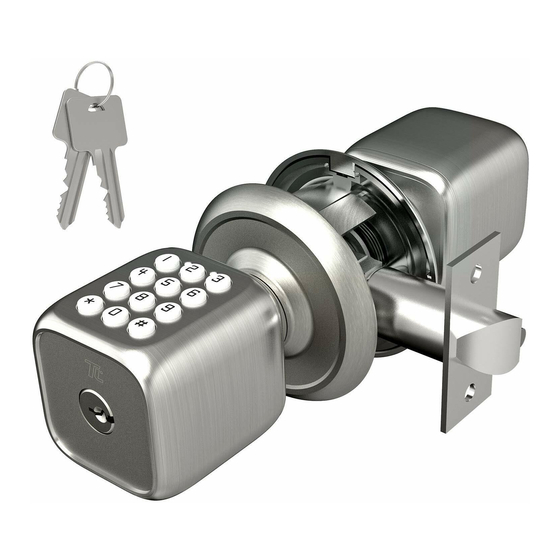
- Page 6 7KLV PLGGOH LQVLGH VFUHZ ZLOO U F G &R W L WR the xture when loosened. Turn FRXQWHUFORFNZLVH WR ORRVHQ TL111 PRO Bluetooth-enabled Smartlock x 1 Outside Knob x 1 Inside Knob x 1 Latch Assembly x 1 Wood Screws x 6...
- Page 7 2.3 Battery Information The lock requires four ‘AAA’ batteries. New batteries should be installed as soon as possible after receiving the rst low-battery warning (three sets of triple beeps). After that rst noti cation, the lock will only have enough power for approximately 50 uses before the batteries are fully depleted.
- Page 8 FWLR IWHU WXUQLQ WKLV IXQFWLRQ RQ RX FDQ RSHQ WKH GRRU ZLWKRXW WKH QHHG RI D SDVVFRGH RU H NH Using an E-Key GPLQ HQHUDWHV DQG VKDUHV H NH V WKURX K WKH 7XERORFN 3OXV DSS ,Q RUGHU WR XVH WKH H NH KRZHYHU WKH SHUVRQ EHLQ VKDUHG ZLWK PXVW DOVR GRZQORDG WKH 7XUERORFN 3OXV DSS DQG UH LVWHU IRU DQ DFFRXQW 2QFH OR HG LQ WKH WUXVWHG XVHUV FDQ UHFHLYH DQG XVH H NH V 5HIHU WR Section 8.5 Use E-Keys in App IRU PRUH LQIRUPDWLRQ...
- Page 9 6KDUH DQG PDQD H H.H V IURP DQ ZKHUH LQ WKH ZRUOG 9LHZ XQORFN UHFRUGV IURP DQ ZKHUH LQ WKH ZRUOG 0DQD H XVHU DFFHVV IURP DQ ZKHUH LQ WKH ZRUOG Directly from the TL111 PRO Lock You Can: UHGLW HGLW DGPLQ SDVVFRGHV UHDWH HGLW NH SDG SDVVFRGHV...
- Page 10 • For easier installation, have another person help to hold the lock. • Remove all parts of any old lock before installing the TL111 PRO. In some cases, the old strike plate and/or box may be used. • For your convenience, installation instructions are broken into segments. Read and follow the instructions for both Pre- ,QVWDOODWLRQ DQG 0DLQ ,QVWDOODWLRQ •...
- Page 11 3DUW WDOOL DWFK KEEP DOOR OPEN AT ALL TIMES SHORTLY BEFORE, DURING AND SHORTLY AFTER INSTALLATION. If the lock is incomplete or improperly installed, the lock and/or door may become stuck. After nishing installation, be sure to use the door at least once to make sure all parts of the lock function correctly. 6W S Insert the latch into the hole and check it.
- Page 12 DL , WDOODWLR 6W S 6WDUW ZLWK WKH RXWVLGH NQRE HQWO IHHG WKH SRZHU FDEOH DQG WDLO SLHFH WKURX K WKH VTXDUH KROH LQ ODWFK 7KUHDG WKH two pegs through the smaller round holes. If needed, have someone hold the door itself or hold the outside knob at D DLQVW WKH IURQW RI WKH GRRU DIWHUZDUGV (Fig.
- Page 13 6W S HHG WKH SRZHU FDEOH WKURX K WKH EDWWHU FRPSDUWPHQW DQG PDNH VXUH WKH VLGH ZLWK LQVLGH VFUHZ LV GRZQZDUG (Fig. 7) 6W S HQWO SXOO RXW WKH SRZHU FDEOH FRQQHFWRUV DQG VQDS WKHP WR HWKHU 2QFH FRQQHFWHG HQWO FROOHFW WKH WZR FDEOHV EDFN LQWR WKH EDWWHU FRPSDUWPHQW (Fig.
-
Page 14: Installation (New)
6 FWLR Installation (New) Backset Mark Hole FWLR G WDLO L WDOODWLR G G LI R DU L WDOOL WK 7 352 R D GRRU Latch Hole LWKR W D F WR W ,I R DU WK 7 352 WR U SODF D ROG ORFN RU LI R U GRRU RWK U L DOU DG KD D F WR W SO D R DFN WR 6 FWLR... - Page 15 P O WK The TL111 PRO comes already assembled. Before installation, loosen the inside screws (counterclockwise) and mounting screws (counterclockwise) to disassemble the lock into six main parts: Outside Knob x 1, Inside Knob x 1, Latch Assembly x 1, Battery Compartment x 1, Back Plate Cover x1, and Back Plate x 1.
- Page 16 3DUW WDOOL DWFK 6W S ,QVHUW WKH ODWFK LQWR WKH KROH 8VLQ D SHQFLO PDUN D OLQH DURXQG HG H RI ODWFK SODWH WR XVH DV D XLGH IWHU PDUNLQ DW DOO IRXU VLGHV RI WKH SODWH UHPRYH WKH ODWFK (Fig.
- Page 17 3DUW &U DWL RUWL WDOOL WK 6WULN 6W S 3XVK WKH GRRU XQWLO QHDUO FORVHG DQG FKHFN ZKHUH WKH ODWFK V EROW WRXFKHV WKH IUDPH 6W S 8VH D SHQFLO WR PDUN WKH KRUL RQWDO FHQWHU RI WKH ODWFK RQ WKH GRRU IUDPH (Fig.
- Page 18 6W S Position the strike and strike box, then use a pencil to mark the center points of the screw openings in the strike plate. Set the strike and strike box aside DQG GULOO WZR VPDOO KROHV DW HDFK FHQWHU SRLQW 6W S Position the strike and strike box.
- Page 19 6W S HHG WKH SRZHU FDEOH WKURX K WKH EDFN SODWH FRYHU DQG FRYHU LW RQ WKH EDFN SODWH part, then use the hex key to tighten the inside screw (clockwise) at the bottom of DFN 3ODWH RYHU EDFN SODWH FRYHU (Fig.
- Page 20 RU VHFXULW LW LV KL KO UHFRPPHQGHG WKDW RX FKDQ H WKH DGPLQ SDVVFRGH IURP WKH PDQXIDFWXUHU GHIDXOW 6W S Press the ‘#’ on the keypad. Enter the default (‘123456’) or the current admin passcode, then press ‘#’. The TL111 PRO ZLOO EHHS...
- Page 21 D DLQ 6W S The TL111 PRO will beep 3 times. Enter ‘3’ then press ‘#’ before the keypad turns o . 6W S Before the keypad turns o , enter the keypad passcode you wish to delete, then press ‘#’ .
- Page 22 V ORQ DV WKH FRUUHFW SDVVFRGH VHTXHQFH LV HQWHUHG UH DUGOHVV RI KRZ PDQ GL LWV ZHUH HQWHUHG EHIRUH RU DIWHUZDUGV WKH 7/ 352 ZLOO XQORFN For example, if your user passcode is “080808“, you can successfully unlock the TL111 PRO by entering “11354080808”, “11080808”, “10808081” and so on. 6 FWLR...
- Page 23 7KH ORFN ZLOO EHHS WLPHV LQGLFDWLQ D VXFFHVVIXO RSHUDWLRQ 7KH TL111 PRO will remain unlocked until passive mode is turned o . 2U RX FDQ WDS GLUHFWO RQ 7XUERUORFN 3OXV SS KRPH VFUHHQ ZKLOH LQ OXHWRRWK UDQ H DQG FRQ...
- Page 24 7KH 7XUER/RFN 3OXV DSS FRPSDWLEOH ZLWK PRVW QGURLG DQG L26 VPDUWSKRQHV UDQWV DFFHVV WR DOO RI WKH 7/ 352 V IHDWXUHV Through the app, you can unlock the TL111 PRO, create and send passcodes (E-Keys), track unlocking records and more. To get WKH DSS IROORZ WKH LQVWUXFWLRQV EHORZ SS ,...
- Page 25 SS 8 D From the lock list screen (Fig. 2), tap HW PRUH LQformation about lock service (Fig. 3). Or tap the name of lock to enter operation screen (Fig. 4 and Fig. 5). • SS FRQWHQW VXEMHFW WR FKDQ H ZLWKRXW noti cation.
- Page 26 UDWL SDG 3D RU XVHUV ZLWKRXW WKH 7XUER/RFN 3OXV DSS WKH GPLQ FDQ HQHUDWH D GL LW WHPSRUDU NH SDG SDVVFRGH WKDW XVHUV FDQ PDQXDOO HQWHU RQ WKH 7/ 352 NH SDG WR XQORFN 7KLV GL LW FRGH FDQ EH UHYRNHG DW DQ WLPH E WKH GPLQ 7KLV LV D WHPSRUDU XQORFN FRGH WKDW FDQ EH XVHG WLPHV DV DVVL QHG E WKH GPLQ 8VH RI WHPSRUDU NH SDG SDVVFRGHV DUH QRW OR...
- Page 27 6W S Make sure you are within Bluetooth range (approx. 10m / 30 ft) of the lock. 6W S . Login to the Turbolock Plus app with your Turbolock account. Enter the User View (Fig. 5). 6W S Tap the [LOCK ICON] icon in the app screen to open the lock. Make sure the Bluetooth status icon is lit up ([purple bluetooth icon]).
- Page 28 RQ WKH NH SDG DQG HQWHU WKH FXUUHQW GPLQ 3DVVFRGH 7KHQ SUHVV D DLQ 6W S The TL111 PRO will beep 3 times. Press ‘5’ followed by ‘#’ before the lock’s backlight turns o . After another 3 beeps, WKH ORFN ZLOO UHVHW 2SWLR...
-
Page 29: Speci Cations
6 FWLR Speci cations ,WHP HVFULSWLRQ 0RGHO 1DPH 1HW :HL KW LPHQVLRQV 7.7 x 3.7 x 3.7 in (196 x 95 x 95 mm) 0DWHULDO LQF DOOR DWWHU 7 SH 4 x AAA /DWFK 6SULQ 6WDQG E RQVXPSWLRQ 3K VLFDO .H V HQHUDWHG 7HPSRUDU Up to 300 temporary (keypad) passcodes can be generated from the app, distributed evenly /RFN RGHV... - Page 30 • After cleaning with a cleaner or detergent, wipe o any residue using a second non-abrasive cloth. Be sure to dampen the cloth with clean (puri ed) water. • The TL111 PRO meets IP65 water-resistance. It can withstand splashes and contact with water once properly installed; KRZHYHU GR QRW VXEPHU H WKH ORFN •...
- Page 31 3UR O P L O &D Solution(s) :K GR WK ORFN 7KH ODWFK VL H LV ZURQ LVDVVHPEOH WKH ORFN DQG FKHFN WKH ODWFK DVVHPEO jam? / The door doesn’t If retro tting, compare the latch length and adjust as QHHGHG ,I LQVWDOOHG RQ D QHZ GRRU DGMXVW WKH ODWFK DQG or, drill into the door to t the latch as needed.
- Page 32 3UR O P L O &D Solution(s) W U G WK SD ,I D SDVVFRGH KDV EHHQ HQWHUHG ZURQ :DLW PLQ DQG WU D DLQ RU XVH WKH SK VLFDO NH WR wrong (at least 5x). 5x in a row, regardless of the entry RSHQ WKH ORFN GLUHFWO PHWKRG WKH ORFN ZLOO R LQWR D PLQXWH...
- Page 33 FKDQ HV ZLOO QRW EH UHWURDFWLYH Warranty services are provided by TurboLock Warranty Pro (“WP”). If a hardware defect arises and a valid claim is received within the Warranty Period, at its option and to the extent permitted by law, WP will: (1) repair the hardware defect by using new or refurbished parts that are equivalent to new in performance and reliability;...
- Page 34 This Warranty does not cover any damage due to: (a) transportation; (b) storage; (c) improper use; (d) failure to follow the product instructions or to perform any preventive maintenance; (e) modi cations; (f) unauthorized repair; (g) normal wear and tear; or (h) external causes such as accidents, abuse, or other actions or events beyond our reasonable control.
- Page 36 23<5, 785 2/2 . // 5, 76 5 6 59...
Need help?
Do you have a question about the TL111 PRO and is the answer not in the manual?
Questions and answers