
Related Manuals for WALDIS Tresore AXESSOR USB


Summary of Contents for WALDIS Tresore AXESSOR USB
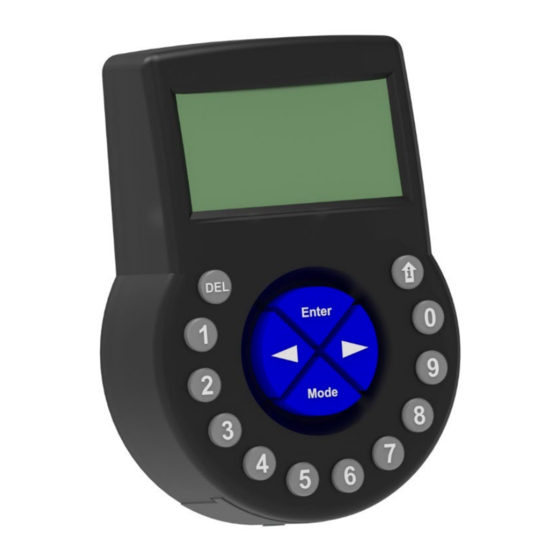
- Page 1 www.tresore.ch OPERATING INSTRUCTIONS KEYPAD LOCK AXESSOR USB Electronic door lock for WA safes Issue 08.2020...
- Page 2 Thank you very much ❤ We would like to thank you for choosing Waldis when it comes to safety. When buying a safe, you have chosen a product tested according to EN1143-1. A Swiss quality product with VdS - tested security.
-
Page 3: Table Of Contents
Table of contents Safe lock ........................ 1 1.1. General notes ....................1 1.1.1. Closed position ..................1 1.1.2. Opening the lock ..................1 1.1.3. Closing the lock ..................2 1.1.4. Code structure ..................2 Code Programming ....................3 1.2. Code programming menu ................3 1.2.1. -
Page 4: Safe Lock
Safe lock 1.1. General notes 1.1.1. Closed position = Move to the "OPEN" position. (Turn in the direction of the arrow to open the safe). 1.1.2. Opening the lock First turn the opening rotary handle to the closed position. This relieves the load on the lock bolt. -
Page 5: Closing The Lock
1.1.3. Closing the lock Close the safe door. Turn the rotary opening handle to the closed position. The lock closes automatically and is thus secured. Description: In the AXESSOR USB lock, 1 master, 2 manager and up to 18 user codes can be programmed. -
Page 6: Code Programming
Code Programming 1.2. Code programming menu Attention: It is essential to reprogram the original opening code (master code 1) 0 0 1 2 3 4 5 6, as a third party may know this factory code and open the safe. All code reprogramming must be performed with the door open. -
Page 7: Manager Code 10 Or 20
1.2.2. Manager code 10 or 20 Procedure 1. With the lock open and the opening handle in the open position, press the MODE key; PRG-MOD appears in the display. 2. Enter existing MASTER-CODE (for initial programming 0 0 1 2 3 4 5 6), confirm with ENTER, TIME appears in the display. -
Page 8: Deleting An Operator Code
1.2.4. Deleting an OPERATOR code Procedure 1. With the lock open and the opening handle in the open position, press the MODE key; PRG-MOD appears in the display. 2. Enter existing MASTER-CODE (for initial programming 0 0 1 2 3 4 5 6), confirm with ENTER, TIME appears in the display. -
Page 9: Manipulation Lock
1.2.7. Manipulation lock After four incorrect code entries, the lock enters a locking period of 5 minutes (penalty appears on the display). The remaining locking time is shown on the display. This locking period cannot be bypassed. After the time has elapsed, a new opening attempt can be made. -
Page 10: Pin Assignment
1.3.2. Pin assignment Terminal assignment Clamp Color Event white Door / bolt position contact internal white Door / bolt position contact internal IN1 + Remote lock IN1 - blue Remote lock OUT1 A black Silent alarm OUT1 B white Silent alarm OUT2 A brown Door/lock position... -
Page 11: Password
1.4. Password 1.4.1. Basic rules when choosing a password 1.4.1.1. Avoid the obvious passwords • No trivial values like 000000, 000815, 123456 • Do not use your own birthday, car license plate, phone number or name (your own, wife/husband, children, pets, company, place of residence, etc.) as password. - Page 12 Notes _______________________________________________________________________________ _______________________________________________________________________________ _______________________________________________________________________________ _______________________________________________________________________________ _______________________________________________________________________________ _______________________________________________________________________________ _______________________________________________________________________________ _______________________________________________________________________________ _______________________________________________________________________________ _______________________________________________________________________________ _______________________________________________________________________________ _______________________________________________________________________________ _______________________________________________________________________________ _______________________________________________________________________________ _______________________________________________________________________________ _______________________________________________________________________________ _______________________________________________________________________________ _______________________________________________________________________________ _______________________________________________________________________________ _______________________________________________________________________________ _______________________________________________________________________________ _______________________________________________________________________________ _______________________________________________________________________________...
Need help?
Do you have a question about the Tresore AXESSOR USB and is the answer not in the manual?
Questions and answers