
Related Manuals for WALDIS PAXOS ADVANCE DUAL LOCK


Summary of Contents for WALDIS PAXOS ADVANCE DUAL LOCK
- Page 1 OPERATING INSTRUCTIONS SAFE LOCK PAXOS ADVANCE DUAL LOCK Electronic safe lock for WA safes...
- Page 2 Many thanks! ❤️ Many thanks for choosing Waldis to give you the security you want. The safe you have decided to purchase is a product tested in compliance with the EN1143-1 standard. A Swiss quality product with security tested by the VdS (German Association of Indemnity Insurers).
-
Page 3: Table Of Contents
Table of contents Overview ..........................1 1.1. Operating controls: WALDIS First and Premium ............ 1 1.2. Description of keys and operating controls ............. 2 Starting to use your safe ....................3 Operation ..........................5 3.1. Opening the safe ......................5 3.2. -
Page 4: Overview
Overview The Paxos Advance is installed in the WALDIS First and WALDIS Premium series of models. Because of their high security class, this is the only lock that is allowed to be installed in these series of models. Users find that the display makes it easy and clear to operate. -
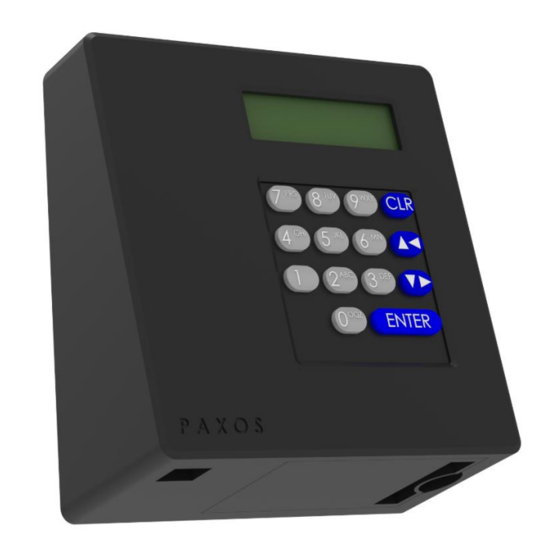
Page 5: Description Of Keys And Operating Controls
1.2. Description of keys and operating controls Pos. 1 = LCD display Menu and input display Pos. 2 = CLR key Delete inputs Cancel a function Return to menu level Pos. 3 = Arrow key up/left Select the next menu item Select the next input value Pos. -
Page 6: Starting To Use Your Safe
Starting to use your safe As soon as the safe has been delivered and correctly anchored, you can start operating the lock and using the safe. To do so, please keep to the following procedure: 1. Check that the rotary opening handle is in the 'closed' position. - Page 7 5. Carefully re-insert the battery case and swivel it upwards into the housing of the input unit until the battery housing clicks into place. As soon as the input unit is supplied with power, the display shows one of these "Battery case was open, messages: battery inserted"...
-
Page 8: Operation
Operation 3.1. Opening the safe 1. First, press the rotary opening handle counterclockwise into the "closed" position to make sure that the lock bolt is relieved of pressure. 2. Press the ENTER key and the display will "Date, time saved" message. show the 3. -
Page 9: Locking The Safe
3.2. Locking the safe 1. Close the door while the rotary opening handle is in the "open" position. 2. Turn the rotary opening handle counterclockwise into the "closed" position (lock closes automatically). Wait for the "Lock closed!" message on the display. 3. -
Page 10: Reprogramming Codes
3.4. Reprogramming codes NOTE: A new code must always be programmed while the door is open so that the safe is not closed in case of an incorrect input, which would result in an incorrect code being programmed! If the code has been forgotten or can no longer be reconstructed, an emergency opening of the safe must be performed and it must be repaired or replaced at the owner's expense! The certification lapses in case of a repair. -
Page 11: User Code 01 (Oca2) And User Code 02 (Ocb2) For Lock 2
7. Then enter the new code (8 digits) and confirm again with the ENTER key. 8. Enter the new code again to confirm it, and press the ENTER key to complete the confirmation. The display shows: "Code saved". 9. With the door open, move the rotary opening handle counterclockwise into the "closed"... -
Page 12: Master Code 00 (Ma2)
1. Open the door with the current codes. 2. Leave the rotary opening handle in the "open" position. 3. On the input unit, press the ENTER key; confirm the "Code functions" menu that is shown on the display by pressing the ENTER key again. 4. -
Page 13: Replacing The Battery
3.6. Replacing the battery 1. Purchase the batteries (6 x 1.5 V AA Note the expiration date! alkaline batteries: LR6, E91 or AM3). 2. Use your finger to release the battery case that is slotted into the input unit from below, and swivel it downwards and outwards. -
Page 14: Malfunctions
As soon as the input unit is supplied with power, the display shows one of these messages: "Battery case was open, battery inserted" or "Battery case was open, rechargeable battery inserted". 6. To delete the battery message, you must first press the ENTER key and then enter the master code (MA1) or the battery code (11111111). -
Page 15: Assignment Of Connections On The I/O Box
Assignment of connections on the I/O NOTE: Installation and connection of the safe to an alarm or security system must only be performed by trained specialist staff! 5.1. Assignment of terminals on the I/O box The I/O box has 8 inputs and 8 outputs, connections for the power supply, and an RS232 interface. -
Page 16: Connection Data For The I/O Box
5.2. Connection data for the I/O box Terminal Description Capacity/comments 1 (IN1) / 2 (GND) ** Input 1 12 ... 24 VDC (min. 5 mA) Standard: remote * Connection without tamper lockout monitoring switch (factory configuration): 3 (IN2) / 4 (GND) * Input 2 ext. - Page 17 Terminal Description Capacity/comments 7 (OUT1+) / 8 Output 1 Output voltage: 24 VAC (OUT1–) Standard: lock 1 open Power load at output: 9 (OUT2+) / 10 Output 2 (OUT2–) 0.4 A at 25°C Standard: all locks and door bolts open 0.3 A at 50°C 11 (OUT3+) / 12 Output 3...
- Page 18 Terminal Description Capacity/comments 39 (NC) / 40 (COM) Output 8 Output voltage: 24 VAC / 41 (NO) power load at output: Standard: 0.4 A at 25°C monitoring of 0.3 A at 50°C external power supply ext. I/O box NC (39) COM (40) NO (41) 14 (VDC) / 15...
-
Page 19: Basic Rules For Secure Codes
Basic rules for secure codes What you should avoid: • Don't use commonplace sequences such as 00000000 or 12345678. • Do not use your own birthday or any car registration numbers, phone numbers or names (your own name or those of your spouse, children, pets, company, place where you live, etc.).
Need help?
Do you have a question about the PAXOS ADVANCE DUAL LOCK and is the answer not in the manual?
Questions and answers