Table of Contents
Advertisement
Quick Links
iXH-Camera Systems
Installation Guide
Phase One
iXH Camera System
Developed for Phase One Cultural Heritage, Scientific and
Industrial Imaging Solutions
Installation Guide
This guide describes installation of your Phase One iXH-150MP camera system. As new features are introduced via
firmware updates, the downloadable version of this document changes accordingly. Downloads are available
HERE
Advertisement
Table of Contents

Related Manuals for PhaseOne iXH


Summary of Contents for PhaseOne iXH
- Page 1 Developed for Phase One Cultural Heritage, Scientific and Industrial Imaging Solutions Installation Guide This guide describes installation of your Phase One iXH-150MP camera system. As new features are introduced via firmware updates, the downloadable version of this document changes accordingly. Downloads are available HERE...
-
Page 2: Table Of Contents
Connecting a USB-c Cable to a Computer ................17 10 Starting a Tethered Session in Capture One ............... 19 11 Setting Date and Time on the iXH camera ................20 12 Operating the Phase One iXH camera using 1G/10G ............21 13 Connecting a new camera to Capture One ................. - Page 3 Checking the Camera Firmware Version ................38 18.1 About the Phase One Firmware Updater Application ............. 38 18.2 Installing the Firmware Updater Application ..............39 18.3 18.3.1 Mac ......................... 39 18.3.2 Windows ......................... 39 Updating the iXH Camera Firmware ................... 39 18.4 Page 3...
-
Page 4: What's In The Box
Installation Guide 1 What’s in the Box? The Standard Components below are included with the camera; the Optional Components can be purchased separately. Phase One iXH 150MP camera • Phase One RS 72mm Mkll / f5.6 Lens • 24 V DC power supply with international outlet adapters, 5m •... -
Page 5: Camera Systems Overview
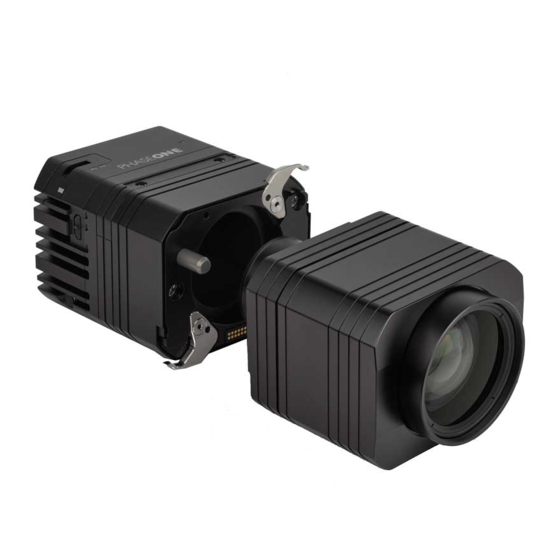
Camera Systems Installation Guide 2 Camera Systems Overview The iXH camera is integrated into a Cultural Heritage digitization system offering high resolution capturing capabilities with the Phase One image capture and processing software, Capture One CH. This iXH Installation Guide guides you through the required procedures for installing the iXH camera. - Page 6 Camera Systems Installation Guide Figure 1 - Camera Parts Page 6...
-
Page 7: Mounting/Dismounting A Lens
Camera Systems Installation Guide 3 Mounting/Dismounting a Lens Figure 2 – Mounting a Lens NOTE: Before mounting or dismounting a lens, ensure that the power cable is not attached to the camera Page 7... -
Page 8: Dismounting A Lens From The Ixh Camera
Camera Systems Installation Guide 4 Dismounting a Lens from the iXH Camera Lenses on the iXH series of cameras are easily dismounted. Note: Ensure that you only dismount lenses in a clean environment. Place the detached lens on a soft cloth on the table to avoid scratching the lens. - Page 9 If no lens is being mounted, ensure that the camera is stored in a way to protect it from dust, moisture and other damage. When the iXH camera is mounted facing down always make sure (double check) that the lens is well secured by having the lens locking levers engaged.
-
Page 10: Mounting A Lens On The Ixh Camera
Ensure that you remove the rear lens cap (if attached) before mounting the lens. ▪ To Mount a lens: 1. Place the Lens over the iXH camera body and guide it into position against the camera body using the two large positioning pins. Figure 5 – Positioning Pins... - Page 11 Camera Systems Installation Guide 2. Close the Lens locking levers. Figure 6 –Lens Locking Lever Note: The Lens is asymmetrical and can only be fitted in ONE position. Page 11...
-
Page 12: Connecting Peripherals
1. If not already attached, use the supplied 4mm Allen screwdriver to attach the VHQ L Bracket to the iXH camera by its two (hidden) screws. 2. Attach and secure the camera onto the receiver on the Phase One copy stand. If using a 3rd party copy stand you can use the 3/8’... -
Page 13: Camera Remote Triggering
Hand release trigger with 30cm cable to the iXH camera. To connect the Remote Shutter Trigger: 1. Connect the LEMO-of the iXH 5-meter trigger cable to one of the data terminals of the iXH camera. -
Page 14: Connecting A Foot Pedal
Foot pedal unit to the iXH camera. To Connect a iXG Foot Pedal: 1. Connect the LEMO-of the iXH trigger cable to one of the data terminals of the iXH G camera. 2. Connect the other end (female Audio Connector) of the iXH hand release trigger cable to the 3.5mm male audio jack of the foot pedal. -
Page 15: Connecting Flash Sync Cable
To connect the Flash sync cable: 1. Connect the Lemo connector of the Flash sync cable to the iXH camera’s sync terminal on the right hand side of the camera. 2. Connect the cable’s other end (Audio connector) to the Flash device. -
Page 16: Connecting The Power Supply
Installation Guide 8 Connecting the Power Supply To connect the camera to the iXH power supply: • Connect the Lemo connector of the iXH power cable to the power terminal of the iXH camera. Note When not in use, always disconnect the power from the iXH camera. -
Page 17: Connecting A Usb-C Cable To A Computer
Installation Guide 9 Connecting a USB-c Cable to a Computer Connecting iXH to a computer using a USB-c cable: 1. Insert the end of the USB-c cable to the USB-c port of the camera. 2. Connect the other end of the USB-c cable to the USB port of your computer. - Page 18 Camera Systems Installation Guide Page 18...
-
Page 19: Starting A Tethered Session In Capture One
Camera Systems Installation Guide 10 Starting a Tethered Session in Capture *After installing and activating the software, see Capture One Installation To start a tethered session: From the File menu, select New Session 1. Fill in the information to customize your session 2. -
Page 20: Setting Date And Time On The Ixh Camera
Camera Systems Installation Guide 11 Setting Date and Time on the iXH camera 1. In Capture One, go to the Camera Settings Tool 2. The first field at the top shows the current date and time set on the camera 3. -
Page 21: Operating The Phase One Ixh Camera Using 1G/10G
1G/10G Phase One iXH cameras use both USB3 and 10G interfaces (not simultaneously). To connect a Phase One iXH camera using 10G networking, use one of the following medias: • _Up to 5 meters: Use SFP + DAC passive cable. Consumes less power on the camera side. -
Page 22: Connecting A New Camera To Capture One
Camera Systems Installation Guide 13 Connecting a new camera to Capture To Connect a new camera to Capture One perform the following procedures: 1. Connect the camera to the computer running Capture One. 2. Click Camera > Camera Network Manager 3. -
Page 23: Verified Hardware For 10G Networking
Camera Systems Installation Guide 3. Make sure that the IP configuration settings are valid and that the 10G option is set to Enable in Camera Settings > Power Management. 13.2 Verified hardware for 10G networking Company: www.SFPcables.com. 13.3 Adapters... -
Page 24: Media
Camera Systems Installation Guide 13.5 Media Copper: Cat 6e and better are required for 10G communication. Lengths range from 1 meter up to 10 + meters. LC to LC, Multimode OM3 10Gb 50/125μm, Duplex. Lengths range from 1 meter Fiber optic: up to 100+ meters. - Page 25 Camera Systems Installation Guide Page 25...
- Page 26 Camera Systems Installation Guide 4. Click Configure for the network adapter and select Advanced tab. Page 26...
- Page 27 Camera Systems Installation Guide 5. Select Jumbo Frame and the required value for your system, (e.g., 9kB MTU [9,014 Bytes]) depending on the NIC. 6. Click OK to all dialogs. • _NOTE: When you make this change, the NIC loses network connectivity for a few seconds.
-
Page 28: Selecting Next Capture Adjustments
Camera Systems Installation Guide 14 Selecting Next Capture Adjustments In the Next Capture Adjustments section, configure the following: ICC Profile • Orientation • Metadata • All Other • Styles • Auto Alignment • Page 28... -
Page 29: Selecting Camera Controls And Settings
Camera Systems Installation Guide 15 Selecting Camera Controls and Settings In the Camera Controls Section, make selections for: Shutter speed • Aperture • • White Balance (from the list or manually) • File Format (IIQ-L 16/14-bit or IIQ-S) •... - Page 30 Camera Systems Installation Guide 6. Adjust the composition. 7. In the Camera focus tool, click on the focus arrows to focus the camera’s lens. 8. Click single arrows for fine focusing and multiple arrows for medium or large focusing.
- Page 31 Camera Systems Installation Guide 11. Enter the Target value in the field and click on the button next to it to apply the value. The Camera Focus tool will now indicate how far the camera has to move on the copy stand to reach the desired target resolution.
- Page 32 Camera Systems Installation Guide will automatically move the lens Up/Down until focus is achieved and the frame is shown in Orange. 14. To use Fine Auto Focus, press and hold the Alt Key and then press the AF button.
-
Page 33: Capturing Images
Camera Systems Installation Guide 16 Capturing Images This section describes the basic steps required for capturing images, optimized in terms of exposure resolution and sharpness. For more advanced instruction, please refer to Capture One’s manual. 16.1 Shooting a Test Shot To shoot a test shot: 1. -
Page 34: Setting White Balance
Camera Systems Installation Guide 2. Check your exposure with the over-exposure and under- exposure warnings and make any necessary corrections. The following figure is an image with a warning of white areas that are over exposed. The following figure displays the Warning On/Off toggling option at the upper tool bar. -
Page 35: Light Control Setting
Light Strobe signal available on both the LEMO 2 and LEMO 3 terminals. The iXH Light Control cable connects to either LEMO 2 or 3 in one end and to a Light controller in the other end with the audio connector. -
Page 36: Light Strobe Mode
Hence the duration of the light pulse is not the same as the exposure time. There DT Photon Smart Controller is a light system that is directly compatible with iXH. The Photon Smart Controller supports operation with a basic modelling light level (called DIM level) and raises to higher light level for exposure (called FLASH Level). - Page 37 Camera Systems Installation Guide Note: When Lighting Mode is “Flash” the LEMO 2 and 3 does not create the Light Strobe signal. When Lighting mode is "Continuous Light" there is no creation of Flash trigger pulse on Lemo5 Page 37...
-
Page 38: Firmware Handling
18.2 About the Phase One Firmware Updater Application The Phase One Firmware Updater application is used to update your Phase One iXH camera with new firmware. The Firmware Updater for Mac or Windows is available at the Downloads section of the industrial.phaseone.com website. -
Page 39: Installing The Firmware Updater Application
Installation Guide 18.3 Installing the Firmware Updater Application Download the Firmware Updater from the Downloads section of the industrial.phaseone.com website and follow the appropriate installation instructions below: 18.3.1 Mac To install the Firmware Updater on a Mac: 1. Open the zip file and copy the Firmware Updater application to your Applications folder. - Page 40 Camera Systems Installation Guide 4. After downloading the new firmware, the download button becomes a Release Notes button. 5. Click the Release Notes button to download the release notes for the newest firmware. 6. To update the camera to the latest firmware, click Update. The firmware is written to the camera and a cog icon is displayed next to the MAIN component and a progress bar displays the progress of the update.
- Page 41 Camera Systems Installation Guide 19. Restoring the iXH Camera Firmware To restore the camera’s firmware to the factory version (camera settings are not affected): 1. Peel off the two plastic covers shown in the image below and remove the two screws and the metal cover.
- Page 42 Camera Systems Installation Guide Phase One Industrial Support industrial.phaseone.com/support.aspx Download the latest version from industrial.phaseone.com/downloads.aspx Visit the website for additional information industrial.phaseone.com Page 42 © Phase One 2020 80089000 revision 1.0 / iXH 150MP Installation Guide...
Need help?
Do you have a question about the iXH and is the answer not in the manual?
Questions and answers