Table of Contents
Advertisement
Quick Links
Advertisement
Table of Contents

Related Manuals for PhaseOne iXR


Summary of Contents for PhaseOne iXR
- Page 1 Phase One iXR Reproduction Camera System Quick Guide...
-
Page 3: Quick Guide
Phase One iXR Reproduction Camera System Quick Guide This Quick Guide shows the basic operations of your new Phase One iXR camera system. -
Page 4: Table Of Contents
Contents 1. What’s in the Box? ..............7 2. Overview ................8 Camera ................8 Digital Back ................9 Before You Start ..............10 Charge Battery for the Digital Back ........10 3. Preparing the Camera ............11 Mounting a Lens ..............11 Mounting the Digital Back ..........11 Dismounting the Digital Back ..........13 Inserting the Battery in the Digital Back ......13 Removing the Battery from the Digital Back .....14... - Page 5 Selecting Next Capture Adjustments ....... 22 Selecting Camera Controls ..........22 Selecting Camera Settings ..........23 Working with Live View ............ 23 5. Ready to Shoot ..............25 Shooting a Test Shot ............25 Evaluating Your Shot ............25 Setting White Balance ............26 6.
-
Page 7: What's In The Box
1. What’s in the Box? • iXR camera • Hand release cable • 24V DC power supply (iXR) • EU adapter • US adapter • UK adapter • IEC adapter • AUS adapter • Mini-USB cable • iXR Quick Guide... -
Page 8: Overview
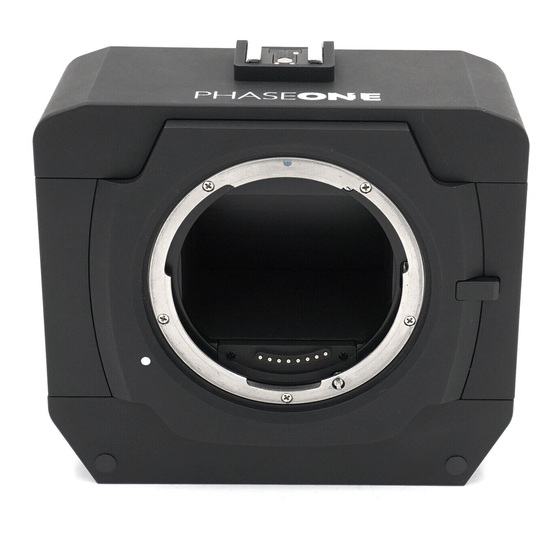
2. Overview Camera 1. IXR camera body 2. On/off button 3. LED indicator 4. Power terminal 5. Data terminal A 6. Data terminal B 7. 3/8 inch tripod sockets (2) 8. Flash sync terminal 9. Lens release button 10. Lens mount alignment mark 11. -
Page 9: Digital Back
Digital Back 1. Digital back 2. Digital back lock 3. Digital back release button 4. Battery compartment 5. FireWire 800 port 6. USB 3.0 port 7. CompactFlash card slot... -
Page 10: Before You Start
To learn more about the capabilities of the back, download the IQ back user guide from the downloads section of the industrial.phaseone.com website. Charge Battery for the Digital Back Charge the battery (approximately 2.5 to 3 hours) as soon as... -
Page 11: Preparing The Camera
3. Preparing the Camera Mounting a Lens To mount a lens on the camera: 1. Remove the front body cap, just like you would remove a lens, by pushing the lens release button inward and then turn the front body cap counter clockwise and lift out. 2. -
Page 12: Mounting The Digital Back
Mounting the Digital Back To mount the back to the camera: 1. Remove the back cover from the camera being careful not to damage the rear shutter curtain. 2. Unlock the back by sliding the back lock away from the camera. -
Page 13: Dismounting The Digital Back
Note: Your back should always be protected by its sensor cover plate when it is not attached to the camera. Ensure that the camera's shutter curtain is protected with the supplied protective plastic cover or digital back at all times. Dismounting the Digital Back To dismount the back from the camera: 1. -
Page 14: Removing The Battery From The Digital Back
1. Line up the red dot on the end of the LEMO-secured external power adapter with the red dot of the Power Terminal of the iXR camera body and push into place. 2. The connector locks into place. 3. Connect the other end of the external power adapter to a power outlet (100-240 V 50-60 Hz). -
Page 15: Shutter Modes
Shutter Modes The iXR camera system can make use of two shutters, depending on the selection of lens. The camera, with its internal focal plane shutter, accepts Schneider-Kreuznach lenses equipped with internal leaf shutters. The three shutter modes enable you to select which shutter is given the highest priority. -
Page 16: Selecting The Shutter Mode
Selecting the Shutter Mode To manually select the shutter mode: 1. Go to Menu > Camera > Shutter in M/X 2. Select Mixed, Leaf or Focal Plane 3. The Shutter Mode is saved automatically... -
Page 17: Connecting A Hand Release Cable
Shutter Lens Focal Plane Connecting a Hand Release Cable When the iXR camera is not in tethered mode or if you need to capture from the camera, use the supplied hand release cable. To connect a hand release cable: 1. Line up the red dot on the end of the LEMO-secured hand release cable with the red dot of one of the data terminals of the iXR camera body and push into place. -
Page 18: Installing And Activating Capture One
4. Installing and Activating Capture One Ensure that you have an Internet connection to activate Capture One (Express and Pro versions). Installing and Activating Capture One for Mac To install Capture One for Mac: 1. Open License Dialog 2. Open the License Activation dialog box in the application by going to Capture One >... -
Page 19: Installing And Activating Capture One For Windows
3. Type your license code and personal account details in the required fields. 4. Click Activate License. Your license is validated by Phase One’s Activation Server. 5. Your software is now activated and ready for use. Installing and Activating Capture One for Windows To activate Capture One for Windows: 1. -
Page 20: Attaching A Firewire Cable For Tethered Shooting
Attaching a FireWire Cable for Tethered Shooting To attach a FireWire cable: 1. Insert the end of the FireWire cable into the FireWire port on the back. 2. Connect the other end of the FireWire cable into the FireWire port on the back of your computer or laptop. Attaching a USB 3.0 Cable for Tethered Shooting To attach a USB 3.0 cable: 1. -
Page 21: Starting A Tethered Session
Starting a Tethered Session To start a tethered session: 1. From the File menu, select New Session. 2. From the Type drop down menu, select Tethered. 3. Fill in the information to customize your session. 4. Click OK to start your session. Note: The back must have a charged battery in it in order to shoot tethered. -
Page 22: Selecting Next Capture Adjustments
Selecting Next Capture Adjustments In the Next Capture Adjustments section, make selections for: • ICC Profile • All Other • Styles • Auto Alignment Selecting Camera Controls In the Camera Controls Section, make selections for: • Shutter • Aperture Note: Program is set to M automatically... -
Page 23: Selecting Camera Settings
Selecting Camera Settings In the Camera Section, make selections for: Camera (automatically shows back model) • Format • Sensor+ • • Balance Camera Settings in Capture One Working with Live View To work with Live View 1. Ensure that the lens focus is set to AF. 2. - Page 24 6. Set White Balance using the White Balance picker (WB is only for Live View). 7. Adjust the composition. 8. In the Live View Controls section, click on the focus arrows to focus the camera’s lens. 9. Click single arrows for fine focusing and multiple arrows for medium or large focusing.
-
Page 25: Ready To Shoot
5. Ready to Shoot Shooting a Test Shot To shoot a test shot: 1. Choose Camera. 2. Click Capture. 3. Your image appears on your monitor. Note: You can also trigger the camera by using an optional hand release cable. Evaluating Your Shot To evaluate your shot: 1. -
Page 26: Setting White Balance
2. Check your exposure with the over-exposure and under- exposure warnings and make any necessary corrections. Setting White Balance To set the white balance: 1. Take a first shot of the Tethered session. 2. Click the White Balance icon in the Camera Tool. 3. -
Page 27: Firmware
6. Firmware The back displays technical information about the hardware and embedded firmware of both the camera body and back. This is especially useful if support is needed or if you want to check if Phase One is offering a newer firmware update. Please make a note of the firmware menu contents before contacting your dealer or Phase One Support. -
Page 28: About The Phase One Firmware Updater Application
About the Phase One Firmware Updater Application The Phase One Firmware Updater application is used to update your Phase One iXR camera body with new firmware. The Firmware Updater for Mac or Windows is available at the Downloads section of the industrial.phaseone.com website. -
Page 29: Updating The Camera Body Firmware
• USB 3.0 or FireWire cables are not connected to the back. • Your computer has the Firmware Updater application installed and the computer is connected to the Internet. To update the iXR firmware: 1. Connect the camera to the computer with a mini-USB cable. - Page 30 4. If displayed, click the link to download the firmware. The firmware is saved locally. 5. After downloading the new firmware, the download button becomes a Release Notes button. 6. Click the Release Notes button to download the release notes for the newest firmware. 7.
-
Page 31: Checking The Back Firmware Version
8. Upon a successful completion of the update, the MAIN component is marked with a green check mark icon. 9. If the update fails, disconnect the mini-USB cable and reconnect it again, then repeat the procedure described above. Checking the Back Firmware Version To check the back firmware version: Go to Menu >... - Page 32 To update the back firmware: 1. Download the latest firmware update from the Downloads section of the industrial.phaseone.com website. 2. Transfer the firmware (.fwr) file to an empty formatted CompactFlash card and insert it into the back’s CF card slot.
- Page 33 4. Select Update Firmware from the Firmware menu and the back automatically detects and implements the update from the card. A progress bar appears on screen during installation. 5. A confirmation screen appears when the installation is complete. Upon completion, the back automatically restarts itself.
-
Page 34: Restoring The Back Firmware
Restoring the Back Firmware In the event you need to restore the back’s firmware to the factory version. (Camera settings are not affected): 1. Go to Menu > Firmware 2. Select Restore Firmware. The original firmware is installed. -
Page 35: Status And Troubleshooting
7. Status and Troubleshooting The LED indicator on the camera body indicates the status of the camera. Status Action/Comments Indicator State Orange Camera is in boot mode Connect camera to steady computer running firmware software Orange Firmware is being Allow firmware upgrade blinking upgraded to finish and do not... -
Page 36: Additional Information
8. Additional Information Mounting the Phase One Lens Adapter on the Camera To mount the Phase Lens Adapter: 1. Match the white dot on the camera up with the white dot on the Lens Adapter. Turn the lens slowly clockwise. NEVER use force to mount the ring. - Page 38 © 2012 Phase One Visit the website for additional information Industrial.phaseone.com PART NUMBER: 85003001 - IXR QUICK GUIDE...
Need help?
Do you have a question about the iXR and is the answer not in the manual?
Questions and answers