Table of Contents
Advertisement
Constant Voltage and Constant Current DC
Power Supply Instruction
Model: RD6006P
Date: 2021.2.25
Dear users, thank you for purchasing the constant voltage constant current DC
power supply produced by Hangzhou Ruideng Technology Co., Ltd. In order to let you
know more about the full function of this product, get a better experience and avoid
misuse. Please read this instruction carefully before using it. Keep it for future
reference.
Note: This instruction is corresponding to firmware V1.34, the page and
operation may be different under different firmware versions, please pay attention
when using it. We do recommend you to download the latest firmware for better
experience.
Advertisement
Table of Contents

Related Manuals for Riden RD6006P


Summary of Contents for Riden RD6006P
-
Page 1: Constant Voltage And Constant Current Dc Power Supply Instruction
Constant Voltage and Constant Current DC Power Supply Instruction Model: RD6006P Date: 2021.2.25 Dear users, thank you for purchasing the constant voltage constant current DC power supply produced by Hangzhou Ruideng Technology Co., Ltd. In order to let you know more about the full function of this product, get a better experience and avoid misuse. -
Page 2: Table Of Contents
CONTENT Constant Voltage and Constant Current DC Power Supply Instruction ..1 1.1 Technical Parameter ................ 5 1.2 Core Function ................... 6 1.3 Panel Instruction ................6 1.3.1 Front Panel ................6 1.3.2 Back Panel ................6 1.4 Operation Instruction ..............8 1.4.1 Main Page ................ - Page 3 2.2.1 APP Update ................15 2.2.2 APP Interface Display ............15 2.2.3 APP Operation ..............16 2.2.3.1 Network Distribution ..........16 3.2.3.2 Proper Wi-Fi Connection ..........18 2.2.3.3 APP Operation ............. 18 IOS APP Instruction ..................20 3.1 Mobile Phone APP Installation ............20 3.1.1 APP Download ..............
- Page 4 4.2.2 PC Software Operation Instruction ........26 4.3 Functions Introduction ..............26 4.3.1 Basic Functions ..............27 4.3.2 Calibration ................27 4.3.3 Advanced Function ............... 28 4.3.4 RS485 Multiple Devices Communication ......29 4.3.5 Firmware Update ..............29 4.3.6 Boot Logo Update ..............30 4.3.7 Version Update Detection ............
-
Page 5: Technical Parameter
1.1 Technical Parameter Model RD6006P RD6006P-W Input voltage range 7-70.00V Output voltage range 0-60.000V Output current range 0-6.0000A Output power range 0-360.00W Input voltage measurement resolution 0.01V Output voltage setting measurement resolution 0.001V Output current setting measurement resolution 0.0001A Battery voltage measurement resolution 0.01V... -
Page 6: Core Function
·10 data groups for storage and call out ·2.4 inch HD color display ·Dedicated terminal for battery charging ·Firmware update, support more functions later ·Brand new PC software ·Support WiFi communication(RD6006P-W) /USB communication ·Support Android/ IOS APP ·Support multiple display interfaces 1.3 Panel Instruction 1.3.1 Front Panel... - Page 7 P: Input fuse Q: Output fuse R: Power source input interface S: External temperature sensor interface T: CR1220 battery socket U: Communication module interface V: Fan interface NOTE: Power source input interface must connected to 7-70V constant DC power source. The external sensor cable (as shown on right) must be connected to the external temperature sensor interface.
-
Page 8: Operation Instruction
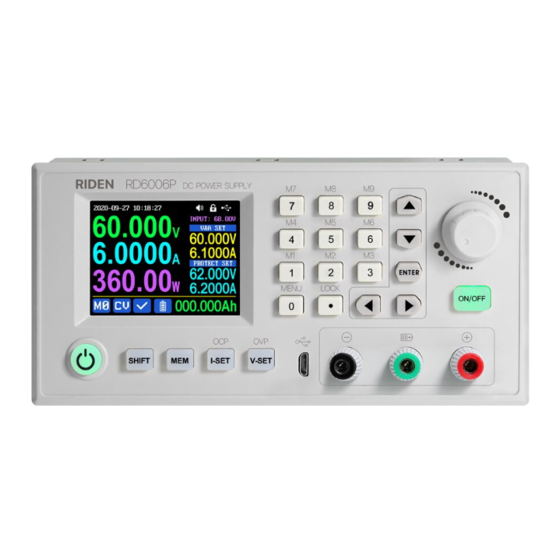
1.4 Operation Instruction After power-on, it will show boot image first, and then enters the main page. 1.4.1 Main Page W: Date/Time X: Button tune Y: Button lock status Z: Communication interface AA: Actual output voltage value AB: Actual output current value AC: Output power AD: Current data group AE:Constant voltage Constant current status... -
Page 9: Operation Introduction
1.4.2 Operation Introduction In the menu operation, the icon in red or cursor is the currently selected menu, the icon in blue is not selected, press to confirm or enter, press the encoder potentiometer to cancel or return, press the direction button to move the cursor or switch menu, rotate the encoder potentiometer to change the setting, the settings will be automatically saved when returning from the menu page. -
Page 10: Main Page Output Voltage And Current Setting
figure 1 figure 2 Figure 3 1.4.2.2 Main Page Output Voltage and Current Setting Output voltage and current setting operation video: https://drive.google.com/drive/folders/1NZW7k3-Kyc5YgIh-bWn8gBGaY5xo7_Lm?us p=sharing Press button to set the output current value, you can use encoder potentiometer to adjust the output value directly, press button to move the cursor. -
Page 11: Keypad Lock And Unlock
Press + keypad button 1-9 to quick call out the saved data (as shown above in figure 3) from the corresponding data group. Press to confirm, it will show ,after change the setting value it will show . When disable the “Take OK”... - Page 12 figure 4 figure 5 figure 6 figure 7 figure 8 Press to enter the system setting menu showed in figure 4, press to enter the sub-menu. Settings Sub-menu: System language is set to English by default. You can also set Simplified Chinese, French, Germany and Russian language;...
-
Page 13: Main Page Display Style Setting
power source, it is recommended to set the value as the rated power of the power source*95%; Temperature unit is ℃ by default, it can be switched between ℃ and ℉(figure Battery Charger Sub-menu(figure 6): CutOff Current is set to 10mA by default and it can be edited, when the real output current is lower than this set value, the output will be cut off automatically. -
Page 14: Storage Data Setting
and it will be switched to display style menu: you can press to enter the sub-menu. Layout Sub-menu(figure 9): Digits Style is set to Normal by default, you can set it to Normal/7-Seg V1/7-Seg Home Style is set to 0(traditional style), you can also set it to 1(Detail Style) or 2(Curve Style). -
Page 15: Android App Instruction
Android APP Instruction 2.1 Mobile Phone APP Installation This App only supports Android 5.0 to Android 10.0 operating system, and there may be incompatibilities problems between APP and operating system, please install and test the It will apply for location service, please agree and software before buying the product. -
Page 16: App Operation
AN: sidebar BC: setting wheel AO: add device BD: move the cursor to the left AP: return BE: move the cursor to the right AQ: more options BF: set button AR: curve BG: screen brightness AS: actual output voltage BH: system temperature AT: actual output current BI: sync time AU: actual output power... - Page 17 Connect Wi-Fi for the first time, please insert the WiFi board to the right place, then power on RD6006P, you will see the blue LED blinks once. Set the communication interface to WIFI, restart RD6006P, then place the RD6006P and the mobile phone close to the 2.4G router (the mobile phone must also be under the...
-
Page 18: Proper Wi-Fi Connection
Picture 18 If the distribution network fails, please power off the module and re-operate in the same way (multiple networking failures you can watch the video and try to use the hotspot of the mobile phone to test). If you use Huawei brand phone, please turn off the random MAC address function. - Page 19 SHARE in “AQ” to exports the voltage-current curve to excel file, up to 24 hours document can be recorded. NOTE: 1. There are many kinds of Android phone, so the user interfaces maybe different on some brand phones or different scales of the same brand. 2.
-
Page 20: Ios App Instruction
IOS APP Instruction 3.1 Mobile Phone APP Installation 3.1.1 APP Download Apple APP only supports IOS10.0-14.3, iphone6 and above models, search for "RDPower" in the Apple store to download. If you must use the software function, please pre-install the test first. To use the WiFi function of the software, you need to apply for location service. -
Page 21: App Update
Apple APP installation and connection process video: https://drive.google.com/drive/folders/1h6Dbqum3b8uy0Ph7yRd4xhGcx8vHsdCZ?us p=sharing After the installation is complete, the mobile APP icon is shown in the figure on the right: 3.2.1 APP Update You can get the latest software from the Apple Store. When the software is updated, you will be prompted to update the version. -
Page 22: App Operation
3.2.3.1 Network Distribution Connect Wi-Fi for the first time, please insert the WiFi board to the right place, then power on RD6006P, you will see the blue LED blinks once. Set the communication interface to WIFI, restart RD6006P, then place the RD6006P and the mobile phone close to the 2.4G router (the mobile phone must also be... -
Page 23: Proper Wi-Fi Connection
3.2.3.2 Proper Wi-Fi Connection When power on RD6006P, it will connect Wi-Fi first, and then detect if it can be connected to APP, and it may not be connected successfully if the phone is under screen-lock status or the APP is running at the background. -
Page 24: Pc Software Installation And Operation Instruction
This instruction is made for version 1.0.0.9, there will be little difference between different versions, the version below does not support RD6006P. and we do recommend you to download the latest software for better experience. RD6006P digital power supply file download link: https://drive.google.com/drive/folders/1nyd7W_JdeQhPLhKdgG_iCRQ3mHZenb... -
Page 25: Software Operation
(picture 27), click "Initialize" and wait for about 5 -10 seconds, after the RD6006P displays the local IP address (as shown in picture 26), click "Next" and enter the WiFi name and password, then click "Network distribution", wait for about 20 seconds, the PC software prompts that the connection is successful, and then Click "Connect". -
Page 26: Pc Software Operation Instruction
Picture 25 Picture 26 4.2.2 PC Software Operation Instruction Choose the right communication port, baud rate, slave address (default 001), click “CONNECT” to start communication. If the communication succeeds, the power supply button will be locked automatically, the buttons will automatically unlock after 3 seconds of accidental disconnection, and the “CONNECT”... -
Page 27: Basic Functions
CS: Voltage-Current Curve CT: Battery information/ Data Group Quick Call Out CU: Calibration CV: RD/DPS series switch CW: Language CX: Software Update CY: About CZ: Input voltage DA: Actual Output Voltage DB: Actual Output Current DC: Actual Output Power DD: System Temperature(℃) DE: System Temperature(℉) DF: Constant Voltage/ Constant Current Status DG: Protection Status Indication... -
Page 28: Advanced Function
RD6006p calibration operation video: https://drive.google.com/drive/folders/1WEusRYtpn94BFjyEQjrtsnzTo1K6hYcw?usp=sharing Click “Calibration” and enter the password “168168”, you can enter the... -
Page 29: Rs485 Multiple Devices Communication
Press and hold and power on RD6006P, enter the boot mode, then connect it to computer, there will be “boot mode” in the mode information text box, then click “Firmware Update”, a firmware update prompt will pop up on the interface, and click “Now”... -
Page 30: Boot Logo Update
During the firmware upgrade process, the interface is displayed as follows: 4.3.6 Boot Logo Update Boot logo setting video: https://drive.google.com/drive/folders/1J0iOyxZ8DSJaDQD2xgrlukBwJBELQBzf?usp= sharing Click “Start Logo Update”, a Logo upgrade prompt will pop up on the page, please select a picture with a size of 320x240 and a resolution of 96dpi. Some logo samples can be used in the installation package. -
Page 31: Version Update Detection
Click “Picture Import” and RD6006 will reboot automatically. 4.3.7 Version Update Detection Click “Software Update”, the software will automatically detect if there is a new version, if so, an update prompt will pop up on the interface. -
Page 32: Language Setting
4.3.8 Language Setting Click “Language”, a language setting prompt will pop up on the interface, you can choose Simplified Chinese, English, France and German. 4.3.9 About Click “About”, you can check the version number, publish time and copyright Information... -
Page 34: Appendix
Appendix Appendix 1: Common Battery Voltage Comparison Table Nominal Battery Voltage Voltage Voltage Application Characteristics Type LiCoMn High capacity, Digital Device NiO2 rechargeable Lithium Electric bike Large discharge Phosp 3.65 current, hate Ba electric tool rechargeable ttery Lead Inexpensive Storage 1.75 rechargeable Battery... -
Page 35: Appendix 2: Common Battery Voltage Comparison Table
Appendix 2: Common Battery Voltage Comparison Table Number of Discharge Battery batteries Charging limit termination Nominal Voltage Type connected in voltage(V) voltage(V) series LiCoMnNiO2 Lithium Phosph 87.6 ate Battery Lead Storage 86.4 Battery Lithium Phosph 52.5 76.6 ate Battery LiCoMnNiO2 71.4 Lithium Phosph ate Battery...
Need help?
Do you have a question about the RD6006P and is the answer not in the manual?
Questions and answers