
Subscribe to Our Youtube Channel
Related Manuals for Shimano Steps SC-E6100


Summary of Contents for Shimano Steps SC-E6100
- Page 1 UM-78S0B-000 SHIMANO Total Electric Power System SC-E6100 User's Manual Cycle Computer...
-
Page 2: Table Of Contents
CONTENTS IMPORTANT NOTICE ..................3 Important Safety Information .................3 NOTICE .......................4 Regular inspections before riding the bicycle ............4 Booklet Structure ..................6 Names of parts .....................7 Notation method for operations ....................8 Installing and removing the cycle computer ............9 Removing ...........................9 Installing ..........................9 Basic operation .................. - Page 3 Indicating the optimal gear shifting timing via an icon [Shifting advice] ........22 Adjusting auto gear shifting [Shift timing] ................. 22 Wireless connection ..................23 2.4 GHz digital wireless systems ................... 23 ANT connection ......................... 23 Connection method ......................23 Bluetooth LE connection ....................
-
Page 4: Important Notice
Bluetooth SIG, Inc. and any use manuals when installing the product. of such marks by SHIMANO INC. is under license. It is recommended that you use SHIMANO genuine parts. Other trademarks and trade names are those of their Loose nuts or bolts and product damage may cause a respective owners. -
Page 5: Notice
• Contact the place of purchase for updates of the component software. The most up-to-date information is NOTICE available on the SHIMANO website. Safety precautions • Do not use thinner or other solvents to clean any of the components. Such substances may damage the surface. - Page 6 FCC compliance information This device complies with part 15 of the FCC Rules. Operation is subject to the following two conditions: (1) This device may not cause harmful interference, and (2) this device must accept any interference received, including interference that may cause undesired operation.
-
Page 7: Booklet Structure
The latest user's manuals are available on our website (https://si.shimano.com). • SHIMANO STEPS user's manual This is the basic user's manual for SHIMANO STEPS. It contains the following content. - SHIMANO STEPS quick guide - How to operate assist bicycles that use flat handlebars, such as city, trekking, or MTB type bicycles - Troubleshooting •... -
Page 8: Names Of Parts
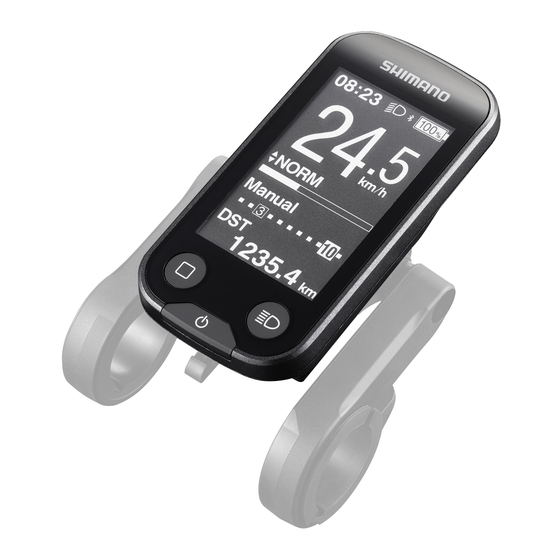
Names of parts This product is operated with the function button on the main body and the switch unit included in the assist bicycle. 3-switch type switch unit (left) 3-switch type switch unit (right) SC-E6100 Light button Function button Power button 2-switch type switch unit (left) 2-switch type switch unit (right) MTB type switch unit (left) -
Page 9: Notation Method For Operations
Switch unit (left) Switch unit (right) (default: for assist) (default: electronic gear shifting) When riding: Increase assistance Switch-X When setting: Move cursor or change Switch-X When riding: Shifting up setting When riding: Decrease assistance Switch-Y When setting: Move cursor or change Switch-Y When riding: Shifting down setting... -
Page 10: Installing And Removing The Cycle Computer
Installing and removing the cycle computer This product can be easily removed from the bicycle. • If it cannot be easily removed with the procedure indicated here, or if you want to secure the product to prevent it from being easily removed, please contact your place of purchase. -
Page 11: Basic Operation
* When the (main) battery is fully charged, charging of the built-in battery also stops automatically. - The power can be turned ON using the power button of the (main) battery. (Refer to the "SHIMANO STEPS User's Manual" and "SHIMANO STEPS Special Battery and Parts User's Manual".) * The power automatically turns OFF if the bicycle is stopped for 10 minutes. -
Page 12: Viewing The Screen
„ Viewing the screen The items displayed on the main screen differ according to the assist bicycle. Main screen (J) (K) Automatic / manual gear shifting *4 *5 Battery level indicator [Auto]: Displayed for automatic gear shifting. (Refer to "Battery level indicator") [Manual]: Displayed for manual gear shifting. -
Page 13: Battery Level Indicator
* The battery level indicator will flash when the battery level is low. • The cycle computer uses zero to indicate a battery level where assistance cannot be performed. With the SHIMANO STEPS system, the light can still be lit up for a while when assist stops due to a low battery. Therefore, the above-mentioned battery level may differ from that... -
Page 14: Turning The Light On/Off
„ Turning the light ON/OFF If a light is connected to the drive unit, this product can be used to operate the light. Press the light button. • Lights are turned on. • To turning off the lights, push the button again. * When the battery powered light is not connected and Light button [Backlight] is set to [MANUAL], pressing the light... -
Page 15: Switching The Traveling Data Display
„ Switching the traveling data display The traveling data that can be displayed differs according to the assist bicycle. On the main screen: <F> Travel data display The traveling data switches in the following order each time <F> is pressed. Display item Explanation [DST]... -
Page 16: Resetting The Traveling Distance
Resetting the traveling distance The traveling distance is reset from the main screen. When the traveling distance is reset, [TIME] (traveling time), [AVG] (average speed), and [MAX] (maximum speed) will also be reset. The traveling distance can also be reset from the setting menu. Refer to "Resetting the settings [Clear]". On the main screen: <F>... -
Page 17: Setting Menu
Setting menu The items that can be set differ according to the assist bicycle. If assist switch is not connected, the setting menu cannot be displayed. „ Switching to the setting menu To display the setting menu, perform the following operation when the traveling data display is something other than [DST]. Stop the bicycle ⇒... -
Page 18: Setting The Time [Clock]
„ Setting the time [Clock] Setting menu screen ⇒ [Clock] ⇒ <↑> or <↓> to change the "Hour" number ⇒ <F> The cursor moves to the "Minute" number. <↑> and <↓> to change the "Minute" number ⇒ <F> The display will automatically return to the setting menu screen. •... -
Page 19: Setting The Display
„ Setting the display Backlight setting [Backlight] Configurable items Details [ON] Always turned on [OFF] Always turned off The backlight will turn ON/OFF when the light connected to the drive unit is turned ON/OFF. If [MANUAL] no light is connected, the backlight can be turned ON/OFF by operating the cycle computer's light button. -
Page 20: Changing The Unit Of The Speed And Distance [Unit]
Changing the unit of the speed and distance [Unit] Select the unit for displaying the speed and distance. Setting menu screen ⇒ [Unit] ⇒ [km] / [mile] The display will automatically return to the setting menu screen. Matching the displayed speed with another device [Display speed] You can adjust the displayed value when there is a difference between the speed displayed on this product and the speed indicator of another device. - Page 21 * When the settings are reset, the following will be reset to their default settings. • [Backlight]: [ON] • [Beep]: [ON] • [Unit]: [km] • [Language]: [English] • [Brightness]: [3] • [Font color]: [White] Setting menu screen ⇒ [Clear] ⇒ [DST] / [Default] The display will automatically return to the setting menu screen.
-
Page 22: Setting The Assist Bicycle Function
„ Setting the assist bicycle function Setting the gear position when starting from a stop [Start mode] Automatically shifts to the set gear position when the bicycle starts from a stop. Setting items Explanation [OFF] Do not set the start mode. [1], [2],...*1 Select the gear position. -
Page 23: Indicating The Optimal Gear Shifting Timing Via An Icon [Shifting Advice]
Indicating the optimal gear shifting timing via an icon [Shifting advice] Performing gear shifting in addition to changing the assist mode enables more comfortable driving. Actively performing gear shifting without relying on only changing the assist mode can also reduce battery consumption. The gear shifting advice function uses an icon to notify you of the recommended timing at which to perform gear shifting, based on the bicycle riding conditions. -
Page 24: Wireless Connection
All the information displayed on the main screen can be sent to an external device that supports ANT connections. Connection method When the main power is turned ON for SHIMANO STEPS, communication can be received at any time. Refer to the manual of the external device, switch the external device to connection mode, and then connect it. -
Page 25: Items Configurable In E-Tube Project
Items configurable in E-TUBE PROJECT The items that can be set differ according to the assist bicycle. Refer to the user's manual for E-TUBE PROJECT for details. • The functions assigned to each operation switch can be changed. • The settings that can be configured from this product can also be configured from E-TUBE PROJECT. •... -
Page 26: Troubleshooting
Troubleshooting „ Recovering from the RD protection function [RD protection reset] In order to protect the system from falls etc., the RD Protection function will operate when the rear derailleur is subjected to a strong impact. The connection between the motor and the link will be momentarily severed so that the rear derailleur can no longer operate. -
Page 27: Error/Warning Indication
If an error code “E***” (where *** is letters or numbers) is displayed on the entire screen, the product may have malfunctioned. Refer to the “SHIMANO STEPS Special Battery and Parts User's Manual” and follow one of the procedures below to reset the display. -
Page 28: When A Problem Occurs
Is the battery charging? The screen continues to display the SHIMANO STEPS logo. The cycle computer does Refer to the “SHIMANO STEPS Special not start when the power Battery and Parts User's Manual” to start button is pressed. the system using the (main) battery power The level of the cycle computer's built-in button or satellite system on/off switch. - Page 29 High Tech Campus 92, 5656 AG Eindhoven, The Netherlands Phone: +31-402-612222 Roebuck Way, Knowlhill, Milton Keynes, Buckinghamshire, MK5 8HL, United Kingdom 3-77 Oimatsu-cho, Sakai-ku, Sakai City, Osaka 590-8577, Japan Please note: specifications are subject to change for improvement without notice. (English) © Feb. 2021 by SHIMANO INC. ITP...
Need help?
Do you have a question about the Steps SC-E6100 and is the answer not in the manual?
Questions and answers