Advertisement
Quick Links
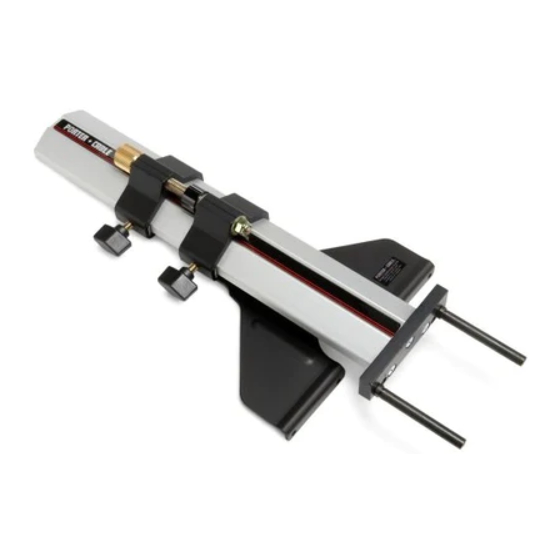
42690 (TYPE 2) ROUTER EDGE anD ciRclE cUTTinG GUiDE
IF YOU HAVE ANY QUESTIONS OR COMMENTS ABOUT THIS OR ANY
PORTER-CABLE TOOL, CALL US TOLL FREE AT: 1.888.848.5175
SafETY inSTRUcTiOnS
To reduce the risk of injury, read the tool instruction manual
before using any accessory. failure to heed these warnings may result in
personal injury and serious damage to the tool and the accessory. When
servicing this tool, use only identical replacement parts.
To reduce the risk of injury, turn unit off and disconnect it
from power source before installing and removing accessories, before
adjusting or when making repairs. An accidental start-up can cause injury.
caRTOn cOnTEnTS (fiG. 1)
•
Edge Guide body
•
(2) #1 rods (shortest)
•
(2) #2 rods
•
(2) #3 rods (longest)
USinG 42690 aS an EDGE GUiDE:
1.
Attach appropriate rods to edge guide as defined below:
•
for all 690 (fig. 1) and 890 series routers (except 6911 "D"
handle): Screw rods marked as #1 into threaded holes marked #1 in
block end (Fig. 1A).
•
for 6911 "D" handle (not shown) : Screw rods marked as #2 into
threaded holes marked as #2 in the block end (Fig. 1A).
•
for 7500 series routers (not shown): Screw rods marked as #3 into
threaded holes marked as #3 in the block end (Fig. 1A).
2.
Attach edge guide to router with enclosed screws. Smaller screws (B)
Fig. 2 are for 690 and 890 series routers and larger screws (C) Fig. 1 are
for 7500 series routers.
3.
For fast adjustment, loosen both lock nuts (D, E) and slide fence to
desired position.
4.
For fine adjustment, tighten lock nut (D) and turn fine adjust knob (F)
until fence is in exact position. Micrometer scale (G) can be rotated and
zeroed to index mark. One complete rotation moves fence 1/16" (1.6
mm).
USinG 42690 aS ciRclE GUiDE
1.
Remove the sheet metal bracket (I) Fig. 3 from the guide by removing
three screws (J).
2.
Thread the pivot pin (H) Fig. 4 into the middle hole as shown. Tighten
with a flat head screwdriver.
Attach edge guide to router as described under Using 42690 as an
3.
Edge Guide.
4.
Drill a perpendicular 1/4" (6.35 mm) hole at the intended center of the
workpiece to be routed.
5.
Install the bit into the router.
follow the instructions in your router owner's manual for
changing bits and operating the router. Be sure to read all safety rules
regarding the proper use of the router.
6.
Adjust the distance from the pin to the bit to your desired radius.
7.
Place pin (H) Fig. 5 into 1/4" (6.35 mm) hole in workpiece. This is used
as the pivot point for the cut to be made.
8.
For through cuts, it is recommended that scrap material be placed
under the workpiece to prevent unnecessary damage. A plunge router
is recommended for the application.
9.
Route in a clockwise direction, as shown in Figure 6.
10. Refer to chart below for circle size capacities when using various
PORTER-CABLE routers:
ROUTER BaSE
D handle #6911
690 fixed base #1001
690 plunge base #6931
890 fixed base #8901
890 plunge base #8931
7500 series routers
11. Circle grooves are also possible, as shown in Figure 7.
PORTER-CABLE
•
(2) Short screws (B)
•
(2) Larger screws (C)
•
Pivot pin (H) for making
circles
min
max
9" (228.6 mm)
27" (685.8 mm)
9" (228.6 mm)
27" (685.8 mm)
9" (228.6 mm)
27" (685.8 mm)
9" (228.6 mm)
27" (685.8 mm)
10" (254 mm)
28" (711.2 mm)
10-1/2" (266.7 mm)
28-1/2" (723.9 mm)
®
• 4825 Highway 45 North, Jackson, TN 38305 • (1.888.848.5175) • deltaportercable.com
H
c
3
G
f
E
D
3
2
1
fiG. 1a
fiG. 2
B
H
fiG. 4
fiG. 6
N030592 - JUNE09 - REV0
1
a
B
2
fiG. 1
3
1
2
i
J
fiG. 3
H
fiG. 5
fiG. 7
Advertisement

Subscribe to Our Youtube Channel
Related Manuals for Porter-Cable 42690


Summary of Contents for Porter-Cable 42690
- Page 1 Thread the pivot pin (H) Fig. 4 into the middle hole as shown. Tighten with a flat head screwdriver. Attach edge guide to router as described under Using 42690 as an Edge Guide. Drill a perpendicular 1/4" (6.35 mm) hole at the intended center of the workpiece to be routed.
- Page 2 Axe (H) pour faire des cercles • (2) tiges nº3 (plus longues) USanDO la 42690 cOmO GUÍa DE REBaJaDORa PaRa BORDES: Conecte los vástagos adecuados a la guía para bordes de acuerdo a lo UTiliSaTiOn DU 42690 cOmmE GUiDE DE cHanT : siguiente: Rattachez les tiges appropriées au guide de chant comme indiqué...
Need help?
Do you have a question about the 42690 and is the answer not in the manual?
Questions and answers