Advertisement
Quick Links
Furniture
TOP BUNK AND ELEVATED BEDS
ARE DANGEROUS AND ARE NOT RECOMMENDED
FOR CHILDREN UNDER AGE OF 9
Falls from elevated beds can be fatal and deaths have
occurred where children have fallen from elevated beds.
This is relevant for all ages. The risk is greater for younger children.
The risk of injury or death from a fall from an elevated bed
compared to a non-elevated bed is :
10 x greater for 7-8 year olds
7 x greater for 9-10 year olds
3 x greater for 11-12 year olds
The upper bunk must be more than 2m from any ceiling fan.
ASSEMBLY INSTRUCTION
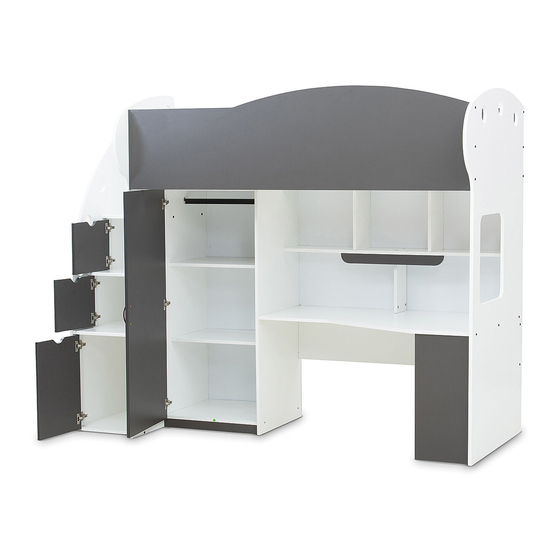
NOAH LOFT BUNK
ITEM CODE - 66098
Imported by Amart Furniture Pty Ltd,Qld, Brisbane Australia.
For any assistance with assembly or for missing parts please phone
Armart Furniture, Customer Service Freecall 1800 351 084.
WARNING :
WARNING :
1 / 17
66098
Advertisement

Subscribe to Our Youtube Channel
Related Manuals for Amart Furniture NOAH 66098


Summary of Contents for Amart Furniture NOAH 66098
- Page 1 ASSEMBLY INSTRUCTION NOAH LOFT BUNK ITEM CODE - 66098 Imported by Amart Furniture Pty Ltd,Qld, Brisbane Australia. Furniture For any assistance with assembly or for missing parts please phone Armart Furniture, Customer Service Freecall 1800 351 084. WARNING : TOP BUNK AND ELEVATED BEDS...
-
Page 2: Pre-Assembly Preparation
PRE-ASSEMBLY PREPARATION BEFORE YOU START..1. Choose a clean, level, spacious assembly area. Avoid hard surfaces that may damage the product. 2. Check and ensure that you have all required contents for complete assembly. 3. Always read the assembly instructions carefully before beginning assembly. 4. - Page 3 PARTS LIST PART PICTURE PACKING CARTON 1 PC LADDER SIDE PANEL END PANEL-LEFT BOX 1 / 5 1 PC 1 PC END PANEL-RIGHT 1 PC LADDER TOP BACK PANEL LADDER TOP PANEL 1 1 PC 2 PCS LADDER TOP DOOR LADDER TOP PANEL 2 1 PC BOX 2 / 5...
-
Page 4: Parts List
PARTS LIST PART PICTURE PACKING CARTON WR-SIDE PANEL 1 PC BOX 3 / 5 1 PC WR-BACK PANEL 1 PC WR-TOP PANEL 1 PC FRONT SAFETY RAIL BOX 5 / 5 1 PC BACK SAFETY RAIL 17 PCS WOOD SLAT TOP STORAGE PANEL 1 PC BOX 4 / 5... -
Page 5: Hardware List
HARDWARE LIST PART PICTURE PACKING CARTON JCBC SCREW M6 x 50mm (BLK) 42 PCS BARREL NUT MINI FIX 27 PCS 76 PCS WOOD DOWEL M8 x 30mm BOX 4 / 5 (B3428) U-BRACKET 2 PCS 8 PCS IRON STUD BOX 2 / 5 HANGING ROD 590mm 1 PC CSK SCREW... -
Page 6: Perspective View
PERSPECTIVE VIEW 6 / 17 66098... - Page 7 Step 1 : Fix Ladder Back Panel (11) and Ladder Top Panel 1 (5) to the Ladder Side Panel (1) by using JCBC Screw-Barrel Nut (A), Minifix (B) and Wood Dowel (C) as shown. NOTE : Please tighten three JCBC Screw-Barrel Nut (A) first.
- Page 8 Step 3 : Fix End Panel Left (2) by using JCBC Screw-Barrel Nut (A), Minifix (B) and Wood Dowel (C) and than please continue tighten three JCBC Screw-Barrel Nut (A) to theLadder Side Panel (1) as shown. JCBC SCREW WOOD DOWEL MINIFIX M6 x 50mm (R/B) M8 x 30mm...
- Page 9 Step 4 : First fix Wr Bottom Support (13) to the Wr-Bottom Panel (14) by using CSK Screw (J) and Wood Dowel (C) and than Fix Wr-Top Panel (18) and Wr-Bottom Panel (14) to the End Panel-Left (2) by using JCBC Screw-Barrel Nut (A) and Wood Dowel (C) as shown. JCBC SCREW CSK SCREW WOOD DOWEL...
- Page 10 Step 6 : Fix Top Storage Panel (22), Vertical Panel (24) and Bottom Storage (25) by Allen Key Crew (N) and Wood Dowel (C) as shown. WOOD DOWEL ALLEN KEY SCREW M8 x 30mm M3.5 x 38mm BOLT(BLK) N - 8 Pcs C - 8 Pcs Step 7 : Fix Table Top (29), Back Support Panel (27) and Front Support Panel (28) by using Minifix (B)
- Page 11 Step 8 : Fix Table Top (29) to the Wr-Side Panel (16) by using JCBC Screw-Barrel Nut (A), Minifix (B) and Wood Dowel (C) as shown. JCBC SCREW WOOD DOWEL MINIFIX M6 x 50mm (R/B) M8 x 30mm BARREL NUT A - 3 Pcs B - 2 Pcs C - 4 Pcs...
- Page 12 Step 10 :Fix Top Storage Panel (22), Bottom Storage (25), Table Top (29) and Front Support Panel (28) to the End Panel-Right (3) by using JCBC Screw-Barrel Nut (A), Minifix (B) and Wood Dowel (C) as shown. JCBC SCREW WOOD DOWEL MINIFIX M6 x 50mm (R/B) M8 x 30mm...
- Page 13 Step 12 : Fix Ladder Top Back Panel (4) with JCBC Screw (H) and Wood Dowel (C) as shown. JCBC SCREW WOOD DOWEL M6 x 30mm (R/B) M8 x 30mm C - 2 Pcs H - 2 Pcs Step 13 : Fix Top Back Panel (23), Bottom Back Panel (26) and Wr-Back panel (17) as shown using the Pan Screw (M).
- Page 14 Step 14 : Fix the Ladder Top Door (6) and Ladder Bottom Door (9) to Hinges Wood (O) as shown. HW-HGS-SOFT-CLS 2/8'' O - 6 Pcs Step 15 : Step 1, Loosen this screw to adjust the door. Step 2, Twist this screw clockwise to adjust the door inside.
- Page 15 Step 16 : Fix U-Bracket (D) with CSK Screw (G) and attach Iron Stud (E) to the End Panel-Left (2) and Wr-Side Panel (16) as shown. CSK SCREW IRON STUD (B3428) U-BRACKET M3.5 x 16mm D - 2 Pcs E - 8 Pcs G - 4 Pcs Step 17 : Place the Hanging Rod (F) into the U-Bracket (D).
- Page 16 Step 18 : Fix the Wr-Door (12) to Hinges Wood (O) and attach the Handle (L) with Handle Screw (K) as shown. SCREW HANDLE HW-HDL-W1401-96 HW-HGS-SOFT-CLS 7/8'' M4 x 22mm K - 2 Pcs L - 1 Pc O - 3 Pcs Step 19 : Fix Wood Slat (21) with CSK Screw (J) as shown.
- Page 17 Product Care for Hi-Gloss Items Hi-gloss lacquered furniture is more sensitive to marks and scratching then some other furniture products. It is important to exercise caution and care to maximise the life and beauty of this product. Following the below simple guidelines when using your hi-gloss product will protect your investment for years to come.
Need help?
Do you have a question about the NOAH 66098 and is the answer not in the manual?
Questions and answers