Roche ACCU-CHEK Performa User Manual
Hide thumbs
Also See for ACCU-CHEK Performa:
- Operator's manual (192 pages) ,
- User manual (196 pages) ,
- User manual (180 pages)
Advertisement
Quick Links
Advertisement

Related Manuals for Roche ACCU-CHEK Performa


Summary of Contents for Roche ACCU-CHEK Performa
- Page 1 User’s Manual Blood Glucose Meter...
-
Page 2: Table Of Contents
Contents Introduction ........................2 Chapter 1: Your New System ..................4 Chapter 2: Blood Glucose Tests ..................8 Chapter 3: Meter Memory, Setup and Data Transfer ............. 13 Chapter 4: Control Tests ....................21 Chapter 5: Maintenance and Troubleshooting ............... 25 Chapter 6: Technical Information.................. -
Page 3: Introduction
WARNING The Accu-Chek Performa meter is designed • Inspect the test strip container before to be used with the Accu-Chek Performa using the test strips for the first time. test strip to quantitatively measure glucose If you see any damage to the... - Page 4 Introduction Why Regular Blood Glucose w WARNING – KEEP BATTERIES Testing Is Important OUT OF REACH OF CHILDREN Testing your blood glucose regularly can In Australia: If you suspect your child make a big difference in how you manage has swallowed or inserted a button your diabetes every day.
-
Page 5: Chapter 1: Your New System
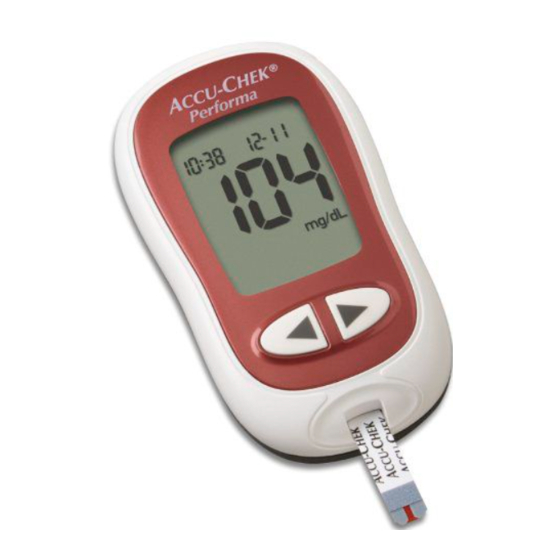
Your New System The Accu‑Chek Performa Meter 5. Battery Door 1. Power/Set Button Turns meter on or off and sets 6. Infrared (IR) Window options. Transfers data from meter to computer. 2. Display Shows results, messages and test results stored in memory. 3. - Page 6 Your New System 7. Test Strip Container* 10. Control Solution Bottle* (for example) (for example) 8. Test Strip* — Metallic End 11. Battery Insert this end into meter. * Some items may not be included in the kit. They are a separate purchase. 9.
- Page 7 Do not use the test strips after System that date. • Use only Accu-Chek Performa test strips. • Store the test strip container and meter • Use the test strip immediately after in a cool, dry place such as a bedroom.
- Page 8 Your New System Button Function Action Adjust settings for time and Press and release date, beeper, test reminders Press and hold to scroll and hypoglycaemic alert. (right arrow and faster. left arrow Enter memory. Press and release buttons) Mark a blood glucose result. Press and release...
-
Page 9: Chapter 2: Blood Glucose Tests
If the meter shows the container. wrong unit, contact Roche. If you do not Do not use test strips know which unit of measurement is past the use by date. - Page 10 Blood Glucose Tests Performing a Blood Glucose Test with Blood from Your Palm, Gently squeeze your Forearm or Upper Arm finger to assist the blood flow. (Alternative Site Testing) This helps you get a You have the option of obtaining a blood blood drop.
- Page 11 • if you sometimes do not notice when your blood glucose is low. If you are interested in AST, talk to your healthcare professional first. To obtain an AST cap and detailed AST instructions, contact Roche. Marking Blood Glucose Results and Setting the Post‑Meal Test Reminder You can mark a blood glucose result to indicate a special event.
- Page 12 Blood Glucose Tests Symbol Function Post‑Meal Marker Marking blood glucose results with a post-meal marker provides more information about your test results to help you and your healthcare professional in the management of your diabetes. The post-meal marker automatically appears with the test result if a test is performed 15 minutes before or after the post-meal test reminder is programmed to beep.
- Page 13 6. Did you follow the directions? See Chapter 2, Blood Glucose Tests and repeat the blood glucose test. Contact Roche if you still have problems. 7. Are the meter and test strips Perform a control test. See Chapter 4, Performing a working properly? Control Test, for instructions.
-
Page 14: Chapter 3: Meter Memory, Setup And Data Transfer
To view stored control results, first time and date correctly in the meter. transfer them to a compatible Having the correct time and date setting software application. Contact Roche helps ensure appropriate interpretation of for product availability. stored blood glucose results by you and •... - Page 15 Meter Memory, Setup and Data Transfer Button Function Action Pre-meal Continue to press to view 7, 14, 30 and 90-day averages pre-meal and post-meal averages. (right arrow Post-meal button) averages w WARNING Do not change your therapy based on an individual test result in memory. Talk to your healthcare professional before changing therapy based on test results in memory.
- Page 16 Meter Memory, Setup and Data Transfer Setup Setup Setting the Time and Date Setting the Beeper On or OFF NOTE Press and release (power/set button) to The beeper prompts you: turn the meter on. • to apply blood or control solution to The flashing test strip the test strip.
- Page 17 Meter Memory, Setup and Data Transfer • If the meter is on at the test reminder time, the test reminder does not beep. • Exposure to cold conditions may disable test reminders until the meter is turned on. Press and release repeatedly until the Press and release flashing beeper symbol and On or OFF...
- Page 18 Meter Memory, Setup and Data Transfer mode, any subsequent test reminders are also off. For example, if you set to select 1Hr Press and release A-1 but turn off A-2, then A-3 and A-4 or 2Hr. will automatically be off. Press and release to set the option.
- Page 19 Meter Memory, Setup and Data Transfer • Consumer: Before you set the hypoglycaemic alert, talk to your Press and release healthcare professional to help you to adjust the hour. decide what blood glucose level is Press and release to set your hypoglycaemic level.
- Page 20 10. The software program may shut off the transfer your results. For information on meter automatically when the data Accu-Chek software, contact Roche. transfer is complete. Should this occur, You can transfer your stored results to a follow the prompts on the computer computer to track, identify patterns and print.
- Page 21 Meter Memory, Setup and Data Transfer NOTE • If the data did not transfer successfully, try again. Contact Roche if you still have problems. • To make the most of the transfer feature, make sure the meter is set to the correct time and date.
-
Page 22: Chapter 4: Control Tests
• you want to check if you are performing the test correctly. About the Control Solution Insert the test strip • Use only Accu-Chek Performa control into the meter in the solution. direction of the arrows. • Close the control solution bottle tightly after use. - Page 23 Control Tests Remove the cap from the control solution bottle. Wipe the tip of the bottle with a tissue. Squeeze the bottle (for example) until a tiny drop forms at the tip. The control result, the bottle symbol and a flashing L appear on the display. Do not remove the test strip yet.
- Page 24 Control Tests Understanding Out‑of‑Range Control Results w WARNING The control ranges are printed on the test strip container label. If the control result is out of range, check this list to help solve the problem. (for example) Press and release to set the control level in the meter.
- Page 25 If you chose the wrong control solution level, either 1 or 2, when you performed level, you can still compare the control the control test? result to the range printed on the test strip container. Are you still unsure of the problem? Contact Roche.
-
Page 26: Chapter 5: Maintenance And Troubleshooting
See snap it closed. Chapter 5, Display and Error Messages. If you drop the meter or think the results are not accurate, contact Roche. w WARNING NOTE Keep new and used batteries away from •... - Page 27 Display and Error Messages w WARNING • Never make therapy decisions based on an error message. • If you have any concerns or see any other error display, contact Roche. Display Action The meter will not • Battery is dead. Insert new battery.
- Page 28 Maintenance and Troubleshooting Display Action Battery power is low. Change the battery soon. The meter is in set-up mode, waiting for you to change or confirm settings. The meter is ready for you to insert a test strip. The meter is ready for a drop of blood or control solution. Blood glucose may be higher than the measuring range of the system.
- Page 29 Maintenance and Troubleshooting Display Action The test strip may be damaged, not properly inserted or was previously used. Remove and reinsert the test strip or replace it if damaged or previously used. This error could appear if the cap on the test strip container was not closed tightly.
- Page 30 Maintenance and Troubleshooting Display Action The temperature is above or below the proper range for the system. Refer to the test strip package insert for system operating conditions. Move to an area with the appropriate conditions, wait 5 minutes and repeat the blood glucose or control test. Do not artificially heat or cool the meter.
-
Page 31: Chapter 6: Technical Information
Approx. 59 g (with battery) Construction Hand-held Protection class Meter type The Accu-Chek Performa meter is suitable for continuous operation. Control solution storage Refer to the control solution package insert. conditions Electromagnetic Compatibility – The meter meets the electromagnetic emission requirements as per EN 61326-2-6. - Page 32 Explanation of Symbols These symbols may appear on the packaging, on the type plate and in the instructions for the Accu-Chek Performa meter. Consult instructions for use or electronic instructions for use Biological risks - used meters carry a risk of infection.
- Page 33 Healthcare Professionals: Follow the Additional Supplies infection control procedures appropriate for your facility. Refer to Test Strips the test strip package insert for Accu-Chek Performa test strips additional healthcare professional Control Solutions information. Accu-Chek Performa control solutions...
- Page 34 Technical Information Sample Handling Our studies involving alternative site testing of adults with diabetes show that Always wear gloves when handling most persons will find their glucose level blood-contaminated items. Always adhere changes more quickly in blood from the to the recognised procedures for handling fingertip or palm than in blood from the objects that are potentially contaminated forearm or upper arm.
-
Page 35: Index
Index alternative site testing 9, 33 post-meal marker 10 post-meal test reminder 10, 16 pre-meal marker 10 battery, changing 25 product limitations 30 battery, door 4 product safety information 31 battery, installing 25 product specifications 30 battery type 25, 30 beeper, setting 15 blood glucose results, unusual 11 settings, meter 14... - Page 36 Enquiry hotline: +852-2485 7512 (office Hotline: 0-800-1-222-999 hours) www.accu-chek.co.id www.accu-chek.com.hk Singapore Accu-Chek ExtraCare line: 6272 9200 www.accu-chek.com.sg Roche Diabetes Care GmbH Sandhofer Strasse 116 68305 Mannheim, Germany www.accu-chek.com ACCU-CHEK and ACCU-CHEK PERFORMA are trademarks of Roche. © 2022 Roche Diabetes Care 09250859061A-0222 09250859001(02)-0222...
Need help?
Do you have a question about the ACCU-CHEK Performa and is the answer not in the manual?
Questions and answers