Table of Contents
Advertisement
Quick Links
Advertisement
Table of Contents

Related Manuals for Innovaphone IP100


Summary of Contents for Innovaphone IP100
- Page 1 IP phone IP 100 Manual P u r e T e l e p h o n y...
- Page 2 Release 5.01, 1st edition, July 2005 PDF version available for download at: http://www.innovaphone.com Copyright © 2005 innovaphone Böblinger Str. 76 71065 Sindelfingen, Germany Phone +49 (70 31) 7 30 09-0 Fax +49 (70 31) 7 30 09-99 http://www.innovaphone.com ®...
- Page 3 IP phone IP 100 Version 5.01 Manual...
- Page 4 Texts and illustrations have been compiled and software created with the utmost care, however errors cannot be completely ruled out. This documentation is therefore supplied under exclusion of any liability or warranty of suitability for specific purposes. innovaphone reserves the right to improve or modify this documentation without prior notice. ®...
-
Page 5: Table Of Contents
Table of contents 1 About this manual ... 8 Tips for reading ... 8 Overview of the chapters ... 9 2 Your telephone ... 10 Top view of the IP 100 ... 10 Putting the phone into service ... 12 2.2.1 Connecting the phone ... - Page 6 3.2.2 Scroll... 22 3.2.3 New entry ... 22 3.2.4 Edit ... 22 3.2.5 Delete ... 22 Call list menu ... 23 3.3.1 Unanswered calls ... 23 3.3.2 Answered calls ... 24 3.3.3 Dialled numbers ... 24 3.3.4 Delete call lists... 24 Function keys menu ...
- Page 7 Other settings ... 39 4.2.1 Date and time ... 39 4.2.2 Tone table... 39 4.2.3 Profile ... 39 4.2.4 Managing the telephone book... 39 4.2.5 Restart... 39 Appendix A: Safety instructions ... 40 Index ... 43 Manual IP 100 version 5.01 Page 7...
-
Page 8: About This Manual
This manual describes the operation and administration of your innovaphone IP 100 phone. Other manuals are available for the administration. Please note that the manuals for the VoIP Gateway and innovaphone PBX components, are available to you on the innovaphone website, under www.innovaphone.com in the download area. -
Page 9: Overview Of The Chapters
Overview of the chapters This manual provides extensive information on the IP 100 telephone. Besides the general basic principles of the phone, it also provides the entire operating instructions, including instructions for the administrator. General information on the phone is provided in chapter 2. It contains the set-up of the phone and descriptions of the available keys and the structure of the display. -
Page 10: Your Telephone
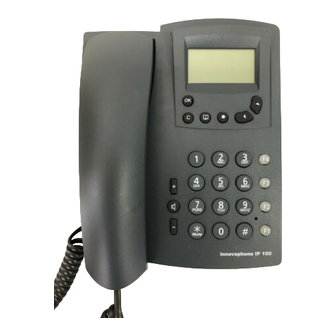
2 Your telephone Top view of the IP 100 Fig. 1 Top side of the innovaphone IP 100 phone Pos. Symbol Description and key function Display The OK key is used to activate the function selected in the display. In the menu, the OK key confirms the current selection. - Page 11 Pos. Symbol Description and key function Use the C key to leave individual menus. In entry mode, the C key deletes the character to the left. The “Phone book” key opens the phone book menu, where phone numbers can be found, dialled, changed, deleted or newly entered.
-
Page 12: Putting The Phone Into Service
DHCP service. The administrator will register the device with the PBX: 1. Create a new user in the innovaphone PBX. As “Hardware ID”, enter the MAC address of the phone. The MAC address is on the bottom of the phone. -
Page 13: Display
2.3.1 Idle mode 04/03/04 6689 Menu Fig. 2 innovaphone IP 100 phone display in idle mode Pos. Symbol Description 04/03/04 Date 10:35 Time... -
Page 14: State During A Connection
2.3.2 State during a connection 00:00:01 Line 1 Smith Line 2 Fig. 3 innovaphone IP100 phone display Pos. Symbol Description Line 1 Description of the line used for the current call 00:00:01 Time counter with hours, minutes and seconds The symbol for “Connected” will appear in the display... -
Page 15: Operating Instructions
3 Operating instructions Call functions 3.1.1 Answering calls You receive a call and your phone rings. If available, the name and number of the caller will be shown in the display. Line 1 Smith Answer Fig. 4 Answering a call If you would like to answer the call: If you would like to answer the call, lift the handset, press the loudspeaker key or confirm with the... -
Page 16: Making Calls
3.1.3 Making calls Proceed as follows to make a call: Line 1 6677 Call Fig. 5 Direct dialling 1. Pick up the handset or press the loudspeaker key 2. Enter the phone number. The number will be dialled. 3. At the end of the call, hang up or press the loudspeaker key You can also enter the phone number first and then pick up the handset or press the loudspeaker key During a call, all digits which are entered are transmitted as DTMF signals. -
Page 17: Loudspeaker
3.1.5 Loudspeaker Whilst making a call with the handset, you can switch the loudspeaker on, to allow the call to be heard within the room. 1. During the call press the loudspeaker key appears and the loudspeaker is activated. You can adjust the volume using the arrow keys 2. -
Page 18: Muting
Press the loudspeaker key The loudspeaker symbol with the call, hands-free. If you are making a hands-free call and would like to change to the handset: Pick up the handset, the operation will be cancelled. 3.1.7 Muting You can mute the microphone during a call to make a confidential enquiry in the room without being heard on the phone. -
Page 19: Switch
00:00:01 Line 1 Smith Line 2 Henry Line 1 Fig. 9 Holding a call 1. During a call press the tone on Line 2 and the phone ready symbol connection is shown in the first line of the display. 2. Enter the second phone number and confirm with the connection will be established and shown underneath the held call. -
Page 20: Call Waiting
4th line of the display. The “call waiting” function must have been activated in your configuration in the innovaphone PBX. 00:00:01 Line 1... -
Page 21: Phone Book Menu
The call count display will be automatically deleted, if the list of callers is requested with the key. You can see the list of callers by pressing the arrow Phone book menu The phone book is used to keep names and numbers of personal and general contacts. -
Page 22: Scroll
3. Enter the first letter of the entry you are looking for and press the In the display, the entries will be shown, which start with that letter. You can use the arrow keys 4. You can call this contact as usual by picking up the handset or by pressing the loudspeaker key 3.2.2 Scroll To scroll through the phone book, from the state as shown in fig. -
Page 23: Call List Menu
Delete >Entire pers. phone book Alexander Andrew Barbara Delete Fig. 14 Delete 2. If you would like to delete all entries, press the asked whether you would like to Delete all. Using the arrow keys select “Yes” and confirm with 3. -
Page 24: Answered Calls
02/06/05 15:10 19 X Smith 6677 Options Fig. 16 Unanswered calls • Date and time of the calls. • Sequential numbering of the entries, beginning with the last incoming call. • Number of calls from the same person. • Name of the caller (if entered in the phone book) and caller's number (if supplied). -
Page 25: Function Keys Menu
Use the arrow keys caller lists” and confirm with the Delete call lists >All lists Unanswered calls Answered calls Dialled numbers Select Fig. 18 Delete call lists If you now select the list and confirm with the lists deleted” or “All answ. calls deleted” depending on which list you want to delete. -
Page 26: Function Description
Key F1 >Freephone no. Function Delete Select Fig. 20 Programming function keys 3. Now, with the not occupied. On the display, the message “Function assigned” will appear. A function key can only have one function assigned. 4. With the Delete function, you can delete a programmed function key, to be able to assign a new function. -
Page 27: Blind Transfer
Function Hold Second call Mute Dialled numbers Blind Transfer Table 4 Optional functions of the programmed function keys Note The “Mute” function can also be called up by a longer press on the Note Only the “Dialled numbers” function can be assigned to a key on the key pad. It is then called by a longer press of the associated key. -
Page 28: Ringtone Menu
Ringtone menu The ringtone menu allows you to set the ringtone produced by the phone. From the idle state, press the “Ringtone” and confirm with the Ringtone. Melody Volume Select Fig. 21 Ringtone menu 3.5.1 Melody You have a choice between ten different melodies. To choose one particular ringtone melody proceed as follows: When you choose “Melody”, the phone plays a ringtone straight away. -
Page 29: Display
3.6.2 Display Via the user settings menu, you can choose your idle state display and set the display contrast. Display >Idle image Contrast Select Fig. 22 Display To set the idle state of your display, proceed as follows: 1. From the state as illustrated in fig. 22 using the image. -
Page 30: Headset
3.6.3 Headset The phone is prepared for operation with a headset. Via Menu, User settings, Headset this mode can be enabled. In headset mode the hook switch (when the handset is replaced) is disabled. For this reason, incoming calls can only be answered with the key and ended with the loudspeaker key Headset... - Page 31 Reset: To reset the configuration, proceed as described below: 1. From the state as shown in fig. 25 select Reset. You will be asked for your password. 2. Enter your password and press the Reset >Factory settings User settings Select Fig.
-
Page 32: Administrator Settings Menu
Administrator settings menu 3.7.1 Current settings Under this menu, you can view the current settings directly on the phone. The settings are divided into 3 areas. The following table shows which information can be found where: Menu option Network Config H.323 configuration Other settings Table 5 Configurable phone parameters... -
Page 33: Change Settings
3.7.2 Change settings Some of the parameters can be set directly on the phone. The administrator password will be requested for this. The password is factory set to 0000. The same settings can also, easily be made via the administrator's user interface, with a web browser. -
Page 34: Time Settings
1. From the state as illustrated in fig.27 press the 2. You now have the options “On” or “Off”. If you choose “On” you will be asked for the alarm time. 3. Enter the alarm time via the key pad. Now you will be asked for an alarm message, which you also enter via the key pad. -
Page 35: Date Settings
3.8.3 Date settings To set the date, the same conditions apply as in Section 3.8.2, “Time settings”. However, for the date, you can also choose and configure another format. Date format >DD/MM/YY MM/DD/YY DD/MMM/YY Select Fig. 30 Date format 1. From the state as shown in fig. 27 using the arrow keys “Date settings”... -
Page 36: Administration Via The Web Browser User Interface
IP 100 web interface. Please note that, to do this, unknown devices must be allowed to log in to the innovaphone PBX. You can also call up the administration interface directly. To do that, you need the IP address of your telephone. -
Page 37: Configuration
In the first section, you set the type of registration with the gatekeeper. With “manual” the telephone automatically registers after turn on. The IP address of the innovaphone PBX is used as the gateway address. The “Time to live” parameter specifies how long the registration is valid. The alias is not required by the innovaphone PBX. -
Page 38: File Servers
PBX. 4.1.6 Quality of service The IP100 phone supports quality of service via IP type of service (TOS) and virtual LAN. The parameters can be set in this section. Ask your network administrator for more information on the parameters. -
Page 39: Other Settings
Fig. 35 Quality of service Other settings 4.2.1 Date and time The innovaphone PBX is a time server for all of the connected telephones. The IP address of the PBX as the time server should thus not be changed. 4.2.2 Tone table The dial-tone used in the USA is different to that used in Europe. -
Page 40: Appendix A: Safety Instructions
Please see the “innovaphone Administrator's Manual - VoIP Gateways” and the “Administrator's Manual - innovaphone PBX” for more on the configuration of the IP 100. All instructions specified there should be followed carefully and the devices should only be used in accordance with these instructions. -
Page 41: Environmental Sustainability
Some types of furniture varnish or cleaning products can damage the plastic feet of the IP 100 comfort telephone and leave marks. In these cases, make sure you put the equipment on a stable, non-slip surface. Cleaning Use a soft, slightly damp cloth to clean the surface of the equipment housing. -
Page 42: Declaration Of Conformity
Only high quality components, which ensure a maximum of reliability, are used for their production. A warranty seal has been applied to the bottom of the IP telephone (on a screw of the housing). Please make sure it is not damaged, since otherwise no warranty claims can be made. -
Page 43: Index
Index Administration ... 32 Administrator name ... 39 Administrator password ... 39 Alarm ... 33 Answering a call ... 15 Call counter ... 20 Call functions ... 15 Call list ... 23 Call waiting ... 20 Change settings ... 33 Cleaning ... - Page 44 Restart ...39 Ringtone ...28 Safety instructions ...40 Second calls ...18 Subnet mask ...32 Switch ...19 Symbol ... 13 Telephone directory ...39 Terminating a call ...15 TFTP ...38 Time ... 12 Time settings ...34 Tone table ...39 Transferring a call ...19 User settings ...28...
- Page 45 ® innovaphone Böblinger Strasse 76 71 06 5 Sindelfi ngen, Germany Tel: +49 (7 0 31 ) 73 0 09 -0 F a x: + 49 ( 70 3 1) 7 30 0 9- 99 www.innovaphone.com...
Need help?
Do you have a question about the IP100 and is the answer not in the manual?
Questions and answers