Advertisement
Available languages
Available languages
User's Manual
Blood Glucose Meter
Kullanım kılavuzu
Kan şekeri ölçüm cihazı
79718_07255233050_01_Cover.indb 1
This file may not print or view at 100%.
Die lines and color breaks do not print.
"Holding Area" text, box and rules do not print.
Roche USA –79718
V4/1 – 07255233050(01) – Black
Roche USA –79718
V4/2 – 07255233050(01) – Cyan
Roche USA –79718
V4/3 – 07255233050(01) – Magenta
Roche USA –79718
V4/4 – 07255233050(01) – Yellow
L A N
5/22/2019 2:21:58 PM
HORRIXM - Mai 23, 2019
ANDREWC2 - Jun 03, 2019
ANDREWC2 - Jun 03, 2019
BROWNIND - Jun 03, 2019
Advertisement
Chapters

Related Manuals for Roche Accu-Chek Performa Nano


Summary of Contents for Roche Accu-Chek Performa Nano
- Page 1 This file may not print or view at 100%. Die lines and color breaks do not print. “Holding Area” text, box and rules do not print. User’s Manual Roche USA –79718 V4/1 – 07255233050(01) – Black Blood Glucose Meter Roche USA –79718 Kullanım kılavuzu...
- Page 2 79718_07255233050_01_Cover.indb 2 5/22/2019 2:21:59 PM...
-
Page 3: Table Of Contents
Chapter 2: Blood Glucose Tests ................... 9 V2/1 – 07255233050(01) – Black Chapter 3: Meter Memory, Setup, and Data Transfer ............17 Roche USA – 79718 V2/2 – 07255233050(01) – PMS 287 Chapter 4: Control Tests ....................27 CVC 30% Chapter 5: Maintenance and Troubleshooting .............. - Page 4 79718_07255233050_01_EN.indb 2 5/22/2019 1:44:48 PM...
-
Page 5: Introduction
Introduction Introduction The Accu‑Chek Performa Nano System The Accu‑Chek Performa Nano meter is designed to be used with the Accu‑Chek Performa test strip to quantitatively measure glucose in fresh venous, arterial, neonatal, and capillary whole blood as an aid in monitoring the effectiveness of glucose control. - Page 6 • If the battery compartment does not close securely, stop using the product and keep it away from children. Contact Roche. • Any object coming into contact with human blood is a potential source of infection (see: Clinical and Laboratory Standards Institute: Protection of Laboratory Workers from Occupationally Acquired Infections;...
-
Page 7: Chapter 1: Your New System
Chapter 1: Your New System Your New System The Accu‑Chek Performa Nano Meter Right Side View Left Side View Back View Front View (for example) Top View 1. Display 5. Power/Set Button Shows results, messages, and test results Turns meter on or off and sets options. stored in memory. - Page 8 Your New System (for example) 9. Test Strip Container* 12. Control Solution Bottle* 10. Insert this end into the meter. 13. Batteries 11. Yellow Window *Some items may not be included in the kit. They are Touch blood drop or control solution here. a separate purchase.
- Page 9 Your New System Using the Accu‑Chek Performa Nano System • Use only Accu‑Chek Performa test strips. • Use the test strip immediately after removing it from the test strip container. • Do not apply blood or control solution to the test strip before inserting it into the meter. •...
- Page 10 If one of the segments is missing or looks different from the picture, do not use the meter. Contact Roche. Adjust settings for time and date, Press and release (right arrow beeper, test reminders, and Press and hold to scroll faster.
-
Page 11: Chapter 2: Blood Glucose Tests
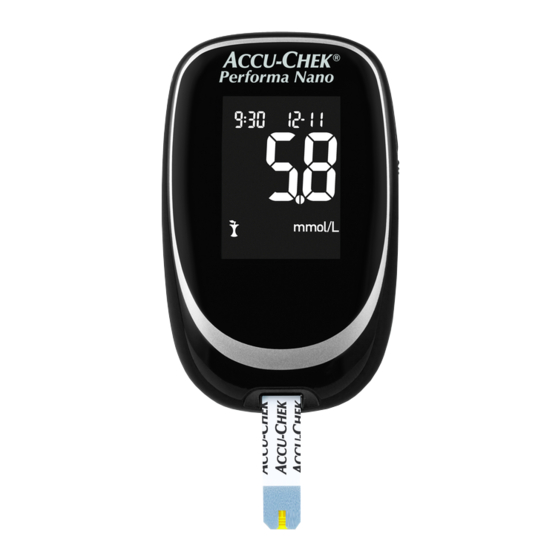
Blood glucose results can be displayed in either mg/dL or mmol/L. The back label of the meter shows the unit of measurement. If the meter shows the wrong unit, contact Roche. If you do not know which unit of measurement is correct for you, contact your healthcare professional. Using the wrong unit of measurement may cause misinterpretation of your actual blood glucose level and may lead to improper therapy. - Page 12 Blood Glucose Tests Before you perform your first blood glucose test, set up the meter correctly. You need the meter with pre‑inserted activation chip, a test strip, a lancing device, and a lancet. Prepare the lancing device. Wash and dry your Check the use by date Insert the test strip into hands.
- Page 13 Blood Glucose Tests The test result appears on the display. To assign a marker to the test result, leave the test strip in the meter. See Chapter 2, Marking Blood Glucose Results and Setting the Post‑Meal Test Reminder. Otherwise, remove and discard the used test strip. After a successful test, the meter turns itself off 5 seconds after the test strip is removed.
- Page 14 Blood Glucose Tests Performing a Blood Glucose Test with Blood from Your Palm, Forearm, or Upper Arm (Alternative Site Testing) You have the option of obtaining a blood sample from other sites on your body besides the fingertip. Alternative sites include the palm, forearm, and upper arm. Blood obtained from the fingertip and palm can be used at any time to perform a blood glucose test.
- Page 15 • if you sometimes do not notice when your blood glucose is low. If you are interested in AST, talk to your healthcare professional first. To obtain an AST cap and detailed AST instructions, contact Roche. 79718_07255233050_01_EN.indb 13 5/22/2019 1:44:52 PM...
- Page 16 Blood Glucose Tests Marking Blood Glucose Results and Setting the Post‑Meal Test Reminder You can mark a blood glucose result to indicate a special event. If you select a test result marker, it is automatically stored in memory. When you review the test results in memory, these markers can help you remember what was different about the test result.
- Page 17 5. Did you follow the directions? See Chapter 2, Blood Glucose Tests, and repeat the blood glucose test. Contact Roche if you still have problems. 6. Are the meter and test strips working Perform a control test. See Chapter 4, Performing a properly? Control Test, for instructions.
- Page 18 Blood Glucose Tests Symptoms of Low or High Blood Glucose Being aware of the symptoms of low or high blood glucose can help you understand your test results and decide what to do if they seem unusual. Low blood glucose (hypoglycemia): Symptoms of hypoglycemia may include, but are not limited to, anxiety, shakiness, sweating, headache, increased hunger, dizziness, pale skin color, sudden change in mood or irritability, fatigue, difficulty concentrating, clumsiness, palpitations, and/or confusion.
- Page 19 • Control results are stored in memory, but cannot be reviewed on the meter. To view stored control results, first transfer them to a compatible software application. Contact Roche for product availability. • Control results are not included in the 7‑, 14‑, 30‑, and 90‑day averages.
- Page 20 Meter Memory, Setup, and Data Transfer Viewing Test Results in Memory With the meter on or off, press and release to enter memory. The most recent test result appears on the display. Button Function Action Previous test results Press to view previous test results from newest to oldest. (left arrow button) General averages...
- Page 21 Meter Memory, Setup, and Data Transfer Using the Set‑Up Mode The following features can be customized as required. Symbol Function Action Factory Pre‑set Time and date Set the time and date. Beeper Select On or OFF. Setting the beeper to OFF does not affect test results.
-
Page 22: Chapter 3: Meter Memory, Setup, And Data Transfer
Meter Memory, Setup, and Data Transfer Setting the Time and Date Press and release Press and release Repeat step 3 to set (power/set button) to to decrease or minutes, day, month, and turn the meter on. increase the hour. year. The flashing test strip Press and release To set up more options, symbol appears on the... - Page 23 Meter Memory, Setup, and Data Transfer Setting the Beeper On or OFF NOTE The beeper prompts you: • to apply blood or control solution to the test strip. • when enough blood or control solution is drawn into the test strip. •...
- Page 24 Meter Memory, Setup, and Data Transfer Setting the Post‑Meal Test Reminder NOTE The post‑meal test reminder: • If a test was performed within 15 minutes of a • beeps 1 or 2 hours after the blood glucose test test reminder, the test reminder does not beep. to remind you to do a post‑meal test.
- Page 25 Meter Memory, Setup, and Data Transfer Setting the Test Reminders NOTE Test reminders: • If a test was performed within 15 minutes of a • beep at the same time each day. test reminder, the test reminder does not beep. • beep every 2 minutes up to 3 times. •...
- Page 26 Meter Memory, Setup, and Data Transfer Press and release Either set the A‑2 test to select 00, 15, 30, reminder or press and or 45. These are the only release to set up more choices. options. Press and release To exit, press and hold set the minutes.
- Page 27 Meter Memory, Setup, and Data Transfer Setting the Hypoglycemic Alert WARNING • This function is no substitute for hypoglycemia training by your healthcare professional. • Consumer: Before you set the hypoglycemic alert, talk to your healthcare professional to help you decide what blood glucose level is your hypoglycemic level.
- Page 28 Should this occur, follow the prompts on the computer screen. NOTE • If the data did not transfer successfully, try again. Contact Roche if you still have problems. • To make the most of the transfer feature, make sure the meter is set to the correct time and date.
- Page 29 Chapter 4: Control Tests Control Tests When to Perform a Control Test Performing a control test lets you know the meter and test strips are working properly. You should perform a control test when: • you open a new test strip box. •...
- Page 30 Control Tests Performing a Control Test You need the meter with pre‑inserted activation chip, a test strip, and control solution Level 1, Level 2, or both. The control level is printed on the bottle label. Check the use by date Insert the test strip into Select the control Remove the cap from the on the test strip...
-
Page 31: Chapter 4: Control Tests
Control Tests (for example) (for example) The control result, the Press to mark the Press and release to set the control level in the bottle symbol, and a control result as a meter. flashing L appear on the Level 1. Press OK and the control result alternate on the display if display. - Page 32 1 or 2, when you can still compare the control result to the range performed the control test? printed on the test strip container. 8. Are you still unsure of the problem? Contact Roche. 79718_07255233050_01_EN.indb 30 5/22/2019 1:44:55 PM...
-
Page 33: Chapter 5: Maintenance And Troubleshooting
The meter automatically tests its own systems every time you turn it on and lets you know if something is wrong. See Chapter 5, Display and Error Messages. If you drop the meter or think the results are not accurate, contact Roche. WARNING Keep new and used batteries away from children. - Page 34 Maintenance and Troubleshooting Cleaning the Meter Keep the meter free of dust. If you need to clean or disinfect it, follow these guidelines carefully to help you get the best performance possible. WARNING • Do not allow liquid to enter any openings in the meter. •...
- Page 35 Maintenance and Troubleshooting Display and Error Messages WARNING • Never make therapy decisions based on an error message. • If you have any concerns or see any other error display, contact Roche. Display Action The meter will not • Batteries are dead. Insert new batteries.
- Page 36 The test strip may be damaged or not properly inserted. Remove and reinsert the test strip or replace it if damaged. The activation chip is incorrect. Turn the meter off and insert a new activation chip. If you need an activation chip, contact Roche. 79718_07255233050_01_EN.indb 34 5/22/2019 1:44:57 PM...
- Page 37 Maintenance and Troubleshooting Display Action Your blood glucose may be extremely high or a meter or a test strip error has occurred. • If your test result matches how you feel, contact your healthcare professional immediately. • If your test result does not match how you feel, repeat the blood glucose test. See Chapter 2, Unusual Blood Glucose Results.
- Page 38 Maintenance and Troubleshooting Display Action The temperature is above or below the proper range for the system. Refer to the test strip package insert for system operating conditions. Move to an area with the appropriate conditions, wait 5 minutes, and repeat the blood glucose or control test.
-
Page 39: Chapter 6: Technical Information
Chapter 6: Technical Information Technical Information Product Limitations See the literature packaged with the test strips and control solution for the latest information on product specifications and limitations. Specifications Blood volume Sample type Measuring time Measurement range Refer to the test strip package insert. Test strip storage conditions System operating conditions Relative humidity operating range... - Page 40 Technical Information Electromagnetic Compatibility – This meter meets the electromagnetic immunity requirements as per EN ISO 15197 Annex A. The chosen basis for electrostatic discharge immunity testing was basic standard IEC 61000‑4‑2. In addition, the meter meets the electromagnetic emissions requirements as per EN 61326. The meter’s electromagnetic emission is thus low.
- Page 41 Technical Information Explanation of Symbols These symbols may appear on the packaging, on the type plate, and in the instructions for the Accu‑Chek Performa Nano meter. Consult instructions for use Caution, refer to safety‑related notes in the instructions for use accompanying this product. Temperature limitation (store at) Manufacturer Catalogue number...
- Page 42 Technical Information Guarantee The statutory provisions on rights in consumer goods sales in the country of purchase shall apply. Additional Supplies Test Strips Accu‑Chek Performa test strips Control Solutions Accu‑Chek Performa control solutions Information for Healthcare Professionals WARNING Healthcare Professionals: Follow the infection control procedures appropriate for your facility. Refer to the test strip package insert for additional healthcare professional information.
- Page 43 Technical Information Sample Handling Always wear gloves when handling blood‑contaminated items. Always adhere to the recognized procedures for handling objects that are potentially contaminated with human material. Follow the hygiene and safety policy of your laboratory or institution. Prepare the selected blood collection site per facility policy. Refer to the test strip package insert for additional information regarding acceptable sample types, anticoagulants, and handling instructions.
- Page 44 Technical Information 79718_07255233050_01_EN.indb 42 5/22/2019 1:44:58 PM...
-
Page 45: Index
Index Index hypoglycemia 16 alternative site testing 12, 41 hypoglycemic alert, setting 25 batteries, changing 31 low blood glucose 16 batteries, installing 31 battery drawer 5, 31 battery type 31, 37 maintenance, meter 31 beeper, setting 21 marking test results 14 blood glucose results, unusual 15 memory, meter 17 blood glucose test 10... - Page 46 Notes 79718_07255233050_01_EN.indb 44 5/22/2019 1:44:58 PM...
- Page 47 Bölüm 2: Kan Şekeri Ölçümleri ................... 9 V2/1 – 07255233050(01) – Black Bölüm 3: Ölçüm Cihazı Hafızası, Kurulumu ve Veri Aktarımı ..........17 Roche USA – 79718 V2/2 – 07255233050(01) – PMS 287 Bölüm 4: Performans Kontrolleri ..................27 CVC 30% Bölüm 5: Bakım ve Sorun Giderme ...................
- Page 48 79718_07255233050_01_TR.indb 2 5/22/2019 2:23:23 PM...
-
Page 49: Giriş
(örn. ön kol) elde edilebilir. Onaylanmış başka bölgeler ve ilgili sınırlamalar için bu kullanım kılavuzunda Alternatif Bölge Testi (AST) kısmını okuyun. Accu-Chek Performa Nano ölçüm cihazı ve Accu-Chek Performa ölçüm çubukları, sağlık profesyonelleri tarafından klinik ortamda vücut-dışı tanı amaçlı kullanım için, diyabetliler tarafından evde kullanım için tam bir ölçüm sistemi sunar. - Page 50 • Pil bölmesi tam olarak kapanmazsa ürünü kullanmayı durdurun ve çocuklardan uzak tutun. Roche ile irtibat kurun. • İnsan kanıyla temas eden herhangi bir nesne olası enfeksiyon kaynağıdır (bkz.: Clinical and Laboratory Standards Institute: Protection of Laboratory Workers from Occupationally Acquired Infections;...
-
Page 51: Bölüm 1: Yeni Sisteminiz
Bölüm 1: Yeni Sisteminiz Yeni Sisteminiz Accu Chek Performa Nano Ölçüm Cihazı Soldan görünüm Sağdan görünüm Arkadan görünüm Önden görünüm (örnek) Üstten görünüm 1. Ekran 5. Güç/Ayar Tuşu Sonuçları, mesajları ve hafızada saklanan Ölçüm cihazını açar veya kapatır ve opsiyon ölçüm sonuçlarını... - Page 52 Yeni Sisteminiz (örnek) 9. Ölçüm Çubuğu Şişesi* 12. Kontrol Solüsyonu Şişesi* 10. Ölçüm çubuğunun bu ucunu ölçüm cihazına 13. Piller yerleştirin. *Bazı parçalar bu sete dahil olmayabilir. Bunların ayrı 11. Sarı Pencere olarak satın alınması gerekir. Kan damlası veya kontrol solüsyonunu buraya değdirin.
- Page 53 Yeni Sisteminiz Accu-Chek Performa Nano Sisteminin Kullanılması • Sadece Accu-Chek Performa ölçüm çubuklarını kullanın. • Ölçüm çubuğunu ölçüm çubuğu şişesinden çıkardıktan hemen sonra kullanın. • Ölçüm çubuğuna ölçüm cihazına yerleştirmeden önce kan veya kontrol solüsyonu uygulamayın. • Ölçüm çubuğu şişesinden bir ölçüm çubuğu çıkardıktan sonra ölçüm çubuklarını nemden korumak için şişeyi hemen sıkıca kapatın.
- Page 54 Ölçüm cihazını kapatın. Ekranın tamamını görmek için tuşuna basın ve basılı tutun. Bu bölümlerden bir tanesi yoksa veya resimden farklı görünüyorsa ölçüm cihazını kullanmayın. Roche ile irtibat kurun. veya Saat ve tarih, sesli uyarı, ölçüm veya basın ve serbest bırakın.
-
Page 55: Bölüm 2: Kan Şekeri Ölçümleri
Kan şekeri ölçüm sonuçları mg/dL veya mmol/L cinsinden görüntülenebilir. Ölçüm cihazının arka yüzündeki etiket ölçüm birimini gösterir. Eğer ölçüm cihazı yanlış ölçü birimini gösteriyorsa Roche ile irtibat kurun. Eğer sizin için hangi ölçü biriminin doğru olduğunu bilmiyorsanız sağlık profesyoneliniz ile irtibat kurun. - Page 56 Kan Şekeri Ölçümleri İlk kan şekeri ölçümünüzü gerçekleştirmeden önce ölçüm cihazınızı doğru bir şekilde ayarlayın. Önceden aktivasyon çipi takılmış ölçüm cihazı, bir ölçüm çubuğu, bir parmak delme cihazı ve bir lansete gereksiniminiz olacaktır. Parmak delme cihazını hazırlayın. Ellerinizi yıkayın ve Ölçüm çubuğu Ölçüm çubuğunu ölçüm kurulayın.
- Page 57 Kan Şekeri Ölçümleri veya Ölçüm sonucu ekranda görünür. Kan şekeri sonucuna bir işaret eklemek için ölçüm çubuğunu ölçüm cihazının içinde bırakın. Bakınız Bölüm 2, Kan Şekeri Sonuçlarının İşaretlenmesi ve Tokluk Ölçümü Hatırlatmasının Ayarlanması. Aksi halde, kullanılmış ölçüm çubuğunu çıkarın ve atın.
- Page 58 Kan Şekeri Ölçümleri Avuç İçinizden, Ön Kolunuzdan veya Üst Kolunuzdan Aldığınız Kan ile Kan Şekeri Ölçümü Gerçekleştirme (Alternatif Bölge Testi). Parmak ucu dışında vücudunuzun başka bölgelerinden kan örneği alma seçeneğiniz vardır. Alternatif bölgeler avuç içini, ön kolu ve üst kolu kapsamaktadır. Kan şekeri ölçümü...
- Page 59 • kan şekerinizin aşırı düşük olduğunu düşünüyorsanız (hipoglisemi). • kan şekerinizin düşük olduğunu bazen fark etmiyorsanız. AST ile ilgileniyorsanız öncelikle sağlık profesyoneliniz ile konuşun. AST başlığını ve detaylı AST talimatlarını almak için Roche ile irtibat kurun. 79718_07255233050_01_TR.indb 13 5/22/2019 2:23:27 PM...
- Page 60 Kan Şekeri Ölçümleri Kan Şekeri Sonuçlarının İşaretlenmesi ve Tokluk Ölçümü Hatırlatmasının Ayarlanması Özel bir durumu göstermek için kan şekeri ölçüm değerlerinizi işaretleyebilirsiniz. Bir ölçüm sonucu işareti seçerseniz otomatik olarak hafızada saklanır. Bu işaretler, hafızadaki ölçüm sonuçlarını gözden geçirdiğinizde o ölçüm sonucunun diğerlerinden farkını hatırlamanıza yardımcı olabilir. Sembol Fonksiyon Açlık İşareti...
- Page 61 çubuğuyla tekrarlayın. 5. Talimatlara uydunuz mu? Bölüm 2, Kan Şekeri Ölçümleri bölümüne bakıp kan şekeri ölçümünü tekrarlayın. Problem devam ederse Roche ile irtibat kurun. 6. Ölçüm cihazı ve ölçüm çubukları düzgün Bir performans kontrolü yapın. Talimatlar için, şekilde çalışıyor mu? Bölüm 4, Performans Kontrolü...
- Page 62 Kan Şekeri Ölçümleri Yüksek veya Düşük Kan Şekeri Semptomları Düşük veya yüksek kan şekeri semptomlarını bilmek ölçüm sonuçlarını anlamanıza ve olağandışı durumlarda ne yapacağınıza karar vermenize yardımcı olabilir. Düşük kan şekeri (hipoglisemi): Hipoglisemi belirtileri aşağıdakileri içerebilir ancak bunlarla sınırlı değildir; endişe, titreme, terleme, baş...
-
Page 63: Bölüm 3: Ölçüm Cihazı Hafızası, Kurulumu Ve Veri Aktarımı
500 ölçüm sonucu dahil edilir. • Kontrol sonuçları hafızada saklanır ama ölçüm cihazında görüntülenmez. Saklanmış kontrol sonuçlarını görmek için önce bunları uyumlu bir yazılım uygulamasına aktarın. Ürüne erişim bilgileri için Roche ile irtibat kurun. • Kontrol sonuçları 7, 14, 30 ve 90 günlük ortalamalara dahil edilmez. - Page 64 Ölçüm Cihazı Hafızası, Kurulumu ve Veri Aktarımı Hafızadaki Ölçüm Sonuçlarının Görüntülenmesi Ölçüm cihazı açık veya kapalıyken, hafızaya girmek için veya tuşuna basıp bırakın. En yeni ölçüm sonucu ekranda görünür. Tuş Fonksiyon Eylem Önceki kan şekeri Ölçüm sonuçlarını en yeniden en eskiye görmek için tuşuna ölçüm değerleri basın.
- Page 65 Ölçüm Cihazı Hafızası, Kurulumu ve Veri Aktarımı Kurulum Modunun Kullanımı Aşağıdaki özellikler gerektiği şekilde özelleştirilebilir: Sembol Fonksiyon Eylem Fabrika ayarları Saat ve tarih Saati ve tarihi ayarlayın. Sesli uyarı On (açık) veya OFF (kapalı) durumunu seçin. Sesli uyarının OFF (kapalı) olarak ayarlanması ölçüm sonuçlarını...
- Page 66 Ölçüm Cihazı Hafızası, Kurulumu ve Veri Aktarımı Saat ve Tarihin Ayarlanması Cihazı açmak için Saati artırmak veya Dakika, gün, ay ve yılı (güç/ayar tuşuna) basın azaltmak için veya ayarlamak için 3. adımı ve bırakın. tuşuna basıp bırakın. tekrarlayın. Ekranda yanıp sönen Saati ayarlamak için Diğer seçenekleri ölçüm çubuğu sembolü...
- Page 67 Ölçüm Cihazı Hafızası, Kurulumu ve Veri Aktarımı Sesli Uyarının On (Açık) veya OFF (Kapali) olarak Ayarlanması Sesli uyarı size şunlar için haber verir: • ölçüm çubuğuna kan veya kontrol solüsyonu uygulamak için • ölçüm çubuğuna yeterli kan veya kontrol solüsyonu alındığında •...
- Page 68 Ölçüm Cihazı Hafızası, Kurulumu ve Veri Aktarımı Tokluk Ölçümü Hatırlatmasının Ayarlanması • Ölçüm hatırlatmasından önceki 15 dakika Tokluk ölçümü hatırlatması: içinde ölçüm yaptıysanız ölçüm hatırlatması • Öğünden 1 veya 2 saat sonra tokluk kan şekeri gerçekleşmez. ölçümü hatırlatmak için uyarır. •...
- Page 69 Ölçüm Cihazı Hafızası, Kurulumu ve Veri Aktarımı Ölçüm Hatırlatmalarının Ayarlanması Ölçüm hatırlatmaları: • Ölçüm hatırlatmasından önceki 15 dakika • her gün aynı saatte uyarı verir. içinde ölçüm yaptıysanız ölçüm hatırlatması • 2 dakikada bir olacak şekilde 3 kez sesli uyarı gerçekleşmez.
- Page 70 Ölçüm Cihazı Hafızası, Kurulumu ve Veri Aktarımı 00, 15, 30 veya 45 İster A-2 ölçüm dakikayı seçmek için hatırlatmasını ayarlayın veya tuşuna basıp veya diğer seçenekleri bırakın. Sadece bu ayarlamak için tuşuna seçenekler basıp bırakın. bulunmaktadır. Çıkmak için, tuşuna Dakikayı ayarlamak için ekranda yanıp sönen tuşuna basıp bırakın.
- Page 71 Ölçüm Cihazı Hafızası, Kurulumu ve Veri Aktarımı Hipoglisemi Uyarısının Ayarlanması UYARI • Cihazınızın bu işlevi sağlık profesyoneliniz tarafından sağlanacak hipoglisemi eğitiminin yerini almaz. • Tüketici: Hipoglisemi uyarısını ayarlamadan önce sağlık profesyonelinizle görüşerek hangi kan şekeri değerinin hipoglisemi düzeyiniz olduğunu öğrenin. •...
- Page 72 Ölçüm Cihazı Hafızası, Kurulumu ve Veri Aktarımı Sonuçlarınızın Bilgisayara Aktarılması Verilerinizi aktarmanız için size bir dizi yazılım sunuyoruz. Accu-Chek yazılımları ile ilgili bilgi için Roche ile irtibat kurun. Saklanan sonuçlarınızı izleme, örüntüleri tanımlama ve yazdırma amacıyla bir bilgisayara aktarabilirsiniz. UYARI Bireysel hasta ölçüm sonuçları...
-
Page 73: Bölüm 4: Performans Kontrolleri
Bölüm 4: Performans Kontrolleri Performans Kontrolleri Performans Kontrolü Ne Zaman Yapılır Performans kontrolü yapmak ölçüm cihazı ve ölçüm çubuklarının uygun şekilde çalıştığından emin olmanızı sağlar. Şu durumlarda bir performans kontrolü yapmanız gerekir: • Yeni bir ölçüm çubuğu kutusu açtığınızda. • Ölçüm çubuğu şişesini açık bıraktığınızda. •... - Page 74 Performans Kontrolleri Performans Kontrolü Yapılması Önceden aktivasyon çipi takılı ölçüm cihazı, bir ölçüm çubuğu ve Düzey 1, Düzey 2 veya her iki kontrol solüsyonu gereklidir. Kontrol düzeyi şişe etiketinde yazılıdır. veya Ölçüm çubuğu Ölçüm çubuğunu ölçüm Ölçüm yapılacak kontrol Kontrol solüsyonu şişesindeki son kullanma cihazına okların yönünde solüsyonunu seçin.
- Page 75 Performans Kontrolleri veya veya (örnek) (örnek) Kontrol sonucu, şişe Kontrol sonucunu Düzey Ölçüm cihazında kontrol düzeyini ayarlamak için sembolü ve yanıp sönen 1 olarak işaretlemek için tuşuna basıp bırakın. bir L ekranda görünür. tuşuna basın. Kontrol Kontrol sonucu aralık içindeyse ekranda sırasıyla Ölçüm çubuğunu şimdilik sonucunu Düzey 2 olarak OK ve kontrol sonucu yanıp söner.
- Page 76 7. Performans kontrolünü yaparken doğru Yanlış kontrol solüsyonu düzeyini seçmiş olsanız da kontrol solüsyonu düzeyini (1 veya 2) kontrol sonucunu ölçüm çubuğu şişesinde basılı seçtiniz mi? aralıkla karşılaştırabilirsiniz. 8. Problemden hala emin değil misiniz? Roche ile irtibat kurun. 79718_07255233050_01_TR.indb 30 5/22/2019 2:23:30 PM...
-
Page 77: Bölüm 5: Bakım Ve Sorun Giderme
Ölçüm cihazı onu açtığınız her seferinde otomatik olarak kendi sistemlerini kontrol eder ve herhangi bir sorun olduğunda sizi bilgilendirir. Bakınız Bölüm 5, Ekran ve Hata Mesajları. Ölçüm cihazını düşürürseniz veya doğru sonuçlar vermediğini düşünüyorsanız Roche ile irtibat kurun. UYARI Yeni ve kullanılmış pilleri çocuklardan uzak tutun. Daha fazla bilgi için bu kullanım kılavuzunun Giriş... - Page 78 Bakım ve Sorun Giderme Ölçüm Cihazının Temizlenmesi Ölçüm cihazını tozdan uzak tutun. Temizlemeniz veya dezenfekte etmeniz gerekirse olası en iyi sonucu almanıza yardımcı olmak üzere bu kılavuzdaki tavsiyeleri dikkatle izleyin. UYARI • Ölçüm cihazındaki yuvalara sıvı girmesine izin vermeyin. • Ölçüm cihazının üstüne doğrudan herhangi bir temizlik solüsyonu püskürtmeyin. •...
- Page 79 Bakım ve Sorun Giderme Ekran ve Hata Mesajları UYARI • Asla bir hata mesajına dayanarak tedavi kararları vermeyin. • Herhangi bir endişeniz varsa veya başka bir hata ekranı görüyorsanız Roche ile irtibat kurun. Ekran Eylem Ölçüm cihazı • Piller bitmiştir. Yeni pil takın.
- Page 80 Aktivasyon çipi eksik. Ölçüm cihazını kapatın ve aktivasyon çipini takın. Bir aktivasyon çipine gereksiniminiz varsa Roche ile irtibat kurun. Bu mesaj, ölçüm cihazında beyaz aktivasyon çipi kullanıldığında görüntülenebilir. Bu ölçüm çubuklarının kullanım süresinin mevcut ayın sonunda biteceği anlaşılır.
- Page 81 Bakım ve Sorun Giderme Ekran Eylem Kan şekeriniz çok yüksek olabilir veya ölçüm cihazı ya da ölçüm çubuğu ile ilgili bir hata meydana gelmiş olabilir. • Kan şekeri sonucunuz kendinizi nasıl hissettiğinizle uyumluysa hemen sağlık profesyonelinizle irtibat kurun. • Kan şekeri sonucunuz kendinizi nasıl hissettiğinizle uyumlu değilse, kan şekeri ölçümünü...
- Page 82 Bakım ve Sorun Giderme Ekran Eylem Sıcaklık, sistem için uygun aralığın üstünde veya altındadır. Sistem çalışma koşulları için ölçüm çubuğu prospektüsüne başvurun. Uygun koşullara sahip bir alana geçin, 5 dakika bekleyin ve kan şekeri ölçümünü veya performans kontrolünü tekrarlayın. Ölçüm cihazını suni yollarla ısıtmayın veya soğutmayın. Piller neredeyse bitmiş.
-
Page 83: Bölüm 6: Teknik Bilgi
69 × 43 × 20 mm (EBY) Ağırlık Yaklaşık 40 g (pillerle) Yapı Elde tutulur Koruma Sınıfı Accu-Chek Performa Nano ölçüm cihazı sürekli çalışmaya Ölçüm cihazı tipi uygundur. Kontrol solüsyonu saklama koşulları Kontrol solüsyonu prospektüsüne bakın. 79718_07255233050_01_TR.indb 37 5/22/2019 2:23:32 PM... - Page 84 Teknik Bilgi Elektromanyetik Uyumluluk – Bu ölçüm cihazı EN ISO 15197 Ek A uyarınca ortaya konan elektromanyetik uyumluluk gerekliliklerine uygundur. Elektrostatik deşarj bağışıklığı testi için seçilmiş olan baz temel standart IEC 61000-4-2'dir. Ek olarak, ölçüm cihazı EN 61326’da öngörülen elektromanyetik emisyon gerekliliklerini karşılar. Dolayısıyla, ölçüm cihazının elektromanyetik emisyonu düşüktür. Elektrikle çalışan diğer cihazlarda parazite neden olması...
- Page 85 Teknik Bilgi Sembollerin Açıklaması Bu semboller pakette, tip levhasında ve Accu-Chek Performa Nano ölçüm cihazı talimatlarında görülebilir. Kullanım kılavuzuna bakınız Dikkat, ürünün kullanım kılavuzunda güvenlikle ilgili bilgilere bakınız. Sıcaklık aralığı (saklama şartları) Üretici Katalog numarası In vitro tanısal kullanım için tıbbi cihaz Küresel ticari ürün numarası...
- Page 86 Teknik Bilgi Garanti Satın alındığı ülkede tüketici mallarıyla ilgili haklar konusunda yasal hükümler geçerli olacaktır. Ek Malzemeler Ölçüm çubukları Accu-Chek Performa ölçüm çubukları Kontrol Solüsyonları Accu-Chek Performa kontrol solüsyonları Sağlık Profesyonelleri için Bilgi UYARI Sağlık Profesyonelleri: Kuruluşunuzdaki uygun enfeksiyon kontrol işlemlerini izleyin. Ek sağlık profesyoneli bilgisi için ölçüm çubuğu prospektüsüne başvurun.
- Page 87 Teknik Bilgi Numune Kullanma Kan bulaşmış nesnelerle çalışıldığında her zaman eldiven kullanın. İnsan materyali ile kontamine nesneler kullanılırken her zaman bilinen prosedürlere sıkı sıkıya uyun. Laboratuvarınızın veya kuruluşunuzun sağlık ve güvenlik politikasını takip edin. Seçili kan toplama yerini kuruluşunuzun politikalarına göre hazırlayın. Uygun numune tipleri, pıhtı...
- Page 88 Teknik Bilgi 79718_07255233050_01_TR.indb 42 5/22/2019 2:23:33 PM...
-
Page 89: Dizin
Dizin Dizin ölçüm cihazı, temizleme 32 açlık işareti 14 ölçüm çubukları 7 alternatif bölge testi 12, 41 ölçüm hatırlatmaları, ayarlar 23 ayarlar, ölçüm cihazı 19 performans kontrolü, yapılması 28 bakım, ölçüm cihazı 31 pil çekmecesi 5, 31 bilgisayar, sonuçların aktarılması 26 piller, değiştirilmesi 31 piller, takma 31 düşük kan şekeri 16... - Page 90 Notlar 79718_07255233050_01_TR.indb 44 5/22/2019 2:23:33 PM...
- Page 91 Telefon: +90 212 306 06 06 Müşteri Danışma Hattı: 0800 211 36 36 (ücretsiz) 0850 211 36 36 www.rochediagnostics.com.tr ÜRETİCİ FİRMA Roche Diabetes Care GmbH Sandhofer Strasse 116 68305 Mannheim, Germany www.accu-chek.com İTHALATÇI FİRMA Roche Diagnostics Turkey A.Ş. Esentepe Mahallesi Kırgülü Sokak No: 4 34394 Şişli, İstanbul...
- Page 92 Roche Diabetes Care GmbH Sandhofer Strasse 116 68305 Mannheim, Germany www.accu-chek.com ACCU-CHEK, ACCU-CHEK PERFORMA, and PERFORMA NANO are trademarks of Roche. © 2019 Roche Diabetes Care 07255233050(01)-0519 79718_07255233050_01_Cover.indb 4 5/22/2019 2:21:59 PM...
Need help?
Do you have a question about the Accu-Chek Performa Nano and is the answer not in the manual?
Questions and answers