Table of Contents
Advertisement
Quick Links
Advertisement
Table of Contents

Related Manuals for Roche Accu-Chek Solo


Summary of Contents for Roche Accu-Chek Solo
- Page 1 User’s Manual Accu-Chek Solo micropump system...
- Page 3 Important information I am a person with diabetes being treated with insulin. The insulin is delivered to my body by a micropump. If I am confused or unconscious, You can call up important handling steps for the micropump system as a please do the following: video via the Help function on the diabetes manager.
- Page 4 DIABETES MELLITUS. 1. Press and hold both quick bolus buttons for approximately 3 seconds. She/He relies on a regular supply of insulin from the Accu-Chek Solo micropump, which she/ 2. Simultaneously press both quick bolus buttons repeatedly until the he carries on her/his body.
- Page 6 Bluetooth SIG, Inc. ® and any use of such marks by Roche is under license. Teflon is a registered trademark of E. I. du Pont de Nemours and Company or its affiliates.
-
Page 7: Table Of Contents
Contents About this User’s Manual Putting the Diabetes Manager into Operation Scope of delivery Charging the Battery Setup Wizard Consumables Programming a Basal Rate Profile Putting the Micropump into Operation What is the Purpose of the Micropump System? Overview Intended Use Recommended Infusion Sites Contraindications Putting the Components into Operation... - Page 8 10 My Data Quick Bolus Delivering a Bolus with a Pen or Syringe 10.1 Overview Cancelling a Bolus 10.2 Logbook Setting the Delivery Lag Time 10.3 Trend Graph 10.4 Standard Week Bolus Advice 10.5 Target Range Overview 10.6 BG Averages Table Setting Up Bolus Advice 10.7 System Events Changing Bolus Advice and Time Blocks...
- Page 9 12.3 Deleting Reminders 16.5 Insertion Device 12.4 Issuing Reminders 16.6 Delivery Rate Accuracy 13 Injection Therapy Mode 17 Symbols, Abbreviations, Signals 13.1 Removing the Micropump Temporarily 17.1 Symbols 13.2 Injection Therapy Displays 17.2 Abbreviations 17.3 Signals 14 Care and Maintenance 18 Appendix 14.1 Cleaning the Micropump System 14.2 Control Test of the Diabetes Manager...
-
Page 10: About This User's Manual
Also consult the instructions for use enclosed with the Solo micropump system for the first time. This User’s Manual components of the Accu-Chek Solo micropump system. provides you with the information you need to safely operate the micropump system. In addition, this User’s Manual provides you with the information you need for maintenance and troubleshooting. - Page 11 Not be able to use the micropump system. Read these chapters heeding the warnings can lead to life-threatening situations. before using the Accu-Chek Solo micropump system. Chapters highlighted in purple...
-
Page 12: Scope Of Delivery
Accu-Chek Solo infusion assembly, consisting of Accu-Chek reserve. Solo cannula assembly and Accu-Chek Solo pump holder Make sure you have a second pump holder and a second Accu-Chek Aviva test strips and Accu-Chek Aviva control... -
Page 13: What Is The Purpose Of The Micropump System
What is the Purpose of the Micropump System? 1.1 Intended Use The Accu-Chek Solo micropump system is a prescription medical Therapy using the micropump system may only be started after device intended for the subcutaneous, continuous delivery of completion of the required training from a qualified instructor. -
Page 14: Contraindications
What is the Purpose of the Micropump System? 1.2 Contraindications The micropump system should not be used by children under People with skin that does not tolerate adhesive pads. 2 years of age or by people who regularly require less than People who often experience a cannula occlusion. -
Page 15: Risks And Benefits
Risks and Benefits 1.3 Risks and Benefits Talk to your healthcare professional about the benefits and potential risks that are associated with using the micropump system. To ensure that insulin pump therapy is safe and successful, you must actively take part in your therapy, test your blood glucose values regularly and monitor the functions of the micropump regularly. -
Page 16: General Warnings
What is the Purpose of the Micropump System? 1.4 General Warnings WARNING WARNING The micropump system may only be used by a single Check your blood glucose level at least four times a day. person for insulin therapy. Check your blood glucose level more than four times a day All objects which can come into contact with human blood if your insulin sensitivity is high. - Page 17 General Warnings WARNING WARNING Do not expose the micropump system to extreme Never attempt to repair or modify the micropump system acceleration forces (for example, roller coaster rides). This yourself. Otherwise, you risk malfunctions of the can lead to hyperglycaemia or hypoglycaemia. micropump system, incorrect test results and over-delivery Do not use the micropump system close to strong or under-delivery of insulin.
-
Page 18: Components Of The Micropump System
What is the Purpose of the Micropump System? 1.5 Components of the Micropump System The Accu-Chek Solo micropump system is a system that primarily consists of a tubeless micropump and a diabetes manager, which serves as a remote control. The interactive displays on the diabetes manager screen, help you to make individual settings and control the micropump. - Page 19 Components of the Micropump System Accu-Chek Solo reservoir Accu-Chek Solo pump holder The Accu-Chek Solo reservoir is the second part of the micropump in addition to the pump base. The The Accu-Chek Solo pump holder is reservoir is a sterile container for...
-
Page 20: Characteristics Of The Micropump System
What is the Purpose of the Micropump System? 1.6 Characteristics of the Micropump System Tubeless insulin pump Customised bolus and basal features Small, light and removable micropump (29 g) Bolus delivery (up to 50 U) with diabetes manager or Transparent reservoir (up to 200 U), usable for up to 4 days programmable directly on the micropump Soft Teflon ®... - Page 21 Characteristics of the Micropump System Assisted setup and application Micropump system is set up using a setup wizard Guided setup of basal rate profiles and bolus advice feature Guided replacement of system components Videos explaining action steps on the diabetes manager Comfort and safety features Built-in blood glucose meter in the diabetes manager Optional entry of blood glucose results that were measured...
-
Page 22: Using The Micropump System In Daily Life
What is the Purpose of the Micropump System? 1.7 Using the Micropump System in Daily Life The micropump system is intended to be used continuously, Showering, bathing, swimming, diving every day in any everyday situation. There are only a few Protect the diabetes manager from moisture and water. - Page 23 Using the Micropump System in Daily Life Temperature Air pressure and altitude Do not expose the micropump to direct sunlight, UV radiation or Rapid and significant changes in air pressure or temperature can heat. The operating temperature of the micropump is between influence insulin delivery, especially if there are air bubbles in the +5 °C and +40 °C.
- Page 24 What is the Purpose of the Micropump System? Travelling and flights Communication between micropump and diabetes manager Before travelling, ask your healthcare professional about any For wireless communication between the micropump and the special preparations you need to make. Take sufficient supplies diabetes manager, it is not necessary for the devices to be right with you for blood glucose testing and for your insulin pump next to each other.
-
Page 25: Getting To Know The Micropump System
Getting to Know the Micropump System 2.1 Diabetes Manager Overview Note The Accu-Chek Aviva Solo diabetes manager is a remote control Always have the diabetes manager with you. with an integrated blood glucose meter that is used to control the A rechargeable battery supplies power to the diabetes micropump. - Page 26 Getting to Know the Micropump System...
- Page 27 Diabetes Manager Overview Name Description Note Power button Turns the diabetes manager on or off. Only use the headphone socket for Lanyard eyelet Used to attach a lanyard. connecting passive headphones, i.e. headphones without their own Headphone socket Socket for connecting passive headphones. power supply.
-
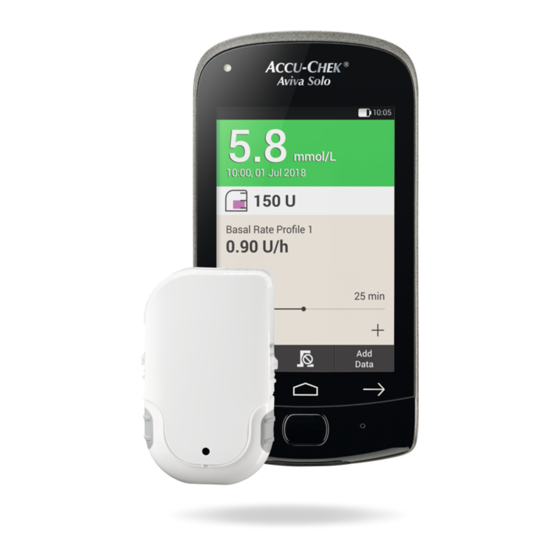
Page 28: Status Screen
Getting to Know the Micropump System 2.2 Status Screen 2.2.1 Overview On the Status screen, you can see the most important, current and most common therapy information on blood glucose result, basal rate, ongoing boluses and reservoir level at a glance. You can access other information and menus from the Status screen. - Page 29 Status Screen Name Description Blood Shows the most recent blood glucose result with the time and date of the test. The background colour glucose indicates whether the test result falls within the target range. For more information, see chapter 5.1.5 Colour Coding of Test Results. result Shows the active basal rate profile with the current basal rate.
- Page 30 Getting to Know the Micropump System 2.2.2 Shortcuts on the Status screen The touch-sensitive areas on the Status screen allow you to quickly access important menus and features. When you tap the areas, the corresponding menus or features are opened. Logbook entries menu Replace system components...
-
Page 31: Main Menu
Main Menu 2.3 Main Menu The main menu is an overview of the most important features of Depending on the situation (for example, pump therapy or the diabetes manager. From here, you can open the basic menus injection therapy), other menus can be displayed. For more information, see chapter 13.2 Injection Therapy Displays. - Page 32 Getting to Know the Micropump System The status bar at the top edge of the screen shows the current time. In addition, the following symbols may be displayed. Symbol Name Description Status of rechargeable Shows the current level of the rechargeable battery in the diabetes manager. battery Is displayed when communication between the diabetes manager and the micropump is No communication...
- Page 33 Main Menu Menu icons in the Main menu Menu icon Description Menu icon Description Deliver manual bolus, use bolus advice, View or change settings, view system cancel bolus information, switch therapy mode Select or set basal rate profiles, set and Display or edit logbook data cancel Temporary Basal Rates (TBR) Micropump is in STOP mode,...
-
Page 34: Information Screen
Getting to Know the Micropump System 2.4 Information Screen The information screen is a representation of important device, If you slide the upper screen edge downwards, the information status and therapy information as well as system events. When screen is shown. The bar on the sliding pane lights up blue while you tap the events, the respective menus open. -
Page 35: Navigation And Operation
Navigation and Operation 2.5 Navigation and Operation 2.5.1 Navigation buttons You navigate and operate the diabetes manager by means of the You can use the navigation buttons below the screen to move touchscreen and navigation buttons. The insulin button is an forwards and backwards or to go to the Status screen. - Page 36 Getting to Know the Micropump System 2.5.2 Insulin Button 2.5.3 Entries The insulin button is only used to confirm a previously set insulin There are various methods of making entries in order to execute delivery. When the diabetes manager is ready to deliver basal or commands, select values, set features and select display bolus insulin, the button lights up green.
- Page 37 Navigation and Operation Executing commands Switching a feature on or off Whenever you tap a command on the screen, the background By tapping a switch, you can turn a feature on or off. Inactive colour changes. function buttons and switches are greyed out. Example Example Not selected...
- Page 38 Getting to Know the Micropump System Simple lists or menus Lists with checkboxes No element is preselected in simple lists or menus. You can In these lists, you can select either one or more elements select an element. simultaneously or no element. Example Example Tap the element you want to select.
- Page 39 Navigation and Operation Lists with radio buttons Editing an element In these lists, one element is always selected, for example, by To edit the desired element, it must be selected. the factory settings. By tapping the desired element, you can change the selection.
- Page 40 Getting to Know the Micropump System Scrolling lists Slider In long menus and lists, you can scroll the list to display the You can make the desired setting by moving the slider. elements that are not visible. Example Example Scroll the list upwards to view additional list elements or Move the slider to the desired position.
- Page 41 Navigation and Operation 2.5.4 Entering Numbers Numeric keypad You can either use a numeric keypad to enter numbers or use the When you use the carbohydrate unit g, you can alternatively enter minus/plus buttons to set them. the carbohydrate amount using the numeric keypad. Some numbers and values can only be set using the minus/plus buttons or only be entered by means of the numeric keypad.
- Page 42 Getting to Know the Micropump System 2.5.5 Entering Text Minus/plus buttons allow you to switch between entering data using the Text is entered using a keyboard. Depending on the language, minus/plus buttons and the numeric keypad. key assignments may differ. Explanation/Example Explanation/Example Symbol for...
- Page 43 Navigation and Operation 2.5.6 Screen Lock Unlocking the screen If the diabetes manager has been inactive for approx. 60 seconds, the screen is automatically locked. You can also lock the screen by pressing the power button. A locked screen is indicated by the symbol.
- Page 44 Getting to Know the Micropump System...
-
Page 45: Putting The Diabetes Manager Into Operation
Putting the Diabetes Manager into Operation 3.1 Charging the Battery Symbols for different battery levels: Before you start using the diabetes manager, you must charge 20 % 40 % 60 % 80 % 100 % the battery. Connect the diabetes manager to a PC or charger by means of a USB cable. - Page 46 IEC 60950 or an equivalent safety standard). Use only the rechargeable battery from Roche. Have the diabetes manager, Open the battery compartment Place the rechargeable battery rechargeable battery, charger by pushing the battery door up into the battery compartment and USB cable ready.
- Page 47 Charging the Battery 3.1.2 Charging the Battery Using a Wall Socket Close the battery compartment Plug the larger end (USB type Plug the smaller end (USB type Plug the charger into a wall by pushing the battery door in A) of the USB cable into the micro-B) of the USB cable into socket (the images show a the direction of the arrow until...
- Page 48 Putting the Diabetes Manager into Operation Note The blue LED lights up to indicate that the battery is being charged. If the rechargeable battery of the diabetes manager has been run right down, it may take up to 15 minutes until the blue LED of the diabetes manager lights up.
- Page 49 Charging the Battery 3.1.3 Charging the Battery Using a Computer Plug the smaller end (micro-B Plug the larger end (USB-A The Status screen or Main menu displays the symbol in the plug) of the USB cable into the plug) of the USB cable into a status bar.
- Page 50 Putting the Diabetes Manager into Operation Note The computer must usually be turned on in order for the battery to be charged. With some PC models, the computer must not be in sleep or standby mode if you want to charge the battery.
-
Page 51: Setup Wizard
Setup Wizard 3.2 Setup Wizard Caching the setup The first time you turn the diabetes manager on, the setup wizard is displayed. You must complete the setup wizard before you start using the micropump or test your blood glucose. The setup wizard is displayed every time you turn the diabetes manager on until you complete the setup. - Page 52 Putting the Diabetes Manager into Operation Power on/Standby Setting the language Entering the PIN Press and hold the power The diabetes manager Tap the desired language. If Enter a PIN (secret button on the top of the vibrates, issues the “Start” required, scroll the list identification number) of your diabetes manager until the...
- Page 53 Setup Wizard Selecting Setup mode Note Note If you have forgotten the PIN It is not currently possible to you chose, you can unlock perform the setup on the PC. the diabetes manager with a PIN unlock code. You can find the label with the 8-digit PIN unlock code on the back cover of the User’s Manual.
- Page 54 Putting the Diabetes Manager into Operation Setting the time and date Times and time periods are always displayed or entered in the following format HH:MM (HH = hours, MM = minutes). 24-hour time 01:07 HH:MM format 16:15 12-hour time 01:07 am HH:MM am or pm format 04:15 pm Time period...
- Page 55 Setup Wizard Tap Time. The hours field is selected Tap the minutes field. Tap Date. (dark background). to set the to set the hours. minutes. Tap OK.
- Page 56 Putting the Diabetes Manager into Operation The day field is highlighted. Tap the month field. Tap the year field. Once you have entered all settings for time and date, tap to set the day. to set the to set the year. month.
- Page 57 Setup Wizard Setting the carbohydrate unit The diabetes manager offers the following carbohydrate units for selection: Abbreviation Unit of measurement Gram equivalent Gram 1 gram Broteinheit (bread 12 grams equivalent) Kohlenhydrateinheit 10 grams (carbohydrate unit) Carbohydrate choice 15 grams Tap the carbohydrate unit you if the correct unit is want to set.
- Page 58 Putting the Diabetes Manager into Operation Setting warning limits You can set warning limits for hyperglycaemia and hypoglycaemia that best fit your needs. Whenever your blood glucose result is above the hyper warning limit or below the hypo warning limit, the diabetes manager displays a warning.
- Page 59 Setup Wizard Note If you do not want to set up bolus advice now, the setup wizard skips the steps for setting up bolus advice. You can set up bolus advice at a later time. to set the lower The warning limits currently If you want to set up bolus warning limit.
- Page 60 Putting the Diabetes Manager into Operation Setting time blocks The diabetes manager allows you to define blood glucose target ranges for certain times of day. For this purpose, the day is divided into time blocks. By dividing the day into time blocks, you can adjust the blood glucose target range to your specific needs.
- Page 61 Setup Wizard to set the start to set the end Tap Done. Upper limit value. time. time. Tap OK. Tap OK.
- Page 62 Putting the Diabetes Manager into Operation to set the upper Lower limit value. to set the lower Tap Done. limit value. limit value. Tap OK. Tap OK.
- Page 63 Setup Wizard Note You can set one blood glucose target range for all time blocks or different ones for the various time blocks. The settings for the first time block are used in all copied time blocks. Tap the appropriate time blocks to change these settings.
-
Page 64: Programming A Basal Rate Profile
Putting the Diabetes Manager into Operation 3.3 Programming a Basal Rate Profile The basal rate covers the basal, meal-independent insulin requirement. Basal rates are specified in insulin units per hour (U/h = Units per hour). The distribution of the basal insulin requirement over up to 24 time blocks results in the basal rate profile. - Page 65 Programming a Basal Rate Profile Note The first time block always starts at 00:00. The last time block always ends at 00:00. The factory settings provide 24 time blocks with one hour each. A time block can range from 15 minutes to a maximum of 24 hours.
- Page 66 Putting the Diabetes Manager into Operation to set the end When the end time of a time Define the insulin units per to set insulin time for the first time block. block shortens or overwrites hour for the first time block. units per hour for the first time the next time block, this block.
- Page 67 Programming a Basal Rate Profile Repeat Steps 4 to 7 for each time block you want to edit. Next, you have to prepare the micropump. For more Scroll the screen upwards or downwards to display all time information, see chapter 4 Putting the Micropump into blocks.
- Page 68 Putting the Diabetes Manager into Operation...
-
Page 69: Putting The Micropump Into Operation
Putting the Micropump into Operation 4.1 Overview This chapter explains all steps necessary to prepare the micropump before using it for the first time. To put the Cannula assembly 6 mm Cannula assembly 9 mm micropump into operation, you need the following: (orange) (blue) Diabetes manager... - Page 70 Putting the Micropump into Operation Infusion assembly Reservoir assembly Pump holder Filling aid Hook for attaching the micropump Adhesive pad Opening for safety release of the insertion device Cannula opening with cannula Protective film for battery support Flap for detaching the Handle for piston rod micropump Cannula assembly...
- Page 71 Overview Insertion device Micropump Recess for attaching the pump holder Positioning aid Inserted cannula assembly Pump base with reservoir Detach button mounted Release button Pairing code Priming handle Recess for attaching the pump holder Cannula assembly slot Safety release Pump shield Opening for ventilation Lock Quick bolus buttons...
- Page 72 Putting the Micropump into Operation WARNING Check all components for visible damage before using them with the micropump system. The reservoir, cannula and pump holder are intended for single use and are sterile packaged. They must not be used if their sterile packaging was previously opened or damaged or if the use by date has expired.
-
Page 73: Recommended Infusion Sites
Recommended Infusion Sites 4.2 Recommended Infusion Sites Choose a suitable infusion site before inserting a new infusion assembly. Consult your healthcare professional for advice. Sites with sufficient subcutaneous tissue are the most suitable. For example: Infusion site Characteristics Abdominal Common infusion site with good insulin region absorption. -
Page 74: Putting The Components Into Operation
Putting the Micropump into Operation 4.3 Putting the Components into Operation Note The pump holder must not be attached to sites on the body with scars, birthmarks and moles, tattoos, injuries, bruises or rashes. Before you attach the pump holder to the body, the infusion site must be completely dry. - Page 75 Putting the Components into Operation 4.3.1 Attaching the Infusion Assembly to the Body Wash your hands and dry Select a suitable site on the Remove the pump holder from Attach the hook on the pump them thoroughly. body. the packaging. holder to the underside of the insertion device.
- Page 76 Putting the Micropump into Operation 180° Prime the insertion device by Insert the cannula assembly Use the positioning aid to Remove both parts of the rotating the priming handle into the insertion device. check whether the cannula protective film from the clockwise in the direction of assembly is in the correct adhesive pad.
- Page 77 Putting the Components into Operation Holding the skin taut, press Press the blue release button Smooth over the adhesive pad Press the detach button and the insertion device firmly to insert the cannula under the around the infusion assembly detach the insertion device against the selected site on skin.
- Page 78 Putting the Micropump into Operation Press the infusion assembly Check whether the grey Remove the used cannula Dispose of the used cannula and the edges of the adhesive cannula head in the cannula casing from the insertion casing according to local pad against the skin so that opening is visible and flush device.
- Page 79 Putting the Components into Operation WARNING During disposal, ensure that no third party could injure themselves and risk an infection. Note Do not use the insertion device without first inserting the cannula assembly. Before storing the insertion device, ensure that there is no cannula assembly in the insertion device. Never store the insertion device in a primed state.
- Page 80 Putting the Micropump into Operation 4.3.2 Filling the Reservoir with Insulin In addition to the reservoir assembly, you need an insulin vial with WARNING U100 insulin and a form of disinfectant, such as a sterile alcohol wipe. Only use the micropump to deliver rapid-acting U100 Use and store the insulin in compliance with the insulin.
- Page 81 Putting the Components into Operation Disinfect the top of the insulin Remove the new reservoir Carefully pull out the battery’s Hold the round part of the vial with a sterile alcohol wipe. assembly from the packaging. protective film downwards in handle firmly and pull it Allow the disinfected top of the the direction of the arrow to...
- Page 82 Putting the Micropump into Operation Note The reservoir must be filled with at least 80 U. The reservoir has a maximum holding capacity of 200 U (2.0 ml). Take care not to touch the reservoir needle. You might injure yourself. Place the insulin vial on a flat Press the handle all the way Turn the reservoir assembly and solid surface (for example,...
- Page 83 Putting the Components into Operation Note Check the reservoir from several angles to make sure that there are no air bubbles in the reservoir. Slowly pull the handle To release air bubbles from Slowly push the handle downwards in the direction of the reservoir, hold the upwards in the direction of the the arrow to fill the reservoir...
- Page 84 Putting the Micropump into Operation WARNING During disposal, ensure that no third party could injure themselves. Remove the filling aid from the Compress the handle on the reservoir by pulling it off ribbed surface 1 and then laterally in the direction of the remove the handle laterally arrow.
- Page 85 Putting the Components into Operation 4.3.3 Connecting the Reservoir to the Pump Base Remove the blue reservoir cap Align the piston rod of the Push the filled reservoir onto When both components are from the pump base. filled reservoir such that you the pump base until both parts connected to each other can insert it into the piston rod...
- Page 86 Putting the Micropump into Operation Note Make sure that there is no gap between the reservoir and the pump base. Do not exert too much force when connecting the pump base to the reservoir. Make sure that the opening for ventilation of the micropump is always clear so that the battery is fully functional.
- Page 87 Putting the Components into Operation 4.3.4 Pairing the Diabetes Manager and Micropump To be able to operate the micropump using the diabetes manager, you must pair the devices. Once the diabetes manager and the pump have been paired, the pairing settings are stored in both devices so that you do not have to repeat this process.
- Page 88 Putting the Micropump into Operation After you have connected the The diabetes manager Scan pairing code. Point the camera of the reservoir to the pump base, establishes the radio diabetes manager at the hold the diabetes manager connection to the micropump. pairing code on the pump close to the micropump to base.
- Page 89 Putting the Components into Operation Entering the pump key manually If no signal sounds, the pairing If there are several Enter here and enter the code was not detected. micropumps within range, tap pump key using the keyboard. the pump serial number of to return to the your micropump.
- Page 90 Putting the Micropump into Operation 4.3.5 Filling the Reservoir Needle WARNING Note You will find the pump key(s) on the inside of the packaging Never fill the reservoir lid (of the system kit or micropump kit). needle while it is connected to an infusion The pump serial number of the micropump is on the pump assembly attached to your...
- Page 91 Putting the Components into Operation Note If you do not see a drop of insulin at the tip of the needle after a maximum of 2 minutes, there is still too much air in the reservoir. If no insulin drop is visible even after refilling, you must use a new reservoir.
- Page 92 Putting the Micropump into Operation 4.3.6 Attaching the Micropump WARNING To properly attach the micropump to the pump holder, the recess Check the micropump and the pump holder for damage before for attaching the micropump needs to be clicked onto the hook on you attach the micropump to the pump holder.
- Page 93 Putting the Components into Operation Fit the recess on the Using pressure on the pump Check whether the micropump Tap Next. micropump onto the hook on shield, press the micropump is securely attached to the the pump holder. onto the pump holder until pump holder.
- Page 94 Putting the Micropump into Operation 4.3.7 Activating the Basal Rate Profile After having completed all preparatory steps for using the micropump for the first time, you can activate the set basal rate profile. Once you have activated the basal rate profile, the micropump system setup is complete.
-
Page 95: Stopping And Starting The Micropump
Stopping and Starting the Micropump Stopping insulin delivery 4.4 Stopping and Starting the Micropump Stop Start items in the Main menu enable you to interrupt or restart insulin delivery. Discuss with your healthcare professional when and for how long insulin delivery may be interrupted. If necessary, use a syringe or insulin pen to deliver insulin according to the instructions of your healthcare professional. - Page 96 Putting the Micropump into Operation Starting or stopping insulin delivery While the micropump is in STOP mode, the micropump issues the “Cancel” signal sequence once an hour to remind you that no insulin is being delivered. For more information on the sequences of signals, see chapter 17.3 Signals.
-
Page 97: Testing Or Entering Your Blood Glucose Level
Testing or Entering Your Blood Glucose Level Note The unit of measurement that your diabetes manager displays cannot be changed. Contact your Customer Support and Service Centre if the wrong unit of 5.1 Testing Blood Glucose measurement is printed on the back. Never use a diabetes manager with an incorrect unit of 5.1.1 Checking the Unit of Measurement measurement. - Page 98 Testing or Entering Your Blood Glucose Level 5.1.2 Performing a Blood Glucose Test After inserting a lancet drum into the finger pricker and setting Note the penetration depth, you can start the blood glucose test. You cannot perform a blood glucose test while the diabetes manager is being charged.
- Page 99 Testing Blood Glucose Prior to the test Inserting the test strip Wash your hands with warm Check the use by date that is Insert the test strip into the Apply drop display water and soap and rinse them indicated on the test strip test strip slot of the diabetes appears.
- Page 100 Testing or Entering Your Blood Glucose Level Obtaining blood Note Do not allow any liquid to enter the test strip slot of the diabetes manager. Remove the test strip in case of a test strip error, and repeat the blood glucose test using a new test strip. Only apply blood to the test strip when the test strip is in the test strip slot and Apply drop is displayed.
- Page 101 Testing Blood Glucose Applying blood Displaying the test result Note For more information about blood glucose results, see chapter 5.1.4 Evaluating Test Results. The blood glucose result can be used for bolus advice for a period of 15 minutes. Touch the blood drop to the The blood glucose test starts The test result is displayed and front yellow edge of the test...
- Page 102 Testing or Entering Your Blood Glucose Level Note You can subsequently change the added information in the My data menu. If bolus advice has been calculated based on information you added about health events and carbohydrates, you can no longer change this information.
- Page 103 Testing Blood Glucose 5.1.3 Adding Information Entering the time of test You can save additional information for a test result to describe You can assign exactly one certain events in connection with this test result or particular time of test to each blood characteristics of the test result.
- Page 104 Testing or Entering Your Blood Glucose Level Entering carbohydrates If you test your blood glucose in connection with a meal, it is advisable to save the carbohydrate amount you wish to eat. If you are using bolus advice, the entered carbohydrate amount is used to calculate the insulin amounts you need.
- Page 105 Testing Blood Glucose Setting health events Health events help you with the evaluation of your blood glucose results. If you have set up bolus advice and select a health event, bolus advice will be adjusted by the percentage you specified. Discuss health event adjustments with your healthcare professional, who...
- Page 106 Testing or Entering Your Blood Glucose Level Entering a note You can enter a personal note (max. 280 characters) to save with the test result. In the Test result in detail Type a note to save with this menu, tap Note. entry.
- Page 107 Testing Blood Glucose Entering basal insulin (injection mode) Injection mode allows you to save the amounts of basal insulin you injected in the diabetes manager. This is done most easily when you test your blood glucose. Note that the basal insulin you specify does not have any influence on bolus advice calculation.
- Page 108 Testing or Entering Your Blood Glucose Level 5.1.4 Evaluating Test Results Blood glucose results reflect the current status of the blood Note glucose level. Test results are influenced by different factors, Do not change your therapy based on individual blood glucose including type of diet, medication taken, state of health, stress results.
- Page 109 Testing Blood Glucose 5.1.5 Colour Coding of Test Results On the Test result in detail display, a coloured dot appears to the Being aware of the symptoms of low or high blood glucose can right of the test result. The colour of the dot depends on how high help you to better understand your test results and decide what the test result is in relation to the defined blood glucose target to do.
- Page 110 Testing or Entering Your Blood Glucose Level Blue with Hyper Blue Green If the blood glucose result exceeds the hyper warning limit, the Blue dot: Green dot: diabetes manager will issue the W-75 warning before displaying The blood glucose result is The blood glucose result is the test result.
- Page 111 Testing Blood Glucose Yellow Yellow dot: If the blood glucose result falls below the hypo warning limit, the The blood glucose result is diabetes manager will issue the W-80 warning before displaying the test result. This warning does not show the blood glucose below the target range for the current time block.
- Page 112 Testing or Entering Your Blood Glucose Level 5.1.6 LO Display LO display display means that the blood glucose result is outside the value range. Note display means that your blood glucose value might be very low. Being aware of the symptoms of low blood glucose can help you to better understand your test results and decide what to do.
- Page 113 Testing Blood Glucose 5.1.7 HI Display HI display display means that the blood glucose result is outside the value range. Note display means that your blood glucose value might be very high. Being aware of the symptoms of high blood glucose can help you to better understand your test results and decide what to do.
- Page 114 Testing or Entering Your Blood Glucose Level 5.1.8 Causes of Implausible Test Results If the diabetes manager repeatedly displays implausible test If you have observed all these items and are still experiencing results or error messages, check the items listed below. If you implausible test results or receiving error messages, perform a control test.
-
Page 115: Entering Your Blood Glucose Value
Entering Your Blood Glucose Value 5.2 Entering Your Blood Glucose Value If you do not want to test your blood glucose with the diabetes manager, you can manually enter a blood glucose value that was measured using another meter on the screen intended for that purpose. - Page 116 Testing or Entering Your Blood Glucose Level Enter the blood glucose value Tap OK. If you want to add information (Time of test, Carbohydrates, you measured with your meter Health events, Note) to the entered blood glucose value, follow the instructions in the section Adding Information on the previous using the numeric keypad.
-
Page 117: Delivering A Bolus
Delivering a Bolus 6.1 Manual Bolus Delivery A bolus represents the required insulin amount to be delivered in addition to the basal rate to cover the intake of food or correct an elevated blood glucose level. The bolus type and bolus amount You can deliver a bolus manually or by means of the bolus advice are determined by your healthcare professional’s guidelines, your feature. -
Page 118: Bolus Input Display
Delivering a Bolus 6.2 Bolus Input Display Blood glucose result Correction bolus The current test result is displayed. Tap this entry field to enter the insulin If no current test result exists, --- is displayed. amount needed to bring a blood glucose value outside the target range back into the target range. -
Page 119: Bolus Types
Bolus Types 6.3 Bolus Types Note the following for bolus input: You can choose from the following bolus types on the Bolus input When the Bolus input display appears for the first time, there is display: no bolus amount specified. You must enter the bolus amount. Standard bolus If you set the correction bolus or the meal bolus first, the Extended bolus... - Page 120 Delivering a Bolus Symbol Name Description The standard bolus delivers the programmed insulin dose all at once. Use this bolus for foods that Standard bolus contain fast-acting carbohydrates, such as juice or bread. Use the standard bolus if you want to correct an elevated blood glucose level. The extended bolus does not deliver the bolus insulin all at once, but over a programmable period of time.
-
Page 121: Programming A Bolus
Programming a Bolus 6.4 Programming a Bolus You can program a bolus in different ways. Start with one of the following three options: Test result > Bolus Status screen > Bolus Main menu > Bolus Option 1: Option 2: Option 3: After testing your blood On the Status screen, tap In the Main menu, tap the... - Page 122 Delivering a Bolus Manual bolus. Tap the entry fields that are to set the to set the appropriate to your situation to desired amount for the meal desired amount for the enter the correction bolus, bolus. correction bolus. meal bolus or total amount. Tap OK.
- Page 123 Programming a Bolus 6.4.1 Standard Bolus Note You can add an extended bolus to an ongoing standard bolus. Standard bolus type is set Check the total amount The micropump delivers the as the default in the factory displayed. standard bolus. The Status settings.
- Page 124 Delivering a Bolus 6.4.2 Extended Bolus The duration of bolus delivery can be programmed in 15-minute increments for a period of up to 24 hours. Delivery begins immediately after you confirm the bolus. Throughout bolus delivery, the Status screen shows the remaining time and remaining amount of the extended bolus.
- Page 125 Programming a Bolus Note The duration you set for the extended bolus will be used as the default setting when the extended bolus is delivered the next time. to set the hours Tap Bolus. Check the total amount and and minutes for the extended duration displayed.
- Page 126 Delivering a Bolus Note You can add a standard bolus to an ongoing extended bolus and an additional extended bolus or a multiwave bolus. The micropump delivers the extended bolus. The Status screen is displayed with the current bolus information.
- Page 127 Programming a Bolus 6.4.3 Multiwave Bolus The duration of the delayed bolus part can be programmed in 15-minute increments for a period of up to 24 hours. Delivery begins immediately after you confirm the bolus. It is only possible to select a multiwave bolus if a meal bolus has been programmed.
- Page 128 Delivering a Bolus Note The duration you set for the extended bolus will be used as the default setting when the multiwave bolus is delivered the next time. to set the After you have set the to set the immediate amount. immediate amount or the duration of the delayed delayed amount, the other...
- Page 129 Programming a Bolus Note You can add an extended bolus to an ongoing multiwave bolus. As soon as the immediate part of a multiwave bolus was delivered, you can add a standard bolus or another multiwave bolus. Tap Bolus. Check the displayed total The micropump delivers the amount, immediate amount, multiwave bolus.
- Page 130 Delivering a Bolus 6.5 Quick Bolus WARNING A quick bolus behaves like a standard bolus that can be Make sure that you know and use the set quick bolus programmed and delivered using the quick bolus buttons on the increment. If you use a different quick bolus increment to the micropump.
- Page 131 Quick Bolus Press and hold both quick Simultaneously press both The micropump issues a If the acoustic feedback bolus buttons simultaneously quick bolus buttons repeatedly “Quick bolus increment” tone corresponds to the desired for approximately 3 seconds until the desired insulin for each programmed quick insulin amount and you want until you hear the sequence of...
- Page 132 Delivering a Bolus Note Example If you do not confirm the acoustic feedback in Step 3 by You want to deliver a quick bolus with 2.5 U: pressing the quick bolus buttons, no bolus will be delivered With a quick bolus increment of 0.5 U, you have to press the and the “Cancel”...
- Page 133 Delivering a Bolus with a Pen or Syringe 6.6 Delivering a Bolus with a Pen or Syringe If you want to deliver a bolus with a pen or syringe, you can document the insulin amounts delivered on the Bolus input display.
- Page 134 Delivering a Bolus to set the Tap Bolus. If the total amount to be Inject the insulin units with a insulin amount you want to delivered is correct, tap OK. pen or syringe. deliver using a pen or syringe. Tap OK.
- Page 135 Cancelling a Bolus 6.7 Cancelling a Bolus 6.7.1 Cancelling a Single Bolus In the Main menu and on the Status screen, you can cancel a bolus by tapping the symbol. In the Bolus menu, you can tap the Cancel bolus item. You can cancel both a single bolus or all ongoing boluses.
- Page 136 Delivering a Bolus If you want to cancel the bolus The W-38 warning is The bolus has been cancelled now, tap Yes. displayed. and deleted from the Status screen. to confirm the warning.
- Page 137 Cancelling a Bolus 6.7.2 Cancelling All Boluses On the Status screen or in the Cancel all boluses. Tap Yes. For each cancelled bolus, the Main menu, tap the option W-38 warning is displayed. with the symbol. to confirm the warning.
- Page 138 Delivering a Bolus All boluses have been cancelled and deleted from the Status screen.
- Page 139 Setting the Delivery Lag Time 6.8 Setting the Delivery Lag Time In some situations (for example, if you have gastroparesis) it may be helpful to only start a bolus after you have started eating. You can use the delivery lag time setting to specify an interval between programming a bolus and the actual start of bolus delivery.
- Page 140 Delivering a Bolus to set the Tap Bolus. To confirm this step and The Status screen is displayed delivery lag time. The delivery deliver the bolus, press the with the current bolus lag time can be 0, 15, 30, 45 insulin button lit up in green information and the set or 60 minutes.
- Page 141 Bolus Advice The bolus advice feature aims to bring your blood glucose level If your blood glucose value is below the hypo warning limit, no back into the target range defined for you, by delivering an bolus advice is issued. Instead, you receive a recommendation to insulin amount that was calculated in advance.
- Page 142 Bolus Advice Terminology for setting bolus advice Note the following: Insulin that was not delivered via the micropump system can only Time blocks be taken into account by the bolus advice feature, if you enter it Time blocks allow you to divide the day into different time periods in the diabetes manager beforehand.
- Page 143 Overview Meal rise During or after meals, an increase in the blood glucose level is Note considered normal within a certain range, even if a bolus was After bolus advice is set up, you can change the options or delivered beforehand. Enter the maximum increase in your blood turn off bolus advice, if required.
- Page 144 Bolus Advice 7.2 Setting Up Bolus Advice Main menu > Settings > Bolus settings After turning on bolus advice, you must make the default settings for the carbohydrate ratio and the insulin sensitivity. These default settings will be adopted for all time blocks. Afterwards, the time blocks are set up.
- Page 145 Setting Up Bolus Advice Defining a time block The display for defining the to set the start to set the end The changed start and end first time block appears. time for the first time block. time for the first time block. times for the first time block are displayed.
- Page 146 Bolus Advice Setting the target range Upper limit value. to set the upper to set the lower The limit values currently set limit value. limit value. for the target range are If you do not want to modify displayed. the limit values for the target Tap OK.
- Page 147 Setting Up Bolus Advice Defining the default settings Carbohydrate ratio Note Done button on the Default settings display remains deactivated (grey) until the entries for Carbohydrate ratio Insulin sensitivity complete. To define the default settings, Example to set the to set the tap the entry fields for the insulin units for the carbohydrate amount for the...
- Page 148 Bolus Advice Insulin sensitivity Example Insulin sensitivity: 1.00 U : 2.2 mmol/L In this example, one insulin unit lowers the blood glucose value by 2.2 mmol/L. to set the to set the blood Tap Done. insulin units for the insulin glucose value for the insulin sensitivity.
- Page 149 Setting Up Bolus Advice Changing time block settings Note You can change the start time for the first time block only. Changes to the target range, carbohydrate ratio and insulin sensitivity can be made for each time block. The default settings for Tap the time block you want to time.
- Page 150 Bolus Advice Set the end time for the Tap Next. Set the upper and lower limit Done when you have selected time block. values. completed the desired settings for all time blocks. Tap OK. Tap Next.
- Page 151 Setting Up Bolus Advice Setting health events Your state of health and your activities have an impact on your blood glucose level. Bolus advice calculation takes health events into account. Each health event adjusts bolus advice by the percentage set by you.
- Page 152 Bolus Advice Setting a health event Setting a customised health event Tap the health event for which Enter a percentage for the If you want to set a to enter a name for the you want to make settings (for selected health event.
- Page 153 Setting Up Bolus Advice Bolus advice options Note Done button on the Bolus advice options display remains deactivated (grey) until you make a numeric entry for the snack size. to set the Tap Done. Meal rise, Snack size, percentage for the customised Acting time Offset time health event.
- Page 154 Bolus Advice Meal rise Snack size Acting time Offset time to set the meal to set the snack to set the hours to set the hours rise value. size value. and minutes for the acting and minutes for the offset time.
- Page 155 Setting Up Bolus Advice Done to complete the All settings for calculating setup wizard. bolus advice are now complete. Tap OK.
- Page 156 Bolus Advice 7.3 Changing Bolus Advice and Time Blocks Main menu > Settings > Bolus settings 7.3.1 Changing Bolus Advice Options This section describes how to change the values for meal rise, snack size, acting time and offset time. Bolus advice options.
- Page 157 Changing Bolus Advice and Time Blocks 7.3.2 Changing Percentages for Health Events Health events. Tap the health event for which Enter a percentage for the The health events are you want to make changes (for selected health event. displayed with the percentages example, Stress).
- Page 158 Bolus Advice 7.3.3 Deleting a Single Time Block In order to delete a single time block, decrease the end time of the time block until it is the same as its start time. After time blocks have been deleted, it may be necessary to change the end times and other information for the remaining time blocks until all...
- Page 159 Changing Bolus Advice and Time Blocks Decrease the end time until it Set the upper limit value and Set the carbohydrate ratio and It may be necessary to adjust equals the start time. lower limit value for the new insulin sensitivity for the new the end times and settings of time block.
- Page 160 Bolus Advice 7.3.4 Deleting Several Time Blocks You can delete one or more time blocks by merging different time blocks. In the Main menu, tap the Time blocks. Select the first time block that Settings menu. is to be merged with one or more time blocks.
- Page 161 Changing Bolus Advice and Time Blocks Increase the end time until it Set the upper limit value and Set the carbohydrate ratio and It may be necessary to adjust equals the end time of the last lower limit value for the insulin sensitivity for the the end times and settings of time block to be deleted.
- Page 162 Bolus Advice 7.3.5 Adding a Time Block This section describes how to add a new time block. To add a time block, decrease the end time of the last time block. After the new time block has been created, you may have to adjust the end time and other information for each time block.
- Page 163 Changing Bolus Advice and Time Blocks End time and decrease the Set the upper limit value and Set the carbohydrate ratio and It may be necessary to change end time in order to create a lower limit value for the new insulin sensitivity for the new the end times and settings of new time block.
- Page 164 Bolus Advice 7.3.6 Resetting All Time Blocks This section describes how to restore the settings for all time blocks to the factory settings and then re-enter them. Changing the start time of the first time block, for example, may be one reason for resetting all time blocks.
- Page 165 Changing Bolus Advice and Time Blocks Set the upper limit value and Set the carbohydrate ratio and Tap OK. It may be necessary to change lower limit value that are to be the insulin sensitivity that are the end times and settings of used for all time blocks for the to be used for all time blocks the other time blocks.
- Page 166 Bolus Advice 7.4 Using Bolus Advice You can use the bolus advice feature directly after testing your In doing so, consider the following: blood glucose or entering a blood glucose value manually. Note Boluses for which bolus advice was used are indicated by the that a blood glucose result is only valid for bolus advice within symbol in the logbook.
- Page 167 Using Bolus Advice 7.4.1 Starting Bolus Advice After a BG Test Note You can select a maximum of 4 health events. If you have selected more than one health event, you will have to enter a total percentage for the selected health events in the next step.
- Page 168 Bolus Advice Changing bolus advice values Selecting the bolus type Example Note Not every bolus type can be selected, depending on the setting. You cannot select an Correction bolus extended bolus, for example, if a correction bolus is to be Meal bolus, changed delivered.
- Page 169 Using Bolus Advice Confirming the bolus Tap Bolus. To confirm this step and The Status screen is displayed deliver the bolus, press the showing the current bolus insulin button lit up in green information. below the diabetes manager screen.
- Page 170 Bolus Advice 7.4.2 Starting Bolus Advice With Manually Entered Test Result You can enter your blood glucose value that was measured using another meter and the carbohydrate amount you want to eat. If you then tap Bolus on the Bolus advice display, a bolus advice is shown.
- Page 171 Using Bolus Advice Entering the test result Confirming the test result Tap the field for manually if you want to enter the Enter the test result using the The entered test result is entering the blood glucose test result manually. numeric keypad and tap OK.
- Page 172 Bolus Advice Entering carbohydrates Tap the Carbohydrates entry. to set the If necessary, enter any health Once all entries are correct, carbohydrate amount you want events. tap Bolus. to eat. Alternatively, you can enter the carbohydrate amount Tap Bolus. using the numeric keypad. To do so, tap the symbol.
- Page 173 Using Bolus Advice 7.4.3 Starting Bolus Advice Without a BG Result Confirming the bolus If you do not want to test or enter your blood glucose, you can enter the carbohydrate amount you wish to eat. If you then tap Bolus on the Bolus...
- Page 174 Bolus Advice Entering carbohydrates Bolus advice. Tap Carbohydrates. to set the Tap Bolus. carbohydrate amount you want to eat. Alternatively, you can enter the carbohydrate amount using the numeric keypad. To do so, tap the symbol. Save.
- Page 175 Using Bolus Advice to use bolus advice Once all entries are correct, To confirm this step and without performing a blood tap Bolus. deliver the bolus, press the glucose test. insulin button lit up in green below the diabetes manager screen.
- Page 176 Bolus Advice 7.4.4 Bolus Advice for Pen/Syringe You can also deliver the bolus with a pen or syringe. Make sure that the insulin amount saved by the micropump system is identical to the amount you delivered. Also consult the instructions for use for your insulin pen or syringe.
- Page 177 Using Bolus Advice Once you have completed your Tap OK. The Status screen is displayed. Inject the insulin units you entries, tap Bolus. confirmed with a pen or This way you confirm to the syringe. system that you are delivering this insulin amount.
- Page 178 Bolus Advice 7.5 Turning Off Bolus Advice Main menu > Settings > Bolus settings This section describes how to turn off bolus advice. Note If you turn off bolus advice, all bolus advice options will be deleted. If you want to use bolus advice again, you must set it up once again.
- Page 179 Basal Rate Profiles and Temporary Basal Rates 8.1 Basal Rate Profiles In this chapter you will learn how you can adapt your basal Basal rate profiles are defined through time blocks. Each time insulin supply to your life situations using different basal rate block needs a start time and an end time as well as an hourly profiles and Temporary Basal Rates (TBR).
- Page 180 Basal Rate Profiles and Temporary Basal Rates 8.2 Creating and Editing a Basal Rate Profile A basal rate profile can be programmed, edited and deleted in different ways. Start by using one of the following two options: On the Status screen, tap the In the Main menu, tap the In the Basal rate...
- Page 181 Creating and Editing a Basal Rate Profile 8.2.1 Programming a Basal Rate Profile Note Basal rate time blocks are not identical to or shared with the time blocks for bolus advice. You can set up a maximum of 24 time blocks, each of which may be between 15 minutes and 24 hours long.
- Page 182 Basal Rate Profiles and Temporary Basal Rates Tap the first time block. Set to set the end When the end time of a time to set the basal the end time and the insulin time for the time block. block shortens or overwrites rate for the time block (for amount.
- Page 183 Creating and Editing a Basal Rate Profile Note If the total amount displayed does not correspond to the total amount defined by your healthcare professional, check all the time blocks and correct the entries. For more information, see chapter 8.2.3 Changing a Basal Rate Profile.
- Page 184 Basal Rate Profiles and Temporary Basal Rates 8.2.2 Activating a Basal Rate Profile Tap the basal rate profile you If required, scroll the display While a basal rate profile is To confirm this step and want to activate (for example, upwards to check all time being activated, insulin activate the basal rate profile,...
- Page 185 Creating and Editing a Basal Rate Profile Note Tapping cancels the activation of the selected basal rate profile and takes you to the previous display. The basal rate profile that Profile 2 was previously active, remains active. The activated basal rate profile is displayed on the Status screen.
- Page 186 Basal Rate Profiles and Temporary Basal Rates 8.2.3 Changing a Basal Rate Profile Tap the basal rate profile you If required, scroll the display Repeat this process until the The changed basal rate profile want to change (for example, upwards to check all time correct basal rate has been is displayed in the overview of Profile 2).
- Page 187 Creating and Editing a Basal Rate Profile 8.2.4 Deleting a Basal Rate Profile Tap the basal rate profile you Tap the symbol in the upper to delete the basal The selected basal rate profile want to delete (for example, right corner of the screen. rate profile.
- Page 188 Basal Rate Profiles and Temporary Basal Rates 8.3 Temporary Basal Rates A Temporary Basal Rate (TBR) allows you to temporarily increase or decrease your active basal rate profile on a percentage basis Note for a specific duration. This helps you to better control your blood A TBR cannot be programmed if the micropump is in STOP glucose level during illness, physical activity or in other situations.
- Page 189 Creating and Editing a TBR 8.4 Creating and Editing a TBR A temporary basal rate can be programmed, edited and deleted in different ways. Start by using one of the following two options: On the Status screen, tap the In the Main menu, tap the Temporary basal rate.
- Page 190 Basal Rate Profiles and Temporary Basal Rates 8.4.1 Programming a TBR Standard TBR. Percentage to enter the to set the Duration to enter the percentage of the temporary percentage for adjusting the running time for the temporary basal rate. Temporary Basal Rate. basal rate.
- Page 191 Temporary Basal Rates Note You can only activate the TBR if the percentage is less than or greater than 100 % (for example, 90 % or 110 %). Tapping cancels the activation and takes you to the previous display. to set the hours Tap Activate.
- Page 192 Basal Rate Profiles and Temporary Basal Rates 8.4.2 Programming a Customised TBR You can program and save customised Temporary Basal Rates for recurring situations that change your insulin needs. For a customised TBR, the percentage and the duration are saved. These settings are used as default values each time you select this TBR.
- Page 193 Temporary Basal Rates Tap the symbol. Percentage to enter the to set the Duration to enter the percentage for the customised percentage for adjusting the running time for the Enter the desired name for the TBR. customised TBR. customised TBR. customised TBR (for example, Run).
- Page 194 Basal Rate Profiles and Temporary Basal Rates Note A customised TBR less than 100 % is indicated by this symbol . A TBR greater than 100 % is indicated by this symbol to set the hours To save your settings for the The newly programmed and minutes for the duration of customised TBR without...
- Page 195 Temporary Basal Rates 8.4.3 Activating a Customised TBR To activate a saved TBR, tap To save and start the TBR To confirm this step and start The activated TBR is displayed the desired entry in the list of straight away, tap Activate. the TBR, press the insulin on the Status screen.
- Page 196 Basal Rate Profiles and Temporary Basal Rates 8.4.4 Cancelling a TBR Cancel TBR?. Tap Yes. The percentage and the The TBR has been cancelled duration of the TBR so far are and deleted from the Status displayed in the W-36 screen.
- Page 197 Replacing System Components In this chapter you will learn when and how to replace the WARNING infusion assembly, reservoir, pump base and insertion device. Check your blood glucose level after replacing system The following table contains guidelines on the period of use of components at least once within 1 to 3 hours.
- Page 198 Replacing System Components 9.1 Starting the Replacement Note Always use the diabetes manager to start the process of replacing one or more system components. This is the only way that the micropump system will be able to give you a timely reminder to replace a component.
- Page 199 Replacing the Infusion Assembly 9.2 Replacing the Infusion Assembly Have the following system components at hand for this process: Pump holder Cannula Insertion device Diabetes manager Disinfectant or sterile alcohol wipe The display for selecting the Tap Replace. system components appears. The micropump switches to Infusion assembly.
- Page 200 Replacing System Components Removing the used infusion assembly Press the flap to detach the Remove the infusion assembly Dispose of the used infusion If you want to see a video on micropump and remove the by loosening the edges of the assembly according to local how to replace the infusion pump from the infusion...
- Page 201 Replacing the Infusion Assembly Attaching the infusion assembly to the body Follow the action steps in chapter 4.3.1 Attaching the Infusion Assembly to the Body. Attach the micropump to the To confirm this step and then infusion assembly. restart the micropump and return to the Status screen, Tap Next.
- Page 202 Replacing System Components 9.3 Replacing the Reservoir Have the following at hand for this process: Reservoir assembly Front and back view of the reservoir assembly Insulin vial with U100 insulin Filling aid Disinfectant or sterile alcohol wipe Reservoir Note Always fill the reservoir with at least 80 U. The reservoir has a maximum holding capacity of 200 U (2.0 ml).
- Page 203 Replacing the Reservoir Removing the reservoir The display for selecting the Tap Replace. Press the flap to detach the Remove the used reservoir system components appears. micropump and remove the from the pump base. The micropump switches to pump from the infusion Tap Reservoir.
- Page 204 Replacing System Components Replacing the reservoir Follow the action steps in chapters 4.3.2 Filling the Reservoir with Insulin, 4.3.3 Connecting the Reservoir to the Pump Base, 4.3.5 Filling the Reservoir Needle, 4.3.6 Attaching the Micropump, 4.3.7 Activating the Basal Rate Profile. Dispose of the used reservoir If you want to see an animated according to local regulations.
- Page 205 Replacing the Pump Base 9.4 Replacing the Pump Base The pump base can be used for up to 4 months. It must not be used for longer than that because otherwise the delivery accuracy may be impaired. You will be reminded regularly to replace the pump base before the deadline expires.
- Page 206 Replacing System Components Removing the pump Follow the action steps in chapters 4.3.2 Filling the Reservoir with Insulin, 4.3.3 Connecting the Reservoir to the Pump Base, 4.3.4 Pairing the Diabetes Manager and Micropump, 4.3.5 Filling the Reservoir Needle, 4.3.6 Attaching the Press the flap of the infusion Dispose of the used reservoir Follow the instructions on the...
- Page 207 My Data 10.1 Overview 10.2 Logbook Analysing your therapy data saved in the diabetes manager is an You can display each single logbook entry on the screen of the effective way for you and your healthcare professional to diabetes manager. There, you will find all the information about determine how your diabetes is developing.
- Page 208 My Data Note the following: Logbook display shows the entries in the order in which they occurred with the most recent entry shown on top. Blood glucose results cannot be entered manually or be subsequently adjusted. If you want to add data to a logbook entry, you can also tap the Add data button on the Status screen or in the Main menu.
- Page 209 Logbook 10.2.1 Understanding the Logbook Column for displaying blood glucose information Blood glucose result range and blood glucose result. Main menu > My data > Logbook Column for displaying bolus information Bolus type, bolus advice and bolus amount. Column for displaying carbohydrate information Symbol for carbohydrates and carbohydrate amount.
- Page 210 My Data Symbol Symbol name Description Blood glucose result range The symbol colours have the following meaning: Blue : above the target range Green : within the target range Yellow : below the target range Red : below the hypo warning limit Standard bolus Bolus insulin from a standard bolus Extended bolus...
- Page 211 Logbook 10.2.2 Viewing and Adjusting Logbook Data data. Tap Logbook. Scroll the display upwards or Tap the entry you want to view downwards to view additional or adjust. logbook entries. Tap a logbook entry if you want to view or adjust the details.
- Page 212 My Data Time of test Carbohydrates Health events Bolus On the Logbook entries display, On the Logbook entries On the Logbook entries On the Logbook entries Time of test. Tap a time of display, tap Carbohydrates. display, tap Health events. display, tap Bolus.
- Page 213 Logbook Note The bolus advice feature initially treats quick boluses as correction insulin. Mark the quick boluses in the logbook as a meal bolus or correction bolus according to their purpose. Enter consumed carbohydrates in the logbook. On the Logbook entries display, tap Note.
- Page 214 My Data 10.2.3 Adding New Data Note You can also access the data display by tapping the Add data function button on the Status screen or in the Main menu. On the Logbook display, tap Tap the entries you want to to add new data to the add.
- Page 215 Trend Graph 10.3 Trend Graph Time scale Illustrated time period Displays health events or indicates Events Main menu > My data > Trend graph that the micropump was stopped. Blue line: The distance from the The trend graph displays your blood glucose trends, basal rates, Basal rate top edge of the graph shows the boluses, carbohydrates and other information.
- Page 216 My Data On the upper left side (U) of the graph, the amount of basal insulin is displayed. The scale comprises a range of 1, 2, 5, 10, 20 or 40 U/h. By means of the scale, you can read the basal rate, Basal insulin amount Bolus values which is represented by the blue basal insulin line.
- Page 217 Trend Graph On the upper right side (U) of the graph, the bolus amount is On the lower right side (g) of the graph, the carbohydrate displayed. By means of the scale, you can read the bolus values amount is displayed. By means of the scale, you can read the of the pink bars.
- Page 218 My Data 10.3.1 Displaying the Trend Graph Time scale Graph options mmol/L to change the trend Tap the setting you want to Tap the desired time period. Tap one or more of the graph representation. change. available graph options (for Tap Save.
- Page 219 Trend Graph Time of test On the Time of test display you can select which logbook entries are to be represented. Only the logbook entries are displayed for which you entered the selected time of test. Tap the appropriate time of test (for example, After meal).
- Page 220 My Data 10.4 Standard Week Represented time period, for Main menu > My data > Standard week Time scale example, 7 days The standard week graph displays your blood glucose averages, Hyper warning Blue line: Hyper warning limit limit the individual tests and the standard deviations for the days of a standard week.
- Page 221 Standard Week to switch to the standard week table. The standard week Time scale table displays the data of the standard week graph in table format. To return to the standard week graph, tap . Using the Selected time of test buttons, you can move backwards or forwards in time according to the selected time scale.
- Page 222 My Data 10.4.1 Displaying the Standard Week Graph Time scale Time of test mmol/L to change the Tap one of the entries Tap the desired time period. Tap the appropriate time of representation of the standard available for selection. test. week graph.
- Page 223 Target Range 10.5 Target Range Time scale Illustrated time period Main menu > My data > Target range Selected time of Displays logbook entries entered for test this time of test. This screen displays a pie chart and a table illustrating your blood Shows the target ranges of blood Target range chart glucose results for the time period and time of test you selected.
- Page 224 My Data to switch to the target range table. The target range table Time scale Illustrated time period displays the target range data in table format. To return to the target range chart, tap . Using the buttons, you can move Blood glucose result Coloured representation of the backwards or forwards in time according to the selected time...
- Page 225 Target Range 10.5.1 Displaying the Target Range Data Time scale Time of test to change the Tap one of the entries Tap the desired time period. Tap the appropriate time of representation of the target available for selection. test (for example, Bedtime). range.
- Page 226 My Data 10.6 BG Averages Table Main menu > My data > Blood glucose averages Time scale Illustrated time period The BG averages table displays your blood glucose averages and Shows the number of test standard deviations (SD) for the time period and time of test you Number of tests results used for the calculation.
- Page 227 BG Averages Table 10.6.1 Displaying the BG Averages Table to change the settings Tap the desired time period. for the time period or time of test. Tap Save.
- Page 228 My Data 10.7 System Events 10.7.1 Event Data Main menu > My data > System events This display lets you access the last 90 maintenance, warning and error messages, with the most recent entry displayed first. The following system events can be accessed directly on the diabetes manager: Example The last 90 maintenance, warning and...
- Page 229 System Events 10.7.2 Bolus Data 10.7.3 TBR Data This display lets you access the last 90 bolus deliveries, with the This display lets you access the last 90 temporary basal rates, most recent entry displayed first. with the most recent entry displayed first. Example Example Each entry includes the following data:...
- Page 230 My Data 10.7.4 Total Daily Dose 10.7.5 Information This display lets you access the last 90 daily insulin totals This display lets you access information about the micropump delivered (in each case from midnight to midnight, including basal currently in use rate and boluses), with the most recent entry displayed first.
- Page 231 Data Transfer 10.8 Data Transfer You can display and evaluate the data on a PC using an Accu-Chek diabetes management software, such as the Accu-Chek Smart Pix software. For more information, see the User’s Manual for the software used. Install the software before you begin the data transfer. WARNING Only use the supplied USB cable.
- Page 232 My Data Plug the smaller end (micro-B Plug the larger end (USB-A Launch the Accu-Chek This display shows that data plug) of the USB cable into the plug) of the USB cable into a diabetes management connection between the USB socket of the diabetes free USB port on your software on your PC.
- Page 233 Changing Settings Main menu > Settings In the Settings menu, you can make changes to the factory settings or change the settings you made. This allows you to adjust the micropump system to your individual treatment requirements and your personal preferences. For information on changing time blocks and health events, and on settings for insulin sensitivity, carbohydrate ratio, meal rise, snack size, acting time and offset time, see chapter 7 Bolus...
- Page 234 Changing Settings 11.1 Warning Limits Upper limit value Main menu > Settings > Warning limits You can set the hyper and hypo warning limits that best fit your needs. Whenever your blood glucose result is above the hyper warning limit or below the hypo warning limit, the diabetes manager displays a warning.
- Page 235 Warning Limits Lower limit value Remaining running time The warning limit for the remaining running time of the micropump indicates the number of days as of which you want to receive a warning regarding the remaining running time of the micropump.
- Page 236 Changing Settings Reservoir level The warning limit for the reservoir level indicates the number of insulin units as of which you want to receive a warning regarding the remaining insulin amount. The remaining insulin amount is the insulin amount that is still available in the micropump reservoir.
- Page 237 Warning Limits Automatic off The automatic off function is a safety feature for emergency situations. If you have not touched any button on your micropump and not operated the diabetes manager for the specified number of hours, the micropump stops insulin delivery. This could happen, for example, if you are no longer able to stop the pump yourself due to severe hypoglycaemia.
- Page 238 Changing Settings Tap Inactivity. to set the Tap Done. number of hours after which the bolus delivery will be interrupted. Tap OK.
- Page 239 Time and Date 11.2 Time and Date Main menu > Settings > Time and date WARNING Having the time and date set precisely is essential for your micropump system to function properly. Having the wrong time set may result in the delivery of incorrect insulin amounts, thus leading to hyperglycaemia or hypoglycaemia.
- Page 240 Changing Settings to set the hours to set the day, Then tap OK. and minutes for the current month and year. time. Tap OK. Tap OK.
- Page 241 Bolus Settings 11.3 Bolus Settings Quick bolus buttons Main menu > Settings > Bolus settings A quick bolus is a standard bolus that is programmed and This section provides information on the following settings: delivered using the quick bolus Quick bolus buttons buttons on the micropump.
- Page 242 Changing Settings Maximum quick bolus You use this setting to define the maximum insulin amount that may be delivered with a quick bolus. Note You cannot define a maximum quick bolus that is greater than the maximum bolus amount. For more information, see section Maximum bolus amount.
- Page 243 Bolus Settings Quick bolus increment The quick bolus increment indicates the amount by which your insulin dose is increased with each press of the quick bolus buttons while programming a quick bolus. You can set the following quick bolus increments: 0.2 U 0.5 U 1.0 U...
- Page 244 Changing Settings Maximum bolus amount This setting specifies the maximum insulin amount that may be delivered in any bolus. Bolus advice that exceeds the maximum bolus amount requires additional confirmation or must be reduced. A manual bolus is upwardly limited by the maximum bolus amount selected.
- Page 245 Bolus Settings Delivery lag time In some situations (for example, if you have gastroparesis) it may be helpful to only start a bolus after you have started eating. You can use the delivery lag time setting to specify an interval between programming a bolus and the actual start of bolus delivery.
- Page 246 Changing Settings 11.4 Tone and Vibration Signal modes Main menu > Settings > Tone and vibration You can define how the diabetes manager should attract your attention in case of an event (for example, a warning). You can choose whether the diabetes manager issues an acoustic signal, vibrates or both.
- Page 247 Tone and Vibration Volume Vibration Blood glucose test Note When the volume slider is set to 0 percent in the far left position, vibration is automatically turned on. Set the volume for the default Tap Vibration. Blood glucose test to turn setting by moving the slider.
- Page 248 Changing Settings Touchscreen feedback Insulin delivery signal Note Signals during a blood glucose test: Insert test strip Blood application detected Test completed Touchscreen feedback Tap the desired touchscreen Insulin delivery signal. set how the diabetes manager setting. reacts when you make a If you turn on the signal, the selection using the Tap OK.
- Page 249 Turning Off Signals Temporarily 11.5 Turning Off Signals Temporarily Note This function allows you to temporarily turn off the diabetes Signals for system manager signals for reminders and warnings. You cannot, messages: however, turn off maintenance and error messages because USB plug connected to these events require your attention.
- Page 250 Changing Settings Turn off signals. Status to turn on the Turn Start time to set the start to set the hours off signals feature. of signal suspension. and minutes for the start time. Tap OK.
- Page 251 Turning Off Signals Temporarily Note If you use the Once setting, the signals for reminders and warnings are turned off only once for the time period you specified. If you use the Repeat setting, the signals for reminders and warnings are turned off daily during the time period you specified.
- Page 252 Changing Settings 11.6 General Settings Language Main menu > Settings > General settings You can make the following settings in the general settings: j Language You can select the language for the texts displayed on the screen from a predefined list of languages. j Brightness You can adjust the brightness of the diabetes manager screen for different lighting conditions.
- Page 253 General Settings Brightness Set the screen brightness by Done to return to the list moving the slider. of settings. Right: bright Left: dark Tap Save.
- Page 254 Changing Settings 11.7 Screen Lock Turning off the screen lock Main menu > Settings > Screen lock The diabetes manager is equipped with a screen lock, which can be used to protect the device against unauthorised access. You can define a personal identification number (PIN) to be used for access.
- Page 255 Screen Lock Turning on the screen lock When you turn off the screen Enter the PIN to confirm it. Status (PIN) to turn on the Enter a PIN with 4 to 8 digits. lock, the above display screen lock. appears for your information. Tap OK.
- Page 256 Changing Settings Changing the background image Note If you have forgotten the PIN you chose, you can unlock the diabetes manager with a PIN unlock code. You can find the label with the 8-digit PIN unlock code on the back cover of the User’s Manual.
- Page 257 System Information 11.8 System Information Main menu > Settings > System information The system information provides various details on the micropump system: Micropump remaining running time Serial number of the diabetes manager Firmware of the diabetes manager Firmware of the blood glucose meter in the diabetes manager Radio frequency signal of the RFI firmware Selected language Status of rechargeable battery...
- Page 258 Changing Settings Tap the Legal information Scroll the display upwards to entry to view the stored be able to read more text. license agreements. to return to the previous display.
- Page 259 Travelling and Flight Mode 11.9 Travelling and Flight Mode For information on how to change the date and time settings of the micropump system, see chapter 11.2 Time and Date. Time zone changes Having the time and date set precisely is essential for your Flight mode If the use of Bluetooth wireless technology is not allowed for micropump system to function properly.
- Page 260 Changing Settings 11.9.1 Turning On Flight Mode In the Main menu, tap Flight Status to put the switch in Confirm the displayed symbol in the status mode. position. information by tapping OK. The bar indicates that flight mode micropump is automatically is turned on.
- Page 261 Travelling and Flight Mode 11.9.2 Turning Off Flight Mode Note It is not possible to turn off flight mode on the micropump using the diabetes manager. To turn off flight mode on the pump, you must use the quick bolus buttons. In the Main menu, tap the Status to put the switch in...
- Page 262 Changing Settings 3× Press both quick bolus buttons When flight mode is turned off, Tap Done. Flight mode is turned off. 3 times simultaneously in the micropump issues the quick succession. A maximum “Flight mode deactivated” The flight mode symbol is no of 3 seconds may pass signal sequence.
- Page 263 Reminders Main menu > Settings > Reminders Setting Explanation You can set reminders for specific appointments and events. This Time The time of day the reminder occurs. can be useful when you have to make specific preparations, for example, for replacing the infusion assembly. A message on the Date The date the reminder occurs.
- Page 264 Reminders 12.1 Overview of Reminders Reminder Explanation Replace infusion assembly Reminds you to replace the infusion assembly after a specified number of days. Alarm clock/Customised The alarm clock sounds at the specified time. Test blood glucose Reminds you to test your blood glucose at a specified time. Reminds you to test your blood glucose after eating if you have previously marked a blood glucose After meal result as...
- Page 265 Programming Reminders 12.2 Programming Reminders Set the desired time and frequency for each reminder. If you choose Repeat, you will be reminded of the event at certain intervals, for example, daily. Some reminders only appear when certain conditions are met. You can add more reminders by tapping .
- Page 266 Reminders 12.2.1 Reminder: Replace Infusion Assembly This reminder reminds you to replace your infusion assembly. Replace infusion assem.. Status to put the switch in position. Tap Recurrence, Time, Tone make the desired settings. Once you have made all settings, tap Done.
- Page 267 Programming Reminders 12.2.2 Reminder: Alarm Clock Alarm clock to assign a name to the Enter a name for the alarm Status to put the switch in alarm clock reminder. clock reminder using the position. Tap Time, keyboard. The name may have Tone Frequency to make...
- Page 268 Reminders 12.2.3 Reminder: Test Blood Glucose This reminder reminds you to Note test your blood glucose at a When you test your blood time that was specified glucose, the diabetes beforehand. manager dismisses any blood glucose test reminders that are pending within the next 30 minutes.
- Page 269 Programming Reminders 12.2.4 Reminder: After meal This reminder reminds you to test your blood glucose if a previously measured blood glucose result was marked as Before meal. After meal. Remind after to enter the time after which you want the reminder to appear.
- Page 270 Reminders 12.2.5 Reminder: Test After Low BG This reminder reminds you to test your blood glucose again when the previous test result was too low. The BG threshold in this reminder can be set individually and is independent of the hypo warning limit set by you.
- Page 271 Programming Reminders 12.2.6 Reminder: Test After High BG This reminder reminds you to test your blood glucose again when the previous test result was too high. The BG threshold in this reminder can be set individually and is independent of the hyper warning limit set by you.
- Page 272 Reminders Programming Reminders 12.2.7 Reminder: Missed Bolus This reminder occurs if no bolus was delivered within 2 hours prior to the programmed time. You can program up to 5 reminders of the Missed bolus type. Example The missed bolus reminder is programmed for 14:00. If no bolus is delivered between 12:00 and 14:00, the previously programmed reminder will occur at 14.00.
- Page 273 Programming Reminders 12.2.8 Appointment Reminders: Healthcare Professional Visit, Lab Test, Customised Appointment reminders are a helpful way of reminding you of an upcoming healthcare professional visit or lab test. In addition, you can set customised appointment reminders. These reminders are displayed when you turn on the diabetes manager on the specified reminder date.
- Page 274 Reminders 12.3 Deleting Reminders If required, you can delete reminders you added yourself. The reminders that are predefined in the system, however, cannot be deleted. Tap the reminder you want to Tap the symbol to delete if you want to delete, for example, Custom 2.
- Page 275 Issuing Reminders 12.4 Issuing Reminders When turned on, the diabetes manager displays a reminder as Example soon as the specified time has been reached. The diabetes manager vibrates and the respective reminder is accompanied by the selected tone. The volume corresponds to the set signal mode.
- Page 276 Reminders...
- Page 277 Injection Therapy Mode If you do not want to use your micropump for a while, you can switch to injection therapy mode. This could be the case, for Note example, if you want to do without your insulin pump while on If you are using bolus advice, carry out the injections in a holiday.
- Page 278 Injection Therapy Mode 13.1 Removing the Micropump Temporarily While you are delivering insulin by injection, set the micropump to STOP mode, take the micropump off and remove the infusion assembly. In the Main menu, tap Stop Tap Yes. interrupt insulin delivery.
- Page 279 Removing the Micropump Temporarily Press the flap to detach the Remove the infusion assembly Remove the used reservoir Dispose of the used infusion micropump and remove the by loosening the edges of the from the pump base. assembly and used reservoir pump from the infusion adhesive pad and pulling it off according to local regulations.
- Page 280 Injection Therapy Mode 13.1.1 Activating Injection Therapy Mode In the Main menu, tap the Tap the Change to injection Tap Yes. Tap the desired insulin Settings menu. therapy entry. increment for the pen. The functions for controlling the micropump will be turned Tap Save.
- Page 281 Removing the Micropump Temporarily to set the The display informs you that maximum bolus amount you injection therapy mode is want to deliver with the pen/ turned on. The current bolus syringe. settings are displayed. Tap OK. if you want to continue with these settings.
- Page 282 Injection Therapy Mode 13.1.2 Deactivating Injection Therapy Mode In the Main menu, tap the Tap the Change to pump Tap Yes. Settings menu. therapy entry.
- Page 283 Removing the Micropump Temporarily If you want to use the micropump with the most recently saved Replace the components as needed. For more information, see chapter 9 Replacing System Components. settings, tap No. The diabetes manager establishes a connection to the most recently used micropump, and you are taken to the Replace If you do not replace any components, the micropump will remain...
- Page 284 Injection Therapy Mode 13.2 Injection Therapy Displays Display elements omitted on the Status screen Once you turn on injection therapy mode, some of the displays and menus on the diabetes manager change. The displays necessary for pump therapy are no longer available on the Status screen.
- Page 285 Injection Therapy Displays Symbols omitted in the Main menu Test result in detail Main menu in pump Main menu in injection therapy mode. therapy mode. Test result in detail display Test result in detail in pump therapy mode. display in injection therapy mode.
- Page 286 Injection Therapy Mode Bolus Reminders Bolus display in pump Bolus display in injection Reminders display in Reminders display in therapy mode. therapy mode. pump therapy mode. injection therapy mode. Cancel bolus element Instead of the Replace is omitted. infusion assem. reminder, Inject basal insulin reminder appears.
- Page 287 Injection Therapy Displays Warning limits My data Warning limits display in Warning limits display in Logbook entries display in Logbook entries display pump therapy mode. injection therapy mode. pump therapy mode. in injection therapy mode. Micropump remain. You can enter or change running time (days), the amount of basal...
- Page 288 Injection Therapy Mode Bolus advice Bolus settings Bolus advice display in Bolus advice display in Bolus settings display in Bolus settings display in pump therapy mode. injection therapy mode. pump therapy mode. injection therapy mode. Type entry provides Instead of the quick bolus only the option.
- Page 289 Care and Maintenance 14.1 Cleaning the Micropump System This chapter provides information on how to care for and maintain the micropump system. In the Control Tests section, you will learn how to check whether the micropump system is Use exclusively lint-free cloths and demineralised water to clean working properly.
- Page 290 Care and Maintenance 14.1.1 Cleaning the Diabetes Manager Use only demineralised water. Use neither soap nor abrasive cleaning agents, as they may cause the screen to become scratched. If the screen of the diabetes manager is scratched, it may be difficult to read under certain circumstances. In this case, the diabetes manager must be replaced.
- Page 291 14.1.2 Cleaning the Micropump Clean the micropump only with the reservoir attached, before the reservoir is due to be replaced. Replace the reservoir afterwards. 3 Min. Wipe the surface of the Wipe the diabetes manager diabetes manager for at least using a dry, lint-free cloth.
- Page 292 Care and Maintenance Note Cleaning the opening for ventilation is important for 3 Min. the battery in the reservoir to work properly. Remove any large Wipe the surface of the Wipe the surface of the pump contaminants with a lint-free micropump for at least base using a fresh, dry, cloth moistened with...
- Page 293 14.1.3 Cleaning the Insertion Device Clean the insertion device using the stipulated cleaning agents. Before cleaning the insertion device, ensure that the insertion 3 Min. device is not primed and there is no cannula assembly in the insertion device. Remove any large Wipe the surface of the contaminants with a lint-free insertion device for at least...
- Page 294 Care and Maintenance 14.1.4 Cleaning the Finger Pricker To prevent infections from being transmitted, you must regularly clean the finger pricker and cap: at least 1 time per week, 3 Min. when there is blood on it, always before another person picks up the finger pricker to help you, for example.
- Page 295 Care and Maintenance Control Test of the Diabetes Manager 14.2 Control Test of the Diabetes Manager You can check whether the diabetes manager is delivering Instead of applying blood to the test strip, you apply glucose correct test results by performing a control test. control solution for this control test.
- Page 296 14.2.1 Preparing a Control Test A control test works the same way as a blood glucose test. Note To perform a control test, you need the following items: If a control test delivers results that are outside the Diabetes manager specified concentration range, you cannot be sure that the Accu-Chek Aviva test strips diabetes manager and test strips are functioning properly.
- Page 297 Care and Maintenance Control Test of the Diabetes Manager 14.2.2 Performing a Control Test Check the use by date that is Insert the test strip into the Select the control solution to Place the diabetes manager on indicated on the test strip test strip slot of the diabetes test.
- Page 298 Applying a drop Remove the bottle cap. Wipe Squeeze the bottle until a tiny Testing starts when there is Wipe the tip of the bottle with the tip of the bottle with a drop forms at the tip. Touch enough control solution in the a paper towel.
- Page 299 Care and Maintenance Control Test of the Diabetes Manager Displaying the control result Note Note If you choose entry, the Outside the permitted control test display shown in concentration range, LO or HI the next step will not appear. means that the control result The control result will not be is outside the permitted analysed.
- Page 300 Disposing of test strips Remove the used test strip and The table in the following section lists the causes of a dispose of it according to local control result outside the regulations. permitted concentration range or of the LO and HI displays. Tap OK.
- Page 301 Care and Maintenance Control Test of the Diabetes Manager 14.2.3 Causes of Control Tests with Errors If the control result is outside the concentration range, check the Did you observe the storage conditions for the diabetes items listed below. If you cannot answer the questions with Yes, manager, test strips and control solutions? correct the respective item and repeat the test.
- Page 302 Care and Maintenance 14.3 Checking the System Functions The micropump system must be working perfectly for all system messages (information messages and warnings, maintenance and error messages) to be issued correctly. If you cannot feel or hear the vibrations and signals of the diabetes manager or suspect that there might be other defects, you can perform a system function test.
- Page 303 Checking the System Functions Checking the screen Diabetes manager signals Check system functions. Tap Screen. The screen shows different Diabetes manager signals. colours (red, green, blue and white) in quick succession. In The diabetes manager sounds addition, the diabetes manager 1 signal.
- Page 304 Care and Maintenance Diabetes manager vibration Micropump signals Note If you are using injection therapy mode, the Micropump signals entry will be deactivated and greyed out. Diabetes manager Micropump signals. vibration. The micropump sounds 1 The diabetes manager signal. vibrates.
- Page 305 Messages and Troubleshooting There are different types of messages that the micropump WARNING system uses to inform you about the status of the micropump system, problems or errors. These messages are: If you ignore or do not notice the messages from the error messages micropump system, there is a risk of hypoglycaemia or maintenance messages...
- Page 306 Messages and Troubleshooting All micropump system messages are stored in the event data. To access a past message, drag the information screen down from Note the top of the screen and tap the message. Event data is retained If the micropump signals a maintenance or error message even if power to the diabetes manager is interrupted (for and you do not have the diabetes manager at hand, you example, when changing the battery).
- Page 307 Information 15.1 Information Examples of information messages: Information messages inform you about a particular state or event. Confirm the information messages with or, if it is a question, answer it with or No. Information on the micropump Information on the diabetes manager Title of information message Information message symbol Information or explanation...
- Page 308 Messages and Troubleshooting 15.2 Warnings Examples of warnings: Warnings inform you about relevant technical states of the micropump system or about possible risks for your therapy or health. Warnings signalise an imminent warning message. You are thus notified at an early stage that you will have to intervene in the short term to ensure the complete functionality of the micropump system.
- Page 309 Warnings Code Title of warning Information/possible cause Information/possible solution Warnings triggered by the micropump. Ensure that you have a new pump base at hand Running time of the pump The period of use of the pump base will as a replacement. W-25 will end soon end soon.
- Page 310 Messages and Troubleshooting Code Title of warning Information/possible cause Information/possible solution At present, the micropump cannot deliver a The micropump cannot deliver the insulin programmed insulin amount within the time W-37 Low amount delivered amount that is programmed for the basal specified.
- Page 311 Warnings Code Title of warning Information/possible cause Information/possible solution Warnings triggered by the diabetes manager. W-50 Battery almost empty The rechargeable battery level is low. Recharge the battery of your diabetes manager. No current data from the micropump is Ensure that the micropump and diabetes W-71 Connection interrupted available.
- Page 312 Messages and Troubleshooting Code Title of warning Information/possible cause Information/possible solution Eat or drink fast-acting carbohydrates. Then Blood glucose has fallen below the hypo W-80 Hypoglycaemia test your blood glucose. If hypoglycaemia warning limit. persists, consult your healthcare professional. Eat or drink fast-acting carbohydrates. Test your blood glucose again and then again within W-81 “LO”...
- Page 313 Warnings Code Title of warning Information/possible cause Information/possible solution You can still use the bolus advice feature. Note, Data cannot be synchronised between the however, that the diabetes manager is not diabetes manager and the micropump receiving any information (for example, errors) because flight mode is turned on.
- Page 314 Messages and Troubleshooting Code Title of warning Information/possible cause Information/possible solution Check whether it is acceptable for you for no Due to the set TBR, the amount to be insulin to be delivered in this time period. delivered in the current time block is so low W-92 TBR without insulin delivery The insulin amount that was not delivered will...
- Page 315 Maintenance Messages 15.3 Maintenance Messages Examples of maintenance messages: Maintenance messages inform you about a temporary loss of certain features of the micropump system. Maintenance messages require you to intervene in order to solve the problem. Once the cause of the maintenance message has been eliminated, you can use all features of the micropump system again.
- Page 316 Messages and Troubleshooting Title of maintenance Code Possible cause/consequences Further information message Maintenance messages triggered by the micropump. The operating life of your micropump Replace your pump base and the reservoir now. M-18 Replace micropump has come to an end. The entered insulin amount does not Discrepancy in reservoir Replace the reservoir, if required, with a new...
- Page 317 Maintenance Messages Title of maintenance Code Possible cause/consequences Further information message Replace the reservoir and the infusion assembly. An occlusion was detected which Then test your blood glucose. If the message is M-24 Occlusion means that insulin delivery is not displayed repeatedly, contact your Customer working at all or is restricted.
- Page 318 Messages and Troubleshooting Title of maintenance Code Possible cause/consequences Further information message Maintenance messages triggered by the diabetes manager. The test strip is used, damaged or not Use a new test strip or re-insert the test strip into M-51 Test strip error completely inserted into the test strip the test strip slot.
- Page 319 Maintenance Messages Title of maintenance Code Possible cause/consequences Further information message The diabetes manager automatically deactivates communication via Bluetooth wireless technology The level of the rechargeable battery is M-59 Battery almost empty to save power. As a result, communication with the very low.
- Page 320 Messages and Troubleshooting Title of maintenance Code Possible cause/consequences Further information message Hold the diabetes manager close to the micropump. There is no connection to the M-67 Bolus delivery failed You can deliver a quick bolus straight from the micropump. micropump.
- Page 321 Maintenance Messages Title of maintenance Code Possible cause/consequences Further information message Try to stop the micropump again. If the pump does not stop, remove the micropump from your body, M-87 Micropump not stopped The micropump cannot be stopped. switch to an alternative therapy method and contact your Customer Support and Service Centre.
- Page 322 Messages and Troubleshooting 15.4 Error Messages Examples of error messages: Error messages inform you about important malfunctions of the micropump system. The micropump switches to STOP mode and does not deliver any insulin. Once the cause of the error message has been eliminated, you can use all features of the micropump system again.
- Page 323 Error Messages Code Title of error Possible cause/consequences Possible solutions Error messages triggered by the micropump. Select the Replace menu and replace the Mechanical error in the The micropump switches to STOP reservoir. If the problem persists, replace the micropump mode and does not deliver any insulin.
- Page 324 Messages and Troubleshooting Code Title of error Possible cause/consequences Possible solutions Error messages triggered by the diabetes manager. The diabetes manager was restarted If the problem recurs, contact your Customer E-57 Electronic error due to an electronic error. Support and Service Centre. Internal clock error in the diabetes Contact your Customer Support and Service E-60...
- Page 325 General Troubleshooting 15.5 General Troubleshooting This chapter deals with general error situations that do not necessarily result in a message on the micropump system. If the problem cannot be resolved using the suggested solutions, contact your Customer Support and Service Centre. Problem Possible cause Possible solutions...
- Page 326 Messages and Troubleshooting Problem Possible cause Possible solutions The battery is not being charged while the diabetes The USB port on the PC is not Recharge the battery with a charger using a wall socket. manager is connected to a PC supplying any charging current.
- Page 327 General Troubleshooting Problem Possible cause Possible solutions Check whether the Turn off signals option is turned on. For more information, see chapter 11.5 Turning Off Signals Temporarily. The feature Turn off signals Check whether the signal modes (Normal, Vibration, Quiet, Loud) activated or the volume is set too have sound activated and whether the volume is set to a level low.
- Page 328 Messages and Troubleshooting Problem Possible cause Possible solutions Make sure the ambient temperature is suitable. Replace the The occlusion message of the The micropump was exposed to a reservoir and the infusion assembly. Then test your blood micropump was triggered. temperature that was too low.
- Page 329 General Troubleshooting Problem Possible cause Possible solutions The micropump issues the “Error” signal sequence and Select the Replace menu and replace the reservoir. Wait at the diabetes manager least 30 seconds after removing the used reservoir before The micropump turned off due to displays the symbol even connecting a new reservoir to the pump base.
- Page 330 Messages and Troubleshooting...
- Page 331 Technical Data 16.1 Micropump System Technical data of the micropump system U100 insulins: Permitted insulin types Humalog , NovoLog , NovoRapid , Apidra , Insuman Infusat, Fiasp ® ® ® ® ® ® The micropump system meets the EMC requirements for home healthcare environments in Electromagnetic compatibility accordance with IEC 60601-1-2.
- Page 332 Technical data of the micropump system 1 mW / 0 dBm Channels: 37*FHSS + 3*DSSS advertising channels Transmission power Modulation: GFSK Bandwidth: 1 MHz “single hop frequency” Communication range 2 m (the range may be impaired by obstacles)
- Page 333 Diabetes Manager 16.2 Diabetes Manager Technical data of the diabetes manager Accu-Chek Aviva Solo diabetes manager Device type The Accu-Chek Aviva Solo diabetes manager is suitable for continuous operation. Expected Service Life 4 years Access control PIN-based protection Dimensions 124 × 64 × 17 mm (L × W × H) Weight 140 g Signal reproduction...
- Page 334 Technical Data Technical data of the diabetes manager Storage and transport, with packaging: -20 °C to +50 °C During operation: +5 °C to +40 °C Storage between periods of use: -25 °C to +70 °C Admissible temperature range Cooling-down time from maximum storage temperature between periods of use to operating temperature, at an ambient temperature of 20 °C: 15 minutes Warming-up time from minimum storage temperature between periods of use to operating temperature, at an ambient temperature of 20 °C: 15 minutes...
- Page 335 Diabetes Manager Technical data of the diabetes manager Power supply Rechargeable lithium polymer battery Model: Nugen Battery voltage 3.7 V Battery capacity 1,530 mAh Charging voltage via USB 5 V Max. charging current 700 mA USB charger Technics switch-mode power supply, model TS051X110-0502R IP rating IP20 Bolus calculator Accu-Chek Bolus Advisor...
- Page 336 Technical Data 16.3 Micropump Technical data of the micropump Dimensions Approx. 63 × 39 × 14 mm Weight Micropump with filled reservoir < 29 g Pump casing Impact and scratch-resistant plastic (polycarbonate) Silicone buttons for delivering quick boluses, turning flight mode on/off and muting Quick bolus buttons messages temporarily Storage and transport, with packaging (pump base): -20 °C to +50 °C Storage and transport, with packaging (reservoir): +10 °C to +30 °C...
- Page 337 Micropump Technical data of the micropump Motor type Stepper motor Power supply 1.4 V zinc-air battery for internal power supply If used in a typical usage pattern (50 U/day using U100 insulin; room temperature: 23 °C Life expectancy of the battery ±2 °C), life expectancy of the battery is up to 4 days. Minimum: 0.1 U/h Basal rate Maximum: 25.0 U/h...
- Page 338 Technical Data Technical data of the micropump ±30 % or better at 0.2 U Bolus delivery accuracy ±5 % or better at 50.0 U 0.2 U up to under 2.0 U: increments of 0.05 U 2.0 U up to under 5.0 U: increments of 0.1 U 5.0 U up to under 10.0 U: increments of 0.2 U Bolus amount, increments 10.0 U up to under 20.0 U: increments of 0.5 U 20.0 U up to 50.0 U: increments of 1.0 U...
- Page 339 Micropump Technical data of the micropump Maximum: 200 U Reservoir fill amount Minimum: 80 U Maximum overdelivery in the event 0.4 U of an error IP rating IP22...
- Page 340 Technical Data 16.4 Infusion Assembly Technical data of the infusion assembly Pump holder Dimensions: Approx. 67 × 32 × 6.5 mm Adhesive pad Dimensions: Approx. 85 × 52 mm Orange: 6 mm, soft Teflon ® catheter, 90° insertion angle Cannula Blue: 9 mm, soft Teflon catheter, 90° insertion angle ® Cannula fill amount 0.7 U Maximum period of use up to 3 days...
- Page 341 Insertion Device 16.5 Insertion Device Technical data of the insertion device Dimensions 82 × 53 × 49 mm (L × W × H) Weight 85 g 720 insertions This corresponds to a period of use of approximately 4 years. You can program a reminder Period of use in the diabetes manager to remind you to replace the insertion device before the end of the period of use.
- Page 342 Technical Data 16.6 Delivery Rate Accuracy It is the responsibility of the healthcare professional to decide The measurements were carried out according to whether the accuracy of the delivery rate is adequate for the IEC 60601-2-24 under the following conditions: patient in question. The delivery accuracy does not depend on the length of the cannula used.
- Page 343 Delivery Rate Accuracy 16.6.1 Startup Chart The startup chart shows changes in the delivery rate over the stabilisation period. 0,1 U/h, 6 mm cannula 0,004 0,002 Actual flow Target flow 0,000 Time [min]...
- Page 344 Technical Data 1 U/h, 9 mm cannula 0,012 Actual flow 0,010 Target flow 0,008 0,006 0,004 0,002 0,000 Time [min]...
- Page 345 Delivery Rate Accuracy 16.6.2 Trumpet Curve The trumpet curve shows the delivery rate accuracy during the observation period. 0,1 U/h, 6 mm cannula 204,0000 64,0000 24,8000 Minimum flow error 14,3636 9,7895 4,5200 7,6129 Maximum flow error 1,4839 -0,3158 -3,6364 -14,4000 Total error -43,0000 -100 -92,0000...
- Page 346 Technical Data 1 U/h, 9 mm cannula 14,0000 6,4000 Minimum flow error 2,6400 0,8727 0,4000 -0,8240 -0,1484 Maximum flow error -1,1742 -1,5636 -1,5579 Total error -2,9200 -8,6000 -32,4000 Observation period [min]...
- Page 347 Symbols, Abbreviations, Signals 17.1 Symbols The following symbols appear on the packaging and on the micropump system components: Symbol Meaning Symbol Meaning Consult instructions for use Sterilized using ethylene oxide Caution, refer to safety-related notes in the Manufacturer instructions for use accompanying this product.
- Page 348 Symbols, Abbreviations, Signals Symbol Meaning Symbol Meaning Global Trade Item Number Keep away from sunlight This product fulfils the requirements of the Keep dry European Directive 93/42/EEC on medical devices. Do not use if package is damaged This product also fulfils the requirements of the following directives: European Directive 2014/53/EU on the Admissible humidity range...
- Page 349 Symbols Symbol Meaning Device is protected against access to IP20 hazardous parts with a finger. Device is protected against access to hazardous parts with a finger and protected IP22 against the effects of dripping water when the casing is tilted at an angle of up to 15°. Warning against device use in electromagnetic or high electrical fields or environments Device of protection class II...
- Page 350 Symbols, Abbreviations, Signals 17.2 Abbreviations Abbreviation Meaning Abbreviation Meaning Ante meridiem: Before midday (12-hour Kohlenhydrateinheit (carbohydrate unit) clock notation for times before 12 noon) Liquid Crystal Display Broteinheit (bread equivalent) mg/dL Milligrams per decilitre Blood Glucose mmol/L Millimoles per litre °C Degrees Celsius (or Centigrade) Kilopascal...
- Page 351 Abbreviations Abbreviation Meaning Insulin amount delivered in units per hour U100 Insulin concentration. Each millilitre of liquid contains 100 units of insulin. Universal Serial Bus...
- Page 352 Symbols, Abbreviations, Signals 17.3 Signals 17.3.2 Signals of the Micropump Both the diabetes manager and the micropump can issue signals. 17.3.1 Signals of the Diabetes Manager The micropump’s acoustic signals are based on the C-major scale. The diabetes manager can issue the following sequences of signals: C1 D1 E1 F1 G1 A1 B1 C2 Designation...
- Page 353 Signals The micropump can issue the following sequences of signals: Designation Occurrence Notes representation Start Plugging together pump base and reservoir A6 AIS6 B6 C7 CIS7 5 short, ascending tones Quick bolus Start of programming a quick bolus A6 AIS6 B6 C7 CIS7 D7 DIS7 7 short, ascending tones Quick bolus increment Acoustic feedback of the programmed...
- Page 354 Symbols, Abbreviations, Signals Designation Occurrence Notes representation Maintenance Issuing error messages Issuing maintenance messages Error AIS6 CIS7 AIS6 CIS7 Energy storage after battery error 3 short tones followed by 1 pause and 1 high tone. The sequence of signals is repeated every 5 seconds. Warning Issuing warnings AIS6...
- Page 355 The statutory provisions on rights in consumer goods sales in the country of purchase shall apply. Roche hereby declares that the radio equipment type Accu-Chek Any changes or modifications to the micropump system not Solo micropump system conforms with the Directive 2014/53/EU.
- Page 356 18.5 Customer Support and Service Centre If you encounter problems, have questions regarding operation or Distributed in the United Kingdom by: need additional information about the Accu-Chek Solo Roche Diabetes Care Limited micropump system, contact your Customer Support and Service Charles Avenue, Burgess Hill Centre.
- Page 357 Accu-Chek finger pricker Use only the rechargeable battery from Roche. Accu-Chek lancets/lancet drums Use only supplies and accessories from Roche and do not modify them. Otherwise, you risk malfunctions of the Accessories*/replacement components micropump system, incorrect test results and over- Charging cradle for the diabetes manager delivery or under-delivery of insulin.
- Page 358 Appendix 18.7 Disposing of the Micropump System WARNING All objects which can come into contact with human bodily fluids carry a potential risk of infection. There is a risk that the objects may transmit infections. Dispose of used micropump system components because using them more than once may result in infections being transmitted.
- Page 359 Bolus Calculation 18.8 Bolus Calculation 18.8.2 Correction Bolus The bolus that is recommended by the bolus advice feature consists of two components: a recommendation for a meal bolus that covers your intake of food and a recommendation for a If your current blood glucose level is not within your target range, correction bolus to adjust your blood glucose level.
- Page 360 Appendix The calculation of the proposed correction bolus is based on your current blood glucose result, your insulin sensitivity factor in the current time block, your target range and on whether you plan a meal. The target BG is calculated as the mean value from the lower and upper target limit value.
- Page 361 Bolus Calculation 18.8.3 Subsequent Meal Boluses 18.8.4 Correction Bolus After a Meal If you intend to eat several meals or snacks within a short time After a meal, it is normal for your blood glucose level to increase period, you should deliver a meal bolus for each meal. even if you delivered the correct meal bolus.
- Page 362 Appendix BG level Hyper Offset time Acting time Target BG Meal rise Target range Hypo Time Current BG values Meal Bolus The dotted line shows how your blood glucose level may change after a meal bolus. No bolus required Bolus advice tolerates an increase in your blood glucose level within the allowed range for the meal rise (green) without calculating an additional correction bolus.
- Page 363 Bolus Calculation 18.8.5 Subsequent Correction Boluses The difference between your current blood glucose level and your blood glucose target value is called delta BG value. A correction bolus that was delivered according to the conditions mentioned above covers this difference. When the correction bolus starts to act, your current blood glucose level should drop, and the respective delta BG value decreases after the offset time.
- Page 364 Appendix 18.8.6 Examples The following charts show various examples of how bolus advice takes different factors into account for the calculations. The currently allowed blood glucose value considers the following factors: Target BG Meal rise Delta BG...
- Page 365 Bolus Calculation After a correction bolus BG level Hyper Offset time Acting time Delta BG Target BG Target range Hypo Time Current BG values Bolus No bolus required Currently allowed BG value: Corrected BG The first correction bolus at 12:00 noon remains active during the acting time (width of the blue area).
- Page 366 Appendix BG level Hyper Target BG Target range Hypo Time Current BG values Bolus If a blood glucose result is above the currently allowed blood glucose value, a bolus will be calculated (light blue) that considers only the difference between the current blood glucose value (orange dots) and the currently allowed blood glucose value (upper edge of the dark blue area).
- Page 367 Bolus Calculation Subsequent Meals BG level Hyper Offset time Acting time Meal rise Target BG Target range Hypo Time Current BG values Meal Bolus No bolus required Currently allowed BG value: If you eat several meals one after the other that are larger than the snack size, the Meal rise meal rise is newly started for each meal bolus.
- Page 368 A basal rate profile consists of up to 24 time blocks. An individual basal rate can be programmed for each time block. The Accu-Chek Solo micropump offers you up to 5 different basal rate profiles in Basal rate profile order to easily adjust insulin delivery to meet your changing insulin needs (for example, during the week compared to at the weekend).
- Page 369 Term Definition Blood glucose (BG) The blood glucose level Blood glucose result Result of a blood glucose test Bluetooth ® wireless Wireless transfer technology that digital devices use to exchange data technology The insulin amount required to cover the intake of food or correct an elevated blood glucose level. Bolus The bolus type and bolus amount are determined by your healthcare professional’s guidelines, your blood glucose level, the food you ate, your current state of health or your physical activity.
- Page 370 Glossary Term Definition One of the 4 units for the carbohydrate amount that you can select when setting up the micropump Carbohydrate unit (KE) system. 1 KE = 10 grams of carbohydrates Carbohydrates are nutrients that are broken down into glucose during digestion and increase blood Carbohydrates glucose.
- Page 371 Term Definition Setting that deactivates all wireless communication of the micropump system. Activate flight mode when you are in an aeroplane or when other situations require the Bluetooth wireless technology Flight mode feature to be deactivated. Exchanging data between the diabetes manager and the micropump is not possible in flight mode.
- Page 372 Glossary Term Definition The amount in units (U) by which your insulin dose is adjusted when programming a bolus or when Insulin increment making a manual logbook entry. The insulin sensitivity defines the insulin amount required to lower your blood glucose level by a Insulin sensitivity certain value.
- Page 373 Term Definition Pen/syringe bolus A bolus delivered using an insulin pen or syringe. Quick bolus Bolus that is programmed and delivered using the quick bolus buttons on the micropump. Insulin that has the same chemical structure as insulin produced by the human pancreas. Regular Regular insulin insulin usually needs 30 to 45 minutes to take effect.
- Page 374 Glossary Term Definition When your micropump is in STOP mode, it does not deliver any insulin. Insulin delivery is only stopped if you switch to STOP mode, change the basal rate profile, make settings using a PC or when STOP mode error messages or maintenance messages are issued.
- Page 375 Term Definition When your blood glucose result is above or below the hyper or hypo warning limit, a warning is displayed. You should set the hyper and hypo warning limits together with your healthcare Warning limit professional. In case of blood glucose results below the lower warning limit, no bolus advice will be calculated.
- Page 376 Index quick bolus ............. 118, 360 Abbreviations ................ 338 standard bolus ............111, 361 Acting time ............131, 142, 363 Bolus Active insulin ..............106, 356 maximum amount ........... 230, 232 automatic off ................ 360 Bolus advice ............129, 154, 276 Automatic off ................
- Page 377 Data; see Logbook Fill amount ................190 bolus data ............... 217 flight mode ................358 event data............... 216 Flight mode ................247 pump data ..............218 activating ................ 248 TBR data ................. 217 turning off ............... 249 total daily dose ............... 218 Data transfer ................
- Page 378 Index filling the reservoir needle ..........78 Key lock; see Screen lock pairing with the diabetes manager ........75 removing temporarily ............266 starting ................83 language ................40 stopping ................83 Language ................240 Logbook ............... 195, 275 BG averages table ............214 Note ..................
- Page 379 Service Centre; see Customer Support and Service Centre Quick bolus ..............118, 360 Setup wizard ................39 increment ............... 118, 231 Shortcuts ................18 Signals; see Tone maximum amount ............230 Quick bolus buttons ............59, 229 Snack size ............131, 142, 361 Standard deviation ........
- Page 380 Index Test result ................273 entering ................158 Warning limits .............. 222, 275 evaluating ................. 96 automatic off ..............225 Test strip slot ..............15, 87 hyperglycaemia ............46, 222 Time ................42, 227 hypoglycaemia ............46, 223 Time blocks ............48, 130, 363 remaining time of pump base .........
Need help?
Do you have a question about the Accu-Chek Solo and is the answer not in the manual?
Questions and answers