Roche Accu-Chek Insight User Manual
Hide thumbs
Also See for Accu-Chek Insight:
- User manual (232 pages) ,
- Training chart (5 pages) ,
- Quick start manual (4 pages)
Table of Contents
Advertisement
Quick Links
Advertisement
Table of Contents

Related Manuals for Roche Accu-Chek Insight


Summary of Contents for Roche Accu-Chek Insight
- Page 1 User’s Manual Accu-Chek Insight insulin pump...
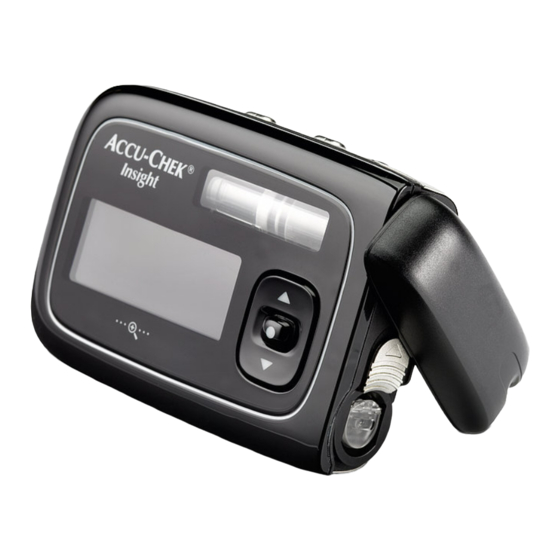
- Page 2 Your Insulin Pump q Quick bolus keys x Up key Display (screen) o OK key z Down key l Zoom key Note If you are in the status screen and you do not press the o, x or z key for more than 10 seconds, these keys will be locked.
- Page 3 Connected Insulin Pump...
-
Page 4: Table Of Contents
TAble of CoNTeNTs Table of Contents Pump features Navigating Through Menus starting Your Pump Choosing the Correct Battery Type Changing the Battery Start-Up Process and Setup Wizard Program Basal Profile 1 Changing the Cartridge and Transfer Set Using Your Pump in Daily life Wearing Your Pump Stopping and Starting Your Pump Your Insulin Pump and Water... - Page 5 TAble of CoNTeNTs Personalising Your Pump Using Reminders Communicating with Other Devices Device Settings Therapy Settings Setting the Time and Date Maintaining Your Pump General Safety Information Inspecting Your Pump Maintaining Your Pump Damage to Your Pump Repairing Your Pump Storing Your Pump Disposal 10 Responding to a Pump Message...
- Page 7 It contains all the your insulin and infusion set. information you need for the safe and efficient use of your new Accu-Chek Insight w WARNING insulin pump. Regardless of your level of experience with pump therapy, read this Do not modify the Accu-Chek Insight manual carefully before using your pump.
- Page 8 example An example shows you how a feature could be used in an everyday-life situation. Note that medical or therapy- related details are provided for illustration purposes only, and are not intended to match your personal medical needs. Always discuss your personal therapy requirements with your healthcare professional.
-
Page 9: Pump Features
PUMP feATURes Pump features sToP mode: When the pump is in PAUSE mode for more than 15 minutes, it switches to STOP mode. The Pump stopped screen appears and the pump stops completely and Guided handling sequences (wizards) cancels all current Temporary Basal Rates Pump therapy sometimes involves complex and boluses. - Page 10 Accu-Chek Insight insulin pump under clothing. The key lock is pump. activated by default. The key lock does not Check the availability in your country or ask lock the quick bolus keys q.
- Page 11 PUMP feATURes Adjustable bolus speed bolus, providing both an immediate and a long-acting part. This could also be a good You can adjust the delivery speed of the option when you plan to eat slow-acting boluses. A lower bolus delivery speed may carbohydrates and need to correct an be helpful if you have high bolus amounts elevated blood glucose level at the same...
-
Page 12: Navigating Through Menus
PUMP feATURes Navigating Through Menus q Quick bolus keys x Up key Display (screen) o OK key z Down key l Zoom key function function In most situations the 2 º Moves you up in a menu q keys have an identical screen function and can be used º... - Page 13 PUMP feATURes function º Enlarges the characters on the display º Reduces enlarged characters on the Press x or z to move to the desired display submenu. One q Press o to enter the highlighted menu. key and then x and Unlocks the key lock when then z pressed in quick...
- Page 14 PUMP feATURes and holding x or z changes the value rapidly (“scrolling”). 1.1.2 Understanding the screen In the main Menu you will find the following When a specific setting is highlighted and functions: shown with small Up and Down arrows, the x and z keys will increase and decrease the value.
- Page 15 PUMP feATURes In each menu you can use the Home PAUSE mode and if boluses or Temporary function to return to the status screen: Basal Rates are currently running. Status icon Current date Battery status Press z to move to Home. Key lock active Press o to select.
- Page 16 PUMP feATURes background colour dark With the dark background colour the screen will show white characters on black background. background colour light With the background colour light the screen will show black characters on white background. Zoom mode When you press l for 1 second, the characters on the screen will be enlarged.
-
Page 17: Starting Your Pump
Make sure you specify the correct battery Choosing the Correct type on your insulin pump. Otherwise, the battery Type remaining battery lifetime may not be calculated correctly. Your Accu-Chek Insight insulin pump requires a 1.5 V AAA battery. -
Page 18: Changing The Battery
sTARTING YoUR PUMP Battery selection screen over 40 °C (104 °F) and below 5 °C (41 °F). º Change your battery cover if it looks used or dirty and at least every 6 months. Removing the battery Changing the battery If you remove the battery while your pump is delivering insulin (RUN mode), the insulin Ensure that you always have a new battery... - Page 19 sTARTING YoUR PUMP condition or the amount of time your pump has been without power. Inserting the battery Ensure that no dirt or dust can enter the battery compartment while changing the battery. When you start your pump for the first time, begin with step 6.
- Page 20 sTARTING YoUR PUMP Remove the battery cover and the old Place the battery cover on top of the battery. battery. (—) Insert the new battery into the battery Push the battery cover all the way into the compartment, positive (+) end first, battery compartment until you hear the negative (−) end pointing outwards.
-
Page 21: Start-Up Process And Setup Wizard
sTARTING YoUR PUMP launches to help you program your pump’s self-test sequence initial settings, such as the time and date. After the battery cover is closed, the Pump self-test starts automatically. start-Up Process and setup Wizard After you insert a new battery, your pump immediately performs a self-test. - Page 22 sTARTING YoUR PUMP set the time, date and battery type w WARNING It is vital that you set the correct time and date on your pump including a.m. and p.m. for the 12-hour time format. Make sure that the area is completely Otherwise, you might not get the correct black.
- Page 23 sTARTING YoUR PUMP Set month screen appears. Press q to select no. Press x or z to set the month. Pump stopped screen appears. Press o to go to day. Set day screen appears. Before using your pump, you must program at least one basal profile.
-
Page 24: Program Basal Profile
sTARTING YoUR PUMP Program basal Profile 1 Your pump delivers a continuous stream of insulin to cover your basic insulin need. This is called your basal rate profile. You can From the status screen, press o. program it in time blocks with different hourly basal rates to cover your varying The main Menu... - Page 25 sTARTING YoUR PUMP Press z to move to Program Basal Press x or z to set the hourly basal rate. Profile. Press o. Press o to select. time of the second time block is Program Basal Profile screen appears. highlighted. Press o to select Basal Profile Continue programming the...
-
Page 26: Changing The Cartridge And Transfer Set
If necessary, you can press q to go back to a previous field. º A new cartridge º A new Accu-Chek Insight infusion set Changing the Cartridge Note and Transfer set Ensure the cartridge and insulin are at Change the cartridge and transfer set in the room temperature. - Page 27 sTARTING YoUR PUMP Cartridge and infusion set menu appears. 120° Press o to select Change cartridge. Change cartridge screen appears. When you reach an angle of 120°, remove the adapter with the cartridge. The pump starts rewinding the piston rod. Disconnect the infusion set from your body.
- Page 28 sTARTING YoUR PUMP Insert a cartridge only if the Insert new cartridge and connect adapter screen appears. 90° w WARNING º Before inserting the cartridge into the insulin pump, check every cartridge for Place a new adapter on the bayonet cracks or damages.
- Page 29 sTARTING YoUR PUMP INCoRReCT 120° Turn the adapter clockwise all the way until it stops. The adapter is correctly w WARNING positioned when it is aligned with the pump’s housing. º Always use a new adapter when changing the cartridge. Then press o to confirm.
- Page 30 sTARTING YoUR PUMP After the self-test, the Fill tubing? screen w WARNING appears. Air bubbles in the cartridge and infusion set may result in the infusion of air instead of insulin. If this happens, your body will not receive the required amount of insulin.
- Page 31 sTARTING YoUR PUMP Filling is complete, when the pump has stopped. Check if insulin drips from the tubing. If no insulin drips from the tubing, press q to go back. Start a second filling process: Press o to fill the infusion set cannula Press x or z to move to Fill tubing.
- Page 32 sTARTING YoUR PUMP...
-
Page 33: Using Your Pump In Daily Life
UsING YoUR PUMP IN DAIlY lIfe Using Your Pump in electromagnetic fields and hazardous areas Daily life w WARNING Wearing Your Pump Do not use your pump near electromagnetic fields such as radar or Attach your pump safely to your body or antenna installations, high-voltage clothes to prevent damage. -
Page 34: Stopping And Starting Your Pump
UsING YoUR PUMP IN DAIlY lIfe barometric pressure sport and exercise Your pump is designed to work in normal You can wear your pump while performing a barometric conditions (from 550 to range of sporting activities. However, it is 1060 mbar). important that you protect your pump before you begin exercise or sporting activities. - Page 35 UsING YoUR PUMP IN DAIlY lIfe You can now disconnect the infusion set w WARNING from your body and take off your pump. Check your blood glucose level and replace the missing insulin immediately if your insulin delivery is interrupted for any reason, for example: º...
-
Page 36: Your Insulin Pump And Water
UsING YoUR PUMP IN DAIlY lIfe Press z to move to Start pump. 120° Press o to select. The RUN screen appears and the pump starts to deliver insulin. Hold the pump in an upright position. Remove the adapter, cartridge and battery from the pump. -
Page 37: Quick Info Screens
UsING YoUR PUMP IN DAIlY lIfe has entered the cartridge or battery The sequence of quick info screens includes compartment, put your pump into STOP information about: mode and disconnect the pump from your º Current insulin amount in your cartridge body. - Page 38 UsING YoUR PUMP IN DAIlY lIfe Press z. Press x if you want to go back. Last message screen appears. Press z. Press x if you want to go back. Time and date screen appears. Press z to return to the status screen. Press x if you want to go back.
-
Page 39: Administering Boluses
ADMINIsTeRING bolUses Administering boluses standard bolus Press o to select Standard Bolus. The standard bolus delivers the programmed insulin dose all at once. This Standard Bolus screen appears with the bolus can be helpful for foods that are immediate bolus amount highlighted. digested quickly, such as cake or bread. -
Page 40: Quick Bolus
ADMINIsTeRING bolUses Your pump returns to the status screen 2.0 units in the Therapy settings on your showing a progress bar for the remaining pump. bolus amount. w WARNING Make sure that you know and use the correct bolus increment. Using the incorrect bolus increment will deliver the wrong insulin dose. -
Page 41: Cancelling A Bolus
ADMINIsTeRING bolUses Note You can cancel a quick bolus while the confirmation screen is displayed or during delivery by pressing and holding q for 3 seconds. The pump displays the Bolus to deliver screen for 5 seconds. Press the other q key once for each increment until the required bolus amount is reached. - Page 42 ADMINIsTeRING bolUses 4.3.3 Cancelling a bolus Using the Cancel bolus Menu From the status screen, press o. The main Menu screen appears. Quick bolus You can cancel a quick bolus while the confirmation screen is displayed or during delivery by pressing and holding q for 3 seconds.
-
Page 43: Extended Bolus
ADMINIsTeRING bolUses example Ian is planning to eat a pizza. He knows it contains few fast-acting carbohydrates and a lot of fat and carbohydrates that are digested slowly. Therefore, he programs If more than one bolus is being delivered, an extended bolus for his pizza. press x or z to move to the bolus you want to cancel. -
Page 44: Multiwave Bolus
ADMINIsTeRING bolUses Extended Bolus screen appears with the bolus amount and duration, in addition to delayed bolus amount highlighted. the hourly basal rate. Note To cancel an extended bolus, use the Cancel Bolus menu. See chapter 4.3.1, page 41. Press x or z to set the delayed bolus Multiwave bolus amount. - Page 45 ADMINIsTeRING bolUses You can add a standard or quick bolus to an in-progress multiwave bolus, and one additional extended or multiwave bolus. example Ian is invited to dinner. He will have Press z to move to Multiwave Bolus. pastries as a starter and steak with Press o to select.
- Page 46 ADMINIsTeRING bolUses The duration of the delayed bolus is the immediate part, or use the Cancel highlighted. The duration of your last Bolus menu during delivery of the delayed multiwave bolus is given as a default. part. See chapter 4.3.1, page 41. Press x or z to set the duration.
-
Page 47: Basal Profile Options
bAsAl PRofIle oPTIoNs basal Profile by the percentage that you program. You can activate only 1 TBR at a time, between options 0 and 250 % in 15-minute intervals for up to 24 hours. In this chapter you will learn how to adjust example your basal insulin supply to different life situations:... - Page 48 bAsAl PRofIle oPTIoNs The status screen appears, showing the percentage and the remaining duration of the TBR in addition to the modified hourly basal rate. Press o to select Temporary Basal Rate. Temporary Basal Rate menu appears. When the duration of the TBR has expired, your pump displays Reminder R7: TBR completed.
-
Page 49: Additional Basal Profiles
bAsAl PRofIle oPTIoNs Additional basal Profiles As well as your initial basal profile you may want to use other basal profiles for different daily routines. Press o to select Temporary Basal You can program up to 5 different basal Rate. profiles. - Page 50 bAsAl PRofIle oPTIoNs Press z to move to Basal. Press x or z to set the time. Press o to select. Press o. Basal menu appears. The hourly basal rate for the first time block is highlighted. Press z to move to Program Basal Profile.
-
Page 51: Activating A Basal Profile
bAsAl PRofIle oPTIoNs Activate basal profile 2 (1, 3, 4, 5) Make sure the daily total matches your therapy requirement. From the status screen, press o. Press o to confirm. The main Menu screen appears. The status screen appears. Press z to move to Basal. Note Press o to select. - Page 52 bAsAl PRofIle oPTIoNs Basal Profile 2 (1, 3, 4, or 5) summary screen appears. Make sure you selected the correct profile. Press o. The status screen appears. The new basal profile is active immediately.
-
Page 53: Viewing Your Data
Rate data rate. Daily insulin Last 90 daily totals of totals insulin delivered. Remaining time in Pump timer days until the Roche warranty expires. Press x or z to move to Event data, Bolus data, data, Daily... -
Page 54: Event Data
VIeWING YoUR DATA bolus Data The bolus data screen allows you to view up to the last 90 bolus deliveries starting with the most recent entry. Each bolus data screen displays: Press z to view previous entries. º Immediate bolus amount (only quick, Press x to move back to more recent standard, or multiwave bolus) results. -
Page 55: Daily Totals
VIeWING YoUR DATA º End time Daily totals screen º End date TbR data screen Date Total basal End time End date Total boluses TBR duration Daily total TBR percentage Pump Timer Daily Totals Pump timer screen shows the time until the warranty for your pump expires. -
Page 57: Modes For Different Life Situations
MoDes foR DIffeReNT lIfe sITUATIoNs you are not allowed to use Bluetooth Modes for Different wireless technology. life situations Change the signal mode The different modes on your pump help you to adjust the signals and other functions of your pump to different situations. By default your pump will be in the Normal mode. - Page 58 MoDes foR DIffeReNT lIfe sITUATIoNs Press x or z to move to Normal, Vibrate, Press z to move to Flight mode. Quiet or Loud. Press o to select. Press o to select. Flight mode screen appears. The pump returns to the status screen and the new mode is active immediately.
-
Page 59: Personalising Your Pump
PeRsoNAlIsING YoUR PUMP Personalising Your enter the settings menu Pump Your pump offers a wide range of options to adjust it to your individual therapy requirements and personal preferences. You can make adjustments to: From the status screen, press o. Help you to remember The main Menu... - Page 60 PeRsoNAlIsING YoUR PUMP to Repeat, the reminder will sound each day at the same time. You can use the following options: Reminds you to deliver a bolus at a specified Press x or z to move to Deliver Bolus, Deliver bolus time.
- Page 61 PeRsoNAlIsING YoUR PUMP Note Press x or z to set the minutes. When the reminder goes off, press o Press o. twice to mute and confirm. If the key lock is active, you must unlock the keys before Reminder 1 (2, 3, 4, or 5) Tone screen...
-
Page 62: Communicating With Other Devices
PeRsoNAlIsING YoUR PUMP Press x or z to set the number of days Press x or z to move to Tone 1 after which the reminder sounds. needed. Press o. Press o. The hours are highlighted. Infusion set change screen appears. Press x or z to set the hour. - Page 63 PeRsoNAlIsING YoUR PUMP 8.2.1 switching Bluetooth Your pump can be paired with up to 5 other devices in total. If you want to pair another wireless technology on device when 5 devices are already paired and off with your pump, you have to delete the There are 2 ways to switch the pairing of one of the paired devices first.
- Page 64 PeRsoNAlIsING YoUR PUMP Bluetooth screen appears. Press z to move to Visibility. Press o to select. Press x or z to move to needed. Visibility screen appears. Press o to select. 8.2.2 Making the Pump Visible to other Devices For communication with some devices, it is necessary to make the pump visible.
- Page 65 PeRsoNAlIsING YoUR PUMP you start the pairing procedure, make sure communication via Bluetooth wireless technology is enabled on both devices. Put the devices as close to each other as possible. It is recommended to do the pairing in a private environment where no In the Settings menu press z to move to...
- Page 66 PeRsoNAlIsING YoUR PUMP The pump shows the Pairing successful screen. Confirm the pump’s serial number on the other device as soon as it appears on its screen. Press o to confirm. While the other device sends a confirmation Before the devices can start communicating to the pump, the pump shows the the pump display has to be turned off.
- Page 67 PeRsoNAlIsING YoUR PUMP 8.2.5 Removing a Device from the list If you remove a device from the list, the pairing between the pump and this device is deleted. The pump can no longer communicate with this device using Press x or z to move to the device you Bluetooth wireless technology.
-
Page 68: Device Settings
PeRsoNAlIsING YoUR PUMP However, since errors and maintenance Device settings messages require your immediate attention, you cannot pause these event signals. Also, The device settings offer a wide range of the reminders you programmed will not be options to adapt your pump to your personal silenced. - Page 69 PeRsoNAlIsING YoUR PUMP Mode settings screen appears. Press o to select Volume. Press x or z to move to Normal, Quiet, Volume screen appears. Vibrate Loud as needed. Press o to select. The Normal, Quiet, Vibrate Loud screen appears. Press x or z to select the volume as needed.
- Page 70 PeRsoNAlIsING YoUR PUMP However, since errors and maintenance messages require your immediate attention, you cannot suspend these event signals. Also, the reminders you programmed will not be silenced. Press z to move to Signal suspension. Press o to select. Signal suspension screen appears with the start time highlighted.
- Page 71 PeRsoNAlIsING YoUR PUMP Increments: 0.05 increments (0–2 U) 0.1 increments (2–5 U) standard 0.2 increments (5–10 U) 0.5 increments (10–20 U) 1.0 increments (20 U) Press x or z to move to Off, Once, or Repeat as needed. expressive 0.5 increments Press o to select.
- Page 72 PeRsoNAlIsING YoUR PUMP Unlocking the keys To unlock the front keys, press the following keys in the order given below, within 1 second: One of the q keys Press x or z to move to Standard, The x key Expressive, or Diminished as needed.
- Page 73 PeRsoNAlIsING YoUR PUMP 8.3.4 select the language In the Settings menu press z to move to Device settings. In the Settings menu press z to move to Press o to select. Device settings. Device settings menu appears. Press o to select. Device settings menu appears.
- Page 74 PeRsoNAlIsING YoUR PUMP 8.3.5 Adjusting the Display You can change the brightness, background colour and orientation of your pump’s display to your own preferences and to help you read the display under different conditions. Press x or z to adjust the brightness as needed.
- Page 75 PeRsoNAlIsING YoUR PUMP Press z to move to Orientation. Press z to move to Display. Press o to select. Press o to select. Orientation screen appears. Display menu appears. Press x or z to move to Standard Press z to move to Background color.
-
Page 76: Therapy Settings
PeRsoNAlIsING YoUR PUMP 8.4.1 Adjusting the Automatic Therapy settings off function With the therapy settings, you can Automatic off function is a safety personalise your pump with regard to your feature for emergency situations. The pump insulin requirement. displays Maintenance M23: Automatic off and stops the insulin flow if you do not w WARNING touch any key on your pump or... - Page 77 PeRsoNAlIsING YoUR PUMP Note It is highly recommended to check your blood glucose level after the pump displayed Maintenance M23: Automatic off. Press x or z to switch from the current value to the desired number of hours. 8.4.2 Adjusting Your bolus settings The bolus settings help you to personalise your pump with regard to your bolus insulin...
- Page 78 PeRsoNAlIsING YoUR PUMP Press o to select. Adjust the quick bolus increment The quick bolus increment is the number of insulin units programmed by each pressing of q in the quick bolus function. You can In the Settings menu press z to move to set 0.1, 0.2, 0.5, 1.0 or 2.0 units per key Therapy settings.
- Page 79 PeRsoNAlIsING YoUR PUMP Quick Bolus increment screen appears. Press z to move to Bolus settings. Press o to select. Press x or z to set the desired increment. Bolus settings menu appears. Press o to confirm. Adjust the delivery speed For more convenience during the insulin delivery, you can adjust the delivery speed.
- Page 80 PeRsoNAlIsING YoUR PUMP Adjust the maximum bolus amount Press x or z to set the maximum bolus amount as needed. In the Settings menu press z to move to Press o to confirm. Therapy settings. Press o to select. Adjust the lag setting Therapy settings menu appears.
- Page 81 PeRsoNAlIsING YoUR PUMP The bolus delivery will start after the lag time has expired. 8.4.3 Adjusting the Infusion set settings Press z to move to setting. With the Infusion set settings you can adjust Press o to select. the fill amount of the tubing and the cannula of your infusion set.
-
Page 82: Setting The Time And Date
PeRsoNAlIsING YoUR PUMP Press x or z to set the tubing fill In the Settings menu press z to move to amount. Therapy settings. Press o. Press o to select. Set cannula fill amount screen appears. Therapy settings menu appears. Press x or z to set the cannula fill Press z to move to Cartridge warning... - Page 83 PeRsoNAlIsING YoUR PUMP p.m. for the 12-hour time format. Otherwise, you might not get the correct amount of insulin at the correct time. set the time Press x or z to set the minutes. Press o to confirm. set the date In the Settings menu press z to move to...
- Page 84 PeRsoNAlIsING YoUR PUMP Press x or z to set the year. In the Settings menu press z to move to Time and date. Press o. Press o to select. The month field is highlighted. Time and date screen appears. Press x or z to set the month. Press z to move to Time format.
-
Page 85: Maintaining Your Pump
General safety Information Accessories Only use the Accu-Chek Insight sterile w WARNING products and accessories, which are Do not place your insulin pump in direct designed to be used with your pump. You sunlight. -
Page 86: Damage To Your Pump
MAINTAINING YoUR PUMP 9.3.2 Replacing the battery What to do if check is not okay Cover Reconnect open connections and tighten loose ones. Replace the battery cover when it looks 2. Pump, sterile products and used or dirty and at least every 6 months. accessories Damage to Your Pump What to check... -
Page 87: Repairing Your Pump
If your pump will not be in use for a long and electronic equipment (WEEE)). If you period of time, it must be properly stored need to dispose of your insulin pump, return to prevent any subsequent malfunction. it to Roche (see inside back cover page) for professional disposal. - Page 88 MAINTAINING YoUR PUMP Cartridge, infusion set and accessories For instructions on how to dispose of the cartridge, infusion set and accessories, refer to the instructions that came with the respective product. battery Make sure that you dispose of dead batteries correctly and recycle them according to the local regulations.
-
Page 89: Responding To A Pump Message
ResPoNDING To A PUMP MessAGe Responding to a A maintenance message Pump Message will be triggered when the pump requires your immediate action to Your pump helps you in your diabetes maintain its management with a variety of messages functionality. For and safety information. - Page 90 ResPoNDING To A PUMP MessAGe Respond to a reminder, warning, maintenance message or error When the message occurs, press o to mute the signals. Unlock the key lock if the keys are locked. See chapter 8.3.3, page 72. Press o again to confirm. Then take appropriate action.
-
Page 91: 10.1 List Of Reminders
ResPoNDING To A PUMP MessAGe 10.1 list of Reminders You can learn how to use and program reminders in the chapter about settings. See chapter 8.1, page 59. If the key lock is active, you must unlock the keys before you can confirm the reminder. See chapter 8.3.3, page 72. -
Page 92: 10.2 List Of Warnings
ResPoNDING To A PUMP MessAGe 10.2 list of Warnings If the key lock is active, you must unlock the keys before you can confirm the warning. See chapter 8.3.3, page 72. Press o to mute Press o to confirm Warning W31 Cartridge low: The cartridge in your pump is... -
Page 93: 10.3 List Of Maintenance Messages
ResPoNDING To A PUMP MessAGe Press o to mute Press o to confirm Warning W38 Bolus cancelled: A bolus has been cancelled. Make sure that the cancellation was intended. Program a new bolus if appropriate. W39 Loantime warning (loan pumps only): The loan time for your pump will expire soon. - Page 94 ResPoNDING To A PUMP MessAGe Press o to mute Press o to confirm Maintenance message M23 Automatic off: You did not press any pump key during the period specified for Automatic off. See chapter 8.4.1, page 76. After this maintenance message the pump will be in STOP mode.
-
Page 95: 10.4 List Of Errors
ResPoNDING To A PUMP MessAGe Press o to mute Press o to confirm Maintenance message M28 Pause mode timeout: Your pump has been in PAUSE mode for more than 15 minutes and has switched to STOP. TBR and boluses have been cancelled. Restart insulin delivery and reprogram TBR and boluses as appropriate. - Page 96 ResPoNDING To A PUMP MessAGe Press o to mute Press o to confirm error E7 Electronic error: When this message occurs, change the battery. If the message still occurs, you cannot resolve the problem yourself. Call your local pump support (see inside back cover page) for advice.
- Page 97 APPENDIX Appendices...
-
Page 98: Appendix A: Technical Data
APPENDIX Appendix A: Technical Data General Technical Data Maximum dimensions Approx. 84 × 52 × 19 mm (3.3 × 2.0 × 0.7 inches) (with adapter) An empty insulin pump: approximately 99 g (3.5 ounces) Weight Pump including cartridge, battery and infusion set: approximately 122 g (4.3 ounces) Shock- and scratch-resistant plastic, resistant to Pump casing... - Page 99 APPENDIX General Technical Data If used in a typical usage pattern (50 U/day using U100 insulin, ambient temperature +23 °C ±2 °C [+73 °F ±4 °F] at minimum/intermediate/maximum basal rate), the battery life is approximately: at least 21 days with Bluetooth Lithium (1200 mAh): wireless technology switched off Lifetime of battery...
- Page 100 APPENDIX General Technical Data very slow = 3 U/min, slow = 6 U/min, moderate = 9 U/min, Bolus delivery speed standard = 12 U/min Priming speed 12 U/min In addition to tactile notification the pump generates on average Sound pressure a sound pressure of at least 45 dB.
- Page 101 Cartridge Insight insulin pump. Check the availability in your country or ask your local pump support. Applied part: the Accu-Chek Insight infusion sets with a Infusion sets proprietary connector Bluetooth wireless technology, ISM 2.4 GHz communication Remote control and data...
- Page 102 Guidance and manufacturer’s declaration – electromagnetic emissions The Accu-Chek Insight insulin pump is intended for use in the electromagnetic environment specified below. The customer or the user of the Accu-Chek Insight insulin pump should ensure that it is used in such an environment.
- Page 103 Guidance and manufacturer’s declaration – electromagnetic immunity The Accu-Chek Insight insulin pump is intended for use in the electromagnetic environment specified below. The customer or the user of the Accu-Chek Insight insulin pump should assure that it is used in such an environment.
- Page 104 To assess the electromagnetic environment due to fixed RF transmitters, an electromagnetic site survey should be considered. If the measured field strength in the location in which the Accu-Chek Insight insulin pump is used exceeds the applicable RF compliance level above, the Accu-Chek Insight insulin pump or the device, which contains it should be observed to verify normal operation.
- Page 105 Recommended separation distances between portable and mobile Rf communications equipment and the Accu-Chek Insight insulin pump. The Accu-Chek Insight insulin pump is intended for use in the electromagnetic environment in which radiated RF disturbances are controlled. The customer or the user of the Accu-Chek...
- Page 106 APPENDIX Note: An additional factor of 10/3 is used in calculating the recommended separation distance to decrease the likelihood that mobile or portable communications equipment could cause interference if it is inadvertently brought into the vicinity of the user.
- Page 107 * The measurements were made at a medium basal rate of 1.0 U/h according to IEC 60601-2-24:2012 with the Accu-Chek Insight Flex and Accu-Chek Insight Tender infusion sets with 100 cm tubing at room temperature. More than 18 tests performed. All within specification.
- Page 108 -100.0000 -150 observation window duration (min) * The measurements were made at the minimum rate of 0.02 U/h according to IEC 60601-2-24:2012 with the Accu-Chek Insight Flex and Accu-Chek Insight Tender infusion sets with 100 cm tubing at room temperature.
- Page 109 The maximum deviation of the delivered amount (overall mean percentage error of flow rate) for 25 U of U100 insulin is ≤ ±5 %* where your Accu-Chek Insight insulin pump is located ≤ 0.8 m (2.62 feet) above/below the infusion site.
-
Page 110: Appendix B: Configuration Parameters
APPENDIX Appendix b: Configuration Parameters standard parameter Available value or range Parameter settings on the pump Maximum basal delivery (maximum hourly basal rate 62.5 U/h 62.5 U/h combined with maximum temporary basal rate) Default basal rate 0–25 U/h 0.01 (from 0.02 U/h to 5.00 U/h) Hourly basal rates increment... - Page 111 APPENDIX standard parameter Available value or range Parameter settings on the pump Standard: 12 U/min Moderate: 9 U/min Bolus delivery speed Standard: 12 U/min Slow: 6 U/min Very slow: 3 U/min Maximum bolus 25 U 1–50.0 U Off or On Lag time If On: 0 to 60 min in 15 min increments...
- Page 112 APPENDIX standard parameter Available value or range Parameter settings on the pump AAA (FR03) LITHIUM 1.5 V or Battery type AAA (FR03) LITHIUM 1.5 V AAA (LR03) ALKALINE 1.5 V Key lock timeout 10 sec. 4–60 sec. Automatic off On (1–24 h) or Off (0 h) Deliver Bolus, Missed Bolus, Alarm Clock, Infusion set Reminder...
-
Page 113: Appendix C: Abbreviations
APPENDIX Appendix C: Abbreviations Abbreviation Meaning approx. Approximately Hour (s) International Electrotechnical Commission Kilopascal sec. Seconds Temporary Basal Rate International Units in context with biological effectiveness of certain insulin amount Amount of International Units of insulin delivered per hour Insulin concentration. Each millilitre of liquid contains 100 U100 International Units of insulin dd.mmm.yy... -
Page 114: Appendix D: Icons And Symbols
APPENDIX Appendix D: Icons and symbols Display icons Icon Meaning Icon Meaning RUN mode (pump running) OK key STOP mode (pump stopped) Quick bolus key PAUSE mode (pump paused) Up key Operation successful Down key Cartridge and infusion set Connection failed menu Battery full Change cartridge menu... - Page 115 APPENDIX Icon Meaning Icon Meaning Standard bolus Event data Extended bolus Settings Multiwave bolus Therapy settings Immediate amount multiwave Device settings bolus Delayed amount multiwave Pump data bolus Basal rate Pump timer Activate basal profile Flight mode Temporary Basal Rate Home TBR data Duration...
- Page 116 APPENDIX General symbols Icon Meaning symbol Meaning Software version Caution, refer to safety- related notes in the instructions for use Maintenance accompanying this product. Follow instructions for use Warning Bluetooth wireless technology Consult instructions for use Sterilized using ethylene Error oxide Sterilized using irradiation Error support...
- Page 117 APPENDIX symbol Meaning symbol Meaning Electronic device of type BF Temperature limitation according to the standard (store at) IEC 60601-1. Protection against electrical shock. Admissible humidity range Symbol for protection against the effect of temporary Admissible air pressure range immersion in water (up to 60 minutes and 1.3 meters [4.3 feet]), according to Use only once...
- Page 118 APPENDIX symbol Meaning The FCC ID (Federal Communications Commission Identification) indicates that the radio frequency equipment has passed the equipment authorization process for the United States of America. The IC ID (Industry Canada Identification) indicates that the radio frequency equipment has passed the equipment authorization process for Canada.
-
Page 119: Appendix E: Warranty And Declaration Of Conformity
The full text of the EU declaration of conformity may be found at the following Internet address: http://declarations.accu-chek.com Radio frequency Connectivity Bluetooth wireless technology operating in the frequency band of 2.400 GHz to 2.4835 GHz. Maximum Transmitted Power Accu-Chek Insight insulin pump: 20 mW... -
Page 120: Appendix F: Details On User Profiles
APPENDIX Appendix f: Details on User Profiles º In addition to the display and the vibrations, Numeric values in many screens are your pump uses a sophisticated sound additionally signalled using acoustic pattern to provide you with information on feedback the pump’s current status and give you º... - Page 121 APPENDIX º TBR percentages (3 sec. after last Tone frequency (Hz, ± 5 %) increment programmed) º TBR durations (3 sec. after last 1584 increment programmed) 1760 º Basal profile total daily dose (when screen is displayed) 1980 º Quick info screen: Time, last bolus amount, total daily dose, cartridge 2112 content, battery percentage (when...
- Page 122 APPENDIX examples: Quick info screen – time 9:29 Digit Acoustic code DO2-RE3 From status screen press x to move to quick info. Wait for the acoustic signal. Digit Acoustic code DO2-LA2 DO3-RE3-MI3-FA3-SO3-LA3- DO2-LA2 TI3-DO4-RE4 Pump messages DO3-RE3 For each type of pump message there is a specific standard acoustic code and the DO3-RE3-MI3-FA3-SO3-LA3- message number is signalled as described...
- Page 123 APPENDIX example: Maintenance M21: Cartridge empty When the message occurs, the standard signal for the corresponding message sounds. Content Acoustic code LA4-DO3-SO3-DO3 pause Maintenance DO3-RE3-MI3 Press o to mute. Then press x to hear the specific message code including the message number: Content/ Acoustic code...
-
Page 124: Appendix G: List Of Accessories
º Do not use infusion sets or other accessories that are not designated for use with your Accu-Chek Insight insulin pump by Roche as this could lead to leakage or malfunction of the pump and underdelivery or overdelivery of insulin. -
Page 125: Glossary
Your Accu-Chek Insight insulin pump offers you the option of delivering up to 5 different basal profiles in order to easily meet your changing insulin needs (for example during the week rather than at the weekend). - Page 126 Hourly basal rate An hourly basal rate is the amount of insulin delivered by your Accu-Chek Insight insulin pump for each hour. Infusion set Infusion sets connect your insulin pump to your body. The insulin is delivered from the cartridge through the infusion set tubing and cannula or needle into your subcutaneous tissue.
- Page 127 GLOSSARY lag Time With the lag time you can specify a delay between programming a bolus and the actual beginning of the bolus delivery. Maintenance A maintenance message will be triggered when the pump requires your immediate action to maintain its functionality. After a maintenance message the pump will be in PAUSE or STOP mode.
- Page 128 GLOSSARY sToP When your insulin pump is in STOP mode, it does not deliver any insulin. The insulin delivery is only stopped if an error or some maintenance messages occurs, if it is in PAUSE mode for more than 15 minutes or if you switch it to STOP mode. Functions such as bolus or Temporary Basal Rate are interrupted by putting your insulin pump into STOP mode.
-
Page 129: Index
INDeX Index Diminished, 71, 120 Display, 9, 68, 74 Error, 54, 89, 95 Acoustically impaired, 71 Event data, 54 Activating basal profile, 51 Event history, 53, 54 Alarm clock, 11 Expressive, 71, 120 Auto key lock, 72 Extended bolus, 11, 43 Background colour, 74, 75 Fill amount, 81 Basal profile, 10, 24, 49, 51... - Page 130 INDeX Sound, 69 Navigate, 12 Standard bolus, 10, 39, 40 Start-up process, 21 STOP warning, 35 Occlusion, 10 Open key lock, 72 Orientation, 74 TBR, cancel, 48 TBR data, 54 TBR history, 54 Pairing, 62, 65 Temporary basal rate (TBR), 47 Personalise, 59 Therapy settings, 76 Preparation, 17...
- Page 131 Some mobile operators may charge for calls to these numbers. burgesshill.insulinpumps@roche.com www.accu-chek.co.uk www.accu-chek.ie Roche Diabetes Care South Africa (Pty) Ltd. Hertford Office Park, 90 Bekker Road Vorna Valley, Midrand south Africa 1686 Email: info@accu-chek.co.za Call Toll Free: 080-34-22-38-37 (SA only);...
- Page 132 Bluetooth SIG, Inc. ® and any use of such marks by Roche is under license. Energizer is a registered trademark of Energizer Brands, LLC and related subsidiaries. ACCU-CHEK, ACCU-CHEK 360° and ACCU-CHEK INSIGHT are trademarks of Roche.
Need help?
Do you have a question about the Accu-Chek Insight and is the answer not in the manual?
Questions and answers