Advertisement
Norsonic NOR-145 User Setup Guide
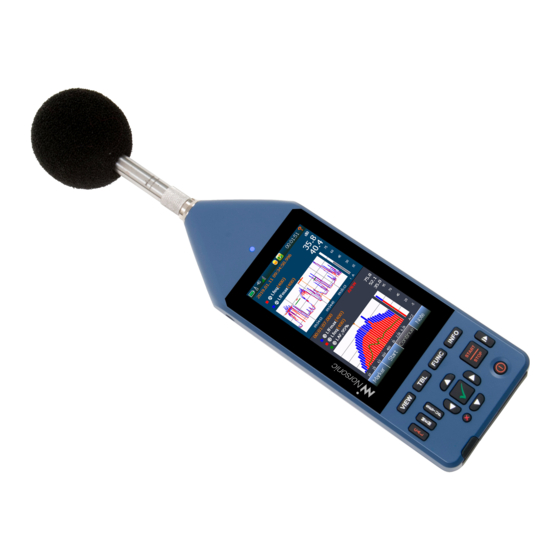
1) Connections
2) Applications menu
The equipment comes with 3 main leads:
• Firstly, connect the long blue microphone
extension cable at the top of the Nor-145 and
the other end to the microphone & preamplifier
• Secondly, connect the hand switch to the
RS232 port on the right-hand side of the Nor-
145
• Lastly, connect the power cable to the circular
port labelled DC 10-28V & plug into a power
socket
Clip the microphone into the mini-tripod provided.
The opening screen of the 145 consists of an
applications menu.
Select the:
3 min NNR -60s
(3 minute audio & -60s pre-recording)
Note: You can create your own apps too.
Advertisement
Table of Contents

Related Manuals for Norsonic NOR-145


Summary of Contents for Norsonic NOR-145
- Page 1 1) Connections The equipment comes with 3 main leads: • Firstly, connect the long blue microphone extension cable at the top of the Nor-145 and the other end to the microphone & preamplifier • Secondly, connect the hand switch to the RS232 port on the right-hand side of the Nor- •...
- Page 2 3) Calibration • Put the Nor1251 calibrator on the end of the microphone ready and press the ON button (halfway down the calibrator) to illuminate the green light • On the Nor145 press the ‘Cal’ button on the left side of the keypad to take you into the calibration menu •...
- Page 3 4) Starting Measurements To start the measurement, simply press the large start button on the keypad. If you do not have the screen shown to the left, then use the ‘View’ button on the keypad to toggle through the displays. These views can be customised by going into the ‘set-up’...
Need help?
Do you have a question about the NOR-145 and is the answer not in the manual?
Questions and answers