Table of Contents
Advertisement
Advertisement
Chapters
Table of Contents
Troubleshooting

Related Manuals for Cisco CIVS-IPC-2500


Summary of Contents for Cisco CIVS-IPC-2500
- Page 1 Cisco Video Surveillance IP Camera User Guide Model CIVS-IPC-2500 Americas Headquarters Cisco Systems, Inc. 170 West Tasman Drive San Jose, CA 95134-1706 http://www.cisco.com Tel: 408 526-4000 800 553-NETS (6387) Fax: 408 527-0883 Text Part Number: OL-14220-01...
- Page 2 Networking Academy, Network Registrar, PCNow, PIX, PowerPanels, ProConnect, ScriptShare, SenderBase, SMARTnet, Spectrum Expert, StackWise, The Fastest Way to Increase Your Internet Quotient, TransPath, WebEx, and the WebEx logo are registered trademarks of Cisco Systems, Inc. and/or its affiliates in the United States and certain other countries.
-
Page 3: Table Of Contents
Preface Overview Organization Obtaining Documentation, Obtaining Support, and Security Guidelines Overview C H A P T E R IP Camera Features IP Camera Physical Details DC Auto Iris Lens Connector Pinouts Package Contents Getting Started C H A P T E R Installing the IP Camera Performing the Initial Setup of the IP Camera Accessing the IP Camera Windows... - Page 4 Contents Video Window Audio Window Security Windows Product Process Window Initialization Window Complexity Window Applications Windows Mail & FTP Window Motion Detection Window Event Window SNMP Window Alarm I/O Ports Window PTZ (RS-485) Window Preset Positions Window Status Windows System Window Audio/Video Window Network Window Syslog &...
-
Page 5: Preface
Preface Overview This document, Cisco Video Surveillance IP Camera User Guide provides information about installing, configuring, using, managing, and troubleshooting the Cisco Video Surveillance IP Camera model CIVS-IPC-2500. Organization This manual is organized as follows: Chapter 1, “Overview” Chapter 2, “Getting Started”... - Page 6 Preface Obtaining Documentation, Obtaining Support, and Security Guidelines Subscribe to the What’s New in Cisco Product Documentation as a Really Simple Syndication (RSS) feed and set content to be delivered directly to your desktop using a reader application. The RSS feeds are a free service and Cisco currently supports RSS version 2.0.
-
Page 7: Chapter 1 Overview
Overview This chapter provides an overview of the Cisco Video Surveillance IP Camera and its features. It includes these topics: IP Camera Features, page 1-1 • IP Camera Physical Details, page 1-2 • DC Auto Iris Lens Connector Pinouts, page 1-6 •... -
Page 8: Ip Camera Physical Details
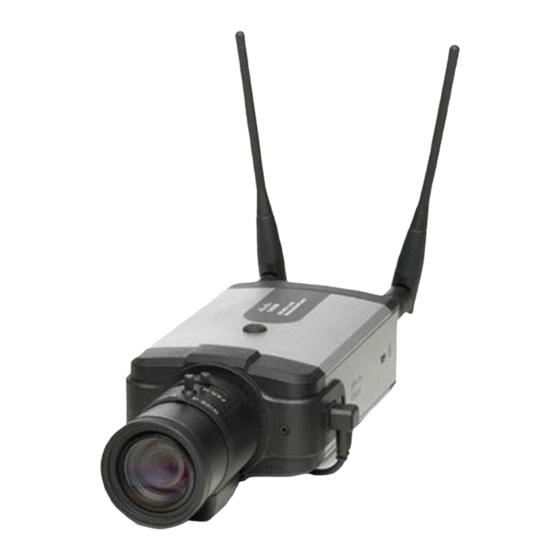
IP Camera Physical Details Motion detection—The IP camera can detect motion in up to three designated fields of view by • analyzing changes in pixels and generate an alert if motion is detected. Flexible scheduling—You can configure the IP camera to respond to events that occur within a •... - Page 9 Chapter 1 Overview Figure 1-1 Lens opening Focus ring Microphone Activity LED (green) Ready LED (amber) OL-14220-01 Front of IP Camera The IP camera supports a variety of C and CS mount lenses, which attach here. For best performance, Cisco recommends that you use a DC auto iris lens.
- Page 10 IP Camera Physical Details Figure 1-2 and the table that follows describe the items on the rear of the IP camera. Figure 1-2 Reset button Network LED (amber) LAN port PoE LED (green) Analog video output Speaker output Cisco Video Surveillance System IP Camera User Guide Rear of IP Camera Recessed button that reboots the IP camera or resets it to a default state.
- Page 11 Chapter 1 Overview Microphone input GPIO ports Power input Figure 1-3 and the table that follows describe the items on the side of the IP camera. Figure 1-3 DC auto iris lens connector Lockdown cable slot OL-14220-01 Allows the connection of an optional external microphone (with pre-amplifier) through a standard 3.5 mm mini phone jack.
-
Page 12: Dc Auto Iris Lens Connector Pinouts
DC Auto Iris Lens Connector Pinouts DC Auto Iris Lens Connector Pinouts Figure 1-4 and the table that follows describe the pinouts of the DC auto iris lens connector on the IP camera. Figure 1-4 Package Contents The includes in the Cisco Video Surveillance IP Camera package these items: Camera •... -
Page 13: Chapter 2 Getting Started
Getting Started This chapter provides instructions for installing and performing the initial setup of the Cisco Video Surveillance IP Camera. It also describes how to access the IP camera through a web browser so that you can configure it or view video from it, and how to perform other important tasks. This chapter includes these topics: Installing the IP Camera, page 2-1 •... - Page 14 Installing the IP Camera The power supply must be placed indoors. Statement 331 Warning Note If you use the IP camera outdoors, place the camera and the power supply in a suitable NEMA enclosure. Warning This product requires short-circuit (overcurrent) protection, to be provided as part of the building installation.
- Page 15 Chapter 2 Getting Started Table 2-1 Installing the IP Camera (continued) Action Step 4 Optional. Connect a microphone to the microphone input jack on the rear of the IP camera. Step 5 Optional. Connect an NTSC or PAL compliant analog video display device to the video output connector on the rear of the IP camera.
-
Page 16: Performing The Initial Setup Of The Ip Camera
Performing the Initial Setup of the IP Camera Table 2-1 Installing the IP Camera (continued) Action Step 10 Check the LEDs on the IP camera. Step 11 Mount the IP camera in the desired location. Step 12 Optional. Use the lockdown cable slot to secure the IP camera. -
Page 17: Accessing The Ip Camera Windows
Chapter 2 Getting Started In the Set Password and Verify Password fields in the Admin column, enter a password for the IP camera Step 2 administrator. You must enter the same password in both fields. The password is case sensitive and must contain at least eight characters, which can be letters, numbers, and special characters, but no spaces. - Page 18 Accessing the IP Camera Windows You need this information to access the IP camera windows: IP address of the IP camera. The default IP address is 192.168.0.100. • Port number, if other than the default value. Default port numbers for the IP camera are 443 for •...
-
Page 19: Adjusting Back Focus On The Ip Camera
Chapter 2 Getting Started The Main window appears and video from the IP camera starts playing automatically. You can take these actions in the Main window: Click the Setup link to access configuration menus for the camera. For detailed information about •... -
Page 20: Resetting The Ip Camera
Resetting the IP Camera If the IP camera is receiving power through the power adapter, unplug the adapter from the wall or • disconnect it from the camera Resetting the IP Camera You reset the IP camera by pressing the Reset button on the rear of the device (see ). There are various reset types, as described in You also can perform some reset operations from the Maintenance window as described in the “Maintenance Window”... -
Page 21: Chapter 3 Configuring And Managing The Ip Camera
Configuring and Managing the IP Camera The Cisco Video Surveillance IP Camera provides configuration windows that you use to configure and manage the IP camera. This chapter explains how to access the configuration windows, describes each window, and provides detailed information about the options that are available in each window. When configuring the IP camera, be aware of these guidelines: You must install and set up the Cisco Video Surveillance IP camera as described in •... -
Page 22: Configuration Overview
Configuration Overview Configuration Overview There are many settings and options that you can configure for the IP camera. The items that you configure depend on several factors, including your camera model, operational requirements, and connected external devices. Table 3-1 provides general information to help you determine what items you need to configure for your situation. - Page 23 Chapter 3 Configuring and Managing the IP Camera Table 3-1 Guidelines for Configuring the IP Camera (continued) Configuration Item Explanation Audio options Includes options for audio streams that are received or sent by the IP camera. Security options Let you stop IP camera processes, configure administrator and root password requirements, and allow access...
-
Page 24: Navigating The Configuration Windows
Navigating the Configuration Windows Navigating the Configuration Windows After you access the configuration windows as described in the section on page Navigation tree—Appears at the left of the window and provides links to each configuration window • Basic Setup window—Appears at the right of the window •... -
Page 25: Basic Setup Window
Chapter 3 Configuring and Managing the IP Camera Status • System – Audio Video – Network – Syslog & Log – – Video Log Setup Windows The Setup windows let you configure a variety of basic and advanced settings for the IP camera, and to designate IP addresses that are allowed or denied access to the IP camera. -
Page 26: Basic Setup Window
Setup Windows Table 3-2 Basic Setup Window Options (continued) Option Enable LED Operations Check this check box if you want the Ready LED or Activity LED on the Current Date/Time Time Zone Adjust for Daylight Saving Time Check here if you want to update the time automatically from the NTP server from the... -
Page 27: Advanced Setup Window
Chapter 3 Configuring and Managing the IP Camera Table 3-2 Option Subnet Mask Gateway Primary DNS Secondary DNS Advanced Setup Window The Advanced Setup window provides options for configuring various network and protocol settings for the IP camera. To display the Advanced Setup window, access the configuration windows as described in the “Performing the Initial Setup of the IP Camera”... -
Page 28: Advanced Setup Window
Setup Windows Table 3-3 Advanced Setup Window Options (continued) Option Enable HTTPS Alternative Port RTP/RTSP RTSP Port RTP Data Port Max RTP Data Packet Enable Multicast Video Address Video Port Cisco Video Surveillance System IP Camera User Guide Chapter 3 Description Check this check box to enable Internet access to the IP camera through an HTTPS port other than the default port 443. -
Page 29: Ip Filter Window
Chapter 3 Configuring and Managing the IP Camera Table 3-3 Option Audio Address Audio Port Time to Live This feature is not currently supported if you use the IP camera with Cisco VSM. Note Enable QoS Mode DSCP IP Filter Window The IP Filter window provides options for controlling access to the IP camera by designating a list of IP addresses that can access the IP camera and a list of IP addresses that cannot access the IP camera. -
Page 30: Ip Filter Window
Administration Windows Table 3-4 Option Options Single/Range Administration Windows The Administration windows let you configure IP camera users, reset or restart the IP camera, and upgrade firmware on the IP camera. The following sections describe the Setup windows in detail: Users Window, page •... -
Page 31: Users Window
Chapter 3 Configuring and Managing the IP Camera To remove a user, click Delete next to the user. If you delete a user who is logged into the IP camera, • the user remains logged in and can continue access the IP camera. To discard the changes before you click Change or Save, click Cancel. -
Page 32: Maintenance Window
Administration Windows Maintenance Window The Maintenance window provides options for resetting or restarting the IP camera, saving configuration information from the IP camera, and uploading the configuration information to the IP camera. Saving and uploading configuration is useful for these activities: Configuring multiple IP cameras—If your network includes several IP cameras that should have •... -
Page 33: Maintenance Window
Chapter 3 Configuring and Managing the IP Camera Table 3-6 Option Upload Firmware Window The Firmware window lets you view information about the firmware that is installed on the IP camera and upgrade the firmware. Before you upgrade firmware, download the firmware file to a PC that is accessible on your network and unzip the file if it is zipped. -
Page 34: Video Window
Audio/Video Windows Audio/Video Windows The Audio/Video windows provide options for configuring audio and video from the IP camera. The following sections describe the Setup windows in detail: Video Window, page • • Audio Window, page 3-17 Video Window The Video window provides options for configuring the video from the IP camera. You can configure settings for the primary and an optional secondary video stream. -
Page 35: Audio/Video Windows
Chapter 3 Configuring and Managing the IP Camera Table 3-8 Option Max. Frame Rate MPEG-4 Settings 2 Note These MPEG-4 Settings 2 options appear if the Resolution setting for MPEG-4 Settings 1 is lower than 720 x 480 for NTSC or 720 x 576 for PAL. Enable MPEG-4 Settings 2 Resolution... - Page 36 Audio/Video Windows Table 3-8 Option Preset Brightness Sharpness Contrast Saturation Frame Repeat Count Options Enable Time Stamp Enable Text Display Cisco Video Surveillance System IP Camera User Guide 3-16 Video Window Options (continued) Description Choose one the following preset white balance modes from the Preset drop-down list: Normal—Suitable for most conditions that do not have special lighting •...
-
Page 37: Audio Window
Chapter 3 Configuring and Managing the IP Camera Table 3-8 Option Day/Night Vision Switch Mode Day to Night Threshold If the Switch Mode option is set to Auto, choose the value that specifies the Night to Day Threshold If the Switch Mode option is set to Auto, choose the value that specifies the Audio Window The Audio window provides options for enabling and configuring audio that is transmitted to and from the IP camera. -
Page 38: Security Windows 3-18
Security Windows Table 3-9 Option Enable Audio Enable Microphone Enable External Speaker Audio Type Security Windows The Security windows provide options for stopping IP camera processes, configuring administrator and root password requirements, and enabling access to the IP camera through HTTP or Secure Shell (SSH) connections. -
Page 39: Product Process Window
Chapter 3 Configuring and Managing the IP Camera Product Process Window The Product Process window displays the processes that occupy TCP or UDP ports, and lets you stop any of these processes. Take care when stopping processes because some processes are required for the camera to operate properly. -
Page 40: Complexity Window
Applications Windows Table 3-11 Option HTTP Complexity Window The Complexity window provides options for configuring requirements for the IP camera administrator and user passwords. Table 3-12 describes the options in the Complexity window. Table 3-12 Option Password Check 1 Password Check 2 Password Check 3 Password Check 4 Applications Windows... -
Page 41: Mail & Ftp Window
Chapter 3 Configuring and Managing the IP Camera Mail & FTP Window When the IP camera detects an event, it can send an e-mail message to up to three designated recipients. The e-mail notifies recipients that an event occurred and provides access to video of the event. The Mail &... - Page 42 Applications Windows Table 3-13 Option SMTP Mail Server Authentication Account Name Password POP Server Name Secondary SMTP Server Secondary SMTP SMTP Mail Server Authentication Account Name Password POP Server Name E-Mail Setup Send To Show “From” as Subject E-mail Body Attach Video Streaming URL Address Primary FTP...
-
Page 43: Motion Detection Window
Chapter 3 Configuring and Managing the IP Camera Table 3-13 Option Port Login name Password File Path Name Enable Passive Mode Secondary FTP Secondary FTP FTP Server Port Login name Password File Path Name Enable Passive Mode Motion Detection Window The Motion Detection window allows you to configure up to three areas in a video field. -
Page 44: Motion Detection Window
Applications Windows Table 3-14 Option Full Screen Setting Custom Area Event Window The Event window provides options for configuring how the IP camera handles events. An event is either of the following: Motion that the IP camera detects. For related information about motion detection, see the •... - Page 45 Chapter 3 Configuring and Managing the IP Camera If you change any options in the Event window, except deleting an event from the event schedule list, you must click Save to save the changes. To discard the changes, click Cancel before clicking Save. These buttons appear at the bottom of the window.
-
Page 46: Snmp Window
Applications Windows Table 3-15 Option Actions Video Attachment These Video Attachment options appear if you enable the Trigger Event option and select the Note E-Mail or FTP option. Overwrite/Replace oldest video file when SDRAM is full Video Format (MPSG-4) Pre-Capture Length Post-Capture Length SNMP Window The SNMP window allows you to configure Simple Network Management Protocol (SNMP) settings for... -
Page 47: Alarm I/O Ports Window
Chapter 3 Configuring and Managing the IP Camera To display the SNMP window, access the configuration windows as described in the Initial Setup of the IP Camera” section on page If you change any options in the SNMP window, you must click Save to save the changes. To discard the changes, click Cancel before clicking Save. -
Page 48: Ptz (Rs-485) Window
Applications Windows Table 3-17 Option Alarm Input Settings Current Status Trigger Events When Alarm Output Settings Current Status Power On State Event Action Manual Control Settings Definition Mappings PTZ (RS-485) Window The PTZ (RS-485) window allows you to enable pan, tilt, zoom (PTZ) functions for the IP camera. These functions require that the IP camera be installed with a motorized zoom/focus lens in a pan/tilt mount that supports the Pelco D protocol. - Page 49 Chapter 3 Configuring and Managing the IP Camera If you change any options in the PTZ (RS-485) window, you must click Save to save the changes. To discard the changes, click Cancel before clicking Save. These buttons appear at the bottom of the window.
-
Page 50: Preset Positions Window
Applications Windows Table 3-18 Option Patrol Sequence Patrol Sequence Preset Positions Window If you click the Set Preset Position button in the PTZ (RS-485) window, as described in the Set Preset Position row in IP camera and provides options for configuring up to nine preset positions for the IP camera. To use the options that are in this window, the IP camera must be installed with a motorized zoom/focus lens in a pan/tilt mount that supports the Pelco D protocol. -
Page 51: Status Windows 3-31
Chapter 3 Configuring and Managing the IP Camera Table 3-19 Option Navigation Keys Focus Far button Focus Near button Set Home Preset List Preset Name Pan Speed Tilt Speed Status Windows The Status windows provide options for viewing and managing a variety of system information. The following sections describe the Applications windows in detail: System Window, page 3-32 •... -
Page 52: System Window
Status Windows System Window The System window displays information about the IP camera. To display the System window, access the configuration windows as described in the Initial Setup of the IP Camera” section on page To make sure that the System window shows the most current information, click the Refresh button. Table 3-20 describes the options in the System window. -
Page 53: Network Window
Chapter 3 Configuring and Managing the IP Camera Table 3-21 describes the options in the Audio/Video window. All options are for display only. This window is not currently supported if you use the IP camera with Cisco VSM. Note Table 3-21 Option MPEG-4 Settings 1 Resolution... -
Page 54: Syslog & Log Window
Status Windows Syslog & Log Window The Syslog & Log window lets you manage the IP camera log file, which captures and stores information about the IP camera and its activities. The IP camera captures the information that you specify and stores the log file in its internal SDRAM. If the SDRAM becomes full, the IP camera begins to overwrite existing information. - Page 55 Chapter 3 Configuring and Managing the IP Camera Table 3-23 Option Log List Log List pane Refresh Clear Log Table 3-24 describes the messages that can appear in the IP camera log file. When you view the log file, each message includes the date and time that it was logged. Table 3-24 Message System log messages.
- Page 56 Status Windows Table 3-24 Message LOG: Clear all messages. LOG: Log file is full. Start to wrap around. Network: Failed to get the IP address. Camera set to default IP address. Network: LAN activated. NTP: Failed to synchronize data & time with the NTP server.
-
Page 57: Video Log Window
Chapter 3 Configuring and Managing the IP Camera Table 3-24 Message System: Invalid upgrade file System: Reset to factory defaults. Web: Invalid login attempt. [id: User_ID, ip: Address] Web: User logged in to web UI. [id: User_ID, ip: Address] Web: User logged out from web UI. [id: User_ID, ip: Address] FTP log messages. -
Page 58: Video Log Window
Status Windows The IP camera stores video log files in its internal SDRAM. When the SDRAM becomes full, the IP camera stops storing additional video files or begins overwriting the oldest video files, depending on the setting of the Overwrite/Replace oldest video file when SDRAM is full option in the Event window. (See the “Event Window”... -
Page 59: Chapter 4 Viewing And Live Video
Viewing and Live Video After you install and set up the Cisco Video Surveillance IP Camera as described in Started,” users can connect to the IP camera through Internet Explorer and access the Home window to view live video from the IP camera. The home window also provides for controlling the video display and certain IP camera functions. -
Page 60: Viewing Video Through The Home Window Overview
Viewing Video through the Home Window Overview Figure 4-1 Digital zoom factor. For information about digital zooming, see the section on page IP camera date and time. You configure the date and time for the IP camera as described in the “Basic Setup Window”... -
Page 61: Home Window Controls
Chapter 4 Viewing and Live Video Home Window Controls The Home window provides controls for several IP camera features. the Home window. The IP camera administrator and users with the administrator or monitor privilege can access all IP Note camera, video display, and audio controls. Users with the viewer privilege can access video display and audio controls only. -
Page 62: Home Window Controls
Viewing Video through the Home Window Overview Table 4-1 Home Window Controls (continued) Control IP camera control buttons Focus far button Focus Near button Day button Night button Video display and audio controls Resolution drop-down list Digital Zoom button Cisco Video Surveillance System IP Camera User Guide Description To pan the IP camera, use the left or right arrow buttons. - Page 63 Chapter 4 Viewing and Live Video Table 4-1 Control Snapshot button Speaker Off toggle button Speaker On toggle button Speaker Volume slider Microphone Off toggle button Microphone On toggle button Microphone Sensitivity slider OL-14220-01 Home Window Controls (continued) Description Captures and saves a snapshot image of the current video image in the format and location of your choice, and with the file name of your choice.
-
Page 64: Viewing Video Through Third-Party Devices Or Software
Viewing Video through Third-Party Devices or Software Viewing Video through Third-Party Devices or Software You can allow users to access video streams from the IP camera through third-party mobile devices, or through the VLC media player or equivalent software. To do so, you must configure the RTSP Port option in the Advanced Setup window. This option enables the IP camera to receive Real-Time Streaming Protocol (RTSP) commands. - Page 65 Chapter 4 Viewing and Live Video Viewing Video through Third-Party Devices or Software Accessing the Secondary Stream by using Devices or Software other than VLC Player In the following command, replace ip_address with the IP address of the IP camera, and replace code with the Access Code that you configured for the secondary stream in the Video window.
- Page 66 Chapter 4 Viewing and Live Video Viewing Video through Third-Party Devices or Software Cisco Video Surveillance System IP Camera User Guide OL-14220-01...
-
Page 67: Chapter 5 Troubleshooting
Troubleshooting This chapter describes some common problems that may be encountered while using the IP camera and provides possible solutions. Cannot connect to an IP camera through a web browser. Symptom Possible Cause incorrect IP address for the IP camera, the PC that you are using is not on the same LAN as the IP camera, you are entering an invalid port number for an HTTP or HTTPS connection, or you are trying to access the IP camera from a device with an IP address that is restricted from access. - Page 68 The motion detection feature does not send e-mail alerts. Symptom Possible Cause camera uses to send the e-mail may be filtering e-mail to prevent spam from being sent from your server. Recommended Action page 3-5, the page 3-24. Try using a different SMTP server or contact your ISP to see if SMTP access is being blocked.
-
Page 69: Appendix
Using the IP Camera with Cisco VSM Cisco Video Surveillance Manager (VSM) is a suite of powerful and flexible video surveillance applications that interoperate with a wide range of devices and cameras to provide a complete, standards-based video surveillance solution. VSM consists of modules to manage, archive, view, and distribute video. -
Page 70: Obtaining The Required Driver Pack
Obtaining the Required Driver Pack Table A-1 Feature SNMP window Status windows This appendix includes the following sections. Review this information before using the IP camera with VSM. • Obtaining the Required Driver Pack, page A-2 Guidelines for Using the IP Camera with VSM, page A-2 •... -
Page 71: Troubleshooting The Ip Camera When Used With Vsm
Appendix A Using the IP Camera with Cisco VSM Troubleshooting the IP Camera when used with VSM If you experience difficulty when using the IP camera with VSM, refer to these troubleshooting guidelines: If you are using the Cisco Video Surveillance Operations Manager, it may take a few attempts to •... -
Page 72: Troubleshooting The Ip Camera When Used With Vsm
Appendix A Using the IP Camera with Cisco VSM Troubleshooting the IP Camera when used with VSM Cisco Video Surveillance System IP Camera User Guide OL-14220-01... -
Page 73: I N D E X
action configuring 3-26 overview 3-24 triggered by event 3-24 ActiveX controls 3-23 activity indication Activity LED Administration windows 3-10 Administrator user type configuring 3-11 description 3-10 password recovering setting 3-11, 3-19 user name 3-11 Advanced Setup window options overview Alarm I/O Ports window options 3-28 overview... - Page 74 Index overview requirements configuration, of IP camera backing up 3-12 copying to camera 3-12 saving 3-12 uploading 3-12 configuration windows accessing Administration windows 3-10 Advanced Setup window Alarm I/O Ports window 3-27 Applications windows 3-20 Audio/Video windows 3-14 Audio window 3-17 Basic Setup window Complexity window...
- Page 75 e-mail notification configuring 3-22 enabling 3-26 From field 3-22 FTP server link 3-21, 3-22 log file 3-37 of event 3-21 primary FTP server 3-22 recipients list 3-22 secondary FTP server 3-23 Subject field 3-22 video file attachment 3-21 event actions 3-24 configuring 3-25...
- Page 76 Index HTTPS accessing camera through alternative port default port I/O ports See input ports, and see output ports Image window options 3-33 overview 3-32 Initialization window options 3-19 overview 3-19 input device, connecting input ports connecting devices to event trigger state 3-28 on IP camera state change...
- Page 77 overview Kensington lockdown equipment LAN port Activity controlling operation of disabling enabling Network Ready lens attaching to IP camera C mount CS mount DC auto iris 1-3, 2-2 for IP camera type live video controlling through Home window viewing through Home window through home window through third-party device or software See also video...
- Page 78 Index Motion Detection window options 3-24 overview 3-23 mounting, IP camera multicast audio address audio port enabling video address video port muting PC microphone PC speaker name, of IP camera 3-5, 3-32 network activity type 3-33 viewing information about 3-33 Network LED Network window options...
- Page 79 moving IP camera to Preset Positions window options 3-30 overview 3-30 privilege level, for users 3-11 processes descriptions 3-19 stopping 3-19 Product Process window options 3-19 overview 3-19 Baud rate 3-29 configuring 3-29 data bits 3-29 enabling external control of 3-29 logical address of controlling device pan speed...
- Page 80 Index primary 3-21 secondary 3-22 snapshot, of video image SNMP, configuring 3-26 SNMP window options 3-27 overview 3-26 speaker enabling 3-18 external 1-4, 3-17 installing SSH, allowing access through 3-20 Status windows 3-31 steps, in a sequence 3-30 stop bits, for PTZ 3-29 subnet mask, of IP camera Syslog...
- Page 81 primary stream 3-14, 4-6 quality 3-14 resolution 3-14, 3-33, 4-4 saturation 3-16 secondary stream 3-14, 3-15, 4-6 sharpness 3-16 stream 1 settings 3-14 stream 2 settings 3-15 text overlay 3-16 time stamp on 3-16 viewing live through Home window 4-1, 4-3 through third-party device or software See also live video video file...
- Page 82 Index Cisco Video Surveillance System IP Camera User Guide IN-10 OL-14220-01...
Need help?
Do you have a question about the CIVS-IPC-2500 and is the answer not in the manual?
Questions and answers