Table of Contents
Advertisement
Quick Links
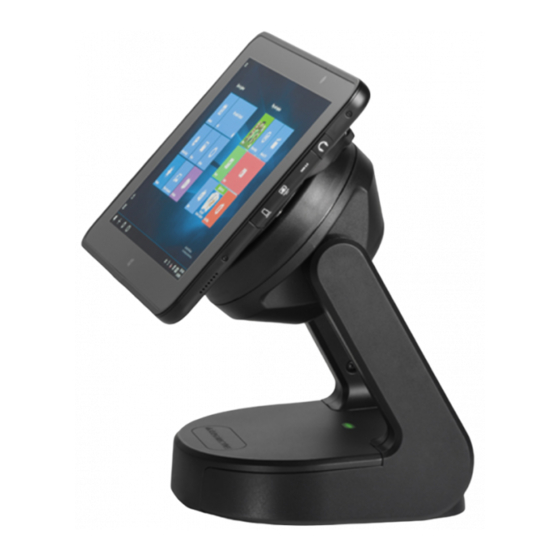
OVERVIEW
RapidDoc
Cable Access
(C.A.)
C.A. Cover
(Minimal Cables)
Nut
www.MTIGS.com | T:801.653.3807
-CONTROLLED DOCUMENT-
®
Kiosk
C.A. Cover
(No Cables)
Mounting
Plate
185-00528 Through-Hole Mounting Accessory (Sold separately)
Adhesive
Pad
063-00180
®
PRO KIOSK INSTALLATION GUIDE
RAPIDDOC
Materials in Box
Use only power supply with output ratings 24VDC
max., 2.7A max., of PS2 or LPS
"If the Kiosk is not mounted to a
counter or table it may fall," causing
damage to the Kiosk or a person.
USB cables may be disconnected as
it moves around a surface. See page
9 for mounting instructions.
The applied nameplate is located at
the bottom of the product.
Equipment is only suitable for
mounting at heights < 2 meters.
(2) Security Screws,
Metric, M4 X 10mm
Round Hd, Torx, W/Lock Washer
(4) Mounting Screws,
6 X 5/8",100º
Flt Hd Phl, Zinc
Threaded
Pipe
PSA with paper
release liner this
surface only.
E-0
Status: Approved
The socket-outlet (power adaptor) shall
be installed near the EQUIPMENT and
shall be easily accessible.
Alcohol Wipes (10)
Red Handle Tool
Access Card (5)
Authorization Card
stolen, contact
See page 9 for mounting
instructions.
(5) Screws
M3x8mm Long,
Flat-Head-Phil
MTI P/N 063-00180 rev E ©2021 MTI All Rights Reserved
ECO-112676
If lost or
customer
service for
replacement.
1
Advertisement
Table of Contents

Subscribe to Our Youtube Channel
Related Manuals for MTI RAPIDDOC PRO KIOSK

Summary of Contents for MTI RAPIDDOC PRO KIOSK
- Page 1 See page 9 for mounting instructions. (5) Screws Adhesive Threaded M3x8mm Long, Pipe Flat-Head-Phil PSA with paper release liner this surface only. www.MTIGS.com | T:801.653.3807 MTI P/N 063-00180 rev E ©2021 MTI All Rights Reserved -CONTROLLED DOCUMENT- 063-00180 Status: Approved ECO-112676...
-
Page 2: Removing The Lid
Tuck the RFID cable into the void in the base and Slide the lid into place and press down on the lid. place the lid on the kiosk base. www.MTIGS.com | T:801.653.3807 MTI P/N 063-00180 rev E ©2021 MTI All Rights Reserved -CONTROLLED DOCUMENT- 063-00180 Status: Approved... -
Page 3: Baseplate Mounting
Secure the kiosk to the mounting plate using the two clockwise on the plate. security screws and the Red Handle Tool. www.MTIGS.com | T:801.653.3807 MTI P/N 063-00180 rev E ©2021 MTI All Rights Reserved -CONTROLLED DOCUMENT- 063-00180 Status: Approved ECO-112676... -
Page 4: Cable Routing
Peel the film on the VHB on the adhesive contact. Allow 24 hours for full VHB adhesion. bottom of the kiosk. www.MTIGS.com | T:801.653.3807 MTI P/N 063-00180 rev E ©2021 MTI All Rights Reserved -CONTROLLED DOCUMENT- 063-00180 Status: Approved... - Page 5 If a 21st card is registered, the first regis- tered card will be deregistered. IF AUTHORIZATION CARD IS LOST OR STOLEN, CONTACT CUSTOMER SERVICE FOR REPLACEMENT. www.MTIGS.com | T:801.653.3807 MTI P/N 063-00180 rev E ©2021 MTI All Rights Reserved -CONTROLLED DOCUMENT- 063-00180 Status: Approved ECO-112676...
- Page 6 Turn the Red Handle Tool clockwise until resistance is felt (about halfway) and hold. NOTE: Do not grab the tablet until after you twist the Red Handle Tool. www.MTIGS.com | T:801.653.3807 MTI P/N 063-00180 rev E ©2021 MTI All Rights Reserved -CONTROLLED DOCUMENT- 063-00180 Status: Approved...
-
Page 7: Led Status Indicators
If an Access Card is swiped more than 10 times within 2 minutes, the LED will flash Red and not allow undock attempts for 2 minutes. www.MTIGS.com | T:801.653.3807 MTI P/N 063-00180 rev E ©2021 MTI All Rights Reserved -CONTROLLED DOCUMENT- 063-00180 Status: Approved... - Page 8 Customer Service. Example: Example: ACCESS006 ACCESS005 IF AUTHORIZATION CARD IS LOST OR STOLEN, CONTACT CUSTOMER SERVICE FOR REPLACEMENT. ACCESS004 ACCESS002 ACCESS001 www.MTIGS.com | T:801.653.3807 MTI P/N 063-00180 rev E ©2021 MTI All Rights Reserved -CONTROLLED DOCUMENT- 063-00180 Status: Approved ECO-112676...
-
Page 9: Mounting Plate Template
Print this document at 100% (or ‘Actual Size’) to assist in placing the RapidDoc ® Mounting Plate. Drill Hole FRONT 3” hole for Optional 3.9376 in Through-Hole Mounting Accessory 3.9376 in www.MTIGS.com | T:801.653.3807 MTI P/N 063-00180 rev E ©2021 MTI All Rights Reserved -CONTROLLED DOCUMENT- 063-00180 Status: Approved ECO-112676... - Page 10 Lock the security screws and the Red Handle Tool. kiosk into place by rotating it counter clockwise on the plate. www.MTIGS.com | T:801.653.3807 MTI P/N 063-00180 rev E ©2021 MTI All Rights Reserved -CONTROLLED DOCUMENT- 063-00180 Status: Approved ECO-112676...
- Page 11 PS2 ou LPS La prise de courant (adaptateur secteur) doit être installée près de l’ÉQUIPEMENT et doit être facilement accessible. www.MTIGS.com | T:801.653.3807 MTI P/N 063-00180 rev E ©2021 MTI All Rights Reserved -CONTROLLED DOCUMENT- 063-00180 Status: Approved ECO-112676...
Need help?
Do you have a question about the RAPIDDOC PRO KIOSK and is the answer not in the manual?
Questions and answers