Advertisement
Quick Links
Assembly Instructions
Instructions de montage
CONTACT US FIRST
WEBSITE
www.prepacmfg.com/content/replacement-part-order
Complete our easy to use order form
BY EMAIL
parts@prepacmfg.com
BY PHONE
1-877-PREPAC1 (1-877-773-7221)
Mon - Fri: 7am - 4pm PST / 10am - 7pm EST
•
If you have received a damaged or defective part
•
If you are missing hardware or parts
•
For help with assembly
Replacement parts will leave our facility within two business days via UPS
ground or mail. Please note: shipping times will vary depending on location.
Before you call please:
1)
Record the following information from the shipping label on the outside
of the box. You will need it for warranty purposes:
•
Ship To Name
•
Sales Order Number
2)
Note the product model number.
3)
Review the contents of your shipment to determine
what you are missing.
Option de service en ligne
Complétez le formulaire Commande de Pièces de Rechange disponible dans la
section Soutien à la clientèle de notre site web : www.prepacmfg.com
•
Si vous avez reçu une pièce endommagée ou défectueuse
•
Si vous manquez la quincaillerie ou les pièces
Les pièces de rechange quitteront notre installation dans deux jours ouvrables via
UPS par terre ou le courrier. Notez s'il vous plaît que les temps d'expédition varieront
selon l'emplacement.
Pour parler avec quelqu'un en français, s'il vous plaît contacter votre détaillant.
Required Tools / Outils requis
Prepac Manufacturing Ltd.
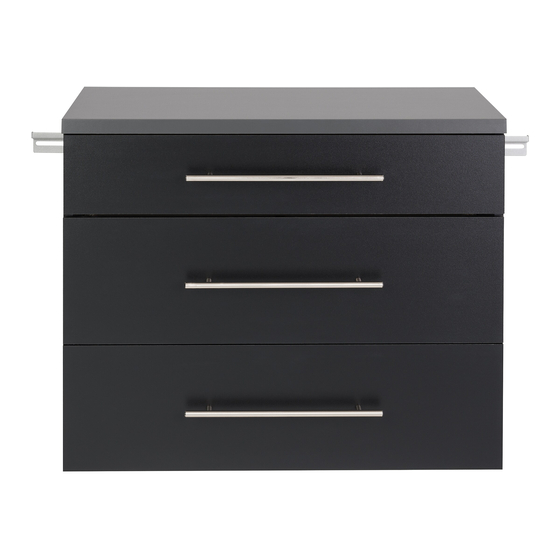
30" Wide 3-Drawer Base Cabinet
Le meuble tablette accrochable à 3 tiroirs
Model #
7/32" inch diameter
7/32 de pouce de diamètre
BSCW-0730-1
GSCW-0730-1
WSCW-0730-1
Installation requires 2 people
L'installation exige 2 personnes
(3/16th size can also be used)
(3/16
taille peut également être utilisé)
ième
Stud Finder
Détecteur de montant
Detector de travesaños
LB-0741 2021-06-09
Advertisement

Related Manuals for Prepac BSCW-0730-1


Summary of Contents for Prepac BSCW-0730-1
- Page 1 Pour parler avec quelqu’un en français, s’il vous plaît contacter votre détaillant. Required Tools / Outils requis Stud Finder 7/32” inch diameter (3/16th size can also be used) Détecteur de montant 7/32 de pouce de diamètre (3/16 taille peut également être utilisé) ième Detector de travesaños LB-0741 2021-06-09 Prepac Manufacturing Ltd.
- Page 2 Cabinet Parts / Pièces du cabinet Top (1) Gable (1) Left Side (1) Right Side (1) Dessus Pignon Côté gauche Côté droit TP-10180-B black / noir GA-10057 SL-10057-B black / noir SR-10057-B black / noir TP-10055-G gray / gris unfinished / non-fini SL-10057-G gray / gris SR-10057-G gray / gris SL-10057-W white / blanc...
- Page 3 Drawer Parts / Pièces des tiroires RM-0921 Small Metal Drawer Sides Petit tiroir métallique côté Small Cabinet Slides Left & Right Drawer Front Bracket Petite abinet glisse Tiroir gaurche et droit support avant RM-0921 RM-0921 Small Metal Drawer Box (1) Métal petite boîte de tiroir (1) Includes: Comprend :...
- Page 4 Hardware / Quincaillerie Metal Rail (1) Rail métallique RM-0924 Allen Key (1) Clef “Allen” Metal Connecting RM-0313 Brace (1) Raccordement métallique renfort RM-0905 Metal Pull & Screw Set (3) Allen Key Bit (1) Poignée métallique & Jeu Clef “Allen” mèche de vis RM-0923 RM-0906...
- Page 5 Insert cams into the top of the Left (C3) Attach Rail Hooks to the Left (C3) and Right (C4) and (C4) Right Sides Sides as shown. Use wrench to tighten nuts. Insérez des cames dans les côtés Fixez les crochets de suspension aux côtés gauche (C3) et droit (C4).
- Page 6 Insert cams into the Upper Stabilizer (C5) Insérez des cames dans la renforcement supérieure (C5). Insert cams with the opening facing toward the hole for the twister dowel. Insérez les cames dans l’ouverture fai- sant face au trou du goujon à visser. Attach Gable (C2) to Upper Stabilizer (C5) with Confirmat Screws Fixez le pignon (C2) et renforcement supérieure (C5) avec les Vis Confirmat Page 6 of 20...
- Page 7 Attach drawer slides to Left (C3) and Right (C4) Sides with Euro Screws Euro Screw Attachez les cabinet glisse aux côtés Vis “Euro” gauche (C3) & droit (C4) avec les Vis Euro Small Cabinet Slides at the top Petit cabinet glisse en haut Green Twister Dowel Goujons verts...
- Page 8 Attach Upper Stabilizer (C5) to Left (C3) and Right Attach Lower Stabilizer (C6) to Left (C3) and Right (C4) Sides and tighten cams (C4) Sides with Confirmat Screws Fixez le renforcement supérieure (C5) aux côtés Fixez le renforcement inférieure (C7) aux côtés gauche (C3) et droit (C4) avec les Vis Confirmat gauche (C3) et droit (C4) avec les Vis Confirmat Tightening Cams...
- Page 9 Insert green twister dowels into Top (C1) Insérez les goujons verts à visser dans le dessus (C1) Green Twister Dowel Goujons verts à visser Tightening Cams Pour serrer les cames Attach the Top (C1) and tighten cams. Attachez le dessus (C1) et serrez les cames. Unlocked Locked Déverrouillées...
- Page 10 The following steps apply to both large and small drawers Les étapes suivantes s’appliquent à la fois aux grands et petits tiroirs Wood Dowel Insert wood dowels into small (D3) and Goujons de bois large (D8) drawer fronts Insérez les goujons de bois en avant de tiroir petit (D3) et grand (D8) Attach the bracket to the drawer front AS SHOWN BELOW...
- Page 11 Slide the small (D2) and large (D7) drawer bottoms toward the bottom of the drawer sides until they connect with the metal frame. The two metal tabs on each drawer side go into the holes on the drawer bottom. The wood dowels will remain uncovered Faites glisser la petite (D2) et de grande taille (D7) tiroir bute vers le fond du tiroir côtés jusqu’à...
- Page 12 Attach handels with screws provided Fixez les poignées avec vis fournies Inserting Drawers Insertion de tiroirs We recommend inserting drawers AFTER you complete the wall mounting steps in the next section. Nous recommandons d’insérer les tiroirs APRÈS que vous avez terminé le montage mural étapes dans la section suivante.
- Page 13 L’AIDE EN LIGNE To see a how-to installation video, click on Pour visionner le vidéo décrivant l’installation “How to Install Prepac’s Garage Storage rangement de garage de suspension, consultez Collection” on the Assembly page in the la page de Soutien Produits sur notre site web : Support section of our website: www.prepacmfg.com/content/assembly...
- Page 14 Hanging Multiple Cabinets Pour suspendre plusieurs armoires We will illustrate how hang multiple cabinets using the Nous allons illustrer comment accrocher plusieurs armoires à sample configuration below. partir de l’exemple de configuration ci-dessous. 1. On your wall, mark where the cabinets will be 1.
- Page 15 The illustration below shows where the Metal Rails & L’illustration ci-dessous montre où les rails métalliques & Connecting Braces should be attached to the wood la connexion les accolades ne doivent être connectés au studs for this configuration bois goujons pour cette configuration NOTE: Rails and Braces are shown ABOVE cabinets REMARQUE : Les rails et les accolades sont indiqués for clarity...
- Page 16 Installing Hang Ups Garage Cabinets Installation “Hang Ups” Garage armoires For Base Cabinets, measure 31½ inches from the floor and make multiple marks along the wall Pour armoires de base, mesurer 31½ pouces du sol et faire plusieurs repères le long du mur 31½...
- Page 17 Find the center of the wall studs and mark the location of each stud along the line. Studs are typically 16 inches apart center to center. Trouver le centre du mur et marquer l’emplacement de chaque goujon le long de la ligne. Les goujons sont générale- ment de 16 centimètres l’un de l’autre centre à...
- Page 18 Hang the First Rail Attach the Connecting Brace Accrocher la première position de Rail Fixez le renfort reliant Position the Metal Rail over the pre-drilled holes and Position the Connecting Brace so that it overlaps the insert wood screws into the first & second holes. last hole on the First Metal Rail.
- Page 19 Hanging the Second Rail Accrocher le deuxième position de Rail Slide the second Metal Rail BEHIND the Faites glisser le Rail Métallique deuxième derrière le Connecting Brace connectant le renfort Secure the Connecting Brace to the Sécuriser la connexion renfort pour le deuxième rail Second Rail Page 19 of 20...
- Page 20 Carefully hang the cabinet onto the Metal Rail until it locks into place. Laisser pendre soigneusement le cabinet sur la rail métallique jusqu’à ce qu’elle se verrouille en place. Make sure the Rail Hook slides fully into the notch on the Metail Rail Track. Assurez-vous que le crochet de Rail de diapositives pleinement dans l’encoche du Metail voies de chemin de fer.
Need help?
Do you have a question about the BSCW-0730-1 and is the answer not in the manual?
Questions and answers