Advertisement
Quick Links
Assembly Instructions
Instructions de montage
CONTACT US FIRST
WEBSITE
www.prepacmfg.com/content/replacement-part-order
Complete our easy to use order form
BY EMAIL
parts@prepacmfg.com
BY PHONE
1-877-PREPAC1 (1-877-773-7221)
Mon - Fri: 7am - 4pm PST / 10am - 7pm EST
Required Tools / Outils requis
Caution
Do not over tighten any screw. The last few turns of each screw
should be done very slowly or by hand.
Attention
Évitez de trop serrer les vis. Ralentissez la vitesse de la foreuse pour
les derniers deux tours de vis ou vissez-les lentement à la main.
Prepac Manufacturing Ltd. 6705 Dennett Place, Delta, BC V4G 1N4
Optional Tools:
Using a power screwdriver
will speed up assembly.
Outils facultatifs
Utilisant la puissance
un tournevis accélérera
l'assemblée.
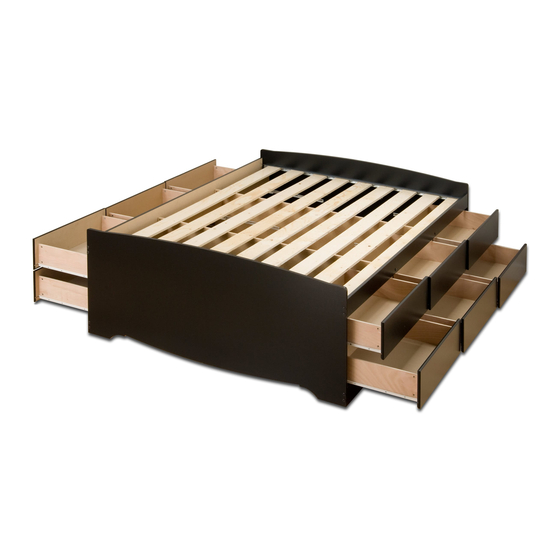
Tall Queen Captain's Platform
Storage Bed with 12 Drawers
Base de lit capitaine haute à
douze tiroirs, pour grand lit
Model / Modèle # BQ-6212-3K
We Can Assist
•
If you have received a damaged or defective part
•
If you are missing hardware or parts
•
For help with assembly
Replacement parts will leave our facility within two business
days via UPS ground or mail. Please note: shipping times will
vary depending on location.
Before you call or email, please:
1)
Record the following information from the shipping label
on the outside of the box. You will need it for warranty
purposes:
•
Ship To Name
•
Sales Order Number & Retailer Name
2)
Note the product model number.
3)
Review the contents of your shipment to determine
what you are missing.
Option de service en ligne
Complétez le formulaire Commande de Pièces de Rechange
disponible dans la section Soutien à la clientèle de notre site web :
www.prepacmfg.com
•
Si vous avez reçu une pièce endommagée ou défectueuse
•
Si vous manquez la quincaillerie ou les pièces
Les pièces de rechange quitteront notre installation dans deux jours
ouvrables via UPS par terre ou le courrier. Notez s'il vous plaît que
les temps d'expédition varieront selon l'emplacement.
Pour parler avec quelqu'un en français, s'il vous plaît
contacter votre détaillant.
LB-1124 2020-04-03
Advertisement

Subscribe to Our Youtube Channel
Related Manuals for Prepac BQ-6212-3K


Summary of Contents for Prepac BQ-6212-3K
- Page 1 Évitez de trop serrer les vis. Ralentissez la vitesse de la foreuse pour Pour parler avec quelqu’un en français, s’il vous plaît les derniers deux tours de vis ou vissez-les lentement à la main. contacter votre détaillant. Prepac Manufacturing Ltd. 6705 Dennett Place, Delta, BC V4G 1N4 LB-1124 2020-04-03...
- Page 2 Bed Hardware / Quincaillerie de Lit 50 mm JCB Bolt (24) JRN Nut (24) T-Spacers (48) Drawer Slide Screw (162) Allen Key Boulon JCB 50 mm Écrous JRN Vis pour coulisse de tiroir Clé Allen Entretoise de “T” RM-0814 black / noir / negro RM-0312 RM-0074 RM-0313...
- Page 3 Bed Parts / Pièces de lit See page 12 for Drawer Parts Voir le page 12 pour les pièces de tiroir Outer Gables (2) Inner Gables (2) Upper Stabilizer (2) Lower Stabilizer (2) Plywood Slats (9) Metal U-channel Pignons extérieurs Pignons intérieurs Stabilisateur supérieur Stabilisateur inférieur...
- Page 4 Attach metal U-channels to each outer gable using drawer slide screws Attachez les chaînes en métal d’ « U » à chaque pignon extérieur en utilisant des vis de glissière de tiroir HAUT Note: In the center of the U-channels there are two pairs of holes.
- Page 5 Attach drawer glides to T-spacers on outer gables Attachez les glissières de tiroir aux en- as shown in the photo tretoises de « T » sur les pignons intérieurs. Position the Drawer Glides with: Place les glissières de tiroir avec : A) The wheel at the finished side A) La roue sur le côté...
- Page 6 Insert JRN nuts into the holes on each end of the inner gables. (B2) The holes are drilled through. You can insert them from either side. Insèrez les écrous de JRN dans les trous sur chaque extrémité des pignons intérieurs. (B2) Les trous sont forés à...
- Page 7 Insert JRN nuts into the holes on each end of the upper (B3) and lower (B4) stabilizers. Insérez les écrous de JRN dans les trous sur chaque fin du supérieur (B3) et inférieur (B4) stabilisateurs. Identifying the upper and lower stabilizers Identifier les stabilisateurs supérieur et inférieur Upper Stabilizer Upper Stabilizer...
- Page 8 Attach “T” spacers and drawer glides to Inner Gables Attachez les entretoises d’ et les de tiroir aux pignons intérieurs « T » Attach “T” spacers to ONE side of each inner gable with drawer slide screws Attachez les entretoises d’ à UN côté de chaque pignon intérieurs avec les vis de de tiroir Attach drawer glides to “T”...
- Page 9 Using JCB connectors, and the Allen Key provided, attach each lower stabilizer (B4), one at a time, to both inner gables En utilisent les connecteurs de JCB, et la clef d’Allen fournie, attachez chaque stabilisateur inférieur (B4), un à la fois, aux deux pignons intérieurs AU DESSOUS de la glissière de tiroir Finished Edge Côté...
- Page 10 Using JCB connectors, attach each upper stabilizer (B3), one at a time, to both inner gables. En utilisent les connecteurs de JCB, et la clef d’Allen fournie, attachez chaque stabilisateur supérieur (B3), un à la fois, aux deux pignons intérieurs. Top edge (FINISHED) is rounded Bord supérieur...
- Page 11 Attach one outer gable (B1) to stabilizers with JCB connectors Attachez un pignon extérieur aux stabilisateurs avec des connecteurs de JCB JRN Nut 50 mm JCB Bolt Écrous JRN Boulon JCB 50 mm Page 11 of 20...
- Page 12 Lay the four metal braces, as shown, with the bend resting on top of the inner gables Étendez les quatre croisillons en métal, comme montré, avec la courbure se reposant sur les pignons intérieurs Find the pre-drilled holes on the inner gables and secure the bent end of each metal brace to the inner gables with the small black screw (#8 - 9/16”...
- Page 13 Secure the other (flat) end of the metal brackets to U-channel. Fixez l’autre extrémité (d’appartement) des parenthèses en métal au profilé en « U » Position the flat end of the metal brace under the hole on the BOTTOM edge of the Uchannel. Push the outer gable toward the center of the bed until holes line up.
- Page 14 Spread the wooden slats out across the inner stabilizers. Etendre les lamelles en bois à travers les stabilisateurs intérieurs. Slide the slats into the wide spaces of the metal U-channel (B6) on one outer gable. Remember that one set of metal braces are still loose on one end. Glissez les lamelles dans les espaces larges du profilé...
- Page 15 Attach second outer gable to stabilizers with JCB connectors Attachez le deuxième pignon externe aux stabilisateurs avec des connecteurs de JCB Secure the gable in place with connectors, but don’t fully tighten Fixez le pignon en place avec des connecteurs, mais ne serre pas entièrement Ensure the slats are set inside the u-channel and that they haven’t pulled out of the first outer gable.
- Page 16 How to Correct a Bed that is “Out of Square” Comment corriger un lit “hors du carré” After you’ve assembled your bed, you may discover that one or more of you drawers do not close properly. This means your bed is “out of square” Une fois que vous avez monté...
- Page 17 Assemble Drawers Montez les tiroir Drawer Parts Pièces de tiroir Drawer Front (12) Left Drawer Side (12) Right Drawer Side (12) Drawer Back (12) Drawer Bottom (12) Devant du tiroir Côté gauche du tiroir Côté droit du tiroir Arrière du tiroir Fond du tiroir DF-10012-B Lado del cajón izquierdo...
- Page 18 Drawer Slide Screw Vis pour coulisse de tiroir Front Devant Small Zinc Cam Petite ferrure en zinc Page 18 of 20...
- Page 19 Page 19 of 20...
- Page 20 #8 - 1½” Screws Vis no.8 - 1½ po. Groove on drawer front & back Cannelure sur l’avant & l’arrière de tiroir Drawer Bottom Stabilizer Stabilisateur inférieur de tiroir Page 20 of 20...
Need help?
Do you have a question about the BQ-6212-3K and is the answer not in the manual?
Questions and answers