GigaPan EPIC Pro User Manual
Hide thumbs
Also See for EPIC Pro:
- User manual (58 pages) ,
- User manual (56 pages) ,
- User manual (49 pages)
Advertisement
Available languages
Available languages
Quick Links
Advertisement

Subscribe to Our Youtube Channel
Related Manuals for GigaPan EPIC Pro


Summary of Contents for GigaPan EPIC Pro
- Page 3 1。はじめに.---------------------------------------------------------- 1 1.1 GigaPanソリューション--------------------------------------- 1 1.2 GigaPan EPIC Proの部品-------------------------------------- 3 1.3 EPIC Proの特別な機能----------------------------------------- 5 1.4EPIC Proメニュー------------------------------------------------ 6 1.5 EPIC Proクイックメニューを設定--------------------------14 1.6電子シャッターケーブルの互換性-------------------------- 17 2。GigaPan EPIC Proの設定----------------------------------- 17 2.1機器の準備-------------------------------------------------------- 17 2.2バッテリの充電-------------------------------------------------- 17 2.3EPIC Proを三脚に載せ方-------------------------------------- 19 2.4カメラとレンズの載せ方-------------------------------------- 21 2.5(欠落) 2.6カメラの設定----------------------------------------------------- 21 2.7カメラとEPIC Proの調整-------------------------------------- 22 2.8マニュアル又はオートフォーカスの設定----------------- 23...
- Page 4 4.4微速度撮影/シリーズ ----------------------------36 4.5設定内容のセーブ/ロード----------------------------37 4.6 Last Pic Hold--------------------------------37 4.7 Shutter Feedback - ---------------------------38 5 パノラマ写真のステッチ、アップロード------------- 39 5.1GigaPanスティッチで作成しアップロードする---------- 39 5.2パノラマをオンラインで共有 -------------------------------- 42 6.エクスペリエンスGigaPan.com ------------------------- 45 6.1パノラマを見る-------------------------------------------------- 45 6.2パノラマを埋め込む-------------------------------------------- 46 6.3 Google Erthにパノラマをアップロードする------------ 47 7。トラブルシューティング----------------------------------- 50 7.1写真がぼやけている--------------------------------------------- 50 7.2写真はフィールドの幅が狭い--------------------------------- 51 7.3最初の撮影をミスり、露出が悪い--------------------------- 52 7.4電子シャッターケーブルで、 カメラのシャッターを作動しな...
- Page 5 8 ヒントとトリック-----------------------------------------------56 1。はじめに 1.1 GigaPanソリューション GigaPanで見事なギガピクセルの画像をキャプチャすること が簡単にできます。統合された機器、ソフトウェア、およびウ ェブサイトの完全なソリューションです。 Giga Pan EPIC Proは、Giga Pan Stitchソフトウェアおよび Giga Pan.comへのアップロード、 ギガピクセルパノラマの共有 とシームレスにつながります。 世界各地から驚くべきGiga Panビューアを使用して見事な パノラマが何千も投稿されています。 参加Giga Pan.comを表示し、友達と共有し、あなた自身のウェ ブサイト上でスナップショットを埋め込むパノラマ作ってくだ さい。 4つのステップで簡単に楽しくGigaPanシステムを使えます。 1。シーンをピックアップ Giga Pan EPIC Proは、パノラマの選択したシーンの画像の 何百枚も撮影するプロセスを自動化します。 2。クリック...
- Page 6 Giga Pan EPIC Pro はシーンの写真の連続撮影を自動コント ロールします。。 3 スティッチ Giga pan スティッチソフトウェアは、 個々のイメージを組み 立て、整列し、ブレンドし、1 つの大パノラマにします。 4。共有する Giga Pan スティッチソフトウェアは、Giga Pan.com を共有 する友人や Giga Pan コミュニィティーにあなたのパノラマを アップロードします。...
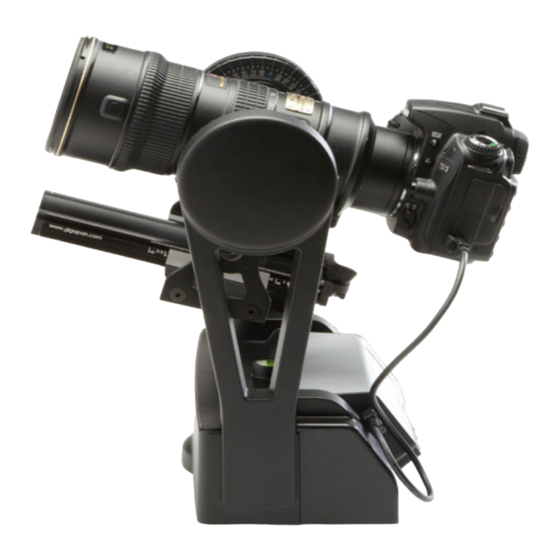
- Page 8 1.2 GigaPan EPIC Proの部品 Size: 10-5/8" x 11-7/8" x 5-7/8" (27.12cm x 30.25cm x 15 cm)
- Page 9 どのようにカメラやレンズをEPIC Proセットし調整するの かEPIC Proの詳細について第2章を参照してください。 EPIC Pro 本体 –カメラマウントホルダー- Camera Rail カメラを取り付けプレートを前方又は後方にカメラとレンズ のサイズに応じた調整をすることができます。 Rail Adjustment Knob-レール調整ノブ -...
- Page 10 カメラとレンズを取り付ける時は、カメラレール移動させる ノブを緩めたり、締めつけたりする。 Platform-カメラ取付プラットフォーム – Camera Mounting お使いのカメラに対応するため上下に調整することができま す。 Platform Thumbscrews-プラットフォーム取り付けネジ 緩めたり、カメラを移動するための締め取り付けプラットフ ォームです。 Camera Mounting Plate-マウント用プレート カメラやレンズをEPIC Pro上にマウントするアタッチメン ト。 Camera Mounting Plate Lever-マウント用プレートレバー 安全な場所にカメラを取り付け、プレートを保持します。レ バーの下の小さな銀ピンを回して、取り付けプレートを、カメ ラを解放するためにレバーを時計回りに回転させます。 EPIC Pro-メニュー画面 Navigation panel- メニューを操作するための液晶ディスプレイと方向ボタンが 含まれます。 -三脚にEPIC Proをつけます。 Tripod Mount (3/8インチと1/4インチのアダプターネジ) Level-EPIC Pro-水準器- Bubble 三脚上でのレベルを示します。...
- Page 11 -液晶ディスプレイ – LCD Display EPIC Proメニューが表示されます -方向キー – Directional Keys 上、下、左、または右のボタンでEPIC Proのメニューの項目 を選択する。またはパノラマ撮影のカメラの移動を左右、上下 のバラメーターから選択します。 Cancel Button –キャンセルボタン- EPIC Proメニュー内の設定をキャンセルします。 Power/OK Button –電源/OKボタン- EPICPro の電源をONまたはOFFにするために、数秒間押し 続けます。またはメニューから項目を選択するために使用しま す。 Trigger cable port –シャッターケーブルホ゜ート- 電子シャッターケーブルを使用して、シャッター作動す。オ ートフォーカスを使用している場合オートフォーカスが作動し ます。 Remote trigger port –リモートシャッターポート- EPIC Pro では2.5mmのステレオミニプラグのポケットウィ ザードまたはワイヤレスシャッターを使用します。...
- Page 12 眼レフカメラで動作します。 Large lenses are supported –大規模なレンズをサポート- 大規模なレンズをサポートしています 。 カメラと、 レンズの 組み合わせ最大4.5kgでEPIC Proを使用することができます。 Precision accuracy –高精度- 多彩なカメラとレンズの組み合わせが持つノーダルポイント を合わせるためにカメラを前後上下に簡単に移動させることが 出来きます。 --クイック設定 – Quick set up 簡単にEPIC Proを三脚に固定します。 標準三脚に1/ 4"また は3 / 8"固定。水平方向の配置のオンボード螺子。 Clear and simple to navigate menu -単純明快なメニュー設定- アクセス頻度の高いボタンなど、カメラを移動したり、シャ ッターの遅延設定の持つ関数を使用します。画面の高いバック アップが点灯表示に表示されます。...
- Page 13 Strong and durable yet lightweight –軽量高耐久性 マグネシウムシャシーとアルミ製アームとの優れたデザイン、 バッテリーパックとはEPIC Proの本体重量3.6kg未満。 特別機能 Rechargeable battery pack (7.2V, 4300mAH) included-充電式バ ッテリーパック(7.2V、4300mAH)を含みます。 EPIC Proにバッテリーいれたまま充電できる、また便利にも 撮影しながら充電できる。充電器を付属しています。 -複数のシャッターオプション – Multiple triggering option EPIC Proは、各イメージの場所で露出ブラケット撮影最大20 枚または複数のイメージ写真を撮ることができます。 -運動最適化の範囲 – Optimized range of motion 水平360゜と垂直-65~+90゜範囲を高精度で動きます。 (プレートが邪魔しない設定なら-90゜~+90゜範囲が可能) --リモートシャッターポート – Remote trigger port キヤノンE3タイプのコネクタ(非付属品)で別の場所からリモ...
- Page 14 エクスポージャーの間の時間は、事前のシャッタ遅延、フォ ーカスアサーションの時間 (シャッターの長さ) 、 モータの速度、 アスペクト比と画像の重なりを調整できます。 。 1.4 Navigate the EPIC Pro Menu 電源/ OKボタンを押してEPIC Proを稼働させて下さい。最初 のメニューオプションは、 「 新しいパノラマ」 、 と表示されます。 他のメニューオプションは、DOWNボタンを押して移動させま す。サブメニューにアクセスするには、希望のメインメニュー でOKボタンを押しオプションに入る。下向きの矢印ボタンは、 サブメニューの選択肢にアクセスします。メニューまたはサブ メニューを終了するには、Xボタンを押してください。 EPIC Pro Menu Tree ver1281.1 New Panorama 360 Panorama Options Time Per Pic Start Del/Trig...
- Page 15 Picture Overlap Quick Menu Set-up Firmware Ver Panorama Memory Previous Save Previous Recall Camera Setup Move Camera EPIC Pro Menu Tree for Firmware Version 171 New Panorama 360 Panorama Options Time/Exposure Mult Picture Brackets EV Step Size Mirror Lock-up Lockup-time...
- Page 16 Pic Order Timelapse/Series Battery Status Save/Load Config Factory Reset Expert Options Checklist Shutter Mode Shutter Length Motor Speed Motors Rigid Pretrigger Delay Bracket Delay Backlight Mode Aspect Ratio Picture Overlap Last Pic Hold Shutter Feedback Shutter Retries Quick Menu Setup Firmware Ver Test Shutter Panorama Memory...
- Page 25 Note: いくつかのメニュー項目は、 他の設定に依存して利用で きるようになります。 'シャッターティーチ'が"On"に設定されている時は、 小さ い"T"のアイコンが右上隅に表示されます 'シャッターティーチ'が有効になっている時、'オプション'メニ ュー項目の時間/露出'、および'ブラケット'は、必要とされてい ないので、 表示をしません。 通常のモードに戻るには、'シャッターティーチ'オプションを " オフ"に選択します。 'Options'の’Brackets’が、1より大きい値に設定されている時、 'Options'->’EV Step Size’ 項目は表示されます。...
- Page 26 'Options'->’Brackets’メニューから、右矢印キーを押すと、 'Options'->'の’EV Step Size’にアクセスできます。 Menu Options Glossary ver128.1 Main Menu –新規撮影 – New Panorama パノラマ撮影の矩形領域の左上と右下定義します。メニュー またはサブメニューを終了するには、Xボタンを押してくださ い。 –360パノラマ – 360 Panorama 上下の180度の水平360度であり、完全な円パノラマの設定。 (上下180度にするとCubic撮影の設定にしたのと同じになる。) Options – より多くの設定を変更できるようにサブメニューが含まれま す。 Panorama Memory –メモリ 以前に定義したパノラマを再呼び出しする、または現在のパ ノラマを定義保存を保存するEPIC Proのメモリがあります。 Camera Setup – ファインダー内の上部にある、さらに下部にある認識できる オブジェクトまたはポイントに合わせることによって、特定の レンズ焦点のために画像の写りを垂直になるようにカメラをセ ットします。...
- Page 27 –カメラを移動 – Move Camera カメラとレンズを左右へ、上下へ方向キーを使用して移動さ せます。 Time per Pic -時間の量- 次の位置にカメラが移動するまでEPIC Proは十分時間を取 ります。これはカメラが、現在の写真を処理するのとフラッシ ュメモリにデータを保管するのに十分な時間が必要である。こ うしなければ、カメラが写真を撮影し損ねる可能性が高くなり ます。 Start Del/Trig –スタートデル/トリガ- それぞれのパノラマをキャプチャする前に、遅延タイマが有 効に開始されます。 Mult Shutter – キャプチャ中に、 各位置に複数の写真を撮ることができます。 同一ポイントで20枚の写真を取ることができます。 attery Status- 電池電圧レベルを知ることができます。7.4ボルトの電圧は、 電池が完全に充電されていることです。 約7ボルトの電圧は、 は るかに長くEPIC Proを操作することができないことを意味し ます。 Factory Reset – デフォルト値にリセットできる特定のオプション。カメラの...
- Page 28 マ写真保存、ビューの垂直方向画角をリセットさせることが出 来ます。 Expert Options – 専門オプションはサブメニューで設定 Expert Options Submenu-エキスパートオプションサブメニュ ー -チェックリスト – Checklist このオプションをONに設定すると、 パノラマ撮影される前に、 その順序で行われ、正常に技術的に良いイメージを作成される か。チェックリストが、ユーザーに提示される(実際にEPIC Pro が稼働し4隅と中央に移動する)。OFFを選択すると、これらの プロンプトが消えます。 -シャッターモード – Shutter Mode どのようにカメラのシャッターを動作させるのか、ユニット を選択することができます。 設定は、 リモートまたは手動です。 EPIC Proのリモート設定接続とカメラのリモートシャッター ポートを、電子シャッターケーブルで繋ぎます。マニュアル操 作の場合は、ユーザーが手動でシャッターを押し、次の写真に 進むために、EPIC ProのOKボタンを押します -シャッター長さ – Shutter Length 撮影が難しい対象にオートフォーカス用いる時、焦点を決め るフォーカス信号の作動時間を増やす設定を使用することがで...
- Page 29 ...、8.0秒) 。が設定できます。(カメラ側に連続撮影可能の設定 がしてある場合でEPIC Proのシャッター長さがあまりにも長 いと、1カ所で数枚の撮影をしてしまうので注意が必要です。) 設定シャッターの長さが1画像撮影シャツター長さより長けれ ば、そのシャッター設定が使用されます。 個別に良いフォーカスを実現するために必要な時間、カメラ のバッファメモリを使わずに、カメラのフラッシュメモリに時 間をかけて書込に必要な時間を微調整することができます。 -。モータ速度 - Motor Speed 低速、普通、高速のオプションがあります。大きなレンズを 使用する場合は、回転作動後に回転減速し、位置決めする低速 設定の使用を勧めます。 Motor Rigid- モーター固定 回転モードでなく、又はパノラマ撮影中でない時に大きなレ ンズをその位置に保持することが出来る設定です。 Pre-trigger Delay-プリシャッター遅延- (0.0s、0.5秒、1.0s、1.5秒、2.0秒、2.5s、3.0s)これは、EPIC Proの動きと電子シャッター信号をカメラに送るタイミングの ズレです。こうしてEPIC Pro回転の後レンズとカメラの揺れの 問題を解決しています。これは特に長い焦点距離のレンズでは 重要です。 Backlight Mode-バックライトモード- バックライトを使用したいときは、これを選択して下さい。 電力保存、常時オフ、常時オンが有ります。 Aspect Ratio-アスペクト比-...
- Page 30 1:1、2:3、4:3、16:9です。 デフォルトの設定は4:3(横長さ4、縦長さ3)です。 Picture Overlap-画像の重なり- (25%、30%、35%、40%、45%、50%、55%、60%、65%、 70%、75%、 )レンズ端のケラレやパフォーマンスの低下を補 正するため重複を増加させることができます。この値を増やこ とにより、ステッチソフトウェアがコントロールポイントを検 索する領域で、ポイントを見つけやすくなります。EPIC Proの デフォルトの画像重複は30%です。 Panorama Memory Menu- Previous –前へ- 以前のパノラマ設定を繰り返します。電源を切る前‘Save Previous’のオプションを使用しなければ、あなたのパノラマ設 定は失われます。 –前を保存する – Save Previous EPIC Proのメモリには、前(現在の設定)のパノラマの設定を 保存できます。次回に、EPIC Proのメモリーを参照して撮影を 開始するおおよその基準点を利用出来ます。 –リコール – Recall パノラマに、‘Save Previous’を用いてEPIC Proのメモリに保 存した設定を呼び戻します。...
- Page 31 Menu Options Glossary for Firmware Version 171 Main Menu –新規撮影 – New Panorama パノラマ撮影の矩形領域の左上と右下定義します。 –360パノラマ – 360 Panorama 上下の180度の水平360度であり、完全な円パノラマの設定。 (上下180度にするとCubic撮影の設定にしたのと同じになる。) Options – より多くの設定を変更できるようにサブメニューが含まれま す。 Test Shutter ‒シャッターのテスト パノラマのキャプチャを開始する前に、シングルシャッター、 複数のシャッター、露出ブラケット、及びまたはアップミラー など任意で設定をテストすることができます。 テストをするには、 メニューから 「Test Shutter」 を選択します。 [OK]ボタンを押すと、 EPIC Proは、 現在の設定でtestをはじめ ます。...
- Page 32 Panorama Memory –メモリ 以前に定義したパノラマを再呼び出しする、または現在のパ ノラマを定義保存を保存するEPIC Proのメモリがあります。 基準点はEPIC Proの筐体を元の位置に再設定する役目を持っ ています。 基準点は三脚上の元のポジションに合わせる位置のことです。 Camera Setup – ファインダー内の上部にある、および下部にある認識できる オブジェクトまたはポイントに合わせることによって、特定の レンズ焦点のために画像の写りを垂直になるようにカメラをセ ットします。その後、EPIC Proは、アスペクト比を使用して垂 直方向と水平方向の角度を計算して認識します。 またEPIC Proは30%のデフォルト設定で画像重複を考慮して 撮影枚数をカウントします。 –カメラを移動 – Move Camera カメラとレンズを左右へ、上下へ方向キーを使用して移動さ せます。 Options Menu-オプションのメニュー Time/Exposure ‒ Time ファームウェアのバージョンが1.2.8.1以前では、これを' 「 per Pic 」と言っていた。 それは次の位置にカメラを移動するまでEPIC Proが待機する...
- Page 33 バッファメモリからフラッシュメモリへデータをコピーのに十 分な時間が重要です。 これはカメラの撮影漏れの可能性が最も高い理由です。 カメラは写真が転送されている間はLEDが点灯します。 Mult Picture ‒ ファームウェアのバージョンが128.1以前では、これを'「 ʻMult Picture 」と言っていた。 この設定は、ポジションごとに撮影される写真の数を設定する ことができます。 ブラケットが有効になっている場合、 " ʻMult Pictureは"あなたが選択した写真の数だけブラケットの撮影を 繰り返します。 Brackets ‒ カメラAEB(自動露出ブラケティング)を持つカメラはHDR画 像を1、3、5、7、または9枚の露出ブラケティング撮影をする。 Step」を使用して、露出値の差分(露出値{0.3, 0 .7, 1 .0, 「EV 1.3, 1.7, or 2.0})を設定する。 「Expert Option」 「Shutter Length」を「Blub」に設定すること により、カメラAEBファームウェアの能力を超えることがあり ます。...
- Page 34 。 Mirror Lock-up ‒ カメラのファームウェアーで設定されているミラーの跳ね上 げと、Gigapanに設定されている「Option」の「Lock-up-time」 で設定されるシャッター前の遅延と、この二つが一緒に使用さ れます。 EPIC Proとカメラのミラーアップが設定されている時、各撮 影において2つのシャッター信号が有ることに成る。 最初の信号でミラーがフリップアップ(跳ね上げ)され、次の 信号すなわち「Option」の「Lock-up-time」でタイミングをず らした後シャッターが切られます。 「Mirror-Lock-up」は光学的にブレが増幅する焦点距離の長 い望遠レンズの場合に効果があります。 もし貴方がF4.0の200-400mmのレンズを使用する場合は 「Lock-up-time」を1.8秒に設定することができます。 50-100mmの常用レンズを使用する時は、 「Mirror L ock u p」を 無効にすることも出来る Lock-up-time 「Mirror Lock up」と「カメラのミラーアッブ設定」は組み合 わせで使用されます。 「Mirror Lock up」の設定時間は0.25s, 0.50s, 0.75s, 1.00s, 1.25s, 1.50s, 1.75s, 2.00s, 2.25s, 2.50s, 3.00sから選べます。...
- Page 35 左向き矢印は次の選択へ移動する為に有ります。 OKボタンを押してシーケンスを終了します。 Start Del/Trig ‒ パノラマ撮影を開始にタイマーを設定できます。其の選択肢 は 外部シュッター、15秒、30秒、45秒、1分、2分、5分です。 外部シュッターの設定は、EPIC Proのリモートシャッターポー トの仕様のキヤノンのE3スタイルのリモートシャッターで動作 するように設計されています。(Gigapan E PIC P ro本体の表示デ ィスプレーの右下に「REMOTE」と表示されている接続端子) Pic Order ‒ 列を右方向、列を左方向、段を下方向、段を上方向の様に写真 を写す順番を異なるパターンから選択出来ます。 Timelapse/Series ‒ Used to capture a sequence of panoramas over a period of time. Y ou m ay u se a t imer o f z ero s econds t o 9 9 d ays o r a n external trigger to change when each panorama in the sequence is taken. When you choose the timer, the value...
- Page 36 外部シャッターが選択されている時、EPIC Proの遠隔操作トリ ガーポートに接続されたキャノンのE3タイプのリモートシャ ッターを使います。 Battery Status ‒ バッテリーの電圧が判ります。 7.4Vの表示は、バッテリーが完全に充電されている。 約7Vの表示は、 、電池がはるかに長いためにEPIC Proを操作す ることができないことを意味します。 Save/Load Config ‒ す最大3つの初期設定値を保存できます。 これはレンズやブラケ ットのオプションをすぐに変更したい場合大変便利です。 Factory Reset ‒ 特定の値が初期値にリセットされます。 「Camera Setup」 「Time per Pic」 「Start Delay」 「Mult Shutter」 「Pic Order」 「Saved Panoramas」および「垂 直画角」で設定した値がリセットされます。 Expert Options のサブメニュー...
- Page 37 t ime f or y our c ameraʼ s a utofocus s ubsystem t o a chieve good focus and not requiring too much time to capture the entire gigapan. When ʻShutter Lengthʼ exceeds ʻTime/Exposureʼ , t hen ʻ Shutter L engthʼ takes p recedent.
- Page 38 を使用して稼働させたり、制止させたりする時間を短くする為 には、 「Slow」を使用することをお勧めします。 Motors Rigid カメラ移動モードでなく、撮影モードでもない時、この 設定がOnであれば、カメラとレンズの現状位置を保持しま す。 Pre-trigger Delay 0.0秒、0.5 1.5 2.0 2.5 3.0秒 これはGigapan EPIC Proの稼動開始と使っているカメラ の電子シャッター信号のズレのことです。 これはGigapan EPIC Proが稼働した後、レンズとカメ ラ本体が制止するのに効果が有ります。 これは特に大きく長焦点のレンズに有効です。 Bracket Delay ‒ このずらしは、HDR画像を作る為の露出ブラケット撮影中に、 メモリーバッファーへの送りがオーバーフローしないようにし ています。 0.1秒から8秒までプログラム出来ます。 Backlight Mode ‒ バックライトを使う時この選択をしてください。 選択肢は「少し節約」 「使わない」 「使う」...
- Page 39 選択肢は、25%, 3 0%, 3 5%, 4 0%, 4 5%, 5 0%, 5 5%, 6 0%, 6 5%, 7 0%, 75%。 この設定でオーバラップを増やすことにより、 あまり良く ないレンズの周辺部のケラレを補正することが出来ます。 この値を大きくすることにより、ステッチする部分のコントロ ールポイントの数が増えステッチが容易になります。 Gigapan EPIC Proの既設定値は30%です。 Last Pic Hold ‒ バノラマ撮影の最後の撮影の後、 カメラの電源が落ちないよう に、Gigapan EPIC Proから信号を出し続けます。...
- Page 40 the E PIC P ro. T he s ync c able h as a P C c onnector a t o ne e nd and a m ini p lug a t t he o ther e nd. Y ou c onnect t he P C c onnector to t he c amera a nd t he m ini p lug t o t he E PIC P ro r emote t rigger cable p ort. I f y our c amera d oes n ot i nclude a P C c onnector, you c an p urchase a h ot s hoe a dapter t hat h as a P C c onnector.
- Page 41 Save Previous-現在の設定を保存 EPIC Proはメモリーに撮影開始基準点を含む現在の設定 を保存出来ます。その基準点は全ての撮影起点として使 用されます。 Recall-リコール 「Save Previous」で保存したEPIC Proのメモリーから パノラマの設定を呼び戻せます。 Set up the EPIC Pro Quick Menu -EPIC Proクイック メニュー設定 クイックメニューが表示さされるまでXボタンを押し続ける とクイックメニューが現れます。好きなアイテムを、このメニ ューから、選択することができます。‘Expert Options’のサブメ ニュー‘Quick Menu Setup’を使用して、Quick Menuにある4つ のメニューの1つを設定します。 Firmware version 128.1 Move Camera Time Per Pic Start Del/trig...
- Page 42 Motor Speed 1撮影当たり時間、シャツター遅延時間、バッテリー状況、シ ャッタースピードなどを含む推奨される機能は、クイックメニ ューに追加する Firmware version 171 Move Camera Time/Exposure Mult Picture Start Del/trig Pic Order Pretrigger Delay Battery Status Motor Speed Shutter Length Mirror Lock-up Recommended functions to add to the Quick Menu, include: Time/Exposure, Pretrigger delay, Mult Picture, Battery Status, Shutter Length, and Mirror Lock-up 1.6電子トリガ(シャツター)ケーブルの互換性...
- Page 43 EPIC Proには 7種類の電子シャッターケーブルが有ります。 下記レビューから、お使いのカメラとの互換性見つけてくださ い。(7種類全てが付属している。)
- Page 44 nikon7000 Hasselblad H1 w ith H asselblad d igital b ack H 2 w ith H asselblad d igital back H3 with Hasselblad digital back...
- Page 46 2. GigaPan EPICProを設定 最高品質のパノラマ画像をキャプチャ-するために、 注意深く 手順を実行します。 2.1対応機器を入手 EPIC Proを使って、パノラマ撮影をするのに必要になりま す: • EPIC Proバッテリと電源コード(本体に付属) • 1/4インチねじの標準的三脚 W3/8可能 • デジタルカメラとレンズ(www.GigaPanSystems.comで適 合するカメラのリストを参照してください)電子(シャッター) トリガケーブル(本体に付属) •カメラの電池および/または充電器 • メモリカード(少なくとも4 GB)パノラマ写真を撮影する のに必要十分なメモリ確保して下さい。 • メモリカードリーダー、 またはお使いのカメラのUSBケーブ ル 2.2充電と電池挿入 EPIC Proは、充電されたバッテリーの状態で到着する。 バッテリを充電するには、2つの方法があります - EPIC Proいれたまま、バッテリーを充電することができます...
- Page 47 EPIC Pro内のバッテリーを充電するには: 1. EPIC Proがオンまたはオフの状態でバッテリーを充電する ことができます。バッテリーの充電レベルが十分な場合、バ ッテリーを充電しながらEPIC Proを操作することができます 2. EPIC Proにバッテリー函を開きバッテリーの端が入り切る までバッテリを挿入して下さい。所定の位置にバッテリーを 入れたら時計回りにラッチを回転させます。 3. EPIC Proの液晶ディスプレイの右の下にアイコンが表示さ れます。 4. ACコンセントに電源コードを差し込みます。 プラグのアイコンが液晶ディスプレイの右下隅に表示されま す。EPIC Proの電源をオフにしても、バッテリー充電をしてい る間はプラグインのアイコンが表示されません。 5. EPICProを十分換気されたスペースに水平に置いて下さい。 電源コードのライトが赤く点滅します。 緑色に点滅するとバッテリーが充電され使用する準備ができ ています。 独自にバッテリーを充電するには: 1. EPIC Proから、バッテリーを取り外すには 反時計回りにラッチを回転させバッテリー函を開きます。 2. 電源コードのコネクタの端をバッテリーに差し込みます。...
- Page 48 電源コードのライトが赤く点滅します。緑色に点滅するとバッ テリーが充電され、使用する準備ができました。 EPIC Proバッテリーの状態を確認するには: バッテリーの電圧が低い時、EPIC Proの液晶ディスプレイの 右下隅に低電圧アイコンが点滅します。 あまりにも低電圧に成っている時は、適切な表示機能が出来ま せん。“Please recharge the battery”「充電して下さい。 」のメツ セージが表示されます。 バッテリーの状態をチェックする時は、‘Options’と言うメニ ューアイテムが表示されるまで方向キーを押し、そして”OK”を 押して下さい。...
- Page 49 2.3 EPIC Pro を三脚にセットする。 一連の画像として着実に撮影するため、 EPIC Proを標準1/4イン チネジの頑丈な三脚に装着して使用します。 三脚をセットアップします。 1. 足が地面にしっかりし保持されているか確認し、三脚をよ り水平にして置きます。三脚に水準器が有る場合、それで三脚 を水平にして下さい。三脚固定ネジ締めつけます。 2. 三脚のクイックリリースプレートをはずし、 EPIC Proの下 部を三脚の上に固定します。 3. クイックリリースプレートとEPIC Proがリと確り接続さ れるまで、ゆっくりとネジを締める。 4. 三脚のプレートバックを閉めます。 水準器使ってEPIC Proの軸線とレベルを調整します。 必要 に応じて三脚の足とマウントを調整します。...
- Page 50 2.4カメラとレンズを載せる EPIC Proに、カメラとレンズをマウントするには下記手順を 使用します。 第1.2章示したEPIC Proの図、 パーツ名前を参照し、 これらの 手順に従って下さい。 1. OKボタンを1秒以上押し続けるとEPIC Proの電源が入り に成ります。 2.‘ Move Camera’ 選択し、 OKを押します。 下向きの矢印ボタ ンを押してカメラを載せるレールを水平にする。...
- Page 51 3. 矢印上下ボタンを使用して、 カメラレールを水平位置に移 動させる。EPIC Proの基本動作です。 4. カメラレールから取付板を外すには、 カメラの前面に取り 付けプレートに小さな銀色のピンを見つけて下さい。小さな銀 色のピンを時計廻りにまわして、カメラマウントレバーを時計 廻りに回転させる。その後取付けプレートを外します。 5. カメラボディとレンズをカメラ(取り付け)プレートへ取り 付ける。カメラ本体が重く、大きいレンズをサポート出来ない が、このようにすることにより、大きなレンズを載せることが 出来ます。 6. レンズとカメラをカメラマウントに固定した物をカメラ レールに戻します。しっかり固定されていることを確認して下 さい。 7. カメラレール下の調整ノブを時計廻りに廻しカメラレー ルを緩めます。 8. カメラレールをスライドさせて、 カメラとレンズの重心を 回転軸の中心に合わせることにより、EPIC Proは簡単にレンズ を移動させることにより、風や車の振動などのような外部の影...
- Page 52 9. 狭い範囲の被写体を撮影するとき以外は、回転軸上に重心 が合うように、レール前方中央に移動させる。この位置は、ほ とんどの場合レンズの表面とフォーカスリングの狭い領域の当 たりにあります。(Cubic撮影以外はノーダルポイントを無視し ても重量バランスを優先したセットをする。) 10. カメラレールの高さとカメラ(取り付け)プレートを調整 し、レンズの中心位置を、EPIC Proのアームに取り付けプラッ トフォームのネジ高さの位置に調整する。プラットフォームネ...
- Page 53 ジを緩め、カメラマウントプレートとレンズ取り付けの高さを 調整する。ニコンD3Xなどいくつかの大きなカメラは、完全に レンズ中心の高さにセットすることはできません。大抵のユー ザーには問題ないでしょう。 2.6 カメラのセットアップ パノラマ撮影用のデジタルカメラの設定を以下の手順に従っ て最適化して下さい。 カメラの電源を入れ、マニュアルモードにして下さい。 フォーカスと露出を調整します。 (ISO、絞り値、シャッタ ー速度) (太陽光、曇天、または蛍光灯) 、照明条件に基づいてカメ ラのホワイトバランスを設定する。良いホワイトバランスを得...
- Page 54 るために、Expodiscや、カラーカード、または灰色のカードの ようなデバイスを使用することがあります。 電子シャッターケーブルをシャツターケーブルポートに接 4. 続する。ポートは液晶ディスプレイの左側に位置有ります。カ メラにケーブルを接続します。 次の写真を撮影をするまでの十分な時間を確保するよう EPIC Proの ‘Options’のサブメニューの‘Time per Pic’を設定し ます。シャッター間隔は、フラッシュメモリにイメージを書き 込むための十分な時間を考慮する必要があります。Time per Pic'を十分に設定し、写真の取り損ねを避けることが重要です。 2.7 カメラとGigaPan EPIC Proの設定 レンズ、カメラ本体、ズームのレンズの焦点距離の長さを変 更した時は、いつでもEPIC Proに知らせるためにメニューの 「Camera Setup」を使うことと成ります。 (用語「Field of View」 (FOV)は撮影画像イメージに使用さ れます、および「angle of view」はレンズに使用されます。 レンズ画角を設定することにより、EPIC Proは使用するカメラ の具体的な焦点距離の長さで調整されます。これは、EPIC Pro がイメージに適切な量のオーバーラップを確保するため、各撮 影位置の間をどのくらい回転移動するかを計算します。 そして、 カメラに設定されたパラメータと組み合せ、EPIC Proは撮影す...
- Page 55 Start a new panorama (3章1節の で左上、 右下の隅でカメラ位 置を設定する方法が解説されています。) 1. 撮影画像イメージを設定するには、 メニューから 「Camera Setup」 選択しなさい。必要ならば、電源ボタンを押し、EPIC Proを再度スタートさせなさい。 2. 撮影画像の対象物またはポイント選び、 カメラのファイン ダーやカメラの液晶モニターの上部にそれを合わせ、 OKボタン を押します。...
- Page 56 3. カメラのファインダーやカメラの液晶モニターで選択し たポイントが下部に位置するまで、カメラアングルを上方向キ ーを使って移動させます。 4. 撮影画像イメージ範囲が設定されます。注意 EPIC Proが重なり具合を調整するので、あなたが重複を調整 する必要はありません。EPIC Proのデフォルトの重ねは30%で す。 必要に応じて画像の重なりを変更するには、 「Picture Overlap」 を使用してください。 'メインメニュー'から‘Camera Setup’を選択し、 OKを 1. 押します。 2. 初めてビューのフィールドを設定する場合は、‘Camera Setup’を選択します。 ‘field of view’を設定し、 OKを押しなさい。 (初めてのfield of viewを設定した後、field of viewの現在値は、 手順2で表示されます。上記の図ステップ7に示されているよう に。) ‘Options’の’Expert Options’の’Checklist’を0ffにし、 ‘Checklist’...
- Page 57 v iew, p ress t he O K b utton a nd f ollow t he d irections a bove in Chapter 2.7. 2.8 Set manual focus or autofocus EPIC Proでパノラマを撮影するとき、フォーカスは非常に重 要です。 撮影前も、撮影時も細心の注意を払うことで、超高解像度、...
- Page 58 撮り損ね、ピントが不揃いピンボケ、などのリスクを低減す るために、マニュアルフォーカスを使用して下さい。マニュア ルフォーカス撮影を選択するならば、パノラマの一枚一枚の画 像のフォーカスの一貫性を維持が保証されます。また、大パノ ラマの中での撮影漏れを心配する必要がなくなります。画質の 許容範囲に慣れるために、被写界深度表を参照してください。 Maximize Depth of Field-最大被写界深度 被写界深度の要素 絞り-開放値-レンズF値 絞り値を小さくすればDOF(被写界深度)は増加します。 f / 8絞りからf/16を超えてF/22にすると、 光回折損失が原因で鮮 明差が低減します。 焦点距離長さ - イメージセンサーの面からレンズ焦点までの距離 焦点距離の長さを減らすと、DOF(被写界深度)が増加します。 3. 被写体までの距離 撮影対象の最も近い点までの距離が増すと、 許容範囲内で、 DOF(被写界深度)を増加させる必要があります。 イメージセンサー-小さいセンサー程DOF(被写界深度)は大 4. きい。{ full frame, partial frame, point and shoot } 5. 錯乱円- 点とみなされた円の直径。 これは、カメラのセッティングによるものではなく、(画像が)鮮明と みなされるものの定義です。あなたは、(錯乱円)の値に対して、被 写界深度を誤解しないように注意する必要があります。錯乱円の直 径が増大する時、好ましく鮮明な(画像)は減少します。 ...
- Page 59 Plan your Panorama パノラマを撮影を計画した時、Google Earthの測定ツール上 で、潜在的な距離を測定することができます。 Google Earthで何日何時の明るさや見え具合を知るツールも あります。 Auto Focus パノラマの鮮明度を上げるためにマニュアルフォーカスを選 択するよりも、オートフォーカスの方が良い場合が有ります。 群衆や建物がその撮影画角に広範囲にまたがっている場合など。 特に長い焦点距離レンズを使用しいる時、 全体の奥行きをカバ ーするために被写界深度をあげることが出来なくなります。 オートフォーカスに適した状況であるなら、 パノラマの各撮 影位置の遠近にピントが合うオートフォーカスが使えます。 それぞれの状況、方法にが利点と欠点があります 「 エキスパートオプション」の「シャッター長さ」の設定及 び、高速なレンズで最小絞りf/2.8~f/5.6などを使用する時、オ ートフォーカス機能に2つの方法があります。 もう一つハードウェアの重要な点は使用している特定カメラ 本体のオートフォーカスのシステムです。 Potential subject problems-撮影対象の持つ問題 距離の異なる複数のオブジェクト – フォーカスポイントを減らすか、またはそのパノラマ撮影の一 部を一時的にマニュアルフォーカスに切り替える必要が有りま す。...
- Page 60 パノラマ撮影一部が、 焦点を合わせる対象としてその機能(被 写体の状況、晴天の空など)に欠けています。 その時はパノラ マの全部又は一部の撮影をマニュアルフォーカス撮影と必要が あります。カメラ本体がピントを認識出来る機能(被写体の状 況)が必要です。 オブジェクトの移動 – 特定の写真を繰り返し撮影 または十分な光量に成るまで一時撮影の中止をする必要が有 るかもしれません。f/2.8~f5.6の明るいレンズなどの装置を使 用する必要があるかも知れません。 マニュアルフォーカスを使用する必要があるかも知れません。 Important auto focus camera settings include: F値小さい高速レンズの絞りはf2.8~f5.6くらいに絞る。 絞り値はレンズ直径に逆比例します。 広角レンズは、より多くの光が受光部に達します。 2. 良いフォーカスが達成されているかどうか関係なく 焦点が合ってれば、撮影される方法です。オートフォーカス信 号の長さを増やすとシャツター時間が増えます。 焦点距離合わせにの駆動に、単一サーボ、連続サーボ、ま たはその混合があります。 。 フォーカスポイントは選択されます。 キヤノンデジタル一眼レフカメラのオートフォーカスモードは、 リリースまたはフォーカスポリシーに固定されています。...
- Page 61 ニコンカメラのメニューシステムを使用して変更出来るデフォ ルトリリース優先かまたはフォーカス優先があります。 青空、滑らかな水、明るい照明など難しい光の状況で、マニュ アルフォーカス、また、オートフォーカスの組み合わせを使用 することができます Test your set-up 接している2つの画像の重なりが約3分の1有れば。最高のパ ノラマ画像が出来ます。どのように設定するか、最良のテスト 方法は、2段x2列のパノラマを撮影するのが一番良いでしょう。 第3章の手順に従って、パノラマを撮影し、 お使いのカメラの プレビュー画像を見いください。 次の画像と良い重複が表示されない場合はEPIC Pro設定に 戻って調整します。...
- Page 62 2.9 Minimize parralax error- パララックスエラーを最小限 に抑えます。(ノーダルポイントずれエラー) パララックス(視差)と呼ばれる現象を除去するためには、次 のヒントを使用して下さい。 注.パノラマ撮影対象がは遠く離れている時は、 視差誤差を最小化するために、 カメラとレンズのバランスを とるのに反して、カメラレールの位置前後に調整します。 (第2章4節-カメラとレンズのバランスの調整についてを参照) Adjust the lens position-レンズの位置を調整 遠く離れている撮影対象とその一直線沿いにある近くの撮影 対象が含まれるパノラマを撮影する場合、 前絞り位置をレンズ のRAW回転の中心に合わせるように、 レンズ位置を調整する ことによってイメージの品質を向上させることができます。 Approximate adjustments for minimizing parallax error- parallax error最小限するための、おおよその調整 EPIC Proの2つのアームのプラットフォームのつまみネジ を緩めて、カメラの高さを調整します。カメラのレンズ芯が、 つまみネジと上下回転軸とが同じ高さに位置になるまで、取り 付けプラットフォームを上下に移動させます。 カメラのレールの調整ノブを緩めてカメラのレールを調整 します。EPIC Proのアームのプラツトホームつまみネジががあ...
- Page 63 るアームの中央と同じ位置にレンズの絞り羽根が有る位置まで、 スライドレールを前方または後方にスライドさせます。 レンズの絞り羽根は右又は左のyaw回転軸に合わせます。 Fine adjustments to the camera mounting platform for parallax errorを最小限に抑えるた minimiz- ing parallax error- めにカメラマウント台を微調整します。 おおよその調整は、ほとんど上記の方法で十分です。し Note: かし、時には、余分な時間と労力かけて、次の微調整をする必 要があります。 (原文に忠実に解釈しても、 どうしたら視差が防げるのか理解出 来ないので、訳者の経験を加えます。) 視差調整のための撮影対象で、 別の距離にある(遠方にある 1. 物と近くに在る物)2本の木のような、または窓枠やドアのよう に、 お互いに異なる距離に隣接している(出来る限り一直線上に ある)2つのオブジェクトを見つけて下さい。 そして2つのオブジ ェクトを使用し2つのアングル(1回目はレンズの右端を利用し 一直線上の2本の木の重なり具合を見、2回目はレンズの左端で 一直線上の木を見ます、これらの画像がレンズの真ん中で見て いるのと同じになるように、カメラを前に移動させるべきか、 後に移動させるべきか、1回目、2回目の操作を繰り返し、レン ズの真ん中で見たときの画像と同じになるまで調整を繰り返し ます。)で繰り返し、より正確な画像が得られるように、カメラ のレールをスライドさせ、位置を調整します。...
- Page 64 2つのオブジェクトの配置は、異なる撮影アングルでEPIC Proを一定のポジションに保ことに役立ちます。 2つの椅子の背もたれを使用し、 ただビューファインダーの左側 に見えるように、2つの角度を繰り返します覗きます。 カメラのレールの下ノブを緩め、レンズの前絞りの推定位 3. 置をEPIC Pro腕の中間位置に合わせるようにレールを移動す る。それはyaw軸です。 (カメラレールを前後に移動調整するときにカメラレール の刻みを読んで、繰り返しをし易くする。)レールのミリ刻みを 使用しカメラのレールの位置を決めます。 5. カメラのレールの異なる位置で2つの角度の2つのオブジ ェクト間の距離を測定します。 2つの異なる角度で少なくとも数ピクセルの変化を持つ2 つのオブジェクト間の隔たりを示すレールの位置を見つけ出せ ば、左右yaw軸の視差を最小限にすることができます。 3. Using the GigaPan EPIC Pro EPIC Proでパノラマを撮影するには、 「新しいパノラマ」 、 「360パノラマ」または以前の設定が保存されているメモリの 「前の撮影」から選択することが出来ます。 レンズや焦点距離の長さを変更した場合は第2章7節のEPIC Proに、 カメラの設定を繰り返す必要があることを忘れないで下 さい...
- Page 65 5. 次に、方向キーを使用し、シーンの右下隅へカメラ軸をを 向け、準備がすめば、OKを押して下さい。 この設定をしている間に、EPIC Proは、水平および垂直方向に 何枚撮影すべきか計算し、その結果を見せてくれます。 6. それが開始される前に、パノラマ設定の内容を確認した ければ、EPIC Proのディスプレーの「Show Panorama」表示 されます。そうしたければ、OKを押して下さい。プレビューせ ずに続行すのなら、Xキーを押して下さい。 7. パノラマ撮影に行きたい時は、確認のOKを押します。 8. EPIC Proが、 パノラマ撮影をしている間はその撮影対象を 見ているだけです。 9. 誰かが、 作動中の装置に触れた時またカメラの撮影失敗が 起こった時は、Xキーを押して、パノラマを一時停止させ、方 向キーを使ってカメラを元の位置に戻し、 撮影をやり直します。 10. いつでも、 クイックメニューが表示されるまで、 Xボタン を押し続けるとクイックメニューになります。...
- Page 66 3.2 Start a new panorama- 360度パノラマの撮影 360度のパノラマ撮影は簡単です、EPIC Proのパノラマ撮影 に似ています。 パノラマの左上と右下の隅にEPIC Proを設定するのに替え て、cubicでは上部と下部を設定する必要があります。 1. EPIC Proの方向キーを使用し、 メニューの 「360パノラマ」 に移動し、OKを押します。 2. 方向キーを使用し、シーンの上隅へカメラ軸をを向け、準 備がすめば、OKを押して下さい。 3. 次に、方向キーを使用し、シーンの下隅へカメラ軸をを向 け、準備がすめば、OKを押して下さい。 4. それが開始される前に、 パノラマ設定の内容を確認したけ れば、EPIC Proのディスプレーの「Show Panorama」表示さ れます。そうしたければ、OKを押して下さい。プレビューせず...
- Page 67 To save a previous panorama for future use: に、以前のパノラマを保存します パノラマ撮影を終えた後、方向キーを使用し、メインメニ 1. ューの「Panorama Memory」を選択し、OKキーを押します。 。 2. 「Save Previous」選択し、OKキーを押します prevous panoroama保存するために、 EPICProが同じ位置に戻るための基準点必要になります。 4. EPIC Pro は「Reference Set!」と「Panorama Saved!」を 表示します。 前のパノラマを呼び出す To recall a previous panorama: 方向キーでメインメニューの「Panorama Memory」を選 択し、OKキーを押します。 「Recall」を選択します。 3. 前のパノラマを呼び出し、EPICProが同じ位置に戻るため...
- Page 68 EPIC Pro は「Reference Set!」と「Taking Panorama!」 を表示します。 プロセスの残りの部分は他のパノラマと同じです。 To repeat a previous panorama: 直近のパノラマを繰り返す場合、物理的にEPIC Proを移動さ せていない場合をは基準点を使用する必要はありません。 1. 方向キーでメインメニューの「Panorama Memory」を選 択し、OKキーを押します。 2. 「Save Previous」選択し、OKキーを押します。 3. それが開始される前に、 パノラマ設定の内容を確認したけ れば、EPIC Proのディスプレーの「Show Panorama」表示さ れます。そうしたければ、OKを押して下さい。プレビューせず に続行すのなら、Xキーを押して下さい。 4. プロセスの残りの部分は他のパノラマと同じです。 4章はHDR撮影について説明しています...
- Page 69 You can improve the overall exposure by capturing multiple photographs with different exposures for each position. You do this by using the EPIC Pro ‘Brackets’ setting and the ‘EV Step Size’ setting. The panorama shown above is a good example because it has a very large horizontal field of view with areas that have shadows.
- Page 70 AEB (automatic exposure bracketing ) or the BULB mode where the EPIC Pro controls how long the shutter is asserted. In order to use the BULB mode, all of the shutter speeds need to be slower than...
- Page 71 about 1/10 of a second. If you are photographing during the day and want to use the BULB mode, then you will need to use a good quality neutral density filter. Frequently Asked Questions 1. What changes exposure and why should I only vary the shutter speed? When you capture multiple exposure brackets for each position for the purpose of capturing HDR images, you vary...
- Page 72 3. What is a simple method of determining the center exposure, number of brackets, and the exposure value separation? Use an evaluative metering mode to determine the center ‘Time/Exposure’ setting and then simply choose three brackets with a larger EV separation such as 1.7 EV or 2.0 EV. 4.
- Page 73 you have changed the exposure by one exposure value or one EV. Set the metering mode on your camera to spot meter Please refer to your camera’s user manual for specific information. See table below for instructions on setting the metering mode for each of the following cameras.
- Page 74 hand side and the third row up. Press the set button again. Use the left and right buttons to select spot metering. There is a dial that is to the right of the eye piece. Rotate the dial counter clockwise until it points at the single dot. This sets the metering type to a spot meter.
- Page 75 second in bright areas where you want to be able resolve details. Method One EV distance from brightest area to average exposure using 1/3 EV shutter settings EV Distance from shadows to average exposure using 1/3 EV shutter settings Set your camera shutter speed to the brightest 1/160 second meter reading and then change the shutter speed and count how many settings it takes to reach the average...
- Page 76 1/4 second meter reading. With default camera settings you will count fourteen shutter dial changes in order to reach 1/4 second. Divide 14 by 3 and you get 4 EV with 2/3 EV remaining. The distance from the shadow meter reading is smaller at six shutter speed setting changes on the dial which equals -2 EV.
- Page 77 The resulting fused or tone mapped images are then stitched by Gigapan Stitch. Some of your fusion or tone mapping options are: Photomatix 4.0 - www.hdrsoft.com...
- Page 78 Once you have processed your exposure brackets and produced fused or tone mapped files, you are ready to stitch your panorama using the Gigapan Stitch software. See Chapter 4 for more information about Gigapan Stitch software.
- Page 79 1. Select the ‘Options‘ submenu from the EPIC Pro ‘Main Menu’. 2. Select the ‘Mirror Lock-up’ menu item and press OK.
- Page 80 The ‘Shutter Teach’ function is an alternative method of setting the timing for exposure bracketing or multiple pictures. The EPIC Pro enters a teaching mode where you press the left directional button at each point in time you want the it to take a photograph.
- Page 81 7. When you have pressed the left arrow button for the last picture to be taken, you need to tell the EPIC Pro how long to wait before it moves to the next position in the panorama. You do this by pressing OK after the last left arrow button press.
- Page 82 You can use the ‘Timelapse/Series’ function to take a series of panoramas over a period of time. You can use either the external trigger and a remote, or a timer to tell the EPIC Pro when to start each successive panorama.
- Page 83 Some things to consider before starting a time lapse series: • If you are mounting the EPIC Pro on a structure or a pole, is it secure? Will it present a danger to any people in the area if it falls? Safety first. •...
- Page 84 C and press OK. 4.6 Last Pic Hold When the ‘Last Pic Hold’ function is set to ‘ON’, the EPIC Pro will keep the half button press signal asserted so that the camera is ready for the next panorama. This is very useful for time lapse panoramas.
- Page 85 ‘Shutter Feedback’ is set to ‘ON’. Select the ‘Shutter Retries’ menu item and press OK. 6. Select the number of times that you want the EPIC Pro to retry triggering the shutter and press OK. 7. Connect the optional user supplied cables PC end to the camera body’s PC...
- Page 86 EPIC Pro. Stitching and uploading panoramas-パノラ マのステッチとアップロード GigaPanステッチソフトウェアは自動的にすべての写真をと り、 一つの大きなパノラマに、 それらを組み合わせたものです。 ステッチが済むと、GigaPan.comにアップロードすることが出 来みんなが見ることが出来ます。 写真をつなぎ合わせるのに、少なくとも1 GB(より多ければ より良い)のRAMを搭載したIntelベースのMacやWindows PC が必要です。 より強力なコンピュータは、 パノラマをつなぎ合わせるのに、 より少ない時間で済みます。 GigaPan.comのサイトにアップロードするには、 パノラマは、 少なくとも50万画素必要です。 (または35枚以上の写真を1つ のパノラマにステッチされていること。 ) 5.1 Using GigaPan Stitch Software- GigaPan Stitchcソ フトを使う 1. GigaPanステッチソフトウェアを始める。 MacでWindowsの「'アプリケーション」の「スタート」の「プ ログラム」に「GigaPanステッチ」が有ります。...
- Page 87 「GigaPanステッチ」が高速動作するようにするには、他のす べてのプログラムを終了させておくことを、お勧めします。 2. 「画像を追加」をクリックする。 画像は、JPG形式です。 3. お使いのコンピュータ上に保存したフォルダから、パノラ マ用に撮影した画像を選択しなさい。 「Shift」 キーを押して一 度 に多くの画像を選択できます。重複または余分なものを削除す ることができます、または画像を追加することも出来ます。 はじめは無秩序(画像の名前の順)に画像が表示されます。 「Number of Rows」すれば、正しく整列します。 5. 画像を削除する場合は、それをクリックしま「画像削除」 を選択すます。 GigaPanステッチは各列の画像が同じ枚数でなければ動 Note: 作しません。 6. 準備ができたら、 「Done」をクリックします。 7. パノラマを保存します。 巨大なパノラマは、ドライブ上の 多くのスペースが必要となります(それぞれ100 MBは有に超え るので)、沢山の空き領域を用意してください。...
- Page 88 時間が掛かります。その間は休憩を取って下さい! 9. パノラマのステッチが済めば、それをクリックアンドドラ ッグして、それを調べることができます。マウスのスクロール ホイールを使用してズームできます。マウスは、スクロールホ イールを持っていない場合、右ボタンを押したまま、マウスを ズームイン、ズームアウトにドラッグします。(Macの場合は、 controlキーを押したまま、 マウスをドラッグすればズームイン、 ズームアウト出来ます。) 別の種類のファイルのとして、このパノラマを保存する には、 「File」 「Export stitched image to」 「TIFF or Adobe RAW」 を選択します。 11. パノラマが50メガピクセルを超えるの場合は、 GigaPan.comにアップロードすることができますここでは、ス ナップショットを共有し、探求することができます。 Additional GigaPan Stitch Options- GigaPan Stitchのオプション を追加 これらの追加のステッチのオプションにアクセスするには、ス テッチソフトウェアの左側にある「Options」ボタンをクリック して下さい。 (下記の4つのモードはステッチをスタートする前に、Optionを 選択し、Image Shooting Oderを選択する。)
- Page 89 画像撮影順 Image shooting order- オプションは、右列、左列、行左 、下、または上。GigaPan スティッチのデフォルト値は- 右列です。撮影したときの手順 にステッチソフトウェアでそれを変更します。 EPIC Proで撮影順序を変更した場合は、ステッチソフトで変 更をして下さい。 (下記の4つのモードはステッチをスタートする前に、Option を選択し、Stitching Optionを選択する。) Combine images in draft mode-ドラフトモードで画像結合 ドラフトモードでは、画像間に縫い目が見えるしかし、ステ ッチ速度は速い。このオプションは、混合工程プロセスを行っ ていません、ステッチスピードのアップ、イメージに近い画像 をすばやくチェックすることができます。 50%大きさでパノラマを Build panorama at 50% scale- 作る 50%のモードでは、画像の細部が得られないが、しかし、速 度は速くなる、その結果として、通常の1 / 4 ピクセルの画像と 成る。余分な詳細は其れ程必要がない印刷、または、少しぼや けている画像の印刷、またアップロード時間を少なくしたい場 合、大きな画像にとつては有益です。 アップロードに念頭に置いて、しかし、50メガピクセルの最...
- Page 90 Use larger blending region-長大領域合成を使用 合成画像に明らかなハードエッジが唐突に現れるような場 。 合の大きなパノラマ領域を合成するのに便利です Mercator projection instead of spherical/equirectangular メルカトル図法は、上記のオブジェクトの地平線上下を歪ま せることはないが、 Google Earthで使用することはできません。 5.2 Share your panoramas online GigaPanコミュニティを使用してパノラマを共有するために、 www.GigaPan.comに参加してくださいしてアップロードして 下さい。 1. Join GigaPan.com GigaPan社会の一員になろう! GigaPan.com参加すれば、 世界中からパノラマの何千もの探索することができます。 今日、共有するするために訪問し、探索し、発見しよう。...
- Page 91 2. Upload to GigaPan.com うまくパノラマを作れたら、試しにGigaPan.comにアップロ ードしてみてはいかがですか。 1. パノラマに名前と説明を付けます。提供する詳細は、より 簡単にそれが検索で見つけられるでしょう。 2. 撮影したパノラマにいくつかの説明荷札-言葉-を付けま す。 例:ハロウィーン、裏庭、冬のように。 必要に応じあなたは多くのタグをカンマで区切りで使用するこ とができます。...
- Page 92 3. あなたのみがパノラマを見る場合は、チェックボックス 。 「Private」をオンに選択して下さい 4. GigaPan.comにユーザー名とパスワードを入力し、 「Upload now」クリックすます。 5. パノラマをアップロードすれば、オンラインで表示するた めのあなたのURLが、提供されます。 今、皆さんが好きなように、あなたのパノラマの部分のスナッ プショットの取拡大や縮小を見ることができます また、皆さんは、あなたのためにコメントを残すことができま す。アップロードする前に「Private」した場合、あなたがパノ ラマを共有したい人にURLを送って下さい。...
- Page 93 Upload using third-party software- サードパーティ製のソ フトウェアを使用してアップロード パノラマを作成するために、サードパーティ製のツールを使 用した場合、 GigaPanStitchソフトで自動的にインストールされ たGiga-Pan Uploadのソフトウェアを使用し、それらをアップ ロードすることができます。 WindowsもしくはMacのApplicationsの中 GigaPanUploaderの 「Start」 、 「 Programs」 、 「 GigaPan Uploade」 を起動します 2. 「Browse」をクリックしてアップロードするパノラマを 。 選択します...
- Page 94 3. パノラマに、簡単な説明名前を付けます。 撮影したパノラマにいくつかの説明荷札-言葉-を付けま す。 あなたのみがパノラマをみる場合は、チェックボックス 「Private」をオンに選択しなさい。 この方法は、あなたがパノ ラマのURL教えた人のみが、それを見ることができます。 GigaPan.comにユーザー名とパスワードを入力し、 「Upload now」クリックすます。 パノラマをアップロードすれば、 オンラインで表示するた めのURLが、あなたに送られます。 皆さんが好きなように、あなたのパノラマの部分のスナップシ ョットの取拡大や縮小を見ることができ、コメントを残すこと ができます。このURLは、アップロードする前に「Private」し た場合、あなたがパノラマを共有したい人に送るURLです。...
- Page 95 6.GigaPan.com 世界中の何千もの優秀なギガピクセルのパノラマをお楽しみ ください。 共有し、議論し、スナップショットしたものです。 6.1 View and Share GigaPan.comで、できること: ・ 世界中の何千ものGigaPansを検索し、コメントし、スナッ プショットを取り、共有できます。 GigaPansとの素晴らしい出会はコミュニケーション、プロ ・ モーションドキュメンテーションに、驚くような新しいビジョ ンを提供します。 GigaPansの作成方法を学び、ウェブサイトに埋込んで下さ ・ い。...
- Page 96 6.2 Embed your panorama 簡単に他のウェブサイト上にパンやズームができるGigaPan ビューアのすべての機能付きパノラマを埋め込むことができま す。 1. GigaPan.comにログインし、 あなたのパノラマを表示する ために「My Home」選択して下さい。 2. 目的のパノラマを表示させ、埋め込みウィザードにアクセ スするために、その下にあるリンク「Embed」をクリックして ください。 3. 埋め込みウィザードは、カスタマイズ可能な機能の一覧を 提供しています それは自動的にパノラマを埋め込むための適切なHTMLコード を生成します。 4. まず、初期ビューを選択します。全体のパノラマを埋め込 みGigaPan.comに表示させるために、オプション「Entire Panorama」を選択して下さい。 5. または、 「A Specific Snapshot」を選択した場合 希望のスナップ写真をクリック、そのID番号は、タイトルと説...
- Page 97 ID番号をカンマで区切って下さい。 (注:スナップショットを入れた順番にパノラマが表示されま す。あなたが好む順番に) 8. パノラマにスナップショットを10まで含めることができま す。 9. あなたが埋め込まれたパノラマをカスタマイズするには、 埋め込みウィザードを使用するときは 、 「Generate HTML」を クリックしなさい。HTMLコードをコビーし、あなたのサイト に貼り付けてください。 パノラマを即見たいときは、 「 View Now」 をクリックして下さい。 10. パノラマを埋め込むための追加オプション: ・ 画面内のナビゲーションコントロールを非表示に選択する ことができます。 (注:ユーザーはキーボードコントロールを使 用してパノラマをコントロールすることができます) 。 ・ パノラマに(GigaPan.comの青色下地に白い文字の) タイトルをGigaPanビューア上に表示するかを選択することが できます。タイトルもGigaPan.com上のパノラマのURLへのリ ンクとして機能します。タイトルを表示しないように選択した 場合は、透かし「GigaPan」もGigaPan.comへのリンクです。 パノラマを他の誰かが所有して埋め込むには、埋め込み用のコ ードのコピーを許可作者に連絡してください。彼または彼女の...
- Page 98 プロフィールを表示するには、著者の名前をクリックして、 「‘Send a message」選択して下さい。 6.3 Place your panorama on Google Earth- Google Earthの世界を使用してパノラマを共有しよう。記録 のパノラマの場所を使用のGPSは容易になります。パノラマを 共有するには、Google Earthの4.2以上が必要です。 http://earth.google.comからGoogle Earthをダウンロードする ことができます。 1. Google Earthにパノラマを配置したい時は「Place this Panorama in Google Earth」をクリックすます。 「gigapan_placement.kml」と呼ばれるファイルをダウンロー ドするよう求められます。 ( 一部のブラウザでは自動的にこのフ ァイルをダウンロードすます)...
- Page 99 「gigapan_placement.kml」ハードディスクに保存しなさい。 gigapan_placement.kml」をGoogle Earthで開く。 3. ほとんどの場合、空中でGigaPanホバーが表示されます。 開いたGoogle Earthは、コメントを残す バックお使いのブラウザのウィンドウに移動します。 5. 「Share this Gigapan with others using Google Earth」を 。 選択すます 6.落丁 パノラマの場所を指定するために3つの方法がありま す。 : a. GPS受信機を使用して座標を記録する場合 テキストボックスを、それらを入力してください 下の図A b. パノラマを撮影した場所がわかっている場合...
- Page 100 「Have an address?」をクリックし、テキストボックスにアド レスを入力し、 「Go there」を選択します。 下の図B あなたは、GPS座標も、アドレスがある場合 クリックして、十字まで地図をドラッグして、直接、写真を撮 ったスポットの上で+、- ボタンを使用する、地図が、それぞれ ズームします。 戻ってGoogle Earthに切り替える場合は、これらの変更はすぐ 。 に作られて表示されます Google Earthでは、 パノラマをダブルクリックして入ります。...
- Page 101 お使いのブラウザのウィンドウで、 地面に近いパノラマを 見るために「Elevation」スライダを左にドラッグして下さい。 あなたの精度を判断するのにGoogle Earthを使って下さい。 注:Google Earthが標高値0は受け付けません。 10. パノラマの向きを変更するには、 「Heading」スライダを ドラッグします。正確な結果については、Google Earthでは、 対応する要素を使用してパノラマの要素を一致するようにして ください。 11. パノラマが正しく見えていない場合 「advanced placement options」をクリックして下さい。 近いカメラにパノラマを見るには、 「Imageplane」スラ イダをドラッグして下さい。...
- Page 102 13. Google Earthの地平線とパノラマの地平線に一致させ るには、 「Image floor」スライダをドラッグして下さい。 ある角度で、パノラマを取るには、 「Camera tilt」と 「Camera roll」スライダを使用します。 あなたはいつまで微調整これらの設定は満足。 終わるには、 「Save Changes」をクリックして下さい。 Google Earthでパノラマを終了するには、 「Exit Photo」をクリックして下さい。...
- Page 103 7章トラブルシューティング GigaPan EPIC Proの一般的な問題を解決する方法を読んで 確認する。ここに、あなたのソリューションを見つけられない 場合は、GigaPanSystems.comのテクニカルサポートに連絡し て下さい。 7.1写真がぼやけている 写真がぼやけている原因は、いくつかが考えられます: カメラが写真を撮影する前に、EPICはプロ動いている可能 性があります。 a. EPIC Proのメニューで「Options」 「Time Per Pic」に移動す る。EPIC Proが移動する前に待機する時間を増やす為に、 方向キーを使用して下さい。これは、特に夜間のパノラマ に便利です。 写真が撮影される前に、 EPIC Proのプラットフォーム十分が 静止していない可能性があります a.メニューの 「Options」 「 ‘Expert Options」 「Pretrigger Delay」 へ進みます。 b. 静止までの時間を可能にするために、 「 Pretrigger Delay」 を高い値に設定します。 c.「Options」 「Expert Options」 「Motor Speed」に進む。...
- Page 104 注:大きく、 重いレンズを使用している時は、 「 Pretrigger Delay」 と「Motor Speed」の調整は特に重要です 突風や振動がレンズとカメラを妨げている可能性がありま す。 a. 少なくともレンズ焦点の長さの逆数値の速いシャッター 速度を使用します。300mmのレンズを使用している場合は、少 なくとも1/300秒のシャッター速度を使用して下さい。 十分な光がない場合、速いシャッター速度を可能にする範囲 のISOの増加を検討して下さい。 樹木や 車のトランク、折りたたみ屏風反射版の様な もの を置いて風からレンズおよびEPIC Proを保護することを試み てください。 極端な条件下では、小さなキャンプテントの内部 にEPIC Proを置くことを検討して下さい。 障害が断続的である場合、 写真ボケのない確率を増やすた め、同じ露出で位置ごとに2つまたは3つの写真を撮って検討し て下さい。 EPIC Proのメニュー 「Options」 「 Expert Options」 「Shutter Length」へ移動。 「Shutter Length」の設定値を「Time per Pic」 の設定値より大きい値に増やす、オートフォーカスのサブシス テムを長く設定し良いフォーカスを実現します。...
- Page 105 最小絞り値f/2.8の高速レンズを持っているなら、 これを使う ことを検討してみて下さい。 注 通常ズームレンズは2つの値が印刷されます 最小焦点距離で最大絞り、そして最長焦点距離で最大開放値 空、水、詳細な機能が含まれていないプレーンの壁などの場 合、マニュアルフォーカスまたは混合マニュアルフォーカスと オートフォーカスを使用して見ることも考えてみましょう。 7.2被写界深度が浅い そのフィールドの深さに影響する、いくつかの要因がある。 カメラで、被写界深度の深さを増やすことができます: ・絞り値を大きくする ・レンズの焦点距離の小さくする ・被写体までの距離を増やす ・ 小さいサイズの画像センサを使用する ・ 必要に応じて合わせたいフォーカスポイントを移動させオ ートフォーカスを使用する。 レンズの製造元から提されている被写界深度のグラフを参考に することができます。 被写界深度を最大限に絞り値を増加させながら、画像品質の逓 減が発生するポイントがあります。 f/8又はf/11や16 よりもf/ 22の絞り値が高いなどを使用する場 合、回折損失によって画像が劣化が始まります。...
- Page 106 2章.8節オートフォーカスの詳細を参照 露出が不足 お使いのカメラが写真を写し損ねるいくつかの原因が考えら れます 1. カメラが写真を撮るよりも EPIC Proのプラットフォームが 先に動いている a. EPIC Proのメニューで 「Options」 「Time per Pic」 に進む。 b. EPIC Proが回転する前に待機する時間を増やすのに、方 向キーを使用して下さい。 2. オートフォーカスを使用し、パノラマを開始する前にレン ズの焦点合わせが出来ていない。 a. フォーカスシステムに従い、 カメラのシャッターボタンを 半押して、パノラマ撮影を開始する前に良いフォーカスを実現 して下さい。 3. オートフォーカスは、 フォーカスが合わない写真を撮りませ ん。 a. EPIC Proの「 」に移動 Options」 「Expert Options」 「Shutter Length します。...
- Page 107 注意してください、ズームレンズ通常、最小焦点距離で最小絞 り値と最長焦点距離で最大絞り値の2つの値か゜レンズに印刷 されてます。 c. 詳細な機能を含んでいない空、水、平坦な壁などの撮影対 象には、マニュアルフォーカス又はマニュアルフォーカスとオ 。 ートフォーカスの混合使用を検討して下さい 7.4電子レリースケーブルとカメラの動作不良 電子シャッターケーブルがカメラのシャッターを作動させな いのか、いくつかの一般的な理由があります。 1. 電子シャッターケーブルがカメラ本体とEPIC Proの液晶 ディスプレイの左に接続されいることを確認して下さい。 メモリーカードがカメラに完全に挿入されていることを確認 して下さい。 3. EPIC Proのバッテリーがパノラマを完了するのに十分な 電荷をカメラに供給しているか確認してください。 (参照:2章を 2バッテリーの状態をチェックする。 ) 4. マニュアルフォーカスを使用して場合は、そのレンズはマ ニュアルフォーカスモードになっていることを確認して下さい。 5. オートフォーカスを使用する場合、オートフォーカスのサ ブシステムのシャッターボタンを半押してフォーカスを作動す るかを確認して下さい。 7.5電子レリースケーブルとカメラのオートフォーカ の動作不良...
- Page 108 EPICのプロメニューの「Options」 「Expert Options」 「Shutter Length」へ移動。 良いフォーカスを実現するには、 オートフォーカスのサブシス テムの「Time per Pic」の値より「Shutter Length」の値を大き くします。 高速 (最小絞り値f/2.8など) レンズ使用を検討する場合は、 注意してください、ズームレンズ通常、最小焦点距離で最小絞 り値と最長焦点距離で最大絞り値の2つの値か゜レンズに印刷 されてます。 サーボモードまたはサーボモードのリリース方法を確認 する。カメラメーカーが異なると、 サーボモードの用語もこと なる。通常、単純なサーボモードは、オートフォーカでピント が決定しない限りカメラはシャッターを作動させないと言うフ ォーカス方法使用しています。あるカメラでは、デフォルトの フォーカス方法とは異なる、カメラが良いフォーカスを実現す るかどうかに関係なく写真が撮影されるリリース方法に変更す ることができます。 Release policy can cause more problems than it solves depending upon your equipment and the subject you are photographing. 詳細な機能を含んでいない空、...
- Page 109 7.6パノラマが歪んでいる パノラマの歪曲やずれには、いくつかの原因が考えられます 1.設定エラーを確認します。 a. 第2章セットアップの手順に移動します。 注 : カメラ、 レンズや焦点距離を変更するたびに、 Gigapan EPIC の設定を繰り返す必要があります。 b.、 カメラがしっかりとEPIC Proに固定されていることを必ず 確認して下さい。 c. EPIC Proが、しっかりと三脚に固定されているか確認して 下さい。 d. お使いの三脚が安定した地面に置かれていることを確認し て下さい。 e. EPIC Proが写真を撮っている間、何も邪魔するものがない ことを確認してください。 2.パノラマの垂直、水平の調整 GigaPanステッチは、写真の大きい要素を配置しますのでポ ールや窓枠などの垂直または水平の線を無視する場合が有りま す。 近景にあまりにも多くの縦線があるパノラマ撮影を避ける ようにしてください。 パノラマをステッチするために、 サードパーティ製のツール を使用してみてください。...
- Page 110 プラットフォームの前方後方位置をチェックして、調整。 マクロのパノラマを取っている場合(つまり、ものすごく近 くにある対象物)は、プラットフォームの位置を調整する必要 があります。 a. 第2章9節 「Parralaxエラーを減らす。 」に戻って 下さい 注:これは時間のかかるプロセスであり、必要な場合のみにし て下さい。しかし、真近な撮影対象、遠く離れている撮影対象 そしてマクロパノラマの撮影対象には、調整は必要でしょう。 7.7GigaPanステッチがフリーズする GigaPanステッチのソフトウェアは、 パノラマのステッチに、 処理能力の多く、CPUのほぼ100%を必要とするので、他のプ ログラムは、最低限の稼働にする方が良い。また、大きなパノ ラマは、より多くの能力と時間が必要となる。 それは、コンピュータがフリーズされるかもしれないが、それ だけGigaPanスティッチは一生懸命稼働いている。 理想的には、ステッチソフトウェアが実行されている間は、コ ンピュータで作業を避ける必要があります。 Windowsでは、タスクマネージャ([Ctrl]キー+ [Shift]キー+ [Esc]キー)をオンにGigaPanステッチを監視します。 GigaPanステッチが「Not Responding」を表示する場合...
- Page 111 GigaPanスティッチの「help」タブの下の「report a bug」を 使用して下さい、又は GigaPanSystems.comのテクニカルサポ ートお問い合わせ下さい。 Macの場合は、 アクティビティモニタ(Applications’ > ‘Utilities ‘> ‘Activity Monitor)を使用してGigaPanステッチを監視するこ とができます。 GigaPanステッチが「Not Responding」を表示する場合 GigaPanスティッチの「help」タブの下の「report a bug」を使 用して下さい、又は GigaPanSystems.comのテクニカルサポー トお問い合わせ下さい。 7.8パノラマに、ケラレがある ケラレは、写真の中央よりも写真のエッジやコーナーでは、 光量が少なくなる結果です。ケラレはパノラマでストライプの パターンとして現れます。ケラレを最小限にするために、カメ ラの設定を調整することがで、また写真を合成する前にイメー ジエディタを使用してケラレを減らすことができます。 ケラレを最小限に抑える撮影方法 カメラ f/ 4よりf/ 8などの大きな絞り値を使用しての削減する。 絞値は開口部の直径に逆比例します。 400mmより200mmの小さな焦点距離を使用して下さい。 花びら型のレンズフードを使用して下さい、またはレンズ フードを使用しないで下さい。...
- Page 112 新しいNikonや、Cannonのカメラにはケラレを少なくする 補正機能がある。 Nikonのケラレ補正コントロールは、 カスタム 。 メニューに配置されています 新しいCannonのカメラは certian lenses用に「peripheral illumination」設定がサポートさ れている。 「EPIC Pro Menu」の「Picture Overlap」設定を使用して、 ステッチ重ねシロを EPICProのデフォルト値30%より高い増 やす。 ステッチする前にケラレ低減させる処理方法 時には、画像を暗い環境での撮影のためパノラマの撮影時に カメラのケラレ低減の調整が十分でなかったなどにより、編集 にプロダクションに編集を依頼する必要があります jpegホーマット画像のケラレを最小限に調整することができま すが、 RAWフォーマット画像の方が積極的な調整を行うことが できることを覚えておいて下さい。 8章はTips 少し多めに撮影する。 さまざまな環境で撮影 1.屋外撮影...
- Page 113 2.屋内撮影 3.夜間撮影 4.市街地撮影 作成ゲーム:隠す&探す Motionでパノラマ写真:群集をキャプチャ...
Need help?
Do you have a question about the EPIC Pro and is the answer not in the manual?
Questions and answers