GigaPan Epic Pro User Manual
Hide thumbs
Also See for Epic Pro:
- User manual (113 pages) ,
- User manual (55 pages) ,
- User manual (56 pages)
Table of Contents
Advertisement
Quick Links
Download this manual
See also:
User Manual
Advertisement
Table of Contents

Related Manuals for GigaPan Epic Pro


Summary of Contents for GigaPan Epic Pro
- Page 1 EPIC Pro User Guide C 2010 GigaPan. All rights reserved. GigaPan is a registered trade and service mark of Carnegie Mellon University licensed by GigaPix Systems, LLC.
-
Page 3: Table Of Contents
1.2 GigaPan EPIC Pro Parts 1.3 EPIC Pro Special Features 1.4 Navigate the EPIC Pro Menu 1.5 Set up the EPIC Pro Quick Menu 1.6 Electronic Trigger Cable Compatibility 2. Setting up the GigaPan EPIC Pro 2.1 Get your equipment ready 2.2 Charge and Install Batteries... -
Page 4: Introduction
GigaPan Viewer. Join GigaPan.com to view and share with friends, take snapshots and embed panoramas on your own website. Here is an overview of how easy and fun it is to use the GigaPan System, in 4 simple steps: 1. Pick a scene The GigaPan EPIC Pro automates the panorama-taking process by taking hundreds of images of the selected scene. - Page 5 The Gigapan Stitch software assembles, aligns and blends the individual images into one large panorama. 4. Share The GigaPan Stitch software then uploads your panorama to GigaPan.com to share with friends and the GigaPan community. You also have the ability to embed your uploaded panorama on any website.
-
Page 6: Gigapan Epic Pro Parts
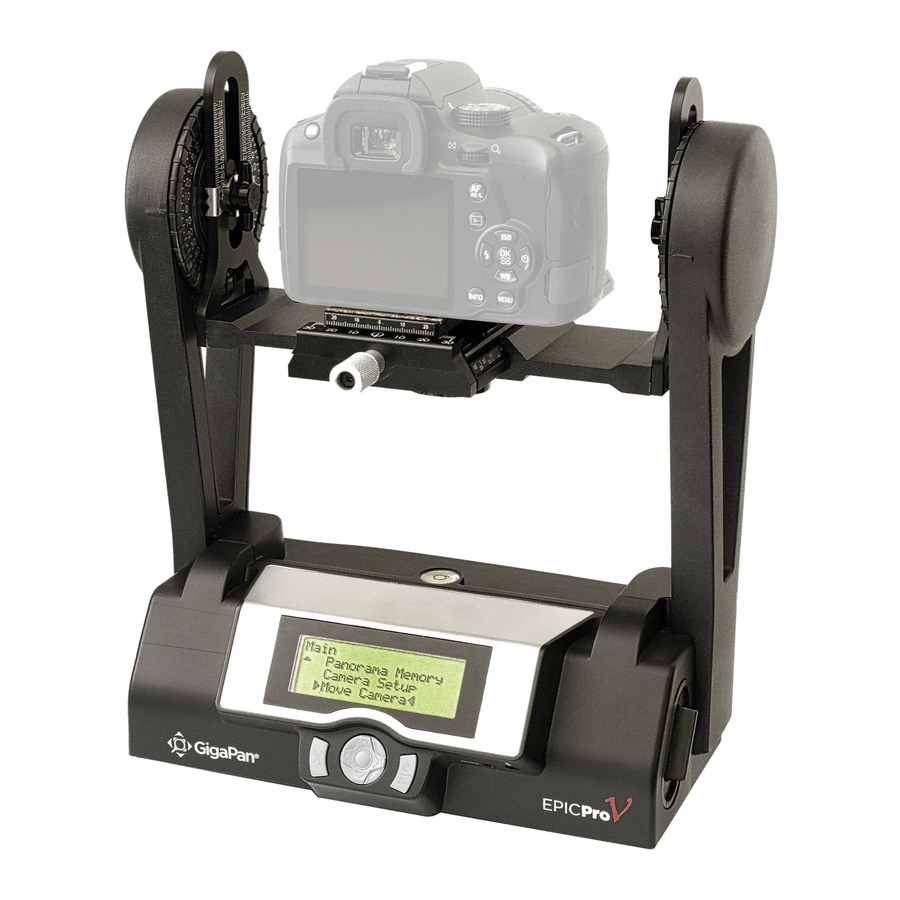
Introduction 1.2 GigaPan EPIC Pro Parts Camera Rail Camera Mounting Platform Camera Mounting Plate Camera Mounting Plate Lever Platform thumbscrew Camera Rail Adjustment Knob Battery Compartment Navigation Panel (see page 4 for detail) Tripod Mount... - Page 7 Platform Thumbscrews - Loosen or tighten the thumbscrews to move the camera mounting platform. Camera Mounting Plate - Attaches to the camera or lens to mount it on the EPIC Pro. Camera Mounting Plate Lever - Holds the camera mounting plate securely in place.
-
Page 8: Epic Pro Special Features
Cancel Button - Cancel selections in navigating the EPIC Pro Menu. Power/OK Button - Hold down for a few seconds to power the EPIC Pro ON or OFF, or use to select items when navigating the Menu. -
Page 9: Navigate The Epic Pro Menu
GigaPan User Guide 1.4 Navigate the EPIC Pro Menu Turn the EPIC Pro on by pressing the Power/OK button. The first menu option, ‘New Panorama’ , will appear. To navigate to other menu options, push the down button. To reach submenus within a menu option, push the OK button once you reach the desired main menu option, then the down button to access the submenu choices. -
Page 10: Main Menu
Options Menu Time per Pic - The amount of time that the EPIC Pro will wait until it moves the camera to the next position. It is important to allow enough time for the camera to process the current photograph and move the data to flash memory. - Page 11 Remote or Manual. The Remote setting will use the electronic trigger cable to connect the EPIC Pro to the remote shutter port on your camera. If the Manual method is used, the user must manually actuate the shutter and press the OK button on the EPIC Pro to advance to the next photograph.
-
Page 12: Set Up The Epic Pro Quick Menu
‘Save Previous’ option before turning the power off. Save Previous –Save the previous panorama settings to the EPIC Pro’s memory, including an approximate reference point that will be used in the future to give the EPIC Pro a point of reference to begin shooting. -
Page 13: Electronic Trigger Cable Compatibility
GigaPan User Guide 1.6 Electronic Trigger Cable Compatibility Your EPIC Pro arrived with seven electronic trigger cables. Review the chart below to find which cable is compatible with your camera. Camera Model Cable Type Canon Canon N3 cable EOS-1Ds Mark III... - Page 14 Nikon Nikon MC-DC2 D90 (2008) D5000 Nikon Nikon MC-DC1 D80 (2006) D70S Olympus Olympus RM-UC1 E-620 E-600 E-520 IS E-510 E-450 E-420 E-410 Pentax Canon E3 cable K10D K200D K110D K100D Super K100D Sony Sony RM-S1AM ALPHA-A900 ALPHA-A850 ALPHA-A700 ALPHA-A550 ALPHA-A500 ALPHA-A380 ALPHA-A350...
-
Page 15: Setting Up The Gigapan Epic Pro
To charge the battery inside the EPIC Pro: 1. You can charge the battery in the EPIC Pro while it is powered on or off. You can also operate the unit while the battery is charging, if there is a sufficient level of charge on the battery. - Page 16 Setting up the GigaPan EPIC To charge the battery on its own: 1. To remove the battery from the EPIC Pro , open the battery compartment by flipping the latch counter-clockwise. 2. Plug the connector end of the power cord into the battery and then plug the power cord into an AC wall socket.
-
Page 17: Mount The Epic Pro On A Tripod
GigaPan User Guide 2.3 Mount the EPIC Pro on a tripod To ensure a steady series of images, use the EPIC Pro with a sturdy tripod fitted with a standard 1/4-20 tripod screw. 1. Set up the tripod. Ensure that the legs have a solid footing on the ground and that the tripod is relatively level. -
Page 18: Mount Your Camera And Lens
2.4 Mount your camera and lens Use these steps below to mount your camera and lens on the EPIC Pro. Refer to the EPIC Pro diagram and part names in Chapter 1.2 as you follow these steps. Turn the EPIC Pro on by pressing and holding the OK button for one to two seconds. -
Page 19: Set Up Your Camera
Adjust the height of the camera rail and the camera mounting plate so that the center of the lens is at the level of the platform thumbscrews attached to the EPIC Pro arms. Loosen the platform thumbscrews to allow for adjustment of the camera mounting plate and lens height. -
Page 20: Align Your Camera To The Epic Pro
Any time you change the lens, camera body, or the focal length on a zoom lens you will need to use the menu item ‘Camera Setup’ to tell the EPIC Pro how much your camera can see for each photograph taken. The term “Field of View” (FOV) is used for image viewers and “angle of view”... -
Page 21: Set The Manual Focus Or Auto Focus
GigaPan User Guide 2.8 Set manual focus or autofocus Focus is very important when capturing panoramas with the EPIC Pro. By paying close attention to the focus both before and during shooting, you can create panoramas wih ulta high resolition and incredible clarity in their detail. By not paying close attention... -
Page 22: Auto Focus
Setting up the GigaPan EPIC Auto Focus There are situations when auto focus is a better choice, than manual focus for increasing the sharpness of a panorama. One example is a crowd of people or a building that are at an angle and span a large distance. You will not be able to increase the depth of field to cover the entire distance, especially if you are using a longer focal length. -
Page 23: Minimize Parralax Error
The best way to test whether your setup is all right is to take a 2x2 panorama. Use the instructions in Chapter 3 to take a panorama, and preview the images in your camera. If you don’t see a good overlap despite following the instructions, go back and adjust your EPIC Pro set-up. Good Overlap Insufficient Overlap 2.9 Minimize parralax error... - Page 24 3. Loosen the knob underneath the camera rail and move the rail so that the estimated location of the lens entry pupil is located at the midpoint of the EPIC Pro arms, which is the yaw axis.
-
Page 25: Using The Gigapan Epic Pro
Taking a 360 degree panorama is easy and is similar to shooting any other panorama. Instead of setting the EPIC Pro to the upper left and lower right corners of the panorama, you just have to set it to the top and bottom. -
Page 26: Repeat Your Last Panorama
3.3 Repeat a previous panorama The EPIC Pro can save the data for your previous panorama, so you can repeat it and correct it if something went wrong with your first try, or if you just want to try the same panorama with a different camera setting. -
Page 27: Stitching And Uploading Panoramas
GigaPan Stitch software automatically takes all your photos and combines them into one big panorama. Once that’s done, you can upload it to GigaPan.com for everyone to see. You’ll need an Intel based Mac or PC with at least 1 GB of RAM (more is better) to stitch photos. - Page 28 10. To save this panorama as another file type, select ‘File’ > ‘Export stitched image to’ > ‘TIFF or Adobe RAW’. 11. If your panorama is larger than 50 megapixels, you can upload it to GigaPan.com where you can share, explore and take snapshots.
- Page 29 Your options are columns - right, columns - left, rows - down, or rows - up. The GigaPan Stitch default is columns - right; remember to change it in the stitching software if you change your shooting order with the EPIC Pro.
-
Page 30: Share Your Panoramas Online
To share your panoramas with the GigaPan community, please join www.GigaPan.com and then upload. 1. Join GigaPan.com Become a member of the GigaPan community! Join GigaPan.com where you can explore thousands of panoramas from around the world. Visit today to share, explore and discover. - Page 31 URL to can view it. 4. Enter your GigaPan.com user name and password, and click on ‘Upload now’. 5. Once you have uploaded your panorama, it’ll give you a URL to view it online. People can now view your panorama, zoom in and out, take snapshots of parts that they like and things they find.
- Page 32 If you used a third-party tool to create your panoramas, you can upload them using Giga- Pan Upload software, which automatically installs with GigaPan Stitch. 1. Start the GigaPan Uploader (‘Start’ > ‘Programs’ > ‘GigaPan Uploader’ in Windows, or under ‘Applications’ on a Mac) The interface of the Uploader is identical to the Upload screen in the stitching software.
-
Page 33: Exploring Gigapan.com
5. Exploring GigaPan.com Enjoy thousands of brilliant gigapixel panoramas from around the world. Share, discuss, snapshot and more. 5.1 View and Share At GigaPan.com, you can: • Explore thousands of GigaPans from around the world, take snapshots, comment and share. -
Page 34: Embed Your Panorama
You can also choose to have your panorama’s title (in white text on a blue back- ground from GigaPan.com) displayed above the GigaPan Viewer. The title also serves as a link to your panorama’s URL on GigaPan.com. If you choose not to display the title, the ‘GigaPan’ watermark is also a link to GigaPan.com. -
Page 35: Place Your Panorama On Google Earth
GPS will make it easier. You’ll need Google Earth 4.2 or higher to share your panoramas. You can download Google Earth from http://earth.google.com. 1. Log into GigaPan.com and go to ‘My Home’. For the panorama you want to place on Google Earth, click on ‘Place this Panorama in Google Earth’. You will be prompted to download a file called gigapan_placement.kml. - Page 36 Exploring Gigapan.com 7. There are three ways for you to specify the location of your panorama: a. If you recorded your coordinates using a GPS receiver, enter them in the text boxes below the map. b. If you know the address that you took the panorama from, click on the ‘Have an address?’...
- Page 37 GigaPan User Guide 10. Drag the ‘Heading’ slider to change the orientation of the panorama. For accurate results, try to match elements in your panorama with corresponding elements on the ground in Google Earth. 11. If your panorama still doesn’t look right, click on ‘advanced placement options’.
-
Page 38: Troubleshooting
6. Troubleshooting Read on to find out how to fix common problems with the GigaPan EPIC Pro. If you don’t find your solution here, contact technical support at GigaPanSystems.com. 6.1 My photos are blurry There could be several causes for blurry photos: 1. -
Page 39: My Photos Have A Narrow Depth Of Field
1. The EPIC Pro’s platform is moving faster than your camera can take pictures. a. Navigate to ‘Options’ > ‘Time per Pic’ in the EPIC Pro Menu. b. Use the directional keys to increase the time that the EPIC Pro will wait before moving. -
Page 40: The Electronic Trigger Cable Is Not Actuating The Camera Shutter
2. Verify that a memory card has been inserted into the camera and that it is not full. 3. Verify that the camera is powered and that there is sufficient charge on the EPIC Pro battery to complete a panorama. (See Chapter 2.2 for checking battery status.) 4. -
Page 41: My Panoramas Are Distorted Or Misaligned
GigaPan Stitch working hard. Ideally, you should avoid work ing on your computer while the stitching software is running. To monitor GigaPan Stitch in Windows, turn on the Task Manager ([Ctrl] + [Shift] + [Esc]). If GigaPan Stitch reports “Not Responding” , use the ‘report a bug’ feature under the ‘help’ tab of GigaPan Stitch or contact tech support via GigaPanSystems.com. -
Page 42: My Panoramas Have Vignetting
Newer Canon cameras support ‘peripheral illumination’ settings for certian lenses. 5. Increase the amount of overlap to an percentage higher than the EPIC Pro default of 30% using the ‘Picture Overlap’ setting in the EPIC Pro Menu. -
Page 43: Tips And Tricks
Another good idea is to set your lower-right corner so that it’s just after the point when the number of horizontal and vertical photos increases. For example, if the EPIC Pro shows you 20 horizontal and 10 vertical images, move it lower and to the right so that it reads 21 horizontal and 11 vertical. - Page 44 EPIC Pro moves and before actuating the shutter. 8. If there is substantial wind gusts, consider placing the EPIC Pro and lens behind a car trunk, tree, building, or a collapsible portrait reflector. Use a higher shutter speed that is at least the recipricol of the focal length such as faster than 1/300 of a second for a 300mm lens.
- Page 45 Another option with the EPIC Pro is to use autofocus if the subject is suitable. (See Chapter 2.8 for more information about autofocus.) If there are obects that are moving, you may want to use a higher ISO such as 400 or 800 to be able to use a faster shutter speed to freeze movement.
- Page 46 3. Night shots Here are a few tips for shooting panoramas at night. The key is to Increase the exposure time for each photo and make sure that the EPIC Pro and your camera are free from vibra- tions. If your camera body or lens has Image Stabilization, turn the feature off. Nikon refers to image stabilisation as VR vibration reduction.
- Page 47 GigaPan User Guide 4. City scenes In cities, you need to be more aware of objects in motion—specifically vehicles and people. You may also find that buildings can get distorted when you stitch your panorama. To avoiding moving objects, watch for people or street traffic that might get in the way of your shots - pause the panorama before they do and resume the panorama after they have left the frame, or pause go back and resume where you left off.
- Page 48 Just follow these instructions when you are uploading your panorama to turn it into a fun hide & seek game: 1. When you upload your panorama to GigaPan.com, click on ‘Edit’. 2. Check the ‘Is a Game’ box. 3. List the objects you’ve hidden in your panorama comments.
- Page 49 GigaPan User Guide Panoramas in Motion: Capturing a Crowd Sporting events, races or crowds of people are great opportunities to take an epic shot that captures every detail of the moment. You’ll be sure to capture every face in the crowd.
Need help?
Do you have a question about the Epic Pro and is the answer not in the manual?
Questions and answers