Table of Contents
Advertisement
Advertisement
Table of Contents

Related Manuals for GigaPan EPIC PRO V


Summary of Contents for GigaPan EPIC PRO V
- Page 1 & User Guide Proudly manufactured and distributed in the U.S. by OmegaBrandess...
-
Page 2: Table Of Contents
3.1 Start a new panorama 3.2 Shoot a 360 panorama 3.2 Repeat your last panorama 3.4 Guide to Epic Pro V Specific Features 4. GigaPan Additional Instructions 4.1 Balance Exposure Bracketing Settings 4.2 Using the GigaPan to Control Bracketing Exposure 4.3 Frequently Asked Questions... - Page 3 6.4 The electronic trigger cable is not actuating the camera shutter 6.5 The electronic trigger cable is not allowing my camera to auto focus 6.6 My panoramas are distorted or misaligned 6.7 My computer freezes while GigaPan Stitch is working 6.8 My panoramas have vignetting 7. Tips and tricks 7.1 Shoot more than you need...
-
Page 4: Introduction
GigaPan Viewer. Join GigaPan.com to view and share with friends, take snapshots and embed panoramas on your own website. Here is an overview of how easy and fun it is to use the GigaPan System, in 4 simple steps: 1. Pick a scene The GigaPan system automates the panorama-taking process by taking hundreds of images of the selected scene. - Page 5 GigaPan community. You also have the ability to embed your uploaded panorama on any website. Images created using the GigaPan are able to be stitched together using a variety of 3rd party software programs as well including Adobe Photoshop, PTGui and others. The popularity of gigapixel images has also led to the creation of new websites for sharing.
-
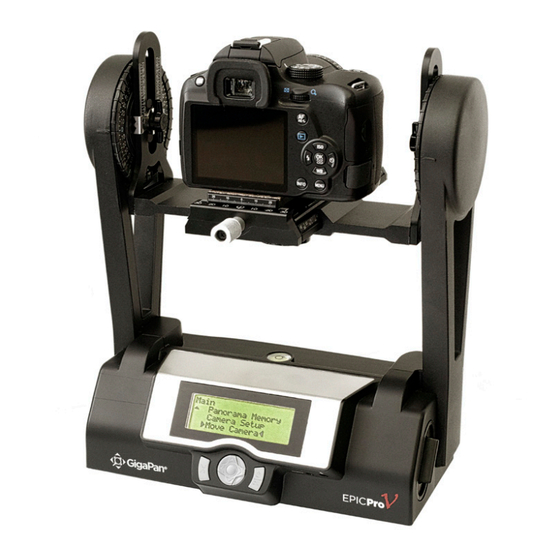
Page 6: Gigapan Parts
GigaPan User Guide 1.2 GigaPan Parts Camera Rail Camera Mounting Platform Camera Mounting Plate Mounting Plate Tension Knob Platform thumbscrew Camera Rail Adjustment Knob Battery Compartment Navigation Panel (See page 4 for detail) Tripod Mount... - Page 7 Platform Thumbscrews - Loosen or tighten the thumbscrews to move the camera mounting platform. Camera Mounting Plate - Attaches to the camera or lens to mount it on the GigaPan. Camera Mounting Plate Lever - Holds the camera mounting plate securely in place.
-
Page 8: Gigapan Features
Cancel Button - Cancel selections in navigating the GigaPan menu. Power/OK Button - Hold down for a few seconds to power the GigaPan ON or OFF, or use to select items when navigating the menu. Trigger cable port - Use with electronic trigger cable to actuate the shutter and cause the camera to focus if you are using auto focus. -
Page 9: Navigate The Gigapan Menu
1.4 Navigate the GigaPan Menu Turn the GigaPan on by pressing the Power/OK button. The first menu option, ‘New Panorama’ , will appear. To navigate to other menu options, push the down button. To reach submenus within a menu option, push the OK button once you reach the desired main menu option, then the down button to access the submenu choices. -
Page 10: Menu Options
Then move the lens so that the unique point is at the bottom of the lens. The the GigaPan knows the vertical angles and calculates the horizontal angle of view using the aspect ratio. The GigaPan also accounts for image overlap which has a default setting of 30%. - Page 11 Time/Exposure - This was previously named “Time per Pic” in firmware 128.1 and is the amount of time that the GigaPan will wait until it moves the camera to the next position. It is important to allow enough time for the camera to process the current photograph and copy the data from the camera’s buffer memory to the flash memory.
- Page 12 Remote or Manual. The Remote setting will use the electronic trigger cable to connect the GigaPan to the remote shutter port on your camera. If the Manual mode is used, the user must manually actuate the shutter and press the OK button on the GigaPan to advance to the next photograph.
- Page 13 PC connector at one end and a mini plug at the other. You connect the PC end to the camera and the mini plug to the GigaPan remote trigger cable port. If your camera does not include a PC connector, you can purchase a hot shoe adapter that has a PC connector.
-
Page 14: Set Up The Gigapan Quick Menu
Motor Speed Shutter Retries Motors Rigid Language 1.7 Electronic Trigger Cable Compatibility Your GigaPan arrived with six electronic trigger cables, for a full list of compatible cameras, please visit www.omegabrandess.com/products/gigapan then click on “Epic Pro Camera Compatability Chart by Cable”... -
Page 15: Setting Up Your Gigapan
To charge the battery inside the GigaPan: 1. You can charge the battery in the GigaPan while it is powered on or off. You can also operate the unit while the battery is charging, if there is a sufficient level of charge on the battery. - Page 16 When the battery is low, a low battery icon will flash in the lower right corner of the GigaPan LCD display. When the battery is so low that proper functionality is no longer possible, a “Please recharge the battery” message will appear.
-
Page 17: Mount The Gigapan On A Tripod
2.3 Mount the GigaPan on a tripod To ensure a steady series of images, use the GigaPan with a sturdy tripod fitted with a standard 1/4-20 tripod screw. 1. Set up the tripod. Ensure that the legs have a solid footing on the ground and that the tripod is relatively level. -
Page 18: Mount Your Camera And Lens
GigaPan User Guide 2.4 Mount your camera and lens Use these steps below to mount your camera and lens on the GigaPan. Refer to the GigaPan diagram and part names in Chapter 1.2 as you follow these steps. Turn the GigaPan on by pressing and holding the OK button for one to two seconds. -
Page 19: Set Up Your Camera
LCD display. Connect the cable to the camera. 5. Set the GigaPan ‘Time/Exposure’ in the ‘Options’ submenu to ensure enough time for the camera to be ready to capture another photograph. You need to account for the shutter speed and enough time to write the image to flash memory. -
Page 20: Align Your Camera To The Gigapan
Any time you change the lens, camera body, or the focal length on a zoom lens you will need to use the menu item ‘Camera Setup’ to tell the GigaPan how much your camera can see for each photograph taken. The term “Field of View” (FOV) is used for image viewers and “angle of view”... -
Page 21: Set The Manual Focus Or Auto Focus
2.7 Set manual focus or auto focus Focus is very important when capturing panoramas with the GigaPan. By paying close attention to the focus both before and during shooting, you can create panoramas with ultra high resolution and incredible clarity in their detail. By not paying close... - Page 22 GigaPan User Guide Auto Focus There are situations when auto focus is a better choice, than manual focus for increasing the sharpness of a panorama. One example is a crowd of people or a building that are at an angle and span a large distance. You will not be able to increase the depth of field to cover the entire distance, especially if you are using a longer focal length.
-
Page 23: Test Your Set-Up
The best way to test whether your setup is all right is to take a 2x2 panorama. Use the instructions in Chapter 3 to take a panorama, and preview the images in your camera. If you don’t see a good overlap despite following the instructions, go back and adjust your GigaPan set-up. Good Overlap Insufficient Overlap 2.9 Minimize parallax error... - Page 24 3. Loosen the knob underneath the camera rail and move the rail so that the estimated location of the lens entry pupil is located at the midpoint of the GigaPan arms, which is the yaw axis.
-
Page 25: Using The Gigapan
Taking a 360 degree panorama is easy and is similar to shooting any other panorama. Instead of setting the GigaPan to the upper left and lower right corners of the panorama, you just have to set it to the top and bottom. -
Page 26: Repeat Your Last Panorama
3.3 Repeat your last panorama The GigaPan can save the data for your previous panorama, so you can repeat it and correct it if something went wrong with your first try, or if you just want to try the same panorama with a different camera setting. -
Page 27: Guide To Epic Pro V Specific Features
Once you have your position adjusted, press the “OK” button to set it. Set End Position– Next you will see a prompt to “Set End Position”, move the Gigapan once again until it is in your desired end position and press “OK” to set it. - Page 28 Once you have your position adjusted, press the “OK” button to set it. Set End Height– Next you will see a prompt to “Set End Height”, move the Gigapan once again until it is in your desired end height and press “OK” to set it. Since the panorama will end on the same vertical position as it started, you will only need to adjust the height if you would like any diagonal motion.
- Page 29 Video Pan Settings The video features of the Epic Pro V are designed to create a fluid panning motion for your camera. It does not, however, start or stop the video recording on the camera itself. You must manually start and stop recording on your camera. To get started with a video pan, select the “New Video Pan”...
-
Page 30: Gigapan Additional Instructions
You can improve the overall exposure by capturing multiple photographs with different exposures for each position. You do this by using the GigaPan “Brackets” setting and the “EV Step Size” setting. The panorama shown above is a good example of exposure bracketing because it has a very large horizontal field of view with areas that have very dark shadows. -
Page 31: Balance Exposure Bracketing Settings
4. Set your shutter and aperture to your 0 exposures value. Might need an ND so as to not overexpose on the longer bracketing shots. 2. Configure the GigaPan to take a panorama as usual. While taking the panorama, the GigaPan will take multiple exposures at each location. Your camera will do the necessary adjustments for shutter speed to get the desired exposure levels. -
Page 32: Using The Gigapan To Control Bracketing Exposure
3. Set your aperture to your 0 EV exposure value. Might need an ND filter so as to not overexpose. 2. Configure the GigaPan to take a panorama. While taking the panorama, the GigaPan will take multiple exposures at each location in the bracket sequence. If the camera has trouble writing the images to the card before the next image position, increase the bracket delay in the “Expert Options”... -
Page 33: Frequently Asked Questions
4.3 Frequently Asked Questions 1. What changes exposure and why should I only vary the shutter speed? When you capture multiple exposure brackets for each position for the purpose of capturing HDR images, you vary the exposure by varying the shutter speed and keeping the ISO &... - Page 34 GigaPan User Guide Setting Your Camera for Spot Metering Please refer to your camera’s user manual for any specific information Two methods on the next page. The first method simply requires you to count the number of shutter values required to travel between each extreme to the average exposure. The second method requires you to divide by two or multiply by two until you reach the other meter reading.
- Page 35 Method One: EV distance from brightest area to average exposure using 1/3 EV shutter settings 1/80 1/60 1/50 1/40 1/30 0 EV +1 EV +2 EV 1/25 1/20 1/15 1/13 1/10 +3 EV 10/3 11/3 +4 EV 13/3 14/3 EV distance from shadows to average exposure using 1/3 EV shutter settings 1”s 0”8 0”6...
- Page 36 Common parameters that you might need to change are Strength, Color Saturation, Exposure Bias, and Black Level. Once you have processed your exposure brackets and produced fused or tone mapped files, you are ready to stitch your panorama using the Gigapan Stitch software.
-
Page 37: Mirror Lock-Up
4.4 Mirror Lock-Up The “Mirror Lock-Up” function is used to flip up the mirror and wait a programmable delay that is independent of the “Time/Exposure” delay before actuating the shutter. “Mirror Lock-Up” is especially important for longer focal length lenses that are larger and heavier. The longer focal length indirectly means that the magnification is greater and that any lens movement is magnified more, and more likely to cause blurry photographs. -
Page 38: Shutter Teach
3. Scroll to the “Shutter Teach” menu item and press “OK”. 4. Select “ON” and press “OK”, you will now enter “Shutter Teach” mode. 5. The display will ask you to use the left arrow button to tell the GigaPan when to trigger the shutter. -
Page 39: Timelapse/Series
Some things to consider before starting a time lapse series 1. If you are mounting the GigaPan on a structure or a pole, is it secure? Will it present a danger to any people in the area if it falls? Safety First! 2. -
Page 40: Save/Load Config
3. Select one of the configuration memory locations, A, B, or C, and press “OK” 4.8 Last Pic Hold When the “Last Pic Hold” function is set to “ON”, the GigaPan will keep the half button press signal asserted so that the camera is ready for the next panorama. This is very useful for time lapse panoramas. -
Page 41: Stitch And Share
GigaPan. com, Prodibi.com, and other similar sites. You’ll need an Intel based Mac or PC with at least 1GB of RAM to stitch photos. To upload to the GigaPan.com site, your panorama must be at least 50 megapixels. -
Page 42: Troubleshooting
GigaPan User Guide 6. Troubleshooting Read on to find out how to fix common problems with the GigaPan. If you don’t find your solution here, contact technical support at GigaPanSystems.com. 6.1 My photos are blurry There could be several causes for blurry photos:... - Page 43 Consider increasing the ISO to allow for a higher shutter speed if there is not enough light. b. Attempt to shield the lens and GigaPan from the wind by placing it to the side of an object such as a tree, car trunk, or a large collapsible portrait reflector. In extreme conditions, consider placing the GigaPan inside of a small camping tent.
-
Page 44: My Photos Have A Narrow Depth Of Field
1. The GigaPan’s platform is moving faster than your camera can take pictures. a. Navigate to ‘Options’ > ‘Time per Pic’ in the GigaPan Menu. b. Use the directional keys to increase the time that the GigaPan will wait before moving. -
Page 45: The Electronic Trigger Cable Is Not Actuating The Camera Shutter
2. Verify that a memory card has been inserted into the camera and that it is not full. 3. Verify that the camera is powered and that there is sufficient charge on the GigaPan battery to complete a panorama. (See Chapter 2.2 for checking battery status.) 4. -
Page 46: My Panoramas Are Distorted Or Misaligned
GigaPan Stitch working hard. Ideally, you should avoid working on your computer while the stitching software is running. To monitor GigaPan Stitch in Windows, turn on the Task Manager ([Ctrl] + [Shift] + [Esc]). If GigaPan Stitch reports “Not Responding” , use the ‘report a bug’ feature under the ‘help’ tab of GigaPan Stitch or contact tech support via GigaPanSystems.com. -
Page 47: My Panoramas Have Vignetting
Newer Canon cameras support ‘peripheral illumination’ settings for certain lenses. 5. Increase the amount of overlap to an percentage higher than the GigaPan default of 30% using the ‘Picture Overlap’ setting in the GigaPan Menu. -
Page 48: Tips And Tricks
Another good idea is to set your lower-right corner so that it’s just after the point when the number of horizontal and vertical photos increases. For example, if the GigaPan shows you 20 horizontal and 10 vertical images, move it lower and to the right so that it reads 21 horizontal and 11 vertical. -
Page 49: Shooting Outdoors
GigaPan moves and before actuating the shutter. 8. If there is substantial wind gusts, consider placing the GigaPan and lens behind a car trunk, tree, building, or a collapsible portrait reflector. Use a higher shutter speed that is at least the reciprocal of the focal length such as faster than 1/300 of a second for a 300mm lens. -
Page 50: Shooting Indoors
Another option with the GigaPan is to use auto focus if the subject is suitable. (See Chapter 2.8 for more information about auto focus.) If there are objects that are moving, you may want to use a higher ISO such as 400 or 800 to be able to use a faster shutter speed to freeze movement. -
Page 51: Night Shots
7.4 Night shots Here are a few tips for shooting panoramas at night. The key is to Increase the exposure time for each photo and make sure that the GigaPan and your camera are free from vibra- tions. If your camera body or lens has Image Stabilization, turn the feature off. Nikon refers to image stabilization as VR vibration reduction. -
Page 52: City Scenes
GigaPan User Guide 7.5 City scenes In cities, you need to be more aware of objects in motion—specifically vehicles and people. You may also find that buildings can get distorted when you stitch your panorama. To avoiding moving objects, watch for people or street traffic that might get in the way of your shots - pause the panorama before they do and resume the panorama after they have left the frame, or pause go back and resume where you left off. -
Page 53: Panoramas In Motion: Capturing A Crowd
7.6 Panoramas in Motion: Capturing a Crowd Sporting events, races or crowds of people are great opportunities to take an epic shot that captures every detail of the moment. You’ll be sure to capture every face in the crowd. When shooting a panorama of a sporting event that has a lot of motion, capture the whole scene and crowd, and then re-shoot the areas in motion individually. -
Page 54: Parts & Accessories
Sliding “Arca-style” mounting clamp. Marked with scale to easily center any camera with an offset mounting socket. Attaches to sliding rail of GigaPan unit. Epic Pro & Epic Pro V Mounting Clamp/Plate Set SKU: 590-3000SET Single set that includes the mounting plate and... -
Page 55: Repairs
Epic Pro & Epic Pro V Daughter Board SKU: 150-0028 Replacement daughter board for GigaPan Epic Pro & Epic Pro V units Epic Pro & Epic Pro V Main PCB Assembly SKU: 150-0024TK Replacement main PCB assembly replacement for GigaPan Epic Pro & Epic Pro V units.
Need help?
Do you have a question about the EPIC PRO V and is the answer not in the manual?
Questions and answers