Table of Contents
Advertisement
Advertisement
Table of Contents

Subscribe to Our Youtube Channel
Related Manuals for Grace Company Q-Zone Queen


Summary of Contents for Grace Company Q-Zone Queen
- Page 1 Assembly Instructions Copyright December 3, 2021 V2.0 Grace Company...
-
Page 3: My Frame Details
My Frame Details Use this page to record information about your frame. This will be helpful if you ever need to call a Grace Company support technician. Q-Zone Queen Frame Type: ________________________________________ Frame Configuration: Queen Crib Date of Purchase: ____________________________________... -
Page 4: Warranty Information
Warranty Information The Q-Zone Queen Quilting Frame has a One-Year limited warranty on all parts. The Grace Company will repair or replace, at its discretion, any part with problems due to our manufacturing or defects in materials. This warranty does not cover parts damaged through misuse, improper storage, improper assembly, loss, natural events, and willful destruction. -
Page 5: Table Of Contents
My Frame Details ........................3 Warranty Information ......................4 Table of Contents........................5 Included Parts and Tools ....................... 6 Welcome to Your Q-Zone Queen Frame .................10 Assembly Options ................12 Queen Assembly ................13 Queen Assembly Part One ..............14 Task 1 - Set the Frame Height ....................15... -
Page 6: Included Parts And Tools
Included Parts and Tools Box 1 Left Leg Middle Leg Right Leg Assembly Assembly Assembly QZF-09-13058 QZF-09-13059 QZF-09-13060 See page 15, 46 See page 7 See page 15, 46 Carriage Box Bottom Dual-Wheel Single Wheel SBHCS Carriage Channel Lock Channel Lock M6 x 20 mm ACC-01-11950 ACC-09-13057... - Page 7 Included Parts and Tools (continued) Hardware Box Corner Leg Brace Corner Leg Brace Middle Ratchet Cap (x2) Side A (x2) Side B (x2) Leg Brace (x2) QZH-04-12031 QZH-04-16326 QZF-04-12060 QZF-05-10315 See page 18, 49 See page 18, 49 See page 18 See page 33, 63 Bungee Clamp Fabri-Fast...
- Page 8 Included Parts and Tools (continued) Bagged Hardware Allen Wrench Allen Wrench Open End Wrench Open End Wrench 3 mm 4 mm 10 mm and 13 mm 14 mm and 17 mm HDW-03-10166 HDW-03-10167 HDW-03-10743 HDW-03-12068 Connector Bolt Connector Bolt SBHCS M6 x 10 mm (x36) M6 x 10 mm (x16) M6 x 16 mm (x4)
- Page 9 Included Parts and Tools (continued) Box 2 Frame Cross Long Track Support Tube (x4) Support (x2) QZF-04-12061 QZF-04-12058 See page 18, 49 See page 22, 52 Short Track Short Track (x2) Support (x4) QZF-04-12059 QZF-05-12067 See page 22 See page 52 Ratcheting Rail Floating Rail Section (x2)
-
Page 10: Welcome To Your Q-Zone Queen Frame
Welcome to Your Q-Zone Queen Frame We are pleased to introduce you to the newest part of your quilting setup. This frame has been especially designed to help quilters like you have the tools available to create quality projects. This manual is broken into four sections (or parts). Notifications at the end each of each section will direct you to switch to your machine manual or QuiltMotion manual for instructions on assembling those products. - Page 11 Frame Manual: Part Two • Install the channel lock on the machine or top plate. • Prepare the top plate and home sewing machine. • Place the machine or top plate on the frame. Quilting Machine Manual: Part Three • Install the wheel covers, display, handles, thread mast.
-
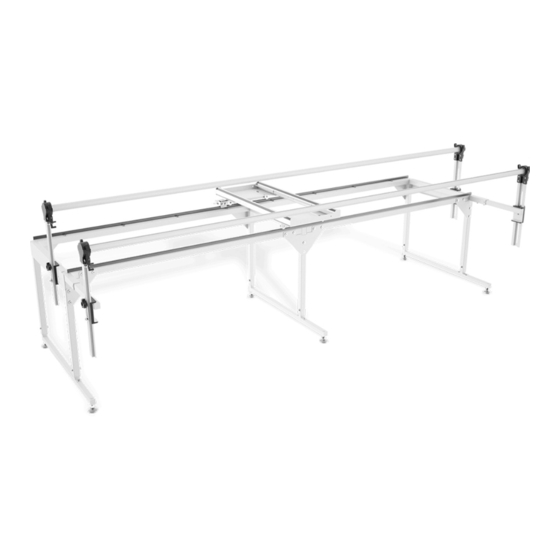
Page 12: Assembly Options
Assembly Options Queen Assembly See page 13 Fits quilt tops up to 76 inches wide Crib Assembly See page 44 Fits quilt tops up to 26 inches wide... -
Page 13: Queen Assembly
Queen Assembly... -
Page 14: Queen Assembly Part One
Queen Assembly Part One Part One Queen Assembly Part One Progress Checkpoint Complete Part One of these instructions before assembling your quilting machine or any accessories. The beginning of each Part will contain a progress checkpoint, helping make sure you accomplish all of the tasks necessary to complete your quilting setup in the most convenient order. - Page 15 Queen Assembly Part One Parts & Tools Needed: Left Leg Middle Leg Right Leg Allen Wrench Assembly Assembly Assembly 4 mm Open End Wrench Tape Measure 10 mm and 13 mm (not included) Instructions The frame height is important for comfortable prolonged use. Ideally, when fully assembled the handlebars on your machine or top plate will be around elbow height.
-
Page 16: Task 1 - Set The Frame Height
Queen Assembly Part One Task 1 - Set the Frame Height (continued) 1. Use the 4 mm Allen wrench to loosen, but not remove, the two M6 connector bolts. M6 Connector Bolts (x2) Hold your arm at a 90 degree angle. Use a tape measure to measure the distance from your elbow to the floor. - Page 17 Queen Assembly Part One Task 1 - Set the Frame Height (continued) Set your frame leg to the corresponding hole and secure in place with the screws, washers, nuts, 4 mm Allen wrench, and 10 mm open end wrench. Use the 4 mm Allen wrench to re tighten the M6 connector bolts. Repeat steps 1-4 for the middle leg and the right leg, making sure to set them to the same height as the left leg.
- Page 18 Queen Assembly Part One Parts & Tools Needed: Frame Cross Corner Leg Brace Corner Leg Brace Support Tube (x4) Side A (x2) Side B (x2) Middle Reference Connector Bolt Allen Wrench Leg Brace (x2) Card Hook M6 x 10 mm (x36) 4 mm Instructions Take the following steps to attach the leg braces to the legs and install the frame cross support tubes:...
-
Page 19: Task 2 - Install The Cross Support Tubes
Queen Assembly Part One Task 2 - Install the Cross Support Tubes (continued) 1. Loosely attach a second M6 x 10 1. Loosely screw in two more M6 x 10 mm connector bolt to the side of the corner connector bolts in the brace holes on the brace. - Page 20 Queen Assembly Part One Task 2 - Install the Cross Support Tubes (continued) 1. Place the end of a cross support tube so that it rests on the shelf of the corner bracket on the front of the left leg. Loosely attach it with two M6 x 10 connector bolts and the 4 mm Allen wrench.
- Page 21 Queen Assembly Part One Task 2 - Install the Cross Support Tubes (continued) 1. Stand up the right leg and repeat steps 8-10 for the other two cross support tubes. 1. Once the braces and tubes are all in place, pull the bottoms of the left and right legs outwards to make sure they are square with the cross support tubes.
- Page 22 Queen Assembly Part One Parts & Tools Needed: Long Track Short Track Support (x2) Support (x4) Bottom Connector Bolt Allen Wrench Long Track (x2) Carriage M6 x 10 mm (x16) 4 mm Instructions Take the following steps to install and align the frame tracks: 1.
-
Page 23: Task 3 - Install And Align The Tracks
Queen Assembly Part One Task 3 - Install and Align the Tracks (continued) 1. Install the other long track support over the front of the middle leg. Make sure the vertical edge is towards the front of the frame. Loosely attach the track support with four M6 x 10 mm connector bolts and the 4 mm Allen wrench. - Page 24 Queen Assembly Part One Task 3 - Install and Align the Tracks (continued) 1. Firmly press the long track onto the front and back track supports for the whole length of the frame. Be sure not to leave any space in between the tracks and track supports. Long Track (x2) 1.
- Page 25 Queen Assembly Part One Parts & Tools Needed: Single Wheel Allen Wrench Channel Lock 4 mm Instructions The single wheel channel lock helps hold your bottom carriage in place on the frame. Take the following steps to install the channel lock to the bottom carriage: 1.
- Page 26 Queen Assembly Part One Parts & Tools Needed: Left Rail Holder Right Rail Holder SBHCS Allen Wrench Bracket (x2) Bracket (x2) M6 x 16 mm (x4) 4 mm Instructions Take the following steps to install the rail holder brackets: 1. Use the 4 mm Allen wrench and two M6 1.
- Page 27 Queen Assembly Part One Congratulations! You have completed Part One of the Queen Assembly instructions for the Q-Zone Queen Frame. If you are also installing a new Q’nique quilting machine, turn to Part One of your machine manual now. If you are going to be using a top plate with a domestic sewing machine, turn to your top plate manual and follow the instructions to fully assemble the top plate.
-
Page 28: Queen Assembly Part Two
Queen Assembly Part Two Part Two Queen Assembly Part Two Progress Checkpoint Machine Manual Have you completed Part One and Part Two? QuiltMotion Manual Have you completed Part One and Part Two? If not, see your Machine manual or QuiltMotion manual for instructions on completing these steps before beginning Queen Assembly Part Two of your machine manual on the next page. - Page 29 Queen Assembly Part Two Parts & Tools Needed: If using a top plate, skip to Part Three on page 32. Dual-Wheel SBHCS Allen Wrench Channel Lock M6 x 20 mm 4 mm Instructions Channel locks restrict the movement of the machine or bottom carriage along one axis, so that it is easy to create a straight line.
-
Page 30: Task 6 - Install The Dual-Wheel Channel Lock
Task 6 - Install the Dual-Wheel Channel Lock (continued) 1. Close the channel lock handle and test it out. The rubber foot should press firmly against the bottom carriage tracks and prevent the machine from moving front-to-back on the carriage. Rubber Foot If the channel lock doesn’t fully reach track, or its grip on the track seems loose, twist the rubber... - Page 31 Queen Assembly Part Two Congratulations! You have completed Part Two of the Queen Assembly instructions for the Q-Zone Queen Frame. If you are also installing a new Q’nique quilting machine, turn to Part Three of your machine manual before moving on to Part Three of this manual.
-
Page 32: Queen Assembly Part Three
Queen Assembly Part Three Queen Assembly Part Three Progress Checkpoint Machine Manual Part Three Have you: • Installed the wheel covers (on applicable models), handlebars, display, thread mast, upper encoder, and power cable? If not, see your Machine manual for instructions on completing these steps before beginning Queen Assembly Part Three of your machine manual on the next page. - Page 33 Queen Assembly Part Three Parts & Tools Needed: Ratcheting Rail Floating Rail Section (x2) Section (x2) Allen Wrench Rail Coupler (x2) Ratchet Cap (x2) 3 mm Instructions Take the following steps to install the rails: Insert a rail coupler into the open end of a ratcheting rail section. Align two of the screws in the coupler so you can see them through the holes in the rail section.
-
Page 34: Task 7 - Install The Rails
Queen Assembly Part Three Task 7 - Install the Rails (continued) Use a 3 mm Allen wrench to tighten the screws inside the rail. This will press the screws against the back of the rail and hold them together. Insert the other end of the rail coupler into the open end of the floating rail section. Align the other two screws so that they can be seen through the holes in the rail. - Page 35 Queen Assembly Part Three Task 7 - Install the Rails (continued) Repeat steps 1-4 for the other rail. Raise the rear rail holder brackets by loosening the plastic knob on both of the rear bracket holders and sliding the bracket up high enough that the rail can pass through the throat of the machine.
- Page 36 Queen Assembly Part Three Task 7 - Install the Rails (continued) Place the ratchet end of the rail in the top of the rear right rail holder bracket. Ratchet End Right Rail Holder Bracket Turn the rail until the Fabri-Fast groove is facing up. Then slide the ratchet cap onto the top of the bracket.
- Page 37 Queen Assembly Part Three Task 7 - Install the Rails (continued) Removal Instructions When needed, take the following steps to remove the rails: Turn the rails until the Fabri-Fast grooves Remove the rails by lifting the right side are facing up. out of the right rail holder brackets and pulling the left side out of the left rail holder brackets.
- Page 38 Queen Assembly Part Three Parts & Tools Needed: Allen Wrench 4 mm Instructions Take the following steps to adjust the rails to more efficiently work with your machine: Use the 4 mm Allen wrench to loosen, but Note: If your machine has a throat length of not remove, the four set screws in the right less than 16 inches, move the machine as far and left extension arm.
-
Page 39: Task 8 - Adjust The Rails
Queen Assembly Part Three Queen Assembly Part Three Task 8 - Adjust the Rails (continued) Adjust the height of the quilt-backing rail by loosening the plastic knobs on both front rail holder brackets. Position the rail so that the top of the rail is even with the machine’s needle plate. - Page 40 Queen Assembly Part Three Queen Assembly Part Three Parts & Tools Needed: Open End Wrench 14 mm and 17 mm Instructions Take the following steps to adjust the frame’s feet to make sure the frame is level and smooth: Follow the leveling adjustment steps on the next page to lower the frame on all 6 leveling feet as far as it can go.
-
Page 41: Task 9 - Leveling The Frame
Queen Assembly Part Three Task 9 - Leveling the Frame (continued) After lowering the frame, make sure both Leveling Foot Adjustment channel locks are open so the machine and Loosen the top nut on the leveling foot bottom carriage can roll freely. with the 17 mm Open-end wrench. - Page 42 Queen Assembly Part Three Task 9 - Leveling the Frame (continued) Repeat the process with machine on the right side of the frame. Repeat the process again, putting the machine a few inches to both sides of the middle leg. If the machine begins to roll toward either side of the frame, raise the feet on that side.
- Page 43 Queen Assembly Part Three Congratulations! You have completed Part Three of the Queen Assembly Instructions for the Q-Zone Queen frame. If you are also installing QuiltMotion, turn to Part Three of your QuiltMotion manual before continuing to Part Four of this manual.
-
Page 44: Crib Assembly
Crib Assembly... -
Page 45: Crib Assembly Part One
Crib Assembly Part One Crib Assembly Part One Progress Checkpoint Complete Part One of these instructions before assembling your quilting machine or any accessories. The beginning of each Part will contain a progress checkpoint, helping make sure you accomplish all of the tasks necessary to complete your quilting setup in the most convenient order. - Page 46 Crib Assembly Part One Parts & Tools Needed: Left Leg Right Leg Allen Wrench Open End Wrench Assembly Assembly 4 mm 10 mm and 13 mm Instructions The frame height is important for comfortable prolonged use. Ideally, when fully assembled the handlebars on your machine or top plate will be around elbow height.
-
Page 47: Task 1 - Set The Frame Height
Crib Assembly Part One Task 1 - Set the Frame Height (continued) Hold your arm at a 90 degree angle. Use a tape measure to measure the distance from your elbow to the floor. Hole Elbow to Floor Number 37 1/2 Inches 38 1/2 Inches 39 1/2 Inches 40 1/2 Inches... - Page 48 Crib Assembly Part One Task 1 - Set the Frame Height (continued) Use the 4 mm Allen wrench to re tighten the M6 connector bolts. Repeat steps 1-4 for the right leg, making sure to set it to the same height as the left leg.
- Page 49 Crib Assembly Part One Parts & Tools Needed: Frame Cross Corner Leg Brace Corner Leg Brace Support Tube (x2) Side A (x2) Side B (x2) Reference Connector Bolt Allen Wrench Card Hook M6 x 10 mm (x24) 4 mm Instructions Take the following steps to attach the leg braces to the legs and install the frame cross support tubes: 1.
-
Page 50: Task 2 - Install The Cross Support Tubes
Crib Assembly Part One Task 2 - Install the Cross Support Tubes (continued) 1. Loosely screw in two more M6 x 10 mm 1. Loosely attach a second M6 x 10 connector bolts in the brace holes on the connector bolt to the side of the corner side of the leg. - Page 51 Crib Assembly Part One Task 2 - Install the Cross Support Tubes (continued) 1. Loosely attach the other end of the cross support tube to the front corner brace on the right leg using two M6 x 10 mm connector bolts and the 4 mm Allen wrench. Connector Bolt M6 x 10 mm (x2) 1.
- Page 52 Crib Assembly Part One Parts & Tools Needed: Long Track Short Track (x2) Support (x2) Bottom Connector Bolt Allen Wrench Carriage M6 x 10 mm (x8) 4 mm Instructions Take the following steps to install and align the frame tracks: 1.
-
Page 53: Task 3 - Install And Align The Tracks
Crib Assembly Part One Task 3 - Install and Align the Tracks (continued) 1. Install the other long track support on the front of the frame. Make sure the vertical edge is towards the front of the frame. Loosely attach the track support with four M6 x 10 mm connector bolts and the 4 mm Allen wrench. - Page 54 Crib Assembly Part One Task 3 - Install and Align the Tracks (continued) 1. Place the bottom carriage on the tracks at the left end of the frame. Align the back track by pressing on the carriage as you slowly move it across the frame. Bottom Carriage 1.
- Page 55 Crib Assembly Part One Parts & Tools Needed: Single Wheel Allen Wrench Channel Lock 4 mm Instructions The single wheel channel lock helps hold your bottom carriage in place on the frame. Take the following steps to install the channel lock to the bottom carriage: 1.
- Page 56 Crib Assembly Part One Parts & Tools Needed: Left Rail Holder Right Rail Holder SBHCS Allen Wrench Bracket (x2) Bracket (x2) M6 x 16 mm (x4) 4 mm Instructions Take the following steps to install the rail holder brackets: 1. Use the 4 mm Allen wrench and two M6 1.
- Page 57 Crib Assembly Part One Congratulations! You have completed Part One of the Crib Assembly instructions for the Q-Zone Queen Frame. If you are also installing a new Q’nique quilting machine, turn to Part One of your machine manual now. If you are going to be using a top plate with a domestic sewing machine, turn to your top plate manual and follow the instructions to fully assemble the top plate.
-
Page 58: Crib Assembly Part Two
Crib Assembly Part Two Crib Assembly Part Two Progress Checkpoint Machine Manual Have you completed Part One and Part Two QuiltMotion Manual Have you completed Part One and Part Two? If not, see your QuiltMotion or Machine manual for instructions on completing these steps before beginning Crib Assembly Part Two of this manual on the next page. - Page 59 Crib Assembly Part Two Parts & Tools Needed: If using a top plate, skip to Part Three on page 62. Dual-Wheel SBHCS Allen Wrench Channel Lock M6 x 20 mm 4 mm Instructions Channel locks restrict the movement of the machine or bottom carriage along one axis, so that it is easy to create a straight line.
-
Page 60: Task 6 - Install The Dual-Wheel Channel Lock
Task 6 - Install the Dual-Wheel Channel Lock (continued) 1. Close the channel lock handle and test it out. The rubber foot should press firmly against the bottom carriage tracks and prevent the machine from moving front-to-back on the carriage. Rubber Foot If the channel lock doesn’t fully reach track, or its grip on the track seems loose, twist the rubber... - Page 61 Crib Assembly Part Two Congratulations! You have completed Part Two of the Crib Assembly for the Q-Zone Queen frame. If you are also installing a new Q’nique quilting machine, turn to Part Three of your machine manual. If you are not installing a Q’nique machine at this time, continue to...
-
Page 62: Crib Assembly Part Three
Crib Assembly Part Three Crib Assembly Part Three Progress Checkpoint Machine Manual Have you: • Installed the wheel covers, handlebars, display, thread mast, upper encoder, and power cable? If not, see your Machine manual for instructions on completing these steps before beginning Crib Assembly Part Three of this manual on the next page. - Page 63 Crib Assembly Part Three Parts & Tools Needed: Ratcheting Rail Floating Rail Section (x2) Section (x2) Allen Wrench Ratchet Cap (x2) 3 mm Installation Instructions Take the following steps to install the rails: Remove the ratchet wheels from the two ratcheting rail sections and insert them into the open ends of the two floating rail sections.
-
Page 64: Task 7 - Install The Rails
Crib Assembly Part Three Task 7 - Install the Rails (continued) Raise the rear rail holder brackets by loosening the plastic knob on both of the rear bracket holders and sliding the bracket up high enough that the rail can pass through the throat of the machine. - Page 65 Crib Assembly Part Three Task 7 - Install the Rails (continued) Turn the rail until the tab on the ratchet wheel is inside the bracket. Then slide the ratchet cap onto the top of the bracket. Fabri-Fast Groove Ratchet Cap Repeat steps 3-5 for the other rail, placing it in the front rail holder brackets.
- Page 66 Crib Assembly Part Three Task 7 - Install the Rails (continued) Removal Instructions When needed, take the following steps to remove the rails: Turn the rails until the Fabri-Fast grooves are facing up. Fabri-Fast Grooves Remove the ratchet covers Remove the rails by lifting the right side out of the right rail holder brackets and pulling the left side out of the left rail holder brackets.
- Page 67 Crib Assembly Part Three Parts & Tools Needed: Allen Wrench 4 mm Instructions Take the following steps to adjust the rails to match your machine: Use the 4 mm Allen wrench to loosen, but Note: If your machine has a throat length of not remove, the four set screws in the right less than 16 inches, move the machine as far and left extension arm.
-
Page 68: Task 8 - Adjust The Rails
Crib Assembly Part Three Task 8 - Adjust the Rails (continued) With the machine on the left side of the Move the machine to the right side of the frame, loosen the plastic knob on the left frame and repeat steps 3-5 for the right rear rail holder bracket for the take-up rail. - Page 69 Crib Assembly Part Three Task 8 - Adjust the Rails (continued) Loosen the plastic knob on the right rail holder bracket for the quilt-backing rail and adjust the height of the bracket until the top of the rail is even with the machine’s needle plate. Needle Plate Quilt-Backing Rail...
- Page 70 Crib Assembly Part Three Parts & Tools Needed: Open End Wrench 14 mm and 17 mm Instructions Take the following steps to adjust the frame’s feet to make sure the frame is level and smooth: Begin by lowering the frame as far as it will go (see next page for leveling foot adjustment steps).
-
Page 71: Task 9 - Leveling The Frame
Crib Assembly Part Three Task 9 - Leveling the Frame (continued) After lowering the frame, make sure both Leveling Foot Adjustment channel locks are open so the machine and Loosen the top nut on the leveling foot bottom carriage can roll freely. with the 17 mm Open-end wrench. - Page 72 Crib Assembly Part Three Repeat the process with machine on the right side of the frame.
- Page 73 Crib Assembly Part Three Congratulations! You have completed Part Three of the Crib Assembly instructions for the Q-Zone Queen frame. If you are also installing QuiltMotion, turn to Part Three of your QuiltMotion manual. If you are not installing QuiltMotion at this time, continue to Part...
-
Page 74: Part Four
Part Four Part Four Progress Checkpoint QuiltMotion Manual Have you: • Completed Part Three? If not, see your QuiltMotion manual for instructions on completing those steps before beginning Part Four of your machine manual on the next page. - Page 75 Cut the batting to be about 8-10 inches wider and longer than your quilt top. Cut the backing to be about 4-6 inches wider and 27 inches longer than your batting. Quilt Top Note: The Grace Company strongly 8-10” recommends using cloth leaders to help...
-
Page 76: Task 10 - Attaching The Fabric
Part Four Task 10 - Attaching the Fabric (continued) Use a tape measure to measure seven inches from the right side of each of the rails. Mark these positions with pieces of tape on each rail. You can use these marks to align your fabric and make sure it is straight. - Page 77 Part Four Task 10 - Attaching the Fabric (continued) If you have enough space on your frame, you can keep your machine to the side while you attach your fabric. Otherwise, keep your needle raised and slide the fabric underneath the hopping foot.
- Page 78 Part Four Task 10 - Attaching the Fabric (continued) Twist the top of the take-up rail towards you to begin rolling the backing fabric onto the rail. Turn it at least one full rotation to hold the fabric in place. Move the extra backing in between the two rails until the bottom of your backing is on the quilt- backing rail.
- Page 79 Part Four Task 10 - Attaching the Fabric (continued) Twist the top of the quilt-backing rail towards you to roll the extra backing fabric onto the rail. Continue until the all of the extra fabric is rolled up. Center your batting on top of the backing with the fuzzier side of the batting facing up and pin the top and sides of your quilting area.
- Page 80 Part Four Task 10 - Attaching the Fabric (continued) Secure the batting and quilt top to the quilt-backing rail with C-clamps. C-Clamps Remove the bungee stop from one of the bungee clamps by pressing on the button and sliding it off the end of the bungee cord.
- Page 81 Part Four Task 10 - Attaching the Fabric (continued) Open the clamp by pressing on the release lever on top of the clamp to open the clamp lever. Slide the clamp over the backing fabric and let go of the release lever to close the clamp. Release Lever Note: If the clamp Clamp Lever...
- Page 82 Part Four Instructions When you have finished the available quilting space on your frame, it’s time to roll the fabric. To do this, take the following steps: Remove the clamp from the quilt-backing rail. Release the ratchet on the quilt-backing rail by pulling down on the ratchet stop.
-
Page 83: Task 11 - Using The Rails
Part Four Task 11 - Using the Rails (continued) When you have finished rolling the fabric up to make your new quilting area, pull on the pin in the ratchet stop on the quilt-backing rail to close the ratchet. Replace the clamps to the quilt- backing rail and tack down the sides of your new quilting area. - Page 84 The Grace Company Phone: 1-800-264-0644 www.graceframe.com...
Need help?
Do you have a question about the Q-Zone Queen and is the answer not in the manual?
Questions and answers