
Subscribe to Our Youtube Channel
Related Manuals for Grace Company G Series


Summary of Contents for Grace Company G Series
- Page 1 Quilt Motion QCT and Wiring Instructions Copyright December 12, 2018 Grace Company (Reproduction Prohibited) Version 1.1...
- Page 2 Warranty Information for your Quilt Motion. The Quilt Motion has a One-Year limited warranty on all parts. The Grace Company will repair or replace, at its discretion, any part with problems due to our manufacturing or defects in materials. This warranty does not cover parts damaged through misuse, improper storage, improper assembly, loss, natural events, and willful destruction.
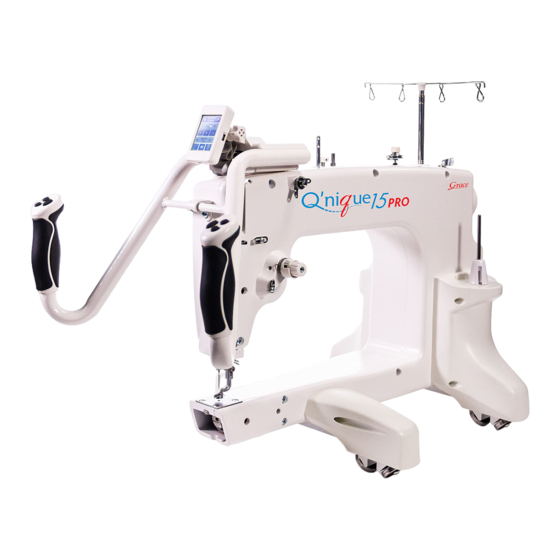
- Page 3 Choose your Machine Quilt Motion Q’nique 15 Q’nique 19 Turn to page 1 Turn to page 7 Q’nique 21 G-Series 2 Top Plate Turn to page 13 Turn to page 19 The G-Series Top Plate revision can be identified by the holes on the front of the handles. Rev1 does not have holes on the front of the handles Rev2 has holes on the front of the handles G-Series Top Plate Rev1...
- Page 4 Q’nique 15” Machine Quilt Motion QCT Bracket Step 1: Attaching the Tablet Mount - Q’nique 15” ................ 2 Wiring Instructions Step 2: Cord Setup for the Bottom Carriage ................4...
-
Page 5: Tools Needed
Q’nique 15” Machine Quilt Motion Step 1 - Attaching the Tablet Mount Parts Needed: 2mm Allen Wrench QCT Bracket Tablet Tray (1) Q’nique 15 (1) 3 Wing Plastic Knob M6 (1) Set Screw Tools Needed: 1-1: Using the 2mm Allen Wrench loosen all (4) set screws on the QCT Bracket Q’nique 15. - Page 6 Q’nique 15” Machine Quilt Motion 3 Wing Knob M6 Set Screw Tablet Tray 2mm Allen Wrench 1-4: Use the 2mm Allen Wrench to tighten the 1-5: Install the Tablet Tray to the QCT Bracket (2) set screws on the front of the QCT Bracket Q’nique 15 using the 3 Wing Knob M6.
- Page 7 Q’nique 15” Machine Quilt Motion Step 2 - Cord Setup for the Bottom Carriage Parts Needed: USB-A to USB-B Quilt Motion Male to Male USB Zip Tie (2) Cable (1) Cable (1) Adapter Cable (1) Zip Tie Mount (2) Cable Wrap (1) USB-A to USB-B Cable USB-A to USB-B Cable Motor Plate Control Box...
- Page 8 Q’nique 15” Machine Quilt Motion Quilt Motion Cable Quilt Motion Cable 2-3: Connect the Quilt Motion Cable to the Motor 2-4: Connect the opposite end of the Quilt Motion Plate Control Box. Cable to the Blue Port on the back of your machine. Male to Male USB Adapter Cable 2-5: Connect the Male to Male USB Adapter Cable to the port on the top of your machine.
- Page 9 Q’nique 15” Machine Quilt Motion Male to Male USB Adapter Cable USB-A to USB-B Cable Bottom Carriage Zip Tie Mount Zip Tie Mount Quilt Motion Cable 2-6: Secure Zip Tie Mounts to the Bottom Carriage. Wrap USB-A to USB-B Cable and Quilt Motion Cable together in the Cable Wrap and route cables as shown.
- Page 10 Q’nique 19” Machine Quilt Motion QCT Bracket Step 1: Attaching the Tablet Mount - Q’nique 19” ................ 8 Wiring Instructions Step 2: Cord Setup for the Bottom Carriage ................10...
- Page 11 Q’nique 19” Machine Quilt Motion Step 1 - Attaching the Tablet Mount - Q’nique 19 Parts Needed: QCT Back Cover M5 x 10mm SBHCS QCT Bracket Tablet Tray (1) QCT Cover Q’nique 19 (1) 3 Wing Knob M6 (1) Tools Needed: 1-1: Remove the QCT Back Cover, (3) M5 x 10mm 2.5mm Allen Wrench SBHCS, and the QCT Cover from the top of the...
- Page 12 Q’nique 19” Machine Quilt Motion M4 x 10mm SBHCS Tablet M4 x 10mm SBHCS 1-4: Loosen the circled M4 x 10mm SBHCS in 1-5: Slide your tablet into the Tablet Tray. Tighten order to adjust the arms of the Tablet Tray to fit the screws that were loosened in Step 1-4.
- Page 13 Q’nique 19” Machine Quilt Motion Step 2 - Cord Setup for the Bottom Carriage Parts Needed: 7’ QM USB Quilt Motion Cable Wrap (1) Zip Tie (4) Cable (1) Cable (1) Zip Tie Mount (2) Tools Needed: 3mm Allen Wrench M4 x 10mm SBHCS Top Front Upper Plastic Top Back Upper Plastic...
- Page 14 Q’nique 19” Machine Quilt Motion 7‘ QM USB Cable Zip Tie Quilt Motion Cable Quilt Motion Cable Zip Tie and Mount 7‘ QM USB Cable 2-2: Connect the 7‘ QM USB Cable and the Quilt 2-3: Secure the Quilt Motion Cable and the 7’ QM Motion Cable to the Motor Plate Control Box.
- Page 15 Q’nique 19” Machine Quilt Motion Plastic Clip 7‘ QM USB Cable Plastic Clip 2-5: Route the remaining 7’ QM USB Cable through the upper plastic clips. M4 x 10mm SBHCS Top Front Upper Plastic Top Back Upper Plastic 2-6: Reinstall the Top Front Upper Plastics and the Top Back Upper Plastics from your machine using the (5) M4 x 10mm SBHCS from Step 2.1 making sure to not pinch the 7’...
- Page 16 Q’nique 21” Machine Quilt Motion QCT Bracket Step 1: Attaching the Tablet Mount - Q’nique 19” ...............14 Wiring Instructions Step 2: Cord Setup for the Bottom Carriage ................16...
- Page 17 Q’nique 21” Machine Quilt Motion Step 1 - Attaching the Tablet Mount Parts Needed: 21in QCT 3 Wing Knob M6 x 10mm Tablet Tray (1) Bracket (1) M6 (1) SBHCS (4) Tools Needed: 2.5mm Allen Wrench 4mm Allen Wrench M3 x 6mm SBHCS 21in QCT Bracket QCT Cover Plate M6 x 10mm SBHCS...
- Page 18 Q’nique 21” Machine Quilt Motion M4 x 10mm SBHCS Tablet Tray 3 Wing Knob M6 M4 x 10mm SBHCS 1-3: Install the Tablet Tray to the 21in QCT Bracket 1-4: Loosen the circled M4 x 10mm SBHCS in using the 3 Wing Knob M6. order to adjust the arms of the Tablet Tray to fit your tablet.
- Page 19 Q’nique 21” Machine Quilt Motion Step 2 - Cord Setup for the Bottom Carriage Parts Needed: USB-A to USB-B Quilt Motion Male to Male USB Zip Tie (2) Cable (1) Cable (1) Adapter Cable (1) Zip Tie Mount (2) Cable Wrap (1) USB-A to USB-B Cable Motor Plate Control Box USB-A to USB-B Cable...
- Page 20 Q’nique 21” Machine Quilt Motion Quilt Motion Cable Quilt Motion Cable 2-3: Connect the Quilt Motion Cable to the Motor 2-4: Connect the opposite end of the Quilt Motion Plate Control Box. Cable to the Blue Port on the back of your machine. Male to Male USB Adapter Cable 2-5: Connect the Male to Male USB Adapter Cable to the port on the top of your machine.
- Page 21 Q’nique 21” Machine Quilt Motion Male to Male USB Adapter Cable USB-A to USB-B Cable Cable Wrap Quilt Motion Cable Bottom Carriage Zip Tie Mount Quilt Motion Cable USB-A to USB-B Cable 2-6: Secure Zip Tie Mounts to the Bottom Carriage. Wrap the USB-A to USB-B Cable and Quilt Motion Cable together in the Cable Wrap and route cables as shown.
- Page 22 G-Series 2 Top Plate Quilt Motion QCT Bracket Step 1: Attaching the Tablet Mount - G-Series 2 Top Plate ............20 Wiring Instructions Step 2: Cord Setup for the Bottom Carriage ................22...
- Page 23 G-Series 2 Top Plate Quilt Motion Step 1 - Attaching the Tablet Mount Parts Needed: QCT Bracket QCT Angle Support QCT Top Plate Tablet Tray (1) Top Plate (1) Bracket (1) U-Bracket (1) 3 Wing Knob M5 x 35mm M5 x 10mm M6 (2) SBHCS (1) SBHCS (4)
- Page 24 G-Series 2 Top Plate Quilt Motion QCT Angle Support Bracket 3 Wing Knob M6 QCT Top Plate U-Bracket QCT Bracket Top Plate M5 x 35mm SBHCS M5 x 10mm SBHCS Tablet Tray 1-2: Attach the QCT Top Plate U-Bracket and the 1-3: Install the Tablet Tray using the 3 Wing Knob QCT Angle Support Bracket using (2) M5 x 10mm M6 to the QCT Bracket Top Plate.
- Page 25 G-Series 2 Top Plate Quilt Motion Step 2 - Cord Setup for the Bottom Carriage Parts Needed: USB-A to USB-B Sewing Cable Zip Tie Mount (6) Zip Tie (6) Cable (1) (Juki 98) (1) Cable Wrap (1) Velcro Strips (6) USB-A to USB-B Cable USB-A to USB-B Cable Motor Plate Control Box...
- Page 26 G-Series 2 Top Plate Quilt Motion USB-A to USB-B Cable Sewing Cable (Juki 98) 2-3: Connect the opposite end of the USB-A to 2-4: Connect the Sewing Cable (Juki 98) to the USB-B Cable to the USB Port on your tablet. Motor Plate Control Box.
- Page 27 G-Series Top Plate Rev1 Quilt Motion QCT Bracket Step 1: Attaching the Tablet Mount - G-Series V1 Top Plate ............25 Wiring Instructions Step 2: Cord Setup for the Bottom Carriage ................27 G-Series Top Plate Rev1 does not have holes on the front of the handles...
- Page 28 G-Series Top Plate Rev1 Quilt Motion Step 1 - Attaching the Tablet Mount - G-Series Top Plate V1 Parts Needed: QCT Bracket QCT Angle Support QCT Top Plate Tablet Tray (1) Top Plate (1) Bracket (1) U-Bracket (1) M5 x 10mm 3 Wing Knob M6 (1) SBHCS (4) Tools Needed:...
- Page 29 G-Series Top Plate Rev1 Quilt Motion QCT Bracket Top Plate M4 x 10mm SBHCS Tablet Tray 3 Wing Knob M6 M4 x 10mm SBHCS 1-3: Install the Tablet Tray to the QCT Bracket Top 1-4: Loosen the circled M4 x 10mm SBHCS in Plate using (1) 3 Wing Knob M6.
- Page 30 G-Series Top Plate Rev1 Quilt Motion Step 2 - Cord Setup for the Bottom Carriage Parts Needed: USB-A to USB-B Sewing Cable Zip Tie Mount (6) Zip Tie (6) Cable (1) (Juki 98) (1) Cable Wrap (1) Velcro Strips (6) USB-A to USB-B Cable Motor Plate Control Box USB-A to USB-B Cable...
- Page 31 G-Series Top Plate Rev1 Quilt Motion Sewing Cable (Juki 98) 2-3: Connect the Sewing Cable (Juki 98) to the Motor Plate Control Box. Connect the opposite end to the foot pedal port of your sewing machine. USB-A to USB-B Cable Sewing Cable (Juki 98) Zip Tie Mount Bottom Carriage...
- Page 32 G-Series Top Plate Rev2 Quilt Motion QCT Bracket Step 1: Attaching the Tablet Mount - G-Series V2 Top Plate ............30 Wiring Instructions Step 2: Cord Setup for the Bottom Carriage ................33 The V2 Top Carriage has holes on the front of the handles...
- Page 33 G-Series Top Plate Rev2 Quilt Motion Step 1 - Attaching the Tablet Mount - G-Series Top Plate V2 Parts Needed: QCT Bracket QCT Angle Support QCT Top Plate Tablet Tray (1) Top Plate (1) Bracket (1) U-Bracket (1) 3 Wing Knob M5 x 30mm M5 x 10mm M6 (1)
- Page 34 G-Series Top Plate Rev2 Quilt Motion QCT Bracket Top Plate M5 x 10mm SBHCS QCT Top Plate U-Bracket M5 x 30mm SBHCS QCT Angle Support Bracket M5 x 10mm SBHCS QCT Angle Support Bracket 1-3: Attach the QCT Bracket Top Plate to the 1-4: Attach the QCT Angle Support to the Top QCT Angle Support Bracket using (2) M5 x 10mm Plate using the QCT Top Plate U-Bracket, (2) M5 x...
- Page 35 G-Series Top Plate Rev2 Quilt Motion Tablet 1-7: Slide your tablet into the Tablet Tray. Tighten the screws that were loosened in Step 1-6.
- Page 36 G-Series Top Plate Rev2 Quilt Motion Step 2 - Cord Setup for the Bottom Carriage Parts Needed: USB-A to USB-B Sewing Cable Zip Tie Mount (6) Zip Tie (6) Cable (1) (Juki 98) (1) Cable Wrap (1) Velcro Strips (6) Velcro Strap USB-A to USB-B Cable USB-A to USB-B Cable...
- Page 37 G-Series Top Plate Rev2 Quilt Motion Sewing Cable (Juki 98) 2-3: Connect the Sewing Cable (Juki 98) to the Motor Plate Control Box. Connect the opposite end to the foot pedal port of your sewing machine. USB-A to USB-B Cable Sewing Cable (Juki 98) Cable Wrap Zip Tie Mount...
- Page 38 The Grace Company 2225 South 3200 West Salt Lake City, UT 84119...
Need help?
Do you have a question about the G Series and is the answer not in the manual?
Questions and answers