
Related Manuals for Axminster AW305WL


Summary of Contents for Axminster AW305WL
- Page 1 Code 107674 Original Instructions AW305WL Woodturning Lathe Deutsch Français Ausführung Version Seiten 21-40 Pages 41-60 AT: 09/02/2022 BOOK VERSION: 04...
- Page 2 Maintenance Exploded Diagrams/Lists 15-16-17 Wiring Diagram Notes EU DECLARATION OF CONFORMITY Cert No: MC1218DA EU Declaration of Conformity Axminster Tool Centre Ltd This machine complies with the following directives: Axminster Devon EX13 5PH UK axminstertools.com 2006/42/EC EN 55014-1:2006 2006/95/EC EN 55014-2:1997+A1+A2 declares that the machinery described:- 06/42/EC - Annex I/05.2006...
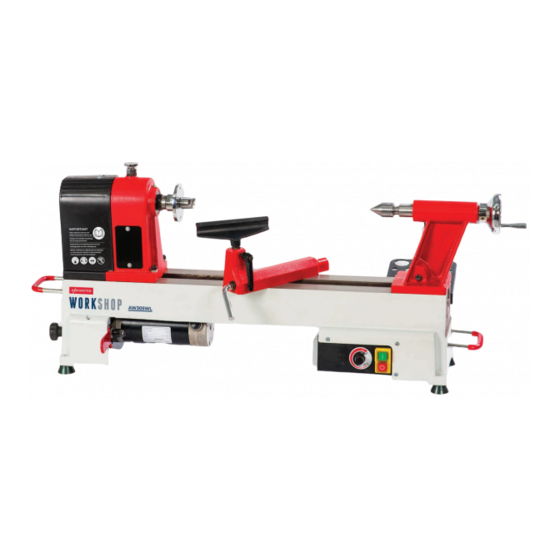
- Page 3 Wood Lathe (Index Lock not fitted to the lathe) AW305WL Banjo arm (fitted) 150mm Tool rest (fitted to banjo arm) 75mm Faceplate (fitted to headstock) Axminster 4 Prong Drive Centre (25mm) (code 340106) Axminster Standard 60˚ Live Centre (code 340203) Push Rod...
- Page 4 GENERAL INSTRUCTIONS FOR 230V MACHINES The following will enable you to observe good • Leave machine unplugged until work is about to working practices, keep yourself and fellow workers commence. safe and maintain your tools and equipment in good • Always disconnect by pulling on the plug body and working order.
- Page 5 SPECIFICATION Code 107674 Model AW305WL Rating Workshop Power 550W, 230V Speed (2) 500-2,040 and 1,000-4,080 Spindle Taper Spindle Thread 1” x 8tpi (Ref T04M) Taper Tailstock 2 MT Distance Between Centres 457 mm Max Diameter over Bed 305 mm Tool Rest Stem Diameter...
- Page 6 ASSEMBLY Fig 01-02 Fig 05 Fig 06 Tool Holder Locate the tool holder (I) the two Phillips screws and washers, see fig 3. Place a washer over the screws and screw them into the two pre-drilled holes below the headstock, see fig 4. NOTE: There are also two pre-drilled holes under the tailstock if you wish to mount the tool holder there.
- Page 7 ASSEMBLY Motor & Power Cable Connections 1. The lathe may be delivered with the motor and 2. The motor cable is plugged into the right-hand power cables unplugged. Follow the steps for correct socket to the rear of the control box and the main connection.
- Page 8 OPTIONAL BED EXTENSION Locate the bed extension (K) and the two Hex screws and spring/washers, (see fig 7) position the bed NOTE: DON’T TIGHTEN THE extension against the end of the lathe and line up SCREWS AT THIS POINT! the pre-drilled holes, see figs 8-9. Place a washer and spring washer over the Hex screws and lightly screw them into the threaded holes, see fig 10.
- Page 9 ILLUSTRATION AND PARTS DESCRIPTION Headstock cover Index lock pin Faceplate 4 Prong drive centre 60˚Live centre Tailstock barrel lock 150mm Tool rest Tool rest lock Tailstock handle Motor handle lock Banjo arm lock Motor handle (ON) Push rod tool holder Motor (OFF) Lower pulley...
- Page 10 ILLUSTRATION AND PARTS DESCRIPTION Fig 13 Fig 14 Index pointer Index locking pin Indexing assembly facility Tailstock barrel with scale Fig 15 Fig 16 Door knob spring lock Motor pulley access door Lower the headstock cover to reveal the pulley system Optional bed extension attached giving a maximum of 965mm between centres...
- Page 11 OPERATING INSTRUCTIONS Indexing Facility The indexing facility is useful for fluted columns, clock faces and accurate hole positioning. Lift and Rotate the index locking pin knob to unlock the headstock spindle, turn the faceplate and line up one of the positions then lower the indexing pin to lock the spindle in position, see figs 17-18-19-20. WARNING! DO NOT USE THE INDEX PIN WHEN REMOVING THE FACEPLATE OR CHUCK OTHERWISE THE PIN COULD BRAKE! Fig 17...
- Page 12 OPERATING INSTRUCTIONS Fig 23 Changing the Lathe Speed DISCONNECT THE LATHE FROM THE MAINS SUPPLY BEFORE CONTINUING! 1. Open the motor pulley access door by pulling the door knob back, see figs 21-22. Lower the headstock cover to access the pulleys, (see fig 23). 2.
- Page 13 4. Lower the motor to put tension back on the pulleys and lock in position. Raise the headstock cover and close the motor access door. Fig 26 Motor High AW305WL NOTE: The speed chart above Pulley grooves shows approximate speeds with the lathe off load. REMOVING THE FACEPLATE...
- Page 14 REMOVING DRIVE/LIVE CENTRES To remove the Drive Centre (F), locate the push rod (H), while holding the Drive Centre insert the push rod (H) through the centre hole of the headstock wheel and push the Drive Centre (F) out, see fig 27. Repeat the procedure for the Live Centre (G) in the tailstock, see fig 28.
- Page 15 EXPLODED DIAGRAMS/LISTS...
- Page 16 EXPLODED DIAGRAMS/LISTS 1218VDA (AW305WL) Description Description Washer ø4 Bush Semi-circle head screwM4X8 Lock handle for tool rest base Hex socket screw M6×12 Headstock spur center Hand wheel Face plate Semi-circle head screwM6×24 Gear Semi-circle head screwM4X6 Round plate Hinge Headstock spindle...
- Page 17 EXPLODED DIAGRAMS/LISTS Switch-box Cam follower tailstock Strain relief Retaining ring 10 Strain relief Tailstock Cable Tailstock quill Hex socket screw M10×25 Semi-circle head screw M5×12 Washer ø10 Tailstock axis Tool rack Lock nut Cup center Nut M10 Ball bearing Rubber washer Taper rod Support Semi-circle head screw M5×12...
- Page 18 WIRING DIAGRAM...
- Page 19 NOTES...
- Page 20 The packaging is suitable for recycling. Please dispose of it in a responsible manner. EU Countries Only Do not dispose of electric tools together with household waste material. By law they must be collected and recycled separately. Axminster Tools, Axminster Devon EX13 5PH axminstertools.com...
- Page 21 Art.-Nr. 107674 Originalanleitung AW305WL Drechselbank DATUM: 09/02/2022 BUCHVERSION: 04...
-
Page 22: Table Of Contents
Entfernen von Stirnmitnehmer/ mitlaufender Körnerspitze Wartung Explosionszeichnungen/Teilelisten 35-36-37 Schaltplan Notizen EU-KONFORMITÄTSERKLÄRUNG Zert.-Nr: MC1218DA EU-Konformitätserklärung Axminster Tool Centre Ltd Diese Maschine entspricht den folgenden Richtlinien: Axminster Devon EX13 5PH UK 2006/42/EG EN 55014-1:2006 axminstertools.com 2006/95/EG EN 55014-2:1997+A1+A2 erklärt hiermit, dass die nachfolgend 06/42/EG - Anhang I/05.2006... -
Page 23: Was Ist Inbegriffen
Drechselbank (Arretierung der Teileinrichtung nicht an der Drechselbank montiert) AW305WL Handauflagenunterteil (montiert) 150 mm Werkzeugablage (am Handauflagenunterteil montiert) 75 mm Aufspannscheibe (am Spindelstock montiert) Axminster 4-Zacken Stirnmitnehmer (25 mm) (Art.-Nr. 340106) Axminster Standard 60˚ Mitlaufkörnerspitze (Art.-Nr. 340203) Ausstoßdorn Werkzeughalter und zwei Kreuzschlitzschrauben/Unterlegscheiben Reitstockgriff OPTIONALES ZUBEHÖR... -
Page 24: Allgemeine Anweisungen Für (230 V ~) Machinen
ALLGEMEINE ANWEISUNGEN FÜR 230 V MASCHINEN Die folgenden Hinweise helfen Ihnen, gute Arbeitspraktiken • Maschine immer sauber halten. einzuhalten, sich selbst und Ihre Kollegen zu schützen und • Netzstecker erst kurz vor Beginn der Arbeiten in die Ihre Werkzeuge und Geräte in gutem Zustand zu halten. Steckdose stecken. -
Page 25: Technische Daten
TECHNISCHE DATEN Art.-Nr. 107674 Modell AW305WL Klassifizierung Werkstatt Leistung 550 W, 230 V Drehzahl (2) 500-2.040 und 1.000-4.080 Spindelkonus Spindelgewinde 1“ x 8tpi (Ref T04M) Reitstockkonus 2 MT Spitzenweite 457 mm Drehdurchmesser über Bett 305 mm Werkzeugauflage Zapfendurchmesser 16 mm Gesamtmaße L x B x H... - Page 26 MONTAGE Abb. 01-02 Abb. 05 Abb. 06 Werkzeughalter Nehmen Sie den Werkzeughalter (I) sowie die beiden Kreuzschlitzschrauben samt Unterlegscheiben, siehe Abb. 3. Schieben Sie eine Unterlegscheibe auf die Schrauben und schrauben Sie sie in die beiden vorgebohrten Löcher unterhalb des Spindelstocks, siehe Abb. 4. HINWEIS: Es gibt auch zwei vorgebohrte Löcher unter dem Reitstock, falls Sie den Werkzeughalter dort montieren möchten.
- Page 27 MONTAGE Anschlüsse für Motor und Stromkabel 1. Die Drehbank wird evtl. mit ausgestecktem Motor und 2. Das Motorkabel wird rechts und das Hauptstromkabel Netzkabel geliefert. Der korrekte Anschluss wird nachfolgend in die linke Netzbuchse an der Rückseite des Steuerkastens gezeigt. eingesteckt.
-
Page 28: Optionales Verlängerungsbett
OPTIONALES VERLÄNGERUNGSBETT Nehmen Sie das Verlängerungsbett (K) und die beiden Sechskantschrauben samt Feder-/Unterlegscheiben (siehe HINWEIS: ZIEHEN SIE DIE Abb. 7). Platzieren Sie das Verlängerungsbett am Ende der SCHRAUBEN NOCH NICHT FEST! Drehbank und richten Sie die vorgebohrten Löcher aus (siehe Abb. 8-9). Setzen Sie eine Unterlegscheibe und eine Federscheibe auf die Sechskantschrauben und schrauben Sie Lösen Sie den Reitstock-Klemmhebel und positionieren diese etwas in die Gewindelöcher ein, siehe Abb. -
Page 29: Abbildung Und Teilebeschreibung
ABBILDUNG UND TEILEBESCHREIBUNG Spindelstockabdeckung Indexsicherungsstift Aufspannscheibe 4-Zacken-Stirnmitnehmer 60˚ Mitlaufkörnerspitze Pinolenarretierung 150 mm Werkzeugauflage Arretierung der Werkzeugauflage Reitstockgriff Motor- Klemmhebel verriegelungsgriff Handauflagenunterteil (EIN) Motorgriff Halter für Ausstoßdorn (AUS) Motor Untere Riemenscheibe Variable Drehzahlregelung Klappenverriegelung WARNUNG! VERGEWISSERN SIE SICH VOR DEM Drehbett Gummifuß... - Page 30 ABBILDUNG UND TEILEBESCHREIBUNG Abb. 13 Abb. 14 Teilzeiger Indexsicherungsstift Teileinrichtung Reitstockpinole mit Skala Abb. 15 Abb. 16 Klappen- verriegelung Zugangsklappe Motorriemenscheibe Nehmen Sie die Spindelstockabdeckung ab, um die Riemenscheiben freizulegen. Optionales Verlängerungsbett mit einer maximalen Spitzenweite von 965 mm...
-
Page 31: Bedienungsanleitung
BEDIENUNGSANLEITUNG Teileinrichtung Die Teileinrichtung ist nützlich für Kannelierungen, Ziffernblätter und die genaue Positionierung von Bohrungen. Knopf des Sicherungsstifts herausziehen und drehen, um die Spindel zu entriegeln. Drehen Sie die Aufspannscheibe und stellen Sie eine der Positionen ein. Senken Sie den Sicherungsstift ab, um die Spindel in dieser Position zu verriegeln, siehe Abb. - Page 32 BEDIENUNGSANLEITUNG Abb. 23 Ändern der Drehzahl der Drehbank TRENNEN SIE DIE DREHBANK VOM STROMNETZ, BEVOR SIE FORTFAHREN! 1. Öffnen Sie die Zugangsklappe zur Motorriemenscheibe, indem Sie den Türknopf zurückziehen (siehe Abb. 21-22). Nehmen Sie die Spindelstockabdeckung ab, um Zugang zu den Riemenscheiben zu erhalten (siehe Abb.
- Page 33 Sie ihn. Setzen Sie die Spindelstockabdeckung wieder auf und schließen Sie die Motorklappe. Abb. 26 Motor Niedrig Hoch AW305WL HINWEIS: DIE OBIGEN DREHZAHLEN ZEIGEN Riemenscheibenrillen UNGEFÄHRE WERTE BEI UNBELASTETER DREHBANK. ENTFERNEN DER AUFSPANNSCHEIBE Abb. A...
-
Page 34: Wartung
ENTFERNEN VON STIRNMITNEHMER/MITLAUFKÖRNERSPITZE Zum Entfernen des Mitnehmers (F) den Ausstoßdorn (H) nehmen, das Werkzeug festhalten und den Dorn (H) durch das Mittelloch des Spindelstockrads führen und den Mitnehmer (F) herausdrücken (siehe Abb. 27). Wiederholen Sie den Vorgang für die Mitlaufkörnerspitze (G) im Reitstock, siehe Abb. 28. Abb. -
Page 35: Explosionszeichnungen/Teilelisten
EXPLOSIONSZEICHNUNGEN/TEILELISTEN... - Page 36 EXPLOSIONSZEICHNUNGEN/TEILELISTEN 1218VDA (AW305WL) Description Description Washer ø4 Bush Semi-circle head screwM4X8 Lock handle for tool rest base Hex socket screw M6×12 Headstock spur center Hand wheel Face plate Semi-circle head screwM6×24 Gear Semi-circle head screwM4X6 Round plate Hinge Headstock spindle...
- Page 37 EXPLOSIONSZEICHNUNGEN/TEILELISTEN Switch-box Cam follower tailstock Strain relief Retaining ring 10 Strain relief Tailstock Cable Tailstock quill Hex socket screw M10×25 Semi-circle head screw M5×12 Washer ø10 Tailstock axis Tool rack Lock nut Cup center Nut M10 Ball bearing Rubber washer Taper rod Support Semi-circle head screw M5×12...
-
Page 38: Schaltplan
SCHALTPLAN... -
Page 39: Notizen
NOTIZEN... - Page 40 Die Axminster-Garantie Kaufen Sie voller Vertrauen bei Axminster! Wir sind von der Qualität unserer Maschinen so überzeugt, dass wir auf alle Teile und Arbeiten eine 3-jährige Garantie aussprechen! Weitere Informationen erhalten Sie unter axminstertools.com/3years Die Verpackung kann recycelt werden. Verpackung bitte auf verantwortliche Weise entsorgen.
-
Page 41: Aw305Wl
Code 107674 Mode d'emploi original Tour à bois AW305WL À : 09/02/2022 VERSION DU LIVRET : 04... - Page 42 Entretien Vues éclatées/listes 55-56-57 Schéma de câblage Notes DÉCLARATION DE CONFORMITÉ EUROPÉENNE N° de certificat : MC1218DA Déclaration de conformité européenne Axminster Tool Centre Ltd Cette machine respecte les directives suivantes : Axminster Devon 2006/42/CE EN 55014-1:2006 EX13 5PH R.-U. axminstertools.com 2006/95/CE EN 55014-2:1997+A1+A2 06/42/CE - Annexe I/05.2006...
- Page 43 Tour à bois (blocage d’index non inséré dans le tour) AW305WL Bras du support (inséré) Porte-outil de 150 mm (fixé sur le bras du support) Plateau de 75 mm (fixé à la poupée) Griffe d’entraînement à 4 dents Axminster (25 mm) (code 340106) Contre-pointe standard à 60° Axminster (code 340203) Poussoir Porte-outil et deux vis cruciformes/rondelles Manette de contre-poupée...
- Page 44 GÉNÉRALITÉS POUR LES MACHINES DE 230 V Les éléments suivants vous permettront d’adopter les • Laissez la machine débranchée jusqu’au début des meilleures techniques, d’assurer votre sécurité et celle de travaux. vos collègues, ainsi que le bon fonctionnement de vos • Débranchez toujours en tirant sur la fiche et non sur le outils et de votre matériel.
- Page 45 SPÉCIFICATIONS Code 107674 Modèle AW305WL Classement Atelier Puissance 550 W, 230 V Vitesse (2) 500 - 2 040 et 1 000 - 4 080 Cône de la broche Filetage de l'arbre 1” x 8 filets au pouce (Réf. T04M) Contre-poupée du cône 2 MT Distance entre les centres 457 mm...
- Page 46 ASSEMBLAGE Fig. 01 et 02 Fig. 05 Fig. 06 Porte-outil Trouvez le porte-outil (I), les deux vis cruciformes et les rondelles, voir figure 3. Placez une rondelle sur les vis et vissez-les dans les deux trous préforés sous la poupée, voir figure 4. REMARQUE : il y a aussi deux trous préforés sous la contre-poupée si vous voulez y fixer le porte- outil.
- Page 47 ASSEMBLAGE Raccordements du moteur et du câble d'alimentation 1. Le tour peut être livré avec le moteur et les câbles 2. Le câble du moteur est branché dans la prise de d’alimentation débranchés. Suivez les étapes pour un droite à l’arrière du boîtier de commande, et celui de bon branchement.
- Page 48 RALLONGE DE BANC EN OPTION Trouvez la rallonge de banc (K) et les deux vis à tête hexagonale et ressort/rondelles (voir figure 7), REMARQUE : NE RESSERREZ positionnez-la contre l’extrémité du tour et alignez les PAS LES VIS À CE STADE ! trous préforés, voir figures 8 et 9. Placez une rondelle et une rondelle à...
- Page 49 ILLUSTRATION ET DESCRIPTION DES PIÈCES Couvercle de la poupée Doigt d’indexage Plateau Contre-pointe à 60° Griffe d’entraînement à 4 dents Blocage du fourreau de la contre- Porte-outil de 150 mm poupée Blocage du porte-outil Manette de contre-poupée Blocage Blocage du bras de la poignée du support du moteur (MARCHE)
- Page 50 ILLUSTRATION ET DESCRIPTION DES PIÈCES Fig. 13 Fig. 14 Repère d'indexage Doigt d’indexage Mécanisme d’indexage Fourreau de la contre-poupée avec graduation Fig. 15 Fig. 16 Verrou à ressort du bouton de porte Porte d'accès à la poulie du moteur Abaissez le couvercle de la poupée pour dévoiler le système de poulies La rallonge de banc en option fixée donne 965 mm au maximum entre les pointes...
- Page 51 CONSIGNES D’UTILISATION Mécanisme d’indexage Le mécanisme d’indexage est utile pour les colonnes cannelées, les cadrans et le positionnement précis de trou. Soulevez et faites tourner le doigt d’indexage pour débloquer la broche de la poupée, faites pivoter le plateau et alignez sur l'une des positions, puis abaissez le doigt d'indexage pour maintenir la broche en place, voir figures 17, 18, 19 et 20.
- Page 52 CONSIGNES D’UTILISATION Fig. 23 Modification de la vitesse du tour DÉBRANCHEZ LE TOUR DU SECTEUR AVANT DE CONTINUER ! 1. Ouvrez la porte d’accès à la poulie du moteur en tirant sur le bouton de porte, voir figures 21 et 22. Abaissez le couvercle de la poupée pour accéder aux poulies (voir figure 23).
- Page 53 Soulevez le couvercle de la poupée et fermez la porte d’accès au moteur. Fig. 26 Moteur Basse Haute AW305WL REMARQUE : le graphique des vitesses Gorges de la poulie ci-dessus mentionne les vitesses approximatives de marche à vide du tour.
- Page 54 ENLÈVEMENT DE LA GRIFFE D’ENTRAÎNEMENT / CONTRE-POINTE Pour retirer la griffe d’entraînement (F), trouvez le poussoir (C) et tout en maintenant la griffe, insérez le poussoir (C) à travers le trou central du volant de la poupée et faites sortir la griffe d’entraînement (F), voir figure 27. Répétez la procédure pour la contre-pointe (G) de la contre-poupée, voir figure 28.
- Page 55 VUES ÉCLATÉES/LISTES...
- Page 56 VUES ÉCLATÉES/LISTES 1218VDA (AW305WL) Description Description Washer ø4 Bush Semi-circle head screwM4X8 Lock handle for tool rest base Hex socket screw M6×12 Headstock spur center Hand wheel Face plate Semi-circle head screwM6×24 Gear Semi-circle head screwM4X6 Round plate Hinge Headstock spindle...
- Page 57 VUES ÉCLATÉES/LISTES Switch-box Cam follower tailstock Strain relief Retaining ring 10 Strain relief Tailstock Cable Tailstock quill Hex socket screw M10×25 Semi-circle head screw M5×12 Washer ø10 Tailstock axis Tool rack Lock nut Cup center Nut M10 Ball bearing Rubber washer Taper rod Support Semi-circle head screw M5×12...
- Page 58 SCHÉMA DE CÂBLAGE...
- Page 59 NOTES...
- Page 60 Cet emballage peut être recyclé. Veuillez le jeter de manière responsable. Pays de l’UE uniquement Ne jetez pas les outils électriques avec les déchets ménagers. La loi vous impose un tri et un recyclage distinct. Axminster Tools, Axminster Devon EX13 5PH, R.-U. axminstertools.com...
Need help?
Do you have a question about the AW305WL and is the answer not in the manual?
Questions and answers