
Subscribe to Our Youtube Channel
Related Manuals for Infiniton CMPP-RU92


Summary of Contents for Infiniton CMPP-RU92
- Page 1 User Manual Manual De Instrucciones DECORATIVE CHIMNEY HOOD CAMPANA EXTRACTORA DECORATIVO H10-20-300-048 Rev 002...
- Page 2 Dear Customer, Thank you very much for your preference for products. Our objective is to ensure that you enjoy this product, manufactured environmentally-friendly with a total sense of quality in a precise working environment at our modern facilities, most efficiently. We recommend you to read the instruction manual carefully and keep it handy before you use this chimney hood so that it maintains its quality just like the first day you bought it and serves you most efficiently.
-
Page 3: Table Of Contents
CONTENTS 1. Safety Instructions 2. Introduction And Technical Drawing Of The Chimney Hood 3. Installation Of Chimney Hood 3.1. Location Of The Chimney Hood 3.2. Mounting Chimney Hood On The Wall 3.3. Mounting The Aluminum Pipe 3.4. Installation Of Outer Duct 3.5. -
Page 4: Safety Instructions
1. SAFETY INSTRUCTIONS 1.This product is designed for domestic use. 2.Product Voltage is 220-240 Volts 50Hz. 3.Power cord of your product is fitted with grounded plug. This cord must be plugged into a grounding socket. 4.All electrical installation must be done by a qualified electrician. - Page 5 12.Food that may burst into flames should not be cooked under the device. 13.Turn on the product after you place pots, pans, etc on the hobs. Otherwise excess heat may cause deformation of some parts of your product. 14.Do not leave hot oil on the hobs. Pans with hot oil inside may cause self-ignition.
- Page 6 24.For duct-out chimney hoods, use pipes with a di- ameter of 150 mm or 120 mm. You should minimize the ducting distance with minimum bends. 25.Make sure your children do not play with the product. Do not let young children operate the product. 26.If the power cord is damaged, the damaged cord should be replaced by the manufacturer or its service agent or similarly specialized personnel in order to...
-
Page 7: Introduction And Technical Drawing Of The Chimney Hood
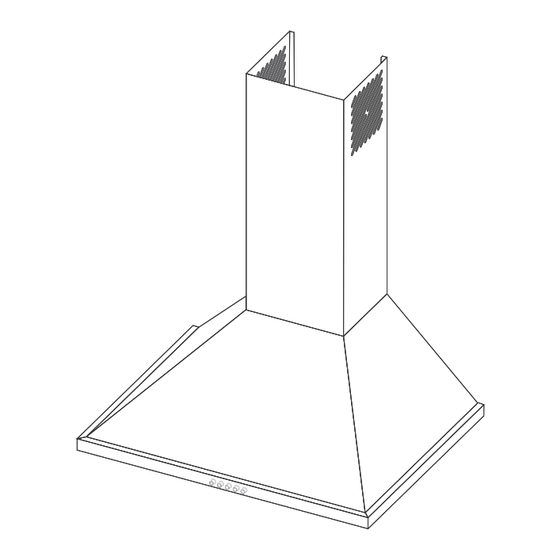
2. INTRODUCTION AND TECHNICAL DRAWING OF THE CHIMNEY HOOD 1. Duct 2. Control panel 3. Filter 4. Lighting 170 mm 200 mm 700 mm 25 mm 450 mm 596 mm / 896 mm... -
Page 8: Installation Of Chimney Hood
3. INSTALLATION OF CHIMNEY HOOD 3.1. Location Of The Chimney Hood Min. 650 mm. 3.2. Mounting Chimney Hood On The Wall 2 drywall (8mm) anchors are nailed into the holes drilled according to installation template (A,B). They are fixed into the wall through 2 key holes by screws as shown in Figure 1. -
Page 9: Installation Of Outer Duct
Fix the inner duct to inner duct connection plate with 2 screws. Figure 3 Figure 4 Figure 2 3.4. Installation Of Outer Duct Put the outer duct on the chimney hood and fix to it by 2 screws (Figure 5) 3.5. -
Page 10: Symbols Functions
4.2. Symbols Functions Switches on and off the motor. Increases the speed when the motor (Except for the lighting) is running. Decreases the speed when the motor If pressed this symbol, the motor is running. turns itself off 15 minutes later. Only switches on and off the lighting Display system. -
Page 11: Use Of Charcoal Filter
5.3. Use Of Charcoal Filter • Our products allow the installation of charcoal filter. • Regardless of use of charcoal filters or not, grease filters should be installed on the product. Do not use your product without grease filter. • Use of charcoal filteris as follows. •... -
Page 12: Maintenance Of The Chimney Hood
6.2. Candle Type Halogen Bulb • Bulb does not operate is possible to remove as shown in. (Figure 9) • A new bulb with the same features is replaced with removed bulb. • Remove the holder on the LED bulb. Put the new LED bulb on the holder housing of the LED bulb you removed as shown in Figure 10. -
Page 13: If Chimney Hood Does Not Work
Efficient Use Of Chimney Hood; • When installing the chimney hood to the air duct, use 150/120 mm diameter pipes and use bends as minimum as possible. • Be ware of cleaning periods of metal filters and replacing times of charcoal filters. •... -
Page 14: Environmentally-Friendly Disposal
Chimney Hood does not work Light bulb is not working Chimney hood air suction is poor Do not send air out (in non-ducted cases) 9. ENVIRONMENTALLY-FRIENDLY DISPOSAL Dispose of packaging in an environmentally-friendly manner. This appliance is labelled in accordance with European Directive 2012/19/EU concerning used electrical and electronic appliances (waste electrical and electronic equipment - WEEE). - Page 15 Estimado Cliente, Antes de todo, agradecemos para comprar productos de. Nuestro objetivo es obtener su uso con desempeño máximo de este producto que ha sido producido según el principio de cualidad total en nuestros plantas mod- ernas, sin dañar el ambiente. Para que la campana extractora de que vd.
- Page 16 ÍNDICE 1. Instrucciones De Seguridad 2. Introduccion De Campana Extractora Y Diseño Técnico 3. Montaje De Campana Extractora 3.1. La Posición De La Campana Extractora 3.2. Montaje De Campana A La Pared 3.3. Montaje De Manguera De Aluminio 3.4. Inserción Del Eje Exterior 3.5.
-
Page 17: Instrucciones De Seguridad
1. INSTRUCCIONES DE SEGURIDAD 1.Este producto es diseñado para uso doméstico. 2.El voltaje del producto es 220-240 V y 50Hz. 3.El producto debe conectarse mediante un cable a la toma de tierra. 4.Toda la instalación eléctrica debe ser realizada por un técnico cualificado. 5.Una instalación realizada por personas no cualificadas puede provocar daños al producto, accidentes o un funcionamiento ineficiente. - Page 18 11.No cocine productos inflamables debajo de este aparato. 12.Instale este producto antes de cocinar. El calor de los fuegos podría dañar algunas partes de su campana. 13.Apague los fuegos antes de retirar las cacerolas, ollas, etc para evitar quemaduras. 14.No deje aceite caliente sobre la estufa. Los recipi- entes con aceite podrían inflamarse espontáneamente.
- Page 19 22.Corte la energía del aparato antes de mantenimiento. (Corte la energía del aparato tirando el clavija del enchufe.) 23.Cuando instala la tubería de extracción a la chime- nea debe usar un tubo de 150mm o 120mm. La conex- ión tiene que ser lo más corta posible, sin pliegues y con pocas curvas.
-
Page 20: Introduccion De Campana Extractora Y Diseño Técnico
2. INTRODUCCION DE CAMPANA EXTRACTORA Y DISEÑO TÉCNICO 1. Chimenea 2. Panel de control 3. Filtro 4. Iluminación 170 mm 200 mm 700 mm 25 mm 450 mm 596 mm / 896 mm... -
Page 21: Montaje De Campana Extractora
3. MONTAJE DE CAMPANA EXTRACTORA 3.1. La Posición De La Campana Extractora Min. 650 mm. 3.2. Montaje De Campana Al Pared Perfore 3 agujeros como señala el patrón de montaje (A, B) y ponga clavijas de 8mm en estos agujeros. Ponga los tornillos de montaje en las clavijas y cuelgue el aparato a la pared. -
Page 22: Inserción Del Eje Exterior
Coloque los extremos del tubo de la chimenea con cuidado. Fije la parte interior de la chimenea a la toma de conexión de la parte interior de la chimenea con 2 tornillos. Figura 2 Figura 3 Figura 4 3.4. Inserción Del Eje Exterior Fije la chimenea exterior a su lugar sobre la campana usando 2 tornillos como se indica en la Figura 5. -
Page 23: Funciones De Campana Extractora
4. FUNCIONES DE CAMPANA EXTRACTORA 4.1. El Panel De Control Y Sus Funciones Control Digital: Sólo tiene que tocar los símbolos sobre los botones. Las funciones de apertura/cierre del motor y ajuste de duración se realizan con el mismo botón: •... -
Page 24: Filtro Redondo De Carbón
5.2. Filtro Redondo De Carbón Si no instala su campana a una chimenea puede usar un filtro de carbono para filtrar el aire y recircularlo al ambiente. Puede obtener el filtro de carbono de su servicio técnico. 5.3. Uso De Filtro De Carbón •... -
Page 25: Mantenimiento Y Limpieza De La Campana
6.1. Lámpara De Tipo Led • Desmonte la lámpara LED que no funcione como se indica en el diseño (Ver figura 9). • Desmonte la lámpara LED con cuidado. • Coloque una lámpara LED de las mismas características de la que retira. -
Page 26: Si La Campana No Funciona
• Tenga cuidado de no poner en contacto las partes electrónicas con agua u otras sustancias de limpieza. • Para producto de acabo en Inox, usar limpiadores apropiados para el mantenimiento del Inox, le ayudará a prolongar la vida de su aparato. -
Page 27: Eliminación Respetuosa Con El Medio Ambiente
La campana no funciona Lámpara de iluminación no funciona La succión de aire de la campana es débil No recicla aire (en ambientes sin chimenea) 9. ELIMINACIÓN RESPETUOSA CON EL MEDIO AMBIENTE Deshágase del embalaje de una manera respetuosa con el medio ambiente. El aparato está...
Need help?
Do you have a question about the CMPP-RU92 and is the answer not in the manual?
Questions and answers