
Related Manuals for Insignia NS-BK2TBS8


Summary of Contents for Insignia NS-BK2TBS8
- Page 1 USER GUIDE Dual Beer Kegerator/Beverage Cooler NS-BK2TBS8/NS-BK2TBK8 Before using your new product, please read these instructions to prevent any damage.
-
Page 2: Table Of Contents
Specifications ..........24 ONE-YEAR LIMITED WARRANTY - INSIGNIA ..... .25 Introduction Congratulations on your purchase of a high-quality Insignia product. -
Page 3: Important Safety Instructions
Dual Beer Kegerator/Beverage Cooler Important Safety Instructions CAUTION RISK OF ELECTRIC SHOCK DO NOT OPEN This symbol indicates that dangerous voltage constituting a risk of electric shock is present within your kegerator/beverage cooler. This symbol indicates that there are important operating and maintenance instructions in the literature accompanying your kegerator/beverage cooler. - Page 4 NS-BK2TBS8/NS-BK2TBK8 14 Do not handle the plug with wet hands. This could result in an electric shock. 15 Unplug the power cord by holding the plug, never by pulling the cord. 16 Do not turn the appliance on or off by plugging or unplugging the power cord.
-
Page 5: Grounding Requirement
Dual Beer Kegerator/Beverage Cooler 4 WARNING–DANGER—Never allow children to play with, operate, or crawl inside the kegerator/beverage cooler. Risk of child entrapment. Before you throw away your old kegerator/beverage cooler: 1) Take off the doors 2) Leave the shelves in place so that children may not easily climb inside 5 Unplug the kegerator/beverage cooler before performing user maintenance on it. -
Page 6: Features
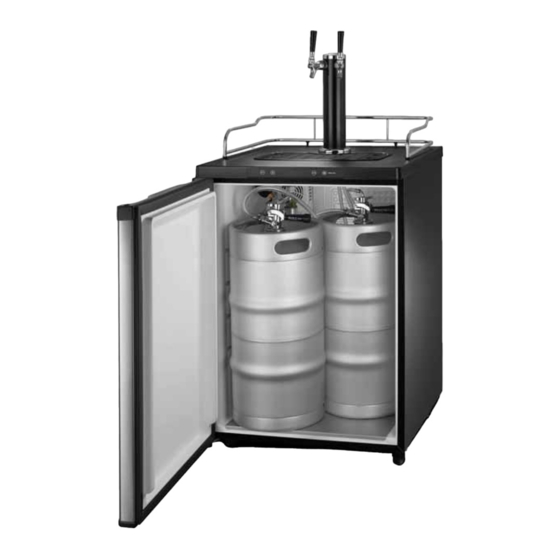
NS-BK2TBS8/NS-BK2TBK8 Features • Taps serve up to two beverages • 5.7 cu. ft. holds a variety of keg sizes • Converts between refrigerator and beverage cooler • Black door looks stylish with any decor • Electric control for ideal temperature •... - Page 7 Dual Beer Kegerator/Beverage Cooler Keg parts Metal wrench Extra valve washers Beer gasket with Beer tap handle (for cleaning) (2 each) screws (4) Draft arm assembly You’ll need • Adjustable wrench • Phillips screwdriver • Pair of pliers/clamp crimper • Full keg(s) of beer (See “Installing and setting up a beer keg“...
-
Page 8: Kegerator Parts
NS-BK2TBS8/NS-BK2TBK8 Kegerator parts Adjust Change temperature temperature unit Display Quick cool Beer tap handles Draft arm assembly Guard rail Drip tray (2 pieces) Worktop Control panel Sankey keg coupler tank regulator 5 lb. CO tank Bolt and nut for retainer... -
Page 9: Locating Your Kegerator
Dual Beer Kegerator/Beverage Cooler Locating your kegerator Before using your kegerator • Let the kegerator stand upright for approximately eight hours before connecting it to power. This reduces the possibility of a malfunction in the cooling system from improper handling during transportation. •... -
Page 10: Assembling Your Kegerator
NS-BK2TBS8/NS-BK2TBK8 Notes • The kegerator should always be plugged into its own individual electrical outlet which has a voltage rating that matches the rating plate. • We strongly recommend that you do not use an extension cord. However, if you must use an extension cord, it is... -
Page 11: Attaching The Guard Rail
Dual Beer Kegerator/Beverage Cooler Attaching the guard rail • Insert the guard rail into the holes on the top of the kegerator. Installing the draft arm assembly 1 Remove the cabinet plug from the top of the kegerator. 2 Align the beer gasket with the holes on the top of the cabinet. 3 Pass both the wing nut and the beer tube (both are attached to the draft arm assembly) through the hole on the worktop until the draft arm assembly is resting on the top of the cabinet. -
Page 12: Installing The Co2 Regulator And Tank
NS-BK2TBS8/NS-BK2TBK8 Installing the CO regulator and tank Before installing the CO regulator and tank, it’s very important that you review this list of safety tips. WARNING Before installing the CO regulator and tank, it’s very important that you review this list of safety tips: •... -
Page 13: Attaching The Co2 Tank
Dual Beer Kegerator/Beverage Cooler 4 Attach the CO regulator to the CO tank by screwing the regulator nut onto the tank valve and tightening with an adjustable wrench. Regulator Tank valve Attaching the CO tank You can install the CO tank inside the kegerator for a cleaner look (Option A) or on the back if you need more space inside your kegerator (Option B). -
Page 14: Installing And Setting Up A Beer Keg
NS-BK2TBS8/NS-BK2TBK8 Installing and setting up a beer keg This kegerator accepts almost all brand name kegs. Here’s what will fit in your kegerator: BARREL SIZE (short, pony) (slim) HOW MANY WILL FIT GALLONS 12 oz GLASSES *You can have a 1/4 (slim) and a 1/6, or a 1/4 (slim) and an 1/8 in your kegerator at the same time. - Page 15 Dual Beer Kegerator/Beverage Cooler 4 Pull the black handle on the sankey keg coupler and press it downward until it locks into position. The keg is now tapped. Sankey keg coupler Note If beer comes up through the top of the wing nut, remove the wing nut, reposition the washer, then reattach the wingnut.
-
Page 16: Using Your Kegerator
NS-BK2TBS8/NS-BK2TBK8 4 Turn the regulator screw clockwise to increase pressure. The needle on the gauge starts to climb. Set the gauge to 10-12 PSI. Adjustment lock nut Regulator screw 5 When the tank is at the correct pressure, tighten the adjustment lock nut by turning it counter-clockwise. -
Page 17: Dispensing Beer
Dual Beer Kegerator/Beverage Cooler 3 After the kegerator is fully cooled, press - or + to adjust to the temperature you want. The kegerator may take a few hours to stabilize after adjusting the temperature. Notes • To change the thermostat setting, adjust it by one increment at a time. - Page 18 NS-BK2TBS8/NS-BK2TBK8 Preventing bad beer Problem Possible Causes Solution Too much head Improper regulator setting Make sure that the (CO ) pressure is between 10 and 12 PSI. Pressure build up Activate the pressure relief valve located on the sankey keg coupler for three seconds.
-
Page 19: Maintaining Your Kegerator
Dual Beer Kegerator/Beverage Cooler Maintaining your kegerator Your kegerator is designed for year-round use with only minimal cleaning and maintenance. When you first receive it, wipe the case with a mild detergent and warm water, then wipe dry with a dry cloth. Do this periodically to keep your kegerator looking new. -
Page 20: Replacing Kegs
NS-BK2TBS8/NS-BK2TBK8 Replacing kegs 1 Unplug your kegerator from the wall outlet to turn it off. 2 Close the main valve on the CO tank. 3 Close the shut-off valve on the CO regulator. 4 Pull the black handle on the keg coupler and press it upward to close the connection between the beer keg and the keg coupler. -
Page 21: Moving Your Kegerator
Dual Beer Kegerator/Beverage Cooler Moving your kegerator 1 Unplug your kegerator from the wall outlet to turn it off. 2 Remove all kegs and beverages. 3 Securely tape down all loose items inside your kegerator. 4 Tape the door shut. Be sure the kegerator stays in the upright position during transportation and protect the exterior with a blanket or similar padding. -
Page 22: Troubleshooting
NS-BK2TBS8/NS-BK2TBK8 Troubleshooting Beer quality Problem Possible cause Possible solution Excess formation of Recent keg agitation. If the keg has recently been moved, let it stand a minimum of foam “head.” Beer is all two hours before tapping. foam, or too much foam Improper regulator setting. -
Page 23: Cooler
Dual Beer Kegerator/Beverage Cooler Problem Possible cause Possible solution Abnormal beer taste System requires cleaning. “Maintaining your kegerator” on page 19. and/or smell. System contamination. Check hoses for possible air leaks. The beer has exceeded its shelf Replace the beer keg with a fresh one. life. -
Page 24: Specifications
NS-BK2TBS8/NS-BK2TBK8 Problem Possible cause Possible solution The cooler turns on and The room temperature is Make sure that the door was properly installed. off frequently. hotter than normal. The door has been opened too Make sure that the door is closed properly. -
Page 25: One-Year Limited Warranty - Insignia
Products and parts replaced under this warranty become the property of Insignia and are not returned to you. If service of Products or parts are required after the Warranty Period expires, you must pay all labor and parts charges. This warranty lasts as long as you own your Insignia Product during the Warranty Period. - Page 26 FOR THE BREACH OF ANY EXPRESS OR IMPLIED WARRANTY ON THIS PRODUCT, INCLUDING, BUT NOT LIMITED TO, LOST DATA, LOSS OF USE OF YOUR PRODUCT, LOST BUSINESS OR LOST PROFITS. INSIGNIA PRODUCTS MAKES NO OTHER EXPRESS WARRANTIES WITH RESPECT TO THE PRODUCT, ALL EXPRESS AND...
- Page 27 1-877-467-4289 (U.S. and Canada) or 01-800-926-3000 (Mexico) INSIGNIA is a trademark of Best Buy and its affiliated companies. Distributed by Best Buy Purchasing, LLC V1 ENG 7601 Penn Ave South, Richfield, MN 55423 U.S.A. 16-1100 ©2017 Best Buy. All rights reserved.
Need help?
Do you have a question about the NS-BK2TBS8 and is the answer not in the manual?
Questions and answers