
Related Manuals for Insignia NS-BC48SS3


Summary of Contents for Insignia NS-BC48SS3
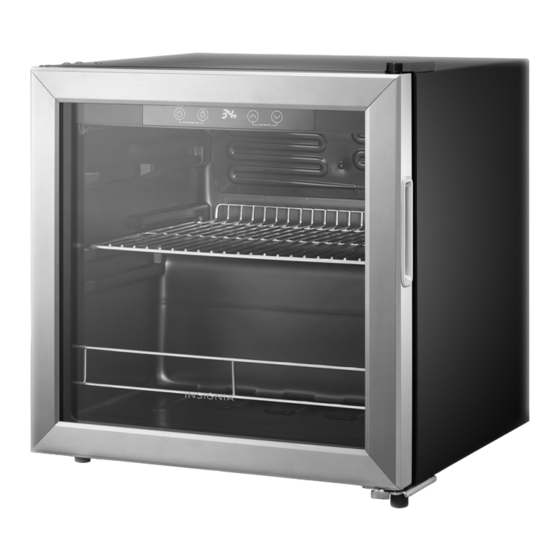
- Page 1 USER GUIDE 48-Can Beverage Cooler NS-BC48SS3 Before using your new product, please read these instructions to prevent any damage.
-
Page 2: Table Of Contents
Contents IMPORTANT SAFETY INSTRUCTIONS ........3 Grounding requirement . -
Page 3: Important Safety Instructions
48-Can Beverage Cooler IMPORTANT SAFETY INSTRUCTIONS CAUTION RISK OF ELECTRIC SHOCK DO NOT OPEN This symbol indicates that dangerous voltage constituting a risk of electric shock is present within your beverage cooler. This symbol indicates that there are important operating and maintenance instructions in the literature accompanying your beverage cooler. - Page 4 Unplug the power cord by holding the plug, never by pulling the cord. Do not turn the appliance on or off by plugging or unplugging the power cord. Turn off the appliance before unplugging it. Refer all servicing to qualified service personnel. Servicing is required when the appliance has been damaged in any way, such as the power-supply cord or plug is damaged, liquid has been spilled or objects have fallen into the appliance, the appliance has been exposed to rain or moisture, does not operate normally, or has...
-
Page 5: Grounding Requirement
48-Can Beverage Cooler • The cooler must be disconnected from the source of electrical supply before attempting the installation of accessory. • Refrigerant and cyclopentane foaming material used for the appliance are flammable. Therefore, when the appliance is scrapped, it shall be kept away from any fire source and be recovered by a special recovering company with corresponding qualification other than be disposed by combustion, so as to prevent damage to the environment or any other harm. -
Page 6: Package Contents
Package contents • 48-can beverage cooler • User Guide Components Temperature control Shelves Glass door Steel bar (prevents cans from falling out) Leveling feet Setting up your beverage cooler Before using your beverage cooler • Remove the exterior and interior packing. •... -
Page 7: Leveling Your Beverage Cooler
48-Can Beverage Cooler Leveling your beverage cooler • Your beverage cooler must be level in order to function correctly. If your beverage cooler is not leveled during installation, the door may not close or seal correctly, causing cooling, frost, or moisture problems. •... -
Page 8: Using Your Beverage Cooler
Using your beverage cooler Light Temperature up/down Standby Display button buttons button Display When you plug in your beverage cooler for the first time, the display screen turns on for three seconds, then the start-up tone rings. CAUTIONS: • The control buttons should be pressed gently. •... -
Page 9: Reversing The Door On Your Cooler
48-Can Beverage Cooler Reversing the door on your cooler All parts removed must be saved to reinstall the door. Remove the top cap, then remove the three screws that hold the upper hinge (right side) to the top of the cabinet. Top cap Button plugs Screws... - Page 10 Remove the three screws that hold the bottom hinge to the lower part of the cabinet, and remove the foot on the other side. Reinstall the bottom hinge on the left corner of the cabinet, then reinstall the foot on the other side.
-
Page 11: Filling Your Beverage Cooler
48-Can Beverage Cooler Filling your beverage cooler The following illustrations are provided to show the best way to fill your cooler for maximum storage: Inner row Outer row Top shelf: 12 cans Top shelf: 13 cans Bottom shelf: 6 cans Bottom shelf: 17 cans Auto Defrosting During the auto defrosting process, the compressor shuts down and the frost melts... -
Page 12: Maintaining Your Beverage Cooler
Maintaining your beverage cooler Your beverage cooler is designed for year-round use with only minimal cleaning and maintenance. When you first receive it, wipe the case with a mild detergent and warm water, then wipe dry with a dry cloth. Do this periodically to keep your beverage cooler looking new. CAUTION: To prevent damage to the finish, do not use: •... -
Page 13: Troubleshooting
48-Can Beverage Cooler Troubleshooting CAUTION: Do not try to repair your beverage cooler yourself. Doing so invalidates the warranty. Fault indication If a fault is detected, the display shows one of the following codes: Fault code Description Temperature sensor fault Communication fault Note: When the above faults are displayed, do not attempt to repair your cooler by yourself. - Page 14 PROBLEM POSSIBLE CAUSE POSSIBLE SOLUTION My cooler is not The door has been Make sure that the door is closed correctly. cold enough. opened too often or was not closed correctly. You have just added a Allow time for the new beverages to cool, then large amount of warm check again.
- Page 15 48-Can Beverage Cooler PROBLEM POSSIBLE CAUSE POSSIBLE SOLUTION My cooler turns The room temperature Cool the room or move your beverage cooler to on and off is hotter than normal. a cooler place. frequently. The door has been Make sure that the door is closed correctly. opened too often or was not closed correctly.
- Page 16 PROBLEM POSSIBLE CAUSE POSSIBLE SOLUTION The beverage When you open the This is normal. If the door is hard to open at cooler door is beverage cooler door, other times, try rubbing paraffin wax or hard to open. warm air rushes inside. petroleum jelly along the edges of the entire When you close the gasket.
-
Page 17: Specifications
48-Can Beverage Cooler Specifications Dimensions (H × W × D) 19.5 × 18.5 × 17.3 in. (49.5 × 47 × 44 cm) Weight 40.8 lbs. (18.5 kg) Capacity 1.5 cu. ft. (.04 cu. m) 48 12-ounce cans Power requirements 115V~60Hz Current Operating temperature 34°... -
Page 18: One-Year Limited Warranty
Product is determined to be defective by an authorized Insignia repair center or store personnel, Insignia will (at its sole option): (1) repair the Product with new or rebuilt parts; or (2) replace the Product at no charge with new or rebuilt comparable products or parts. Products and parts replaced under this warranty become the property of Insignia and are not returned to you. - Page 19 Damage due to incorrect operation or maintenance • Connection to an incorrect voltage or power supply • Attempted repair by any person not authorized by Insignia to service the Product • Products sold “as is” or “with all faults” •...
- Page 20 1-877-467-4289 (U.S. and Canada) www.insigniaproducts.com INSIGNIA is a trademark of Best Buy and its affiliated companies. Distributed by Best Buy Purchasing, LLC 7601 Penn Ave South, Richfield, MN 55423 U.S.A. V1 ENGLISH ©2022 Best Buy. All rights reserved. 22-0152...
Need help?
Do you have a question about the NS-BC48SS3 and is the answer not in the manual?
Questions and answers