Table of Contents
Advertisement
Available languages
Available languages
Quick Links
Advertisement
Table of Contents

Related Manuals for Colorful B365M-PLUS V21


Summary of Contents for Colorful B365M-PLUS V21
- Page 1 痲簊 B365M-PLUS V21 BATTLE-AX B365M-PLUS V21...
-
Page 2: Table Of Contents
痲簊 B365M-PLUS V21/BATTLE-AX B365M-PLUS V21 驘焲 ⺮剣�� ��厙..................1 .................. 1 1-1 劶缟銫 1-2 劶缟 聏 .................. 1 1-3 劶缟滎歳愿 ................3 ................. 4 ⺮匯�� 鲳叙樚 ................4 2-1 拃纡鲳叙樚 .................. 7 ..............7 硵怸崡炴 碿 ................12 缟硵尞厙 糄..............13 ⺮剮��... - Page 3 聊研务嬳卿蝒堜崡愾啈狾卝劈 封滎馯ㄔ靅榦啈狾卝嵴蟎群硹奓!锐 娂衼ㄕ瘺殙炏馯 SJ/T11364-2006 翶墢 螛 纡卝嵴蟎群硹奓翶 叀寷繟蛦繟橯 銕 痰埈 翶 糄敱剰 卝嵴繟蛦繟橯銕 痰埈 翶 卝嵴务繟蛦繟橯銕 痰埈 馯屙齜寷岋 繟蛦繟橯銕 痰埈 叙屙齜 (Pb) 蟊(Hg) (Cd) 堖叛 撰譻 撰譻匯 (Cr(VI)) (PBB) (PBDE) PCB 缟 × ぽ ぽ ぽ ぽ ぽ 缨叙 ぽ ぽ...
- Page 4 PCMCIA 崡 CardBus ⺯ Personal Computer Memory Card International Association 馯袟塀帾翶ㄌ 堣厩憄纡 糄勸务咦霳馯卝嵴屙齜⺯厩⼜屍 瘺殥堓尽瘺睂繟崡 堓 馯ㄌ 皪纥筁睫 敱罏獜馯 壽钗 , 澃剾籹衼厞纡劶缟咦霳癗塀务 熠漌娑, 獜瘺 匄劶缟馯 帾ㄌ藷撦獜 尰叀欿 叀剰簬炩 熠漌娑 剧煕 馯樺簬 �� http://www.colorful.cn/ 專卝嵴崡 娐龆澴��啈 狾筁睫, 尰叀馣焲剧煕 樺簬 懌 http://bbs.colorful.cn , 專皪纥睳欈ㄌ...
- Page 5 睅癣 400-678-5866 橍瘦繦娆辒 嵍 , 藷撦 尰叀驣硵剴剧煕 屍殥 憍潾尲繦娆务燭 , 堥呠 簬衼敱剰: 剧煕 鼦皪堉愾嬐抒帏屜繦娆潾尲劈娆 愱寷 簬炩 潾尲屙齜 繦娆 愱 簬衼 嫉卥ㄋ擐裳ㄋ衉嫉驸ㄋ衉嬿驸ㄋ 嫉卥繦娆潾尲 010-82488344 毇劊驸ㄋ毇 驸ㄋ堸 尟 衖嬐 蠉 繦娆潾尲 樉驸ㄋ屔罈驸ㄋ 蟋驸 024-31321731 藻螥繦娆潾尲 諡嫉驸ㄋ諡嬿驸ㄋ蟋 驸 027-87873911 嬳劊潾尲 蟋 驸ㄋ褿蟋驸ㄋ樚燥驸ㄋ副襮滍 025-86817950 澗溘繦娆潾尲...
- Page 6 憄獜炏映勏奵 劶缟媨 騨堸 翶墢 叙 憄獜癣炏纡劶缟媨 騨勏屜 副脧翀剰 瘺夦壽馯屍 翶墢 叙⺯岁 堉ㄌ 1 懈痲簊 B365M-PLUS V21 劶缟 2 绱 SATA 6Gb/s 箤研 1 烊 娐埒騰 1 鉏屜 缟 IO 肎缟 1 纡劶缟务 篎咦霳癗塀 袟琍:叀副 叙厍哔審 , 叀橇銕劵墢 剧煕 鼦皪唾靼啙筒馯绅奁ㄌ Note: 叀副夦壽馯叟呢剣...
-
Page 7: 剣�� ��厙
⺮剣�� ��厙 琩 獜 匄剧煕 劶缟 劶缟碻哔匧 漞吋 馯犉 崡嵴 唾 ㄌ 1-1 劶缟銫 痲簊 B365M-PLUS V21 劶缟 霳 Intel B365 鉏 , 筁睫 Intel LGA1151 Coffee Lake-S 夦撁锐怸,筁睫寺 DDR4-2666/2400/2133MHz 堸榵 绱ㄌ 劶缟碻哔 4 劝 DDR4 堸榵绱碿荰ㄋ1 劝 HDMI 硵尞ㄋ1 劝 DVI 硵尞ㄋ1 劝... - Page 8 痲簊 B365M-PLUS V21/BATTLE-AX B365M-PLUS V21 榵嚬 撆 劶缟碻哔 5 劝 SATA3.0 6Gb/s 鲳騰硵尞 6 摪 撆 箪屓 6 摪 詙絜箤榳 硹奓怸 筁睫 6 摪 3D 钖 摪筦 娃 劶缟 霳嬧埍 ⼦ 筁睫 10/100/1000Mbps 箤研吗 鑝 USB 硵尞 劶缟碻哔 6 劝 USB2.0 崡 6 劝 USB3.1 Gen1 硵尞 岋的殙...
-
Page 9: 劶缟滎歳愿
简介 1-3 劶缟滎歳愿 厍哔審... -
Page 10: 匯�� 鲳叙樚
⺮匯�� 鲳叙樚 審邇叀剰藺 模痩靅 馯樚 樚 务擗撁锐怸 CPU 樚 堸榵 堃纸 樚 瘺繟的殙⼦ 硵瘺繟 尼 ㄋ硓 ㄋ靅謺 寷 缟硹奓 2-1 拃纡鲳叙樚 樚 务擗撁锐怸崡 癋 纡劶缟堥撆剣劝 Socket 1151 撁锐怸碿荰 纡碿荰⺯剽劵 Intel LGA1151 硵尞 Coffee Lake-S 夦撁锐怸瘺 ㄌ 哘邇叀剰藺 樚 撁锐怸崡 癋 1. - Page 11 硬件安装...
- Page 12 痲簊 B365M-PLUS V21/BATTLE-AX B365M-PLUS V21 樚 堸榵 劶缟碻哔 4 劝 DDR4 堸榵绱碿荰ㄌ剰愿瘺鸏劵 DDR4 堸榵绱碿荰憄劶缟 副馯呕 ㄌ 剣绱堸榵: 呵尰叀碿堃奉叟呢剣劝堸榵绱碿荰ㄌ 劕绱堸榵: 碿堃奉 DIMM1 崡 DIMM3 碿荰 痰 DIMM2 崡 DIMM4 碿 荰, 叀 炆寺 ㄌ. 剮绱堸榵: 割 樚碿 3 绱堸榵 尰 吐炴 筢 ㄌ...
-
Page 13: 硵怸崡炴 碿
硬件安装 CMOS 詙 碿 CLR_CMOS 藷 尰叀詙 劶缟馯 CMOS 篭 咺敱 粄纉寷 BIOS 樾 ,愌奉壽 宇 樾嗥ㄌ 敱罏獜 詙 CMOS 篭, 咦霳 漤鰀硵 馯 Pin2-3 箤鼨 ㄌ CLR_CMOS CLR_CMOS 1-2 闭合正常 2-3 闭合清除 CMOS CMOS 清除设置 注意: 1.詙 CMOS 篭奵, 埐堟... - Page 14 痲簊 B365M-PLUS V21/BATTLE-AX B365M-PLUS V21 奵 缟炏堟纸崡睳鸏躟碿 F_PANEL PWR_ON ATX 靅謺炏堟ㄌ鰀硵藷炴 尰叀炏纸ㄌ 岔炏堟ㄌ鰀硵藷炴 割 堟 靅謺孭尰 簙岔娐 纸ㄌ PWR_LED 靅謺睳鸏躟ㄌ焮 靅謺炏岔粚 藷躟吐⼙ ㄌ HD_LED 鲳騰睳鸏躟ㄌ欃鲳騰 箤研榵專粚 藷躟吐⼙ ㄌ SATA ��尞 硵怸 劶缟碻哔 5 劝 SATA3.0 6Gb/s 鲳騰硵尞ㄌ...
- Page 15 硬件安装 M.2 碿荰 劶缟碻哔 2 劝 M.2 碿荰 副 1 劝 M.2 碿荰筁睫 PCI-e x4 SSD 剰 劝 M.2 碿荰筁睫 PCI-e x4 崡 MSATA SSDㄌ劕劝 M.2 碿荰 筁睫 NVME ㄋ 筁睫 Intel OPTANE 皪纥ㄋ 筁睫 2242/2260/2280 歬欁 聏馯 SSD 箤研吗 鑝繎 尰 32Gb/sㄌ...
- Page 16 痲簊 B365M-PLUS V21/BATTLE-AX B365M-PLUS V21 USB2.0 硵尞的殙碿 FUSB2 FUSB3 劶缟碻哔 2 劝 USB2.0 硵擞 尰的殙 4 劝 USB2.0 硵尞ㄌUSB2.0 硵 尞吗 鑝繎 尰 奉 480Mbps 尰叀碻哔 馯匹 硵ㄋ匹娐炩 靅 誯痨 尰叀屗粚 馯撦愱 撆ㄌ USB3.1 Gen1 硵尞的殙碿 F_USB3.0 劶缟碻哔 1 劝 USB3.1 Gen1 硵擞...
- Page 17 硬件安装 努 撆碿 JCOM 劶缟碻哔 1 劝 COM 硵擞,霳绷 硵努尞 COM ㄌ欙努尞莲 馯硓 硵 劝碿濜,硵髗欙 莲 樚 纸 屜哥 缟X馯碿荰务ㄌ 癋碿濜 CPU_FAN1-3 SYS_FAN 劶缟堜碻哔 3 劝 癋碿濜 霳绷 呗 CPU 崡 馯誓濚ㄌ堣务 CFAN1 崡 CFAN2 ⺯ CPU 癋碿濜 硵 CPU 癋...
-
Page 18: 缟硵尞厙
痲簊 B365M-PLUS V21/BATTLE-AX B365M-PLUS V21 庥尭 硵擞 SPEAK 劶缟碻哔 1 劝庥尭 硵擞 樍 硵奉纸 馯欪庥尭副ㄌ 缟硵尞厙 屜 缟碻哔劦檟馯 堃崡 壽硵尞ㄌ 劶缟 缟硵尞媨睉 1 劝 PS2 翶崡 騰 霳��尞ㄋ2 劝 USB2.0 硵尞ㄋ 1 劝 HDMI 硵尞ㄋ1 劝 DVI 硵尞ㄋ1 劝 VGA 硵尞ㄋ4 劝 USB3.1 Gen1 硵... -
Page 19: 剮�� 娐龆澴樚 糄
⺮剮�� 娐龆澴樚 糄 碿堃剧煕 劶缟 娐龆澴樚 埒騰 樚 龆澴吐 娐 烼壽剰 ニ尞ㄌ CAUTION: 樚 模痩鲳叙屜, 燯 樚 欃澺馯 娐龆澴, 癚 封瞢劶 缟馯烾娟犉 ㄌ 叀橇銕劵墢 娐埒騰 娐脧褰劶缟瘺咦霳馯 鉏 戓尼ㄋ摪⼦戓尼ㄋ缟 納⼦戓尼 痰 缟 ⼦戓尼,輷壾驨澺馯睹 樚 驨澺馯 娐ㄌ... -
Page 20: 愇�� Bios
⺮愇�� BIOS ��厙 敱呢 BIOS 绷縻筒 堸橿 審 藷��ㄌ ��媨岋剰夦堸橿: Main 啈狾 Advanced BIOS Chipset 鉏 銫熀 Security 樚堉 Boot 岔娐 C.Oclock Save & Exit 壽 CAUTION: 靁匱劶缟馯 BIOS 鉒纡憄割簓馯嬫 瘺叀 纡癗塀务繟堟 BIOS 馯碹 厍哔審 ㄌ 堃 BIOS 劶靨 纡��碻哔匧 BIOS Setup 龆澴馯啈狾 霳瘦尰叀... - Page 21 BIOS 设置 硹奓 呕 < ⓦⓨⓥⓧ > 屟副ㄋ屟剰ㄋ屟溥痰屟尵齪娐埒翶叀 睆 驘 < Enter > 樾藷 < +/PU > 揚娅箤嗥痰筒尊 睆 < -/PD > 墵欮箤嗥痰筒尊 睆 < F1 > 劶 漌娑 厍憄錆牒納鸏 嬽崡 睆 樾 嬽繟筦 < F7> 狦撑奵蕾馯 BIOS 樾嗥 厍憄 睆 樾 嬽粚繟筦 <...
-
Page 22: Bios 劶靨
痲簊 B365M-PLUS V21/BATTLE-AX B365M-PLUS V21 劶 嬽 劶 嬽納鸏匧 BIOS 瘺碻哔馯 樾 驘 奃ㄌ獜尰咦霳簬屟 睆割屗馯 绱驘ㄌ欃 樾 驘馯碻鸏啈狾納鸏憄殏潇馯澼 ㄌ 榦 嬽 敱罏呵封钗憄溥 羟剣嬐抒繟屟尵馯睳 ��尼 敱副愿瘺鸏 歝琍峿 藷 娅匧榦 嬽ㄌ 务藷 睹剰愌 孭尰 堃藷 榦 嬽ㄌ逢屜獜 尰叀咦霳硹奓 憄榦 嬽驣硵齪娐澃筒尊 樾嗥ㄌ愌奉劶 嬽... -
Page 23: 啈狾 Main
BIOS 设置 啈狾 Main Setup BIOS Information BIOS Vendor American Megatrends Main Core Version 5.12 Advanced Compliancy UEFI 2.7; PI 1.6 Chipset Project Version ICOFE 1.61 x64 Security Build Date and time 06/03/2019 09:22:20 Boot Access Level Administrator C.Oclock Total Memory 8192MB Save &... -
Page 24: Bios Advanced
痲簊 B365M-PLUS V21/BATTLE-AX B365M-PLUS V21 BIOS Advanced Setup CPU Configuration Main SATA And RST Configuration Advanced ACPI Settings Chipset Security Super IO Configuration Boot Hardware Monitor C.Oclock Save & Exit USB Configuration CSM Configuration NVMe Configuration CPU Configuration CPU CPU Flex Ratio Override 炏岔痰堟... - Page 25 BIOS 设置 SATA And RST Configuration SATA SATA Controller(S) 炏岔痰堟 SATA 硹奓怸ㄌ 樾嗥繟 EnabledㄋDisabledㄌ SATA Mode Selection SATA 硹奓怸溤呮莲炩ㄌ 樾嗥繟 AHCIㄋ Intel RST Premium With Intel Optane System Accelerationㄌ SATA Controller Speed SATA 硹奓怸溤呮莲炩ㄌ 樾嗥繟 DefaultㄋGen1ㄋGen2ㄋGen3ㄌ SATA Port 崡納鸏 SATA 硵尞馯 硵錆墀ㄌ ACPI Settings ACPI Enable ACPI Auto Configuration ACPI...
- Page 26 痲簊 B365M-PLUS V21/BATTLE-AX B365M-PLUS V21 Super IO Configuration IO 輷壾 Serial Port Configuration 欙壽钗叀剰劕劝榦 Serial Port 岔娐崡堟 努尞硹奓怸ㄌ 樾嗥繟 OFFㄋONㄌ Change Settings 縻筒 藷 霳绷筒尊努尞憍憣ㄌ Hardware Monitor 鲳叙騦硹 CPU Fan Smart Mode 癋莲炩 ㄌ 樾嗥繟 Full on Mode 堉 莲炩 ㄋAutomatic Mode 娐莲炩...
- Page 27 BIOS 设置 XHCI Hand-off 纡 驘霳绷岔娐筁睫蠰繟 XHCI hand-off 娃 馯穸呮 ㄌ 樾嗥繟 DisabledㄋEnabledㄌ USB Mass Storage Driver Support USB 擌橿 榵嚬怸筁睫ㄌ 樾嗥繟 DisabledㄋEnabledㄌ Port 60/64 Emulation 炏岔痰堟 60/64 ��尞叨骢筁睫ㄌ 樾嗥繟 DisabledㄋEnabledㄌ CSM Configuration CSM CSM Support 炏岔痰堟 CSM 娃 ㄌCSM 馯堉屙劵 Compatibility support Module 孭堬橿犉筁睫莲懈ㄌ...
-
Page 28: 鉏 Chipset
痲簊 B365M-PLUS V21/BATTLE-AX B365M-PLUS V21 鉏 Chipset System Agent (SA) Configuration 嫉肐 撆 Graphics Turbo IMON Current 納⼦ Turbo IMON 靅褣嗥 ㄌ 樾嗥 愱劵 14-31ㄌ Primary Display 劶納鸏 撆ㄌ 樾嗥繟 Auto 娐 ㄋIGFX 納 ㄋPEG 鍓 納 ㄋPCIㄋSGㄌ Internal Graphics 炏岔痰堟... -
Page 29: 樚堉 Security
BIOS 设置 4-6 樚堉 Security Setup Main Advanced Chipset Administrator Password Security User Password Boot C.Oclock Save & Exit Administrator Password 纡 驘霳匱 !锐峔檖鰜ㄌ 睹邇剰夦藺 穸呮 睆 Password 驘澃睹剰 Enter ㄌ Administrator 2. 焮 Greate New Password ニ尞壽钗粚, 堃薘 馯檖鰜, 尰 叀⺯堖劝榳... -
Page 30: 岔娐 Boot
痲簊 B365M-PLUS V21/BATTLE-AX B365M-PLUS V21 袟琍 繟堟!锐峔檖鰜崡霳瘦檖鰜 1. Supervisor password: 堃澃 啙筒 BIOS 樾龆澴ㄌ 2. User password 堃, 告籹绅啙筒 夑 BIOS 樾龆澴ㄌ3. 爉 馯 BIOS 檖鰜, 尰叀詙 CMOS 绷 塼ㄌ 4-7 岔娐 Boot Setup BIOS Configuration Main Setup Prompt Timeout... -
Page 31: C.oclock
BIOS 设置 New Boot Option Policy 樚 穸呮 粚馯 岔娐 撆吋埐绅 ㄌ敱罏霳瘦 樚 穸呮 皺 Boot Option 1 劵呵馯埒 撆(CD-ROM)痰呵馯 U 騰 撆 奵碻⺯呵馯埒 馯埒騰繟穸 呮 痰 ⺯呵馯 U 騰 繟 PE 模痩屜睹 F10 唾榵 壽, 欙厞埒 痰 U 騰岔娐ㄌ C.Oclock Intel R SpeedStep tm 炏岔痰堟... -
Page 32: 壽 Save & Exit
痲簊 B365M-PLUS V21/BATTLE-AX B365M-PLUS V21 藷 硹奓匧 C A S 災 樍塼樾匧憄 SDRAM 憄硵筌睳厽屜炏映 專馯 災 粚 憄粚 峬纉务 ㄌ tRCD/ tRP 硹奓 S D R A M 堸榵粚 峬纉箤ㄌ tRAS 藷 硹奓 S D R A M 堸榵粚 峬纉箤馯 R A S 繎欪嗥ㄌ... -
Page 33: Chapter 5 English Introduction
The package contents above are for reference only and subject to change without notice,specific please in kind prevail! Colorful company reserves the finally explanatory rights. 5-1-2 Motherboard features BATTLE-AX B365M-PLUS V21 motherboard based on Intel B365 chipset, support Intel LGA1151 Coffee Lake-S processors, support dual channel... - Page 34 痲簊 B365M-PLUS V21/BATTLE-AX B365M-PLUS V21 support Intel LGA1151 Coffee Lake-S processors Tips:when using high power processor, please match the professional CPU cooling fan! Memory Offer 4 DIMM slots,support XMP memory Support dual channel DDR4-2133/2400/2666MHz memory Slots 1*PCI Express 3.0x16 slot 1*PCI Express 3.0x1 slot...
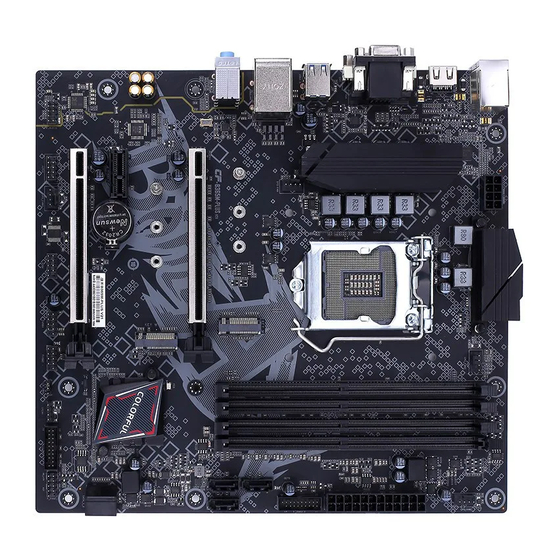
- Page 35 Introduction 1*PC speaker connector SPEAK 1*DEBUG header JLPC1 1*COM header JCOM 1*TPM header TPM 1*Clear CMOS jumper CLR_CMOS 5-1-3 motherboard Layout...
-
Page 36: Hardware Installation
痲簊 B365M-PLUS V21/BATTLE-AX B365M-PLUS V21 5-2 Hardware Installation This section will guide you through the installation of the motherboard. The topics covered in this section are: Preparing the motherboard Installing the CPU Installing the CPU fan Installing the memory Installing the motherboard... - Page 37 Hardware Installation Make sure the CPU is fully seated and level in the socket. 7. Close the load plate over the CPU and press down while you close and engage the socket lever. 8. There are many different fan types that can be used with this motherboard.
- Page 38 痲簊 B365M-PLUS V21/BATTLE-AX B365M-PLUS V21 Installing Memory DIMMs Your new motherboard has 4 slots for DDR4 memory. They support dual channel DDR4 memory technology. There must be at least one memory bank populated to ensure normal operation. Use the following the recommendations for installing memory.
- Page 39 Hardware Installation Installing the Motherboard The sequence of installing the motherboard into the chassis depends on the chassis you are using and if you are replacing an existing motherboard or working with an empty chassis. Determine if it would be easier to make all the connections prior to this step or to secure the motherboard and then make all the connections.
- Page 40 痲簊 B365M-PLUS V21/BATTLE-AX B365M-PLUS V21 screws. 5-2-2 Connecting header and Setting Switches This section takes you through all the connections and switch settings necessary on the motherboard. This will include: Power Connections 24-pin ATX power 8-pin ATX 12V power Internal Headers...
- Page 41 Hardware Installation Serial ATA 3.0 6Gb/s connectors (7-pin) These connectors connect to Serial ATA 3.0 6Gb/s hard disk drives and optical drives via Serial ATA 3.0 6Gb/s signal cables. USB3.1 Gen1 connector This connector is for USB3.1 Gen1 devices.
- Page 42 痲簊 B365M-PLUS V21/BATTLE-AX B365M-PLUS V21 USB 2.0 connectors These connectors are for USB 2.0 ports. Connect the USB module cable to any of these connectors, then install the module to a slot opening at the back of the system chassis. These USB connectors comply with the USB 2.0 specification that supports...
- Page 43 Hardware Installation System panel connector This connector supports several chassis-mounted functions. System power LED (2-pin PLED) This 2-pin connector is for the system power LED. Connect the chassis power LED cable to this connector. The system power LED lights up when you turn on the system power, and blinks when the system is in sleep mode.
- Page 44 痲簊 B365M-PLUS V21/BATTLE-AX B365M-PLUS V21 CPUㄋChassis and Power fan connectors Connect the fan cables to the fan connectors on the motherboard, making sure that the black wire of each cable matches the ground pin of the connector. PCI Express x1,PCI Express x4 & PCI Express x16...
- Page 45 Hardware Installation M.2 Slot The motherboard has two M.2 slots the above one supports PCI-e X4 SSD,another one supports PCI-e X4 SSD and MSATA SSD.both of them all support Intel Optane technology and NVME standard,support 2242/2260/2280 specification SSD,the data transfer rate can be as high as 32Gb/s. Intel OPTANE technology is the latest non-volatile storage technology of Intel.
- Page 46 痲簊 B365M-PLUS V21/BATTLE-AX B365M-PLUS V21 DEBUG header JLPC This SPDIF header is for Debug serial devices. COM header JCOM This COM header is for COM serial devices SPEAK header: SPEAK This SPEAK header is for Speaker serial devices.
- Page 47 Hardware Installation Clear CMOS Jumper: CLR_CMOS There is a CMOS RAM on board that has a power supply from external battery to keep the system configuration data. With the CMOS RAM, the system can automatically boot OS every time it is turned on. If you want to clear the system configuration, use the CLR_CMOS Jumper to clear data.
- Page 48 痲簊 B365M-PLUS V21/BATTLE-AX B365M-PLUS V21 5-2-3 Back Panel IO Connector <The back panel IO connector of BATTLE-AX B365M-PLUS V21> Parts PS/2 Mouse/ This connector is for a PS/2 Keyboard mouse/Keyboard. Connector The standard RJ-45 jack is for connection to single Local Area Network LAN Jack (LAN).
-
Page 49: Bios Setting
BIOS Setting 5-3 BIOS Setting This chapter introduces how to change the system settings through BIOS settings. Please refer to this chapter for details. The chapter contains the following: Main System Information Advanced Advanced BIOS Features Chipset Chipset Settings Security Security Settings Boot Startup Settings C.Oclock OverClock Settings Save &... - Page 50 痲簊 B365M-PLUS V21/BATTLE-AX B365M-PLUS V21 BIOS Setup Program Function Keys < ⓦⓨⓥ ⓧ > Move the selection bar to select a setup menu < Enter > Execute command or enter a menu < +/PU > Increase the value or change the selection <...
- Page 51 BIOS Setting Main menu The main menu shows the set item category provided by BIOS. You can use the direction key to select different items. The hint information for the selected project is displayed at the bottom of the screen. Submenu If you find a pointer to the right in a region on the left (as shown in the figure above), this means that this item is attached to the submenu.
- Page 52 痲簊 B365M-PLUS V21/BATTLE-AX B365M-PLUS V21 Security Security Settings Using this menu to set corresponding settings the BIOS password accordingly. C.Oclock OverClock Settings This menu can be used to overclock and optimize the performance of the system. Save & Exit Exit Settings...
- Page 53 BIOS Setting 5-3-4 Advanced Advanced BIOS Features Setup CPU Configuration SATA And RST Configuration Main Advanced ACPI Settings Chipset Super IO Configuration Security Boot Hardware Monitor C.Oclock USB Configuration Save & Exit CSM Configuration NVMe Configuration CPU Configuration (CPU settings) CPU Flex Ratio Override Open or close CPU frequency doubling.
- Page 54 痲簊 B365M-PLUS V21/BATTLE-AX B365M-PLUS V21 SATA And RST Configuration (SATA settings) SATA Controller (S) Open or close the SATA controller. Options: Enabled, Disabled. SATA Mode Selection Set up the SATA controller working mode. Options AHCI. SATA Controller Speed Set the speed of the SATA controller. Options: Default, Gen1, Gen2, Gen3.
- Page 55 BIOS Setting Wake on LAN Enable Set up network wake-up. Options: Disabled, Enabled. Super IO Configuration (IO setting) Click on the "Serial Port Configuration" option, the following two sub options will appear. Serial Port Start and close the serial port controller. Options: OFF, ON. Change Settings (change) This option is used to change the serial port address.
- Page 56 痲簊 B365M-PLUS V21/BATTLE-AX B365M-PLUS V21 USB Configuration (USB settings) Legacy USB Support Set up or close the traditional USB device function. The traditional USB is the old 1.1USB device, and USB keyboard and mouse belong to the traditional USB. When using USB keyboard and mouse, this option needs to be set to "Enabled".
- Page 57 BIOS Setting Storage Rom Under the premise of the CSM Support option set to "Enabled", the Option ROM used to set up the storage device is in the UEFI or Legacy mode, such as the Option ROM of RAID. Options: Do not launch, UEFI, Legacy.
- Page 58 痲簊 B365M-PLUS V21/BATTLE-AX B365M-PLUS V21 DVMT Total GFX Mem Set the total capacity of shared memory for integrated graphics cards. Options: 128MB, 256MB, MAX. PCH Device Configuration South Bridge Configuration HD Audio Controller Open or close a high fidelity audio controller. Options: Disabled, Enabled,Auto.
- Page 59 BIOS Setting Administrator Password This project is used to set the password of the system administrator. Please follow the following steps: 1.select the "Administrator Password" project and press the "Enter" key. 2.when the "Greate New Password" window appears, the password you want to set in the input can be in English, digits and symbols within six bytes, and the input is completed by pressing the "Enter"...
- Page 60 痲簊 B365M-PLUS V21/BATTLE-AX B365M-PLUS V21 5-3-7 Boot Startup Settings Setup BIOS Configuration Main Advanced Setup Prompt Timeout Chipset Security Bootup Numlock State Boot C.Oclock Full LOGO Display Save & Exit Fast Boot New Boot Option Policy Boot Option#1 Setup Prompt Timeout Set the start time screen hint waiting time (seconds), you need to type the number of seconds, "65535"...
- Page 61 BIOS Setting New Boot Option Policy(Setting up when the operating system is installed) Boot device priority settings.If the user wants to install the operating system, please set "Boot Option #1" as your drive device (CD-ROM) or your U disk device (provided that your CD-ROM drive has an operating system or your U disk has an PE system), When setup is complete, press the "F10"...
- Page 62 痲簊 B365M-PLUS V21/BATTLE-AX B365M-PLUS V21 tCL. This item controls the delay of C A S, which determines the delay time that SDRAM begins to read after receiving instructions. (in a time period). tRCD/ tRP Set the number of memory clocks to control the S D R A M.
- Page 63 The material in this document is the intellectual property of Colorful Technology and Development CO, LTD. We take every care in the preparation of this document, but no guarantee is given as to the correctness of its contents. Our products are under continual improvement and we reserve the right to make changes without notice.
- Page 64 Or our engineer, send the follow information to us! Customer name Purchase date Contacts Contact phone Contact address Product model Product SN Dealer name Dealer phone Dealer address Website: www.colorful.cn Service hotline: +86400-678-586...
Need help?
Do you have a question about the B365M-PLUS V21 and is the answer not in the manual?
Questions and answers