Table of Contents
Advertisement
Advertisement
Table of Contents

Subscribe to Our Youtube Channel
Related Manuals for SAESHIN Implant XCUBE


Summary of Contents for SAESHIN Implant XCUBE
- Page 1 INSTRUCTION MANUAL www.saeshin.com...
- Page 2 목차 · 소개 · 주의 사항 · 제품의 특징 & 장점 · 제품 구성품 · 본체 유닛 각 부분 명칭 · 조작 패널상의 버튼 · 액정 표시부 · 풋 컨트롤러의 버튼 · 각 부의 연결 방법 · 작동 방법 · 제품의 유지보수 ·...
-
Page 3: Table Of Contents
CONTENTS · INTRODUCTION · USER GUIDELINES · PRODUCT FEATURES & ADVANTAGES · PRODUCT COMPONENTS · PART NAME OF CONTROL BOX · BUTTONS ON THE OPERATION PANEL · LCD WINDOW · BUTTONS ON THE FOOT CONTROLLER · CONNECTION OF EACH PART ·... - Page 4 소개 의료기기 본 제품은 입니다. 작업을 시작하기 전에 반드시 읽어주십시오. 이 사용자 매뉴얼은 제품의 올바른 설치와 사용을 보장하기 위한 것입니다. 이 제품을 최대한 활용하고 장기 수명을 보장하기 위해서는 제품을 설치하거나 사용하기 전에 주의 깊게 읽어주시기 바랍니다. 특히 나, 심볼이 표시 된 내용은 특별한 관심을 요청 드립니다. <사용자>...
-
Page 5: Introduction
INTRODUCTION This product is medical device. Make sure to read this user manual before using. This user manual is to assure proper installation and use. Pay attention to read this user manual in order to making the best use of this product and to assure the prolonged lifespan before using. - Page 6 주의 사항 주의 ● 환자의 안전을 제일로 하여, 사용시 충분한 주의를 기울여 주시기 바랍니다. ● 사용 전에 기기의 작동상태를 점검하고, 이상 유무를 확인 후 사용해 주시기 바랍니다. ● 사용 전, 또는 사용 도중 진동 및 발열, 소음 등의 이상 징후를 발견하면 즉시 사용을 멈추고 점검해 주십시오. ●...
-
Page 7: User Guidelines
USER GUIDELINES CAUTION ● Please pay attention to the use considering the patient’s safety first of all. ● Check condition of the product before use. ● Stop to use and inspect the product when an abnormal sign such as calescence, vibration or noise occurs before or during operation. - Page 8 경고 ● 이 제품이 설치된 장소에 노약자나 장애자, 어린이가 가까이 있는지 주의 깊게 관찰하고, 어린이를 혼자 두지 마십시오. ● 핸드피스를 떨어뜨리거나 손상시키지 않도록 조심하십시오. 제대로 작동이 안되거나, 떨어뜨렸거나, 물에 빠뜨린 경우 절대 작동하지 말고, 본사로 문의하여 주십시오. (버의 떨림 현상과 과도한 열 발생, 베어링이 파손 될 수 있습니다.) ●...
- Page 9 WARNING ● Please watch old person, children, or disabled person near the place that the product is installed. If so, do not let them alone. ● Do not drop or damage the angle handpiece. In case of malfunction, dropping, or dropping in water, do not use it and contact the manufacturer.
- Page 10 제품의 특징 & 장점 - BLDC 모터를 장착하여 임플란트 수술 시 0~50,000rpm을 표준 앵글로 최적화된 성능을 제공합니다. * 최대회전수 16:1 20:1 27:1 32:1 64:1 200,000rpm 250,000rpm 50,000rpm 3,100rpm 2,500rpm 1,850rpm 1,560rpm 780rpm * 앵글 핸드피스의 회전수는 제조사에서 지정된 회전수 ±10%의 오차가 있습니다. (ISO 14457 참고) * 토크...
- Page 11 PRODUCT FEATURES & ACVANTAGES <BLDC motor designed by SAESHIN’s own technology and know-how> - Provide the optimized performance by BLDC motor (0~50,000rpm) and Angle handpiece of several kinds. * RPM 16:1 20:1 27:1 32:1 64:1 200,000rpm 250,000rpm 50,000rpm 3,100rpm 2,500rpm...
- Page 12 제품 구성품 * 제품 구성품을 확인하여 주십시오. 구성품 구성품 본체 유닛 내부 주수 노즐 (선택사항) 앵글 핸드피스 수분유입 방지볼트 BLDC 모터 앵글용 스패너 풋 컨트롤러 튜브 홀더 모터 스탠드 튜브 클립 수액 걸이 AC 전원코드 주수 튜브 Y자 튜브 (선택사항) A-슬리브...
-
Page 13: Product Components
PRODUCT COMPONENTS * Please check all components are included. Component Component ㅋINTERNAL SPRAY NOZZLE(Option) CONTROL BOX ANGLE HANDPIECE MOTOR CAP (For sterilization of motor) SPANNER FOR ANGLE BLDC MOTOR FOOT CONTROLLER TUBE HOLDER TUBE CLAMP MOTOR STAND HANGER AC POWER CORD IRRIGATION TUBE Y-Tube (Option) A-SLEEVE... - Page 14 본체 유닛 각 부분 명칭 수액걸이 주수펌프 풋 컨트롤러 커넥터 모터 커넥터 전원 스위치 퓨즈 박스 버튼 버튼 버튼 버튼 버튼 버튼 버튼...
-
Page 15: Part Name Of Control Box
PART NAME OF CONTROL BOX Hanger Irrigation pump Foot controller connector Motor connector Main power Switch Fuse box Operation direction Gear ratio button Main power socket button Irrigation pump button Memory button Speed button Program button Torque button... - Page 16 조작 패널상의 버튼 프로그램 선택버튼 : 설정 값을 입력한 프로그램 번호를 선택 시 사용합니다. (+)키를 누르면 1단계 상승, (-)키를 누르면 1단계 하강합니다. 회전속도 설정버튼 : 회전 속도를 설정할 시에 사용합니다. (+)키를 누르면 1단계 상승, (-)키를 누르면 1단계 하강합니다. 키를 길게 누르면 숫자가 빨리 변합니다. * 기어비율의...
-
Page 17: Buttons On The Operation Panel
BUTTONS ON THE OPERATION PANEL Program button : Use for selecting the set program number. (+) button for 1 stage up and (-) button for 1 stage down. Speed button : Use for setting the speed (RPM). (+) button for 1 stage up and (-) button for 1 stage down. Keep pressing speed button to change the stage rapidly. - Page 18 액정 표시부 1. 주수량 표시부 : 현재 선택된 주수량을 보여줍니다. 0~4단계까지 있으며, 0단계가 주수량이 없음을 나타내고 4단계가 (75ml/min) 최대 주수량을 나타냅니다. 2. 프로그램 번호 표시부 : 현재 선택되어 있는 프로그램 번호를 보여줍니다. 1~9까지 9개가 저장 가능하며, 전원을 끈 후 다시 켜면 항상 1번 프로그램으로 돌아갑니다. 3.
-
Page 19: Lcd Window
LCD WINDOW 1. Irrigation volume display : It shows the selected irrigation level. There are 5 levels. Level 0 is no volume and level 4 is maximum 75ml/min. 2. Program number display : 9 programmable programs set from 1 to 9. And it shows program 1 at every power on. 3. - Page 20 풋 컨트롤러의 버튼 1. 프로그램 선택 버튼 : 프로그램을 선택할 시에 사용합니다. 한 번 누를 때마다 1단계씩 상승합니다. 2. 예비용 버튼 3. 회전방향 선택버튼 : 회전 방향 변경 시에 사용합니다. 4. 주수량 선택버튼 : 주수량 선택 시에 사용합니다. 한 번 누를 때마다 1단계씩 상승합니다. 5.
-
Page 21: Buttons On The Foot Controller
BUTTONS ON THE FOOT CONTROLLER 1. Program button : Select the program. Each press increases 1 stage. 2. Not in use currently 3. Operation direction button : Select the operation direction. 4. Irrigation pump button : Set the irrigation volume. Each press increases 1 stage. 5. - Page 22 각 부의 연결 방법 * 반드시 전원을 끈 상태에서 모터와 풋 컨트롤러를 연결해 주십시오. (전원이 켜진 상태에서 연결할 경우 제품에 결함이 나타날 수도 있습니다.) 모터코드 연결 모터 코드 커넥터에 있는 홈과 본체의 핀 위치를 유의하여 끼워주십시오. 그리고 반드시 고정 나사를 돌려주십시오. 커넥터...
-
Page 23: Connection Of Each Part
CONNECTION OF EACH PART * When connect the motor and foot controller, please make sure the power is off. (Otherwise, it might cause malfunction.) Motor Cord Connection Please insert the motor connector. Check the hole and pins of motor connector are in place. Then screw the Connector Lock. Connector Lock Foot Controller Connection Please insert the foot controller connector. - Page 24 전원코드 접속 본체 유닛 뒷면에 있는 전원코드 접속소켓에 전원코드를 형태에 맞게 정확히 끼워주십시오. 주수 튜브 부착방법 본체 유닛 뒷면에 있는 개폐 손잡이를 시계방향으로 돌리면, 펌프 롤러 사이의 공간과 펌프커버가 열릴 것입니다. 이 때 주수 튜브를 주수 펌프 속에 끼우십시오. 펌프커버를 닫을 시에는 개폐 손잡이를 시계반대방향 으로...
- Page 25 Power Cord Connection Insert the power cord into the power socket in the back of control box. Irrigation Tube Connection Turn the open-close knob clockwise in the back of control box, and pump cover opens and can see the space between the covers. Then insert the irrigation tube into the space.
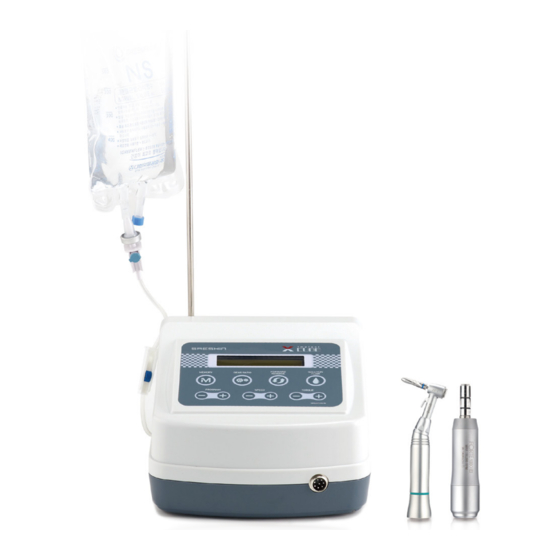
- Page 26 수액 설치 방법 본체 유닛 뒷면에 있는 수액걸이 구멍에 수액걸이를 꽂습니다. 식염수 팩을 수액 걸이에 걸어 놓습니다. 주수 튜브의 투입 식염수를 수액걸이 아래로 향하게 하여 주수튜브침을 식염수 입구에 꽂아주십시오. 주수튜브침과 식염수의 사이에 있는 주수 스토퍼를 잠근 후, 브리더니들(Bottle에 공기를 불어넣는 침)를 끼워 주십시오. * 튜브가...
- Page 27 Bottle Setting Put the hanger into the hanger hole in the back of control box. Hang the saline solution pack on the hanger. Irrigation Tube Insertion Insert the irrigation tube needle to the bottle in place with the bottle downward. Lock the irrigation stopper and put it between the irrigation tube needle and bottle.
- Page 28 주수 노즐의 장착 Y자 커넥터튜브 Y 커넥터를 이용하여 내부와 외부 양방향 주수가 가능합니다. 사용하는 버와 수술 방법에 따라 그림과 같이 액세서리를 장착하여 사용하십시오. * 버 교체 시 내부주수노즐을 제거하지 않고 버튼을 누르거나 레버를 열 경우 노즐이 파손될 위험이 있습니다. 튜브 홀더의 장착 튜브...
- Page 29 Irrigation Nozzle Connection Y-connector tube Tube clamp Internal spray nozzle External spray nozzle The internal and external irrigation are available by the Y-connector tube. Connect the accessories like the picture according to the using bur and surgery type. * If the user did not remove the internal spray nozzle and press the button or open the lever when replace the bur, the nozzle may be damaged.
- Page 30 작동 방법 (1) 전원을 켭니다. 전원을 켜면 프로그램 번호 1에 저장된 내용이 선택된 상태로 아래 그림과 같이 대기모드 상태가 됩니다. (2) 프로그램을 선택합니다. 풋 컨트롤러의 좌측 아래편의 버튼 또는 본체 유닛의 을 눌러 사용할 프로그램을 선택해 주십시오. 풋 컨트롤러의 버튼을 누를 경우, 프로그램이 프로그램 번호 순서대로 1단계씩 이동합니다. 프로그램...
-
Page 31: Operation Process
OPERATION PROCESS (1) Turn on the main switch. Product remains as standby mode having memory in Program 1 like below picture when power on. (2) Choose the program. Press the bottom of the left side button on the foot controller or button on the control box, the program changes by 1 stage. - Page 32 프로그램 설정 X-CUBE는 아래 항목의 설정 값을 최대 9개까지 저장하여 사용 가능합니다. 기어비율, 회전속도, 토크, 회전방향, 주수량 설정 후 메모리 버튼을 길게 누릅니다. 에러표시 및 조치방법 고장, 과부하, 단선, 사용상의 오류 등에 의해 이상이 발생하여 모터가 정지한 경우, 본체 유닛의 상태를 확인하고...
- Page 33 Program Setting X-CUBE has 9 programmable memories in conditions below Set the gear ratio – speed – torque – operation direction – irrigation pump. And press the memory button. Complete Complete Error and Remedy If the motor is stopped due to the overload, user’s error and etc., circuit safety system cuts the power supply and shows an error code on LCD window.
- Page 34 제품의 유지보수 퓨즈 교환 본체 유닛이 작동하지 않을 경우에는 퓨즈를 점검해 보십시오. 교체 시에는 본사에 문의하십시오. 퓨즈 상자 퓨즈 세척 / 멸균 / 윤활 1. 세척 ■ 앵글 핸드피스 ① 앵글 핸드피스의 헤드부분을 상수에 담근 후 약 10초간 고속(최대속도)으로 공회전하십시오. ※...
-
Page 35: Maintenance Of The Product
MAINTENANCE OF THE PRODUCT Fuse Change Check the fuse if the control box doesn’t work. Contact your dealer. Fuse box Fuse Cleaning / Sterilization / Lubrication 1. Cleaning ■ Angle Handpiece ① Rotate the head in a tap water about 10 seconds with maximum speed to remove the remains (blood, physiologic saline solution, etc.) and rinse. - Page 36 2. 멸균 멸균 적용 제품 · 앵글 핸드피스 · 모터(수분유입방지 볼트 체결) 멸균 방법 ① 앵글 핸드피스 및 모터를 세척 후 완전 건조시키십시오. ② 멸균팩 안에 해당 제품을 넣고 밀봉하십시오. ※ 모터에 수분유입방지 볼트를 반드시 끼워 주십시오. ※ 모터와 모터코드를 분리하지 마십시오. 고장의 원인이 됩니다. ③...
-
Page 37: Attention
2. Sterilization Sterilization part list · Angle handpiece · Motor (assembling with the motor cap) Sterilization method ① Dry the applicable products completely after cleaning. ② Put the applicable products in a sterile bag and seal tightly. ※ Make sure to assemble the motor cap for autoclave on the motor. ※... - Page 38 제품사양 1. 본체 유닛 모델명 X-CUBE 전압 AC 100-120V / 220-240V 퓨즈 5A / 2A 주파수 50 / 60 Hz 소비전력 230W 최대 주수량 Max. 75 ㎖/min ± 20% 2. 핸드피스 레버 타입 버튼 타입 품명 ACL-41I ACL-42I ACL-43I ACL-45I ACL(B)-41I ACL(B)-42I ACL(B)-43I...
-
Page 39: Product Specification
PRODUCT SPECIFICATION 1. Control box Model name X-CUBE Input AC 100-120V / 220-240V Fuse 5A / 2A Frequency 50 / 60 Hz Output 230W Maximum Max. 75 ㎖/min ± 20% irrigation volume 2. Handpiece Lever type Button type Name ACL-41I ACL-42I ACL-43I ACL-45I... - Page 40 제품 보증 세신은 인보이스 날짜로부터 1년간 제품을 보증하며 제품 보증은 자재나 작업에서 일어날 수 있는 제조자 책임을 의미합니다. 보증은 사용자의 오용, 잘못된 설치, 부적절한 유지보수나 수리, 베어링, 스핀들, 기어, 회전자와 같은 소모 부품의 정상적 마모는 해당되지 않습니다. 보증을 확인하기 위해 제품...
- Page 41 WARRANTY SAESHIN guarantees out product for 1 year from invoice date, and product warranty means that SAESHIN has responsibility of defective material or operation failure. The product warranty does not cover user’s misuse, wrong installation, inappropriate maintenance and repair, and normal wear of consumables such as bearings, spindle, gear, and rotator.
-
Page 42: Electromagnetic Compatibility Information
ELECTROMAGNETIC COMPATIBILITY INFORMATION In IEC/EN 60601-1-2:2007. These limits are designed to provide reasonable protection against harmful interference in a typical medical installation. This equipment generate, use and can radiate radio frequency energy and, if not installed and used in accordance with the instructions, may cause harmful interference to other devices in the vicinity. - Page 43 (3) ELECTROMAGNETIC IMMUNITY / RADIOFREQUENCY MOBILE EQUIPMENT Portable and mobile RF communications equipment should be used Conducted RF no closer to any part of the X-CUBE including cables, than the IEC 61000-4-6 recommended separation distance calculated from the equation EN 61000-4-6 applicable to the frequency of the transmitter.
- Page 44 심볼 마크 메모리 버튼 프로그램 선택버튼 기어비율 선택버튼 회전속도 설정버튼 회전방향 선택버튼 토크 설정버튼 주수량 선택버튼 회전방향 선택버튼 프로그램 선택버튼 주수량 선택버튼 사용설명서를 참고하시오 제조자 일반적인 주의 신호 EC 위임대리인 시리얼 넘버 일반적인 경고 신호 132℃ 오토클레이브 일반적인 금지 신호 BF형...
-
Page 45: Symbol
SYMBOL Memory Button Program Button Gear Ratio Button Speed Button Operation Direction Button Torque Button Irrigation Pump Button Operation Direction Button Program Button Irrigation Pump Button Consult Instruction for Use Manufacturer General Caution Sign EC Representative Serial Number General Warning Sign 132℃... - Page 46 MEMO...
- Page 47 MEMO...
- Page 48 Unit 3D, North Point House North point Business Park New Mallow Road CORK, T23AT2P , Ireland +353 212066448 Tel. 82-53-587-2341 / Fax. 82-53-580-0999 대구광역시 달성군 다사읍 세천로 1길 52 (성서5차산업단지) Tel. 053-587-2345 / Fax. 053-580-0918 www.saeshin.com / traus@saeshin.com SOM-S040S-KE Rev.13 2020-03-31...
Need help?
Do you have a question about the Implant XCUBE and is the answer not in the manual?
Questions and answers