
Subscribe to Our Youtube Channel
Related Manuals for Ruijie RG-WS6816 Series


Summary of Contents for Ruijie RG-WS6816 Series
- Page 1 Ruijie RG-WS6816 Series Wireless Controllers Hardware Installation and Reference Guide V1.02...
- Page 2 Ruijie Networks reserves all copyrights of this document. Any reproduction, excerption, backup, modification, transmission, translation or commercial use of this document or any portion of this document, in any form or by any means, without the prior written consent of Ruijie Networks is prohibited. Exemption statement This document is provided “as is”.
- Page 3 It is intended for the users who have some experience in installing and maintaining network hardware. At the same time, it is assumed that the users are already familiar with the related terms and concepts. Obtaining Technical Assistance Ruijie Networks Website: https://www.ruijienetworks.com/ Technical Support Website: https://ruijienetworks.com/support...
-
Page 4: Product Overview
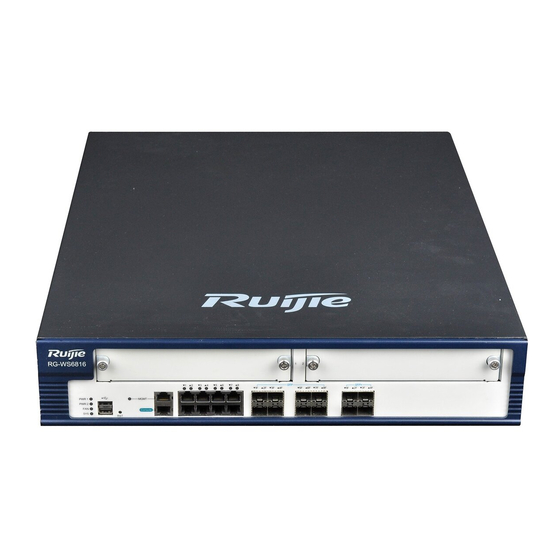
Hardware Installation and Reference Guide Product Overview 1 Product Overview The RG-WS6816 wireless LAN controller is introduced by Ruijie Networks to provide powerful WLAN access control for medium-large-sized wireless networks. 1.1 RG-WS6816 Table 1-1 Technical Specifications of RG-WS6816 Model RG-WS6816... - Page 5 Hardware Installation and Reference Guide Product Overview Product Image Figure 1-1 Front Panel of RG-WS6816 Figure 1-2 Rear Panel of RG-WS6816 LED Indicators State Meaning The power module is NOT in the position. PWR1 and PWR2 Solid green The power module is operational. Solid red The power module fails or NOT receiving power.
- Page 6 Hardware Installation and Reference Guide Product Overview 1.2 Module 1.2.1 RG-PA300I Module Appearance Figure 1-3 Appearance of RG-PA300I Power Module Indicator State Meaning The power input fails. Solid green The power input is operational. The power output fails. Solid green The power output is operational.
- Page 7 Hardware Installation and Reference Guide Product Overview 1.2.2 WNM-4GE-S Module Appearance Figure 1-4 Appearance of WNM-4GE-S The WNM-4GE-S module applies to only RG-WS6816. Indicator State Meaning Solid green The system is being initialized. Blinking green The initialization process is complete. Solid red The system sends out an alarm.
- Page 8 Hardware Installation and Reference Guide Product Overview Temperature Operating Humidity 10% to 90% RH (noncondensing) 1.2.3 WNM-2XS-S Figure 1-5 Appearance of WNM-2XS-S The WNM-2XS-S module applies to only RG-WS6816. Indicator State Meaning Solid green The system is being initialized. Blinking green The initialization process is complete.
-
Page 9: Preparation For Installation
Misuse of battery may cause damage to the device or hurt to people. Do not replace battery by yourself. Instead, contact Ruijie Service Center for the replacement of battery. This device is an A-class product. It may cause radio interference in living environment, which may require you to take anti-interference measures. -
Page 10: Cleanness Requirements
Hardware Installation and Reference Guide Preparation for Installation Relative Temperature Relative Temperature Long-time working condition short-time working condition Long-time working condition short-time working condition 15ºC to 30ºC (59ºF to 86ºF) 0ºC to 45ºC (32ºF to 113ºF) 40%~65% 5%~95% The ambient temperature and humidity are measured at a point 1.5 meters (4.9 feet) above the ground and 0.4 meters (1.3 feet) before the device when there is no protective board in the front or back of the rack. -
Page 11: Anti-Interference Requirements
Hardware Installation and Reference Guide Preparation for Installation Always wear an anti-static wrist strap when you touch any circuit board. Place the circuit board on an anti-static workbench or in an anti-static shielding bag. Try to hold a circuit board by its edges. Do not touch any components or the PCB. 2.2.4 Anti-Interference Requirements The wireless controller is susceptible to external interference such as electromagnetic wave and current. -
Page 12: Installation Flowchart
Hardware Installation and Reference Guide Installing Wireless Controller 3 Installing Wireless Controller 3.1 Installation Flowchart Please follow the following procedure to install the wireless controller to ensure the smooth installation and avoid any damage to the device. Begin Read Chapter 2 Ensure Requirements are Met Mount Wireless Controller Connect Cables... -
Page 13: Installing Power Cable
Hardware Installation and Reference Guide Installing Wireless Controller 3.2.2 Mounting RG-WS6816 on Workbench In the absence of a 19-inch standard cabinet, install the wireless controller on a clean workbench. During the operation, pay attention to the following items: The workbench is firm and well-grounded. ... -
Page 14: Connecting Console
Hardware Installation and Reference Guide Installing Wireless Controller 3.5 Connecting Console RG-WS6816 supplies an EIA/TIA-232 configuration console for local configuration. If you configure RG-WS6816 through Web, skip this part. Table 3-1 Console Attributes Parameter Description Connector RJ-45 Interface Standard Asynchronous EIA/TIA-232 Baud Rate 57,600 bps, 115,200 bps, 9,600 bps (default) Command line interface... -
Page 15: Configuration Guide
Hardware Installation and Reference Guide Configuration Guide 4 Configuration Guide 4.1 Setting up Configuration Environment When you use the wireless controller for the very first time, you will need to configure it through a console port as follows: As shown in the following figure, connect the serial port of a character terminal or microcomputer to the console port through an RS232 cable. -
Page 16: Verification Before Power-On
Hardware Installation and Reference Guide Configuration Guide Figure 4-3 Setting Communication Parameters for Serial Port. After building the configuration environment, you may power on the wireless controller 4.2 Powering on Wireless Controller 4.2.1 Verification Before Power-on Before powering on the wireless controller, please check the following items:... -
Page 17: Startup Process
Hardware Installation and Reference Guide Configuration Guide If the power cable and the grounding cable are connected correctly. If the power supply voltage meets the requirement. If the configuration cable is connected correctly, the microcomputer or terminal is turned on, and the setting is complete. - Page 18 [ OK ] Press RETURN to get started *May 15 11:08:01: %CAPWAP-4-NO_IP_ADDR: Please config the IP address for capwap. Ruijie> Now the wireless controller is ready for configuration. Such information may vary with hardware configuration or software version. When using the wireless controller for the first time, it is recommended to set basic parameters during configuration.
-
Page 19: Power Troubleshooting
5.2 System Troubleshooting Fault Possible Cause Solution Contact Ruijie Technical Assistance Center Forgot login password for help Verify that the power outlet functions Status LED is off after the The wireless controller is not receiving correctly. - Page 20 Hardware Installation and Reference Guide Troubleshooting The fiber type is not correct. Replace the optical fiber with one of the The fiber length exceeds the allowed proper length. length of the optical module.
Need help?
Do you have a question about the RG-WS6816 Series and is the answer not in the manual?
Questions and answers