Table of Contents
Advertisement
Quick Links
Advertisement
Table of Contents

Related Manuals for ROOTECH ACCURA 3300S


Summary of Contents for ROOTECH ACCURA 3300S
- Page 2 Notice Symbols Caution Indicates the presence of dangerous voltage which can cause severe injury or death to persons if proper precautions are not followed. Caution Alerts users of the presence of hazards which can cause injury to persons, property damage or damage to the device if proper precautions are not followed. Note Indicates major instructions for the installation, operation, and maintenance of the product.
- Page 3 About the Manual Rootech, Inc. reserves the right to make changes in the product specifications shown in this User Guide without prior notice. We recommend that customers should obtain the latest information on product specifications and the manual before making orders.
- Page 4 Rootech will decide at its discretion whether to repair or replace it or give a refund for the product for when the warranty period for the product expired or issues related to the product are not applicable for warranty terms and conditions.
- Page 5 ◼ If the original identification marks(trade-mark, serial number, etc.) have been defaced, altered, or removed Rootech shall not be liable for any other claims except the claims made by customers, including the original purchaser, his employees, agents, or contractors for any loss, damage, or expense incurred related to the purchased product when the above warranty terms and conditions are not fulfilled.
- Page 6 Revision History The following versions of the Accura 3300S User’s Guide have been are released. Revision # Revision date Description Revision 1.0 2008. 03. 05 Initial draft Revision 1.1 2009. 11. 27 Voltage input range modified Revision 1.2 2015. 05. 12 Standard compliance updated Revision 1.3...
-
Page 7: Table Of Contents
Contents Chapter 1 Introduction ........................10 Overview ............................10 Simultaneous Display of Voltage, Current, Power, and Energy ........... 10 Integrated Measurements of Various Electrical Parameters ............10 Accurate Measurements ......................10 Power Quality Data Available ....................10 Proven Safety and Reliability with CE/UL Certifications .............. 10 Features ............................ - Page 8 Ground Terminal ........................27 Step 5: Adding the Cover/Powering Up the Meter ................. 28 Adding the Cover ........................28 Powering Up the Meter ......................28 Chapter 3 Meter Operation/Setup ....................29 Display Mode ..........................30 Setup Mode ........................... 36 Reset Mode ............................ 38 System Mode ..........................
- Page 9 Figures Fig 1.1 Front Side ........................15 Fig 1.2 Rear Side ........................15 Fig 1.3 Front View ........................16 Fig 1.4 Rear View ........................16 Fig 1.5 Side View ........................16 Fig 1.6 ANSI 4” ........................17 Fig 1.7 DIN96 ........................17 Fig 1.8 Voltage and Current Connector ...................
-
Page 10: Chapter 1 Introduction
Integrated Measurements of Various Electrical Parameters Accura 3300S is a high accuracy digital power meter tailored for reliable measurements and accurate analysis of power consumption. Installed in factories, power and generator panels in buildings, etc, the device performs integrated measurements of various power parameters, including voltage, current, power, frequency, and power factor. -
Page 11: Features
Features Measurement ◼ 64 samples/cycle, True RMS ◼ IEC 62053-22 Class 0.5S ◼ 50, 60Hz ◼ Energy stored periodically to non-volatile memory. ◼ 4 Quadrant Energy kWh/kVARh received , kWh/kVARh delivered kWh/kVARh net[kWh/kVARh received - kWh/kVARh delivered] kWh/kVARh total[kWh/kVARh received + kWh/kVARh delivered] ◼... -
Page 12: Applications
RMS measurements for voltage and current waveforms distorted due to harmonics. Power Quality Analysis Accura 3300S provides data on voltage and current THD and K-Factor and allows for the analysis of voltage and current harmonics up to the 31st order. It allows for effective analysis of power quality by providing real time data on voltage and current waveforms. -
Page 13: Parameters
Parameters Item Realtime Average Total Maximum Minimum † Phase voltage ■ ■ ■ ■ † Line to line voltage ■ ■ ■ ■ Current ■ ■ ■ Power Active ■ ■ ■ † † Reactive ■ ■ ■ Apparent † †... -
Page 14: Chapter 2 Mounting
Chapter 2 Mounting Environmental Conditions The Accura 3300S should be mounted in a dry, dirt free location away from heat sources and very high electric fields. To operate properly and effectively, environmental conditions should range within the following guidelines Description... -
Page 15: Before You Begin
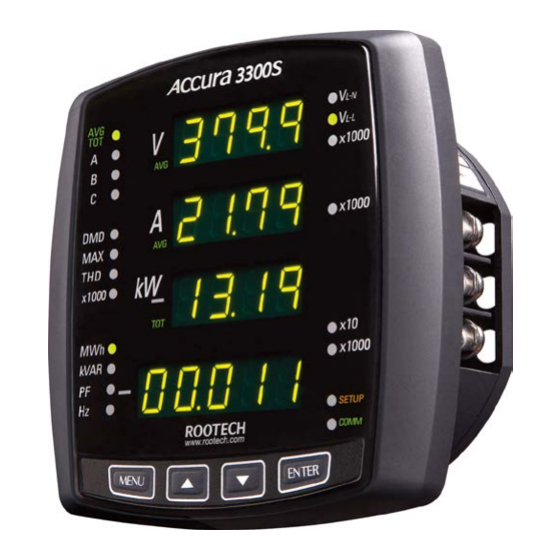
Before You Begin Before installing the meter, observe the instructions in this guide and read the safety precautions presented on the “Installation Considerations” page. Caution Power up after the voltage and current wiring is completed. Meter Overview Fig 1.1 Front Side Fig 1.2 Rear Side Page 15... -
Page 16: Meter Dimensions
Meter Dimensions Fig 1.3 Front View Fig 1.4 Rear View Fig 1.5 Side View Page 16... -
Page 17: Step 1: Panel Mounting
Step 1: Panel Mounting Sequence Remove connector on the bottom of the meter. Fit the meter into cutout[ANSI 4” or DIN96]. Fix the meter onto the panel by turning the mounting nut. When conforming to the DIN96 standard, there is no need to drill holes on the panel. Fig 1.6 ANSI 4”... -
Page 18: Step 2: Voltage And Current Inputs
Step 2: Voltage and Current Inputs Fig 1.8 Voltage and Current Connector Voltage Input Item Description Pin name Connector Terminal block Wire 2.1 to 3.5 mm [ 14 to 12 AWG] Rating 0 ~ 600V 3 ~ L-L[Line to line], 0 ~ 457V 3 ~ L-N[Line to neutral] Burden 0.02VA/phase @220V Impedance... -
Page 19: Current Input
Current Input Item Description Pin name 1S, 2S, 3S, 1L, 2L, 3L Connector Terminal block[Busbar] Wire 2.1 to 6 mm [ 14 to 10 AWG] Ratings 5A nominal/ 10A full scale 3 ~ Burden Maximum 0.005A/phase @10A Pollution degree 2, Installation Category Ⅲ Compliance CT[Current Transformer] Item... -
Page 20: Wiring Diagram Using External Pts
Wiring Diagram Using External PTs Caution Failure to observe the following wiring diagrams may result in severe injury or death. Be sure to use shorting block when connecting the meter to CT secondaries. Fig 1.9 Single Phase 2 Wire Connection, Wiring Mode = 1P2U Caution In single phase 2 wire mode, be sure to use V , 1S, 1L terminals as the above. - Page 21 Fig 1.10 Three Phase 3 Wire Open Delta Connection Using 2 CTs, Wiring Mode = 3P3O Caution In three phase 3 wire open delta connection mode, be sure to connect V to V as the above. Fig 1.11 Three Phase 3 Wire Open Delta Connection Using 3 CTs, Wiring Mode = 3P3O Caution In three phase 3 wire open delta connection mode, be sure to connect V to V...
- Page 22 Fig 1.12 Three Phase 4 Wire Connection Using 3 PTs and 3 CTs, Wiring Mode = 3P4U Page 22...
-
Page 23: Direct Connection Diagram Using No Pts
Direct Connection Diagram Using No PTs Caution Failure to observe the following wiring diagrams may result in severe injury or death. Be sure to use shorting block when connecting the meter to CT secondaries. Fig 1.13 Single Phase 2 Wire Direct Connection, Wiring Mode = 1P2U Caution In single phase 2 wire mode, be sure to use V , 1S, 1L terminals as the above. - Page 24 Fig 1.14 Single Phase 3 Wire Direct Connection Using 2 CTs, Wiring Mode = 1P3U Caution In single phase 3 wire mode, be sure to use V , 1S, 1L, 3S, 3L terminals as the above. Fig 1.15 Three Phase 3 Wire Open Delta Direct Connection, Wiring Mode = 3P3O Caution In three phase 3 wire open delta direct connection mode use PTs for voltages over 457V [line to...
- Page 25 Fig 1.16 Three Phase 3 Wire Open Delta Direct Connection Using 3 CTs Wiring Mode = 3P3O Caution In three phase 3 wire open delta direct connection mode, use PTs for voltages over 457V [line to line]. be sure to connect V to V as shown above.
-
Page 26: Step 3: Wiring The Device For Rs485 Communication
Using a UL2919 cable is recommended for communication. Comm Indicator The Comm LED blinks green when the meter is transmitting data. Protocol The meter provides Modbus RTU protocol. Refer to the Accura 3300S Communication User’s Guide for details about the Modbus protocol. Page 26... -
Page 27: Step 4: Wiring The Power Supply And Ground Terminal
Step 4: Wiring the Power Supply and Ground Terminal Fig 1.19 Wiring of Power Supply and Ground Terminal Power Supply Item Description Pin name PP[+/L], PN[-/N] Connector Screw terminal[Pluggable] Wire 1.25 to 3.5 mm [ 24 to 14 AWG] Ratings AC 85 ~ 265V, 50/60Hz ~, DC 100 ~ 300V Compliance Pollution degree 2... -
Page 28: Step 5: Adding The Cover/Powering Up The Meter
Note Wire the meter’s ground terminal G to switchgear earth ground. Do not use metal door hinges as a ground path Step 5: Adding the Cover/Powering Up the Meter Adding the Cover Fig 1.20 Adding the Cover Powering Up the Meter Close the PT fuses( or direct voltage input fuses). -
Page 29: Chapter 3 Meter Operation/Setup
Chapter 3 Meter Operation/Setup Each of these functions can be accomplished by pressing the Menu, Up, Down, and Enter buttons on the front panel. Item Description Display mode View parameter measurements Setup mode Configure parameters[wiring, communication, etc.] Reset mode Reset energy, demand, maximum, and minimum. System mode View meter system information[meter option, firmware version]. -
Page 30: Display Mode
Display Mode In Display mode, you can view values from these measurement groups. Fig 2.1 Measurement Group A, B Fig 2.2 Measurement Group C Fig 2.3 Measurement Group D † Measurement group C, D automatically returns to A, B after 30 seconds when “group auto-return” menu item of system mode is on[default]. -
Page 31: Fig 2.4 X1000, X10 Led
x1000 LED When the “x1000” LED is lit, multiply the displayed value by 1000 for actual value. When the “x10” LED is lit, multiply the displayed value by 10 for actual value. Fig 2.4 x1000, x10 LED Moving between Parameters in Each Group Button Function Move to the previous measurement group A, C, D. - Page 32 Voltage b Current b kW b Voltage c Current c kW c † ‡ AVG/TOT means Average/Total. Total kW[phase a, b, c] ◼ Three phase 3 wires Order Parameter † ‡ AVG/TOT Line voltage average Current average Total kW Line voltage ab Current a Line voltage bc Current b...
- Page 33 Parameter displays in following order In Group C Order Parameter kWh net[9digit] kWh received[9digit] kWh delivered[9digit] kWh total[9digit] Energy configured in “display energy” menu item of system mode is first displayed, and the others are recursively displayed. kWh/kVARh received is positive for “view as load”, kWh/kVARh delivered is positive for “view as generator”.
- Page 34 Current c demand AVG/TOT † ‡ Total kW demand DMD, MAX Current a peak demand DMD, MAX Current b peak demand DMD, MAX Current c peak demand DMD, MAX AVG/TOT † ‡ Total kW peak demand Voltage a THD Current a THD Voltage b THD Current b THD Voltage c THD...
- Page 35 Current a demand Current c demand AVG/TOT † ‡ Total kW demand DMD, MAX Current a peak demand DMD, MAX Current c peak demand DMD, MAX AVG/TOT † ‡ Total kW peak demand Voltage a THD Current a THD Voltage c THD Current c THD †...
-
Page 36: Setup Mode
Setup Mode In Setup mode, you can set up menus, such as PT/CT ratio, wiring, and communication after mounting the meter. Button Functions in Setup Mode Button Function Enter setup mode by pressing the Up and Down buttons at the same time. - Page 37 Wiring mode Single phase 2 wires Single phase 3 wires Three phase 3 wires, Open Delta √ Three phase 4 wires Comm address 1 ~ 247 √ Protocol Modbus RTU Rootech † Speed[bps] 1200bps 2400bps 4800bps √ 9600bps 19200bps 38400bps 57600bps ‡...
-
Page 38: Reset Mode
Reset Mode In Reset Mode, you can reset Energy, Demand, and the Maximum/minimum values. Button Functions in Reset Mode Button Function Enter reset mode by pressing the Down and Enter buttons at the same time. Move to the previous menu screen. Move to the next menu screen. -
Page 39: System Mode
System Mode You can view system information, such as product number, version, demand time, frequency selection, etc. Button Functions in System Mode Button Function Enter System Mode Move to the previous menu screen. Move to the next menu screen. Enter system edit mode to configure the displayed menu value. →... - Page 40 Menu Items Order Menu Item Range Default Demand time 1 ~ 60 Frequency 50Hz, 60Hz √ Reactive power calculation Method 1 Method 2 † Group auto-return √ Display energy kWh received kWh delivered kWh total kWh net √ Transmission delay time 0~50 ‡...
-
Page 41: Reactive Power Calculation
Reactive Power Calculation Rootech supports two methods for accurate calculation of reactive power. Method 1: General Calculation Method 1 is used to obtain reactive power, and apparent power by using calculation of vector apparent power. PF = Fig 2.5 P , Q[according to general calculation]... - Page 42 Method 2: Calculation of Harmonics Method 2 is used to obtain reactive power from apparent and active power, and the overall apparent power by using calculation of vector apparent power. PF = Note P can be a positive or negative value, while Q is always a negative value. Page 42...
-
Page 43: Appendix A Specifications
Appendix A Specifications Voltage Input Rating Input 0 ~ 600V 3 ~ L-L, 0 ~ 457V 3 ~ L-N [In three phase 3 wire open delta direct connection mode, use PTs for voltages over 457V line to line] Calibration 60 ~ 220V per phase Wiring Mode 1P2W, 1P3W, 3P3W, 3P4W Burden... -
Page 44: Appendix B Standard Compliance
Appendix B Standard Compliance Accuracy IEC 62053-22 Class 0.5S Safety UL 61010-2, 2nd edition[IEC61010] IEC 61326-1 [IEC 61000-4-2] Electrostatic Discharge[ESD] IEC 61326-1 [IEC 61000-4-3] EM Field IEC 61326-1 [IEC 61000-4-4] Electric Fast Transient IEC 61326-1 [IEC 61000-4-5] Surge Immunity IEC 61326-1 [IEC 61000-4-6] Conducted RF Immunity IEC 61326-1 [IEC 61000-4-8] Rated Power Frequency Magnetic Field... -
Page 45: Appendix C Test Report
Measuring Test IEC 62053-22, Electricity Meter Equipment: active energy for Class 0.5S Current range Power factor Class 0.2S/ 0.5S Accura 3300S 0.05A < I < 0.25A ± 0.4%/ ± 1.0% ± 0.4% 0.25A < I < 10.0A ± 0.2%/ ± 0.5% ±... -
Page 46: Reliability Test
True RMS Accuracy Accura 3300S Harmonic Voltage Current ±1.0% ±1.0% ±1.0% ±1.0% ±1.0% ±1.0% ±1.0% ±1.0% ±1.0% ±1.0% ±1.0% ±1.0% *Voltage : 220V, Tested percentages of harmonic-to-fundamental: 50%... - Page 47 Page 47...
- Page 48 3300S/3300, Accura 3500S/3500, Accura 3550S/3550, Accura 3700, Accura 5500, and Accura 7500 are trademarks of Rootech Inc. Contact us for detailed product specifications and ordering information. Information contained herein is subject to change without notice. CopyrightⓒRootech Inc. Printed In Korea...
Need help?
Do you have a question about the ACCURA 3300S and is the answer not in the manual?
Questions and answers