HP Media Center,Pavilion Media Center m200 Hardware Manual
Hp media center,pavilion media center m200: hardware guide
Hide thumbs
Also See for Media Center,Pavilion Media Center m200:
- User manual (86 pages) ,
- Start here manual (72 pages) ,
- Supplementary manual (48 pages)
Table of Contents
Advertisement
Advertisement
Table of Contents

Related Manuals for HP Media Center,Pavilion Media Center m200


Summary of Contents for HP Media Center,Pavilion Media Center m200
- Page 1 guide...
- Page 2 HP shall not be liable for errors contained herein or for incidental or consequential damages in connection with the furnishing, performance, or use of this material.
-
Page 3: Safety Information
Before you get started, please read this important safety information about your HP Media Center PC. This product has not been evaluated for connection to an “IT” power system (an AC distribution system with no direct connection to earth, according to IEC 60950). -
Page 4: Safety And Comfort
Refer to Working in Comfort in the Help and Support Center for important ergonomic information. Just click Start, Help and Support, My HP Pavilion PC, and then click Working in Comfort. You can find important ergonomic information on the Internet. -
Page 5: Help And Support
The Help and Support Center also gives you access to the latest news and updates for your PC. The HP Web site provides a place where you can get supplemental information about HP computers and products and contact HP Support. -
Page 6: Hp Web Site And Hp Support
Customer Care, you will need your PC model number and serial number. HP Web Site and HP Support Connect to the Internet: Open your Web browser, or press Connect on your keyboard. Type http://www.hp.com into your Web browser address box and press Enter on your keyboard. -
Page 7: Table Of Contents
Headphones ... 20 Starting My PC ... 21 Starting the PC for the First Time ... 21 Selecting an ISP ... 22 HP Desktop ... 23 Enabling TV Out Image ... 24 Opening Media Center ... 25 Software Programs ... 26 Turning Off the PC ... - Page 8 viii...
-
Page 9: Welcome
Welcome Thank you for purchasing the HP Media Center PC. HP has combined the features of the HP Pavilion home PC with the Microsoft ® Windows ® XP Media Center Edition operating system to create a powerful entertainment center for you. -
Page 10: How To Use This Guide
How to Use This Guide A note describes important infor- mation you need. A warning describes infor- mation you need to avoid possible personal injury or damage to equip- ment or data. Read and follow all warnings. This guide will help you get started using your new PC right away. -
Page 11: Where Can I Find Information
Where Can I Find Information? Record Support information for your PC here. (To open the HP Pavilion Support Information window, press the Ctrl key, the Alt key, and the s key at the same time.) Product name:... -
Page 12: Inventory
Inventory PC and Main Components Power cord Documentation packet of books and CDs Mouse Modem cable Keyboard Media Center Components 2-AA batteries for Remote control remote control 10' Coaxial cable Remote sensor S-video to composite video adapter Composite video cable Remote sensor control cable 2.1 Speaker System... -
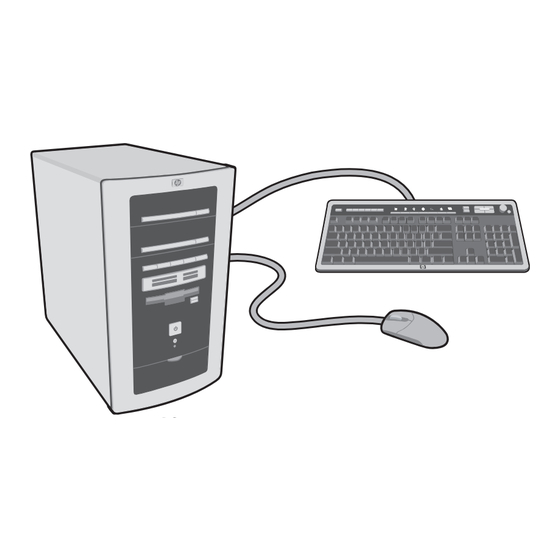
Page 13: Setting Up My Pc
Follow the steps in the setup poster to set up the computer. Connect the keyboard, mouse, speaker system, and remote sensor to the connections on the back of the PC. Match the colors. Your connector locations and system components may vary. -
Page 14: Front Of Pc
cd writer plus dvd writer GUIDE MUSIC PICTURES VIDEOS SmartMedia MultiMediaCard/SD CompactFlash I/II Memory Stick Front of PC 1st Optical (CD or DVD+RW/+R) drive Eject button 2nd Optical (CD or DVD+RW/+R) drive Eject button Mode buttons 6-In-1 memory card reader Diskette (floppy) drive Eject button On button with power indicator light... -
Page 15: Back Of Pc
Back of PC PS/2 Mouse PS/2 Keyboard Serial port Parallel port USB 2.0 (Universal Serial Bus) ports (Remote Sensor uses USB) LAN (Ethernet) Composite video (TV out) TV Out (s-video) VGA Monitor (DB-15) Telephone (Line Out RJ-11) Modem (Line In RJ-11) Location and Power LED number of connec-... -
Page 16: Connecting The Monitor
Connecting the Monitor Connect your monitor to the PC. The monitor is not included with the PC. Refer to the documentation that came with your monitor. ; ; ; ;; ; @ @ @ @@ @ ; ; ; ;; ; @ @ @ @@ @ ;... -
Page 17: Connecting To The Internet Through A Modem/Telephone Connection
Connecting to the Internet Through a Modem/Telephone Connection Connect the telephone line to the modem, which is inside the computer. Plug the modem cable (provided in the computer box) into the computer modem connector and to your telephone line wall jack connector. Optionally, you can plug a telephone cable into the computer telephone connector and into a telephone. -
Page 18: Connecting The Remote Sensor
Remote Sensor Connect remote control receiver to computer If you use a cable or satellite set-top box, pass the signal through the remote sensor Connecting the Remote Sensor The remote sensor is a small device that connects to the PC and allows the remote control to work with the Media Center program. -
Page 19: Connecting The Signal Source
Connecting the Signal Source This section describes connecting the signal source for TV. Connect the signal source for the TV by using the TV (in) coaxial connector or the S-VID IN (s-video) connector: Plug the connector of a coaxial cable from your TV antenna or from your TV cable (wall or set-top box) into the TV connector on the back of the PC, and then turn the connector to tighten it. -
Page 20: Optional Connections
Optional Connections Coaxial cable S-video to composite video adapter Composite video cable Connecting the TV is optional and not required to enjoy Media Center. Using the TV Cables Your PC comes with the following cables for the TV signal: One coaxial cable (10 feet). Use a coaxial cable for a BNC connector, such as the TV source signal. -
Page 21: Connecting The Tv
Connecting the TV Plug a cable into the TV OUT s-video connector or the COMP composite video connector an the back of the PC. Choose the cable type your TV needs. Plug the other end of the cable into the TV IN connector on your TV. -
Page 22: Connecting The Tv Signal Source When You Have An Existing Setup
Connecting the TV Signal Source When You Have an Existing Setup This section describes how to connect the PC to an existing setup for your TV signal source. Wall to VCR to TV using coaxial cable Remove the coaxial cable at the input to the VCR, and connect it to the input of a coaxial cable signal splitter (not included;... -
Page 23: Wall To Cable Tv Set-Top Box Or Satellite Box To Vcr To Tv Using Coaxial Cable
Wall to Cable TV Set-top Box or Satellite Box to VCR to TV Using Coaxial Cable Remove the coaxial cable at the input to the VCR, and connect it to the input of a coaxial cable signal splitter (not included; available at electronics stores). Connect two coaxial cables to the splitter outputs. -
Page 24: Wall To Cable Tv Set-Top Box Or Satellite Box To Vcr And Tv Using S-Video Cable Or Composite Video Cable Between The Box And The Vcr Or Tv
Wall to Cable TV Set-top Box or Satellite Box to VCR and TV Using S-video Cable or Composite Video Cable Between the Box and the VCR or TV Do not detach any cables from your existing setup. Connect an additional cable: Using s-video cable (not included): connect an additional s-video cable to a second output on the set-top box or satellite box. -
Page 25: Connecting Your Speakers
Speaker systems are not included in all PC models. Always turn on the PC before you turn on the speaker system. The 2.1 speaker system and the 5.1 speaker system are powered by the sound card that has a suite of software applications from Creative. -
Page 26: 2.1 Speaker System
2.1 Speaker System Put the rubber feet on the bottom of the speakers. Place the two speakers on the left and right of your monitor or TV. Place the subwoofer on the floor beneath your computer desk or TV. Do not block the side or front of the subwoofer, and allow for ventilation to reach the rear of the subwoofer. -
Page 27: Speaker System
5.1 Speaker System Because your 5.1 speaker system may vary, to set up your speakers, please refer to the instruction package included with the 5.1 speaker system box. To connect the 5.1 speaker system, refer to the table listing connector information. 5.1 Plug (color) Connects to back of PC (color) Front speakers (green) -
Page 28: Adjusting The Volume
For the 5.1 speaker system, look for the headphones connector on the right side of the control tower. If the control tower displays HP , the headphones are enabled; the sound to the speakers and the subwoofer is muted. Push and hold the On button on the control tower for several seconds to enable sound from the speakers. -
Page 29: Starting My Pc
Press the On button on the front of the PC. Follow the onscreen instructions for the initial Microsoft Windows setup. When you see the Register with HP screen, enter your information, completing all of the required boxes. Then click Next to go to the next screen. -
Page 30: Selecting An Isp
LAN (local area network), cable modem, or DSL (digital subscriber line). Open Easy Internet Sign-up: Double-click the easy Internet sign-up icon on the desktop. Click Start on the taskbar, choose All Programs, and click easy Internet sign-up. The Easy Internet Sign-up screen appears. Follow the... -
Page 31: Hp Desktop
HP Desktop The HP desktop has shortcut icons that make it easy to find the things you need. Click the icon to find out more information about its program. The screen on your computer may not match the screen pictured here. -
Page 32: Enabling Tv Out Image
Check that the TV is connected to the PC. See “Connecting the TV.” Turn on the TV. If you have Media Center open, close it. Right-click an empty part of the PC desktop and click Properties. Click Settings tab. Click the Advanced button. -
Page 33: Opening Media Center
GUIDE MUSIC PICTURES VIDEOS hp media center pc ® ® Microsoft Windows Media Center Edition user’ s guide Opening Media Center Open Media Center: Press the Start button on the remote control. Press a Mode button on the front of the PC. -
Page 34: Software Programs
Web site for HP Pavilion home PC owners. You will find fun projects, important product notices, support updates, tips, and special offers from HP; just press the HP button on the keyboard or enter the address in your Internet Web browser. - Page 35 Acrobat Reader 5.0 displays documents that are in the Adobe Portable Document Format (PDF). You can navigate through the document and print all or part of it. WordPerfect Productivity Pack provides WordPerfect 10, a word processing program, and Quattro Pro 10, a spreadsheet program, along with a task manager that makes choosing templates easy.
-
Page 36: Turning Off The Pc
Turning Off the PC Turn off the PC by using the following steps: If you are using Close any open software programs. To close Media Center to programs, click X in the upper-right corner of record television each window. programs, put the PC into standby Click Start on the taskbar. -
Page 37: Manual Standby Mode
Manual Standby Mode Press the Standby button on the keyboard or the Standby button on the remote control, or briefly press the On button on the front of the PC. The screen goes dark, and the computer goes into standby mode. The On button on the front of the PC has a power indicator light that flashes when the PC is in standby. -
Page 38: Manual Hibernation Mode
Hibernation differs from standby. When the PC enters standby, it is still active and able to respond to scheduled activities. When the PC enters hibernation, it copies everything currently displayed and on the desktop to the hard disk and then turns itself off. When you press Shift, the Click Start on the taskbar. -
Page 39: Automatic Standby Or Hibernation Mode
Automatic Standby or Hibernation Mode To automatically put the computer into standby or hibernation mode when the PC is idle, modify the power management settings: Click Start on the taskbar. Click Control Panel. Click Performance and Maintenance, if it is present. Double-click Power Options. -
Page 41: Using The Pc Hardware
Keyboard The keyboard has an Function keys are arrangement of standard the F1 through F12 keys keys and special buttons. located above the main keys. F1 opens a Help Alphanumeric window for the software keys are the main keys program being used. F3 found on a standard opens a search window. -
Page 42: Keyboard Functions
Access buttons user photo music video Put PC into or out Connect to Open Open of standby HP Web site HP Picture My Video folder (power saving) Tool Kit mode Log off or Open Help and Open switch users Support Center... - Page 43 Double-click Keyboard. connect search chat Open your Open an Internet browser HP-related Web site for chatting Search the Internet Open your e-mail Choose the button On the Buttons tab, capability from the click Apply. drop-down list. Enter Repeat steps 6...
- Page 44 Optical drive and Volume buttons The Volume knob eject1 can continue to be turned, even eject2 after maximum sound has been reached. optical drive trays play pause prev Open or close Control active optical drive stop next volume Control speaker volume Mute speaker sound...
-
Page 45: Mouse
Mouse Left-click the item, and Your PC includes an then press and hold optical scrolling mouse. down the left mouse When you move the button. mouse, it uses light and an optical sensor, instead Move the mouse to of a roller ball, to sense position the cursor;... -
Page 46: Remote Control
Remote Control Use the remote control to open the Media Center program and use it to view television, record television programs, play previously recorded TV programs, and play music, movies, or video. To use the remote control, simply point it at the remote sensor and press the Start button. - Page 47 Install the remote control batteries Slide the battery cover off the back of the remote control. Insert the two AA batteries (provided). Replace the battery cover. Use alkaline batteries in the remote control.
-
Page 48: Remote Control Buttons Overview
Remote Control Buttons Overview Standby puts the PC into a power reduced state called standby. An LED located under the Standby button blinks when the remote control is transmitting a signal to the remote sensor. You must press Standby for 1–2 seconds. This button has no function. -
Page 49: Cd And Dvd Drives
CD and DVD Drives Your PC comes with one Do not touch the or two of the following unlabeled side of a CD optical drives: or place the unlabeled side down on your CD-RW desk. Doing so could scratch the surface of DVD-ROM the CD. -
Page 50: Dvd-Rom Drive
DVD-ROM Drive The DVD-ROM drive can play movie DVDs and music CDs, read data DVDs and CDs, and run CD-based and DVD-based software programs. Using the DVD-ROM drive When you insert a disc into the DVD-ROM drive, the computer automatically detects the type of disc. -
Page 51: Dvd/Cd Writer Plus (Combo) Drive
dvd/cd writer plus (Combo) Drive The dvd/cd writer plus is a DVD/CD-RW drive. It can play music CDs, read data DVDs and CDs, run CD-based and DVD-based software programs, create, or write, music and data CDs, copy CDs, and play DVD movies. Using the combo drive When you insert a disc into the combo drive, the computer automatically detects... -
Page 52: 6-In-1 Memory Card Reader
SmartMedia You can place media in one or more of the card reader slots and access each media independently. CompactFlash I Each drive has its CompactFlash II own drive letter. or Microdrive Do not try to insert or remove media when the In-use light is lit. -
Page 53: Upgrading And Servicing
HP recommends that you use an antistatic wrist strap and a conductive foam pad when working on the computer. Read “Safety Information”... -
Page 54: Removing The Side Panels
Removing the Side Panels Loosen the two thumbscrews on the right side of the back panel. (You may need a flathead screwdriver. These screws do not detach; they’ll stay on the side panel loosely until you tighten them again.) Pull the panel toward you until it stops. Lift the panel off the chassis and set it aside. -
Page 55: Locating Components In The Pc Chassis
Locating Components in the PC Chassis 1st optical drive bay Power supply 2nd optical drive bay Drive cage with 3 drives (top to bottom): Hard disk drive 6-In-1 memory card reader Fan duct Diskette (floppy) drive Memory sockets Expansion (Add-In) cards slots... -
Page 56: Removing The Fan Duct
Removing the Fan Duct Remove the fan duct when replacing memory, an optical drive, or the drive cage. To disengage the fan duct, push down the two tabs. You can push with your fingers or a pen. Rotate the fan duct down and out to remove it from the chassis. -
Page 57: Accessing The Optical Drives
Accessing the Optical Drives To access the optical drives, you remove the side panels, the front panel, and the fan duct. Remove both side panels. (See page 46.) To release the front panel, locate the three small tabs on each side of the chassis. Press each tab away Release tab from the center of the chassis. -
Page 58: Removing The Optical Drive
Removing the Optical Drive Your computer comes with one or two optical drives (CD, DVD, or combo) which you can replace or upgrade. These drives are located in the two fixed bays at the top of the chassis. When you are removing the top optical drive, to have better access to the back of the drive, remove the two screws on both optical drives and push both drives part way out through the front of the computer. -
Page 59: Installing A New Optical Drive
Installing a New Optical Drive Make sure the jumper on the new drive is in the CS (Cable Select) position. Slide the new optical drive through the front of the computer. Don’t slide the drive in all the way — you need room to attach the cables. Connect the cables to the back of the drive. -
Page 60: Replacing And Adding Drives
Replacing and Adding Drives You can replace the drives that are located in the removable drive cage: hard disk drive, 6-In-1 memory card reader (select models), and diskette (floppy) drive. On PCs with no 6-In-1 memory card reader, you can add a second hard drive by installing it into the drive cage. - Page 62 6-In-1 memory card reader To ensure that the drive fits properly into the chassis, be sure to purchase the replacement drive from HP. Remove the drive cage. (See page 52.) Remove the two screws that secure the diskette drive in the drive cage: one screw on each side of the drive cage.
- Page 63 CS SL MA Example drive with Cable Select jumper installed (your drive may vary) Installing a second hard drive If your PC model does not have a 6-In-1 memory card reader, the bottom slot of the drive cage is empty and can accommodate an additional 3.5-inch hard drive.
-
Page 64: Adding Memory
(dual in-line memory modules) or DDR (double data rate) DIMMs, depending on which PC model you have. To determine which type of memory module 256 MB memory your PC uses, go to the HP Web site by typing configurations http://www.hp.com into your Web browser address box vary depending and pressing Enter on your keyboard. - Page 65 Removing a memory module Remove the fan duct. (See page 48.) Locate the memory sockets on the motherboard. Move any cabling out of the way, if necessary. Push down the two retaining clips on the ends of the socket until the memory module pops out of the socket.
-
Page 66: Removing Add-In Cards
Removing Add-In Cards Disconnect any external and internal cables attached to the card. Be careful of the sharp edges on Loosen the screw on the bracket of the card you are the expansion replacing. slot cover. Hold the metal bracket and the far top corner of the card. -
Page 67: Troubleshooting
Problem My computer won’t turn on at all. Troubleshooting For help on general and miscellaneous problems you may be experiencing with the PC, refer to the following pages for possible solutions. Look up the description of the problem and try the solution listed. For more detailed information, press the Help button on your keyboard, or click Start on the taskbar and select Help and Support. - Page 68 Be sure that you installed the device drivers that came with the new device. You may need an updated driver for Windows XP. For non-HP peripherals, contact the vendor directly. For HP peripherals, visit the HP Web site. Refer to your Support Guide for details.
- Page 69 Problem The computer (or part of it) doesn’t seem to be working. (continued) The computer doesn’t make any sound. When I push one of the special or multimedia buttons on the keyboard, nothing happens. Solution It’s possible that a voltage spike, power outage, or brownout has occurred. Symptoms of voltage spikes include a flickering video display, unexpected computer startups, and the computer not responding to your commands.
- Page 70 Problem When I push one of the special or multimedia buttons on the keyboard, nothing happens. (continued) My keyboard doesn’t work even though the computer and monitor seem to work. Solution 5 In the Keyboard Properties window that opens, click the Buttons tab. 6 Double-click the button you want to change.
- Page 71 Problem The monitor doesn’t work, even though the computer appears to. The mouse doesn’t work, even though everything else does. Solution Make sure the monitor is turned on — it has its own power button. Adjust the brightness and contrast controls on the monitor. Check the connection of the power cord into the monitor.
- Page 72 Problem The mouse doesn’t work, even though everything else does. (continued) I am using a TV with Media Center, but I cannot see anything. USB Hub Power Exceeded error. I cannot remove a CD or DVD. Solution If the pointer doesn’t move on the screen when you move the mouse, clean the mouse.
-
Page 73: Restore And Recovery
Restore and Recovery Recovery CDs HP PCs with Windows XP feature a recovery partition included on the hard disk drive, thus eliminating the need for recovery CDs that may get lost or damaged. If you have concerns completing a recovery procedure in “Using Application Recovery and System Recovery,”... -
Page 74: Using Application Recovery And System Recovery
Microsoft system restore feature in Windows XP to restore the computer system and program settings. Before using System restore returns the computer settings to a selected the HP System restore point without affecting user programs or Recovery or document files. For more information, type System Application Restore into the Search box in Help and Support. - Page 75 Increasing available hard disk space You can free up space on the hard disk by uninstalling programs or by using the Disk Cleanup utility to remove unneeded files. To uninstall programs: Click Start. Click Control Panel. Double-click Add or Remove Programs, if it is present.
- Page 76 If an individual application or software driver accidentally gets erased or damaged, you can reinstall the software by using the HP Application Recovery program. Do not use application recovery to reinstall software programs that came on CDs or DVDs included in the computer box.
- Page 77 When other methods of repairing your system software (like system restore or application recovery) fail, you may want to use the HP PC System Recovery program as a last resort to reinstall the software. The system recovery program uses a special recovery...
- Page 78 Important information about recorded TV programs When you replace the hard disk drive, you lose any files or software that you created, saved, or installed on the PC. Because of this, you also lose a special code that Microsoft includes in the files of recorded TV programs. Without the code, Media Center will not play TV When you replace programs previously recorded to disk, or copied to...
-
Page 79: Index
On 21 not working 59, 60 computer (continued) opening chassis 46 DDR DIMM requirements 56 part of PC not working 60 desktop 23 resources 3 digital audio out 17 restarting from standby 60 digital out connector 17 setting up iv... - Page 80 CD or DVD drive 41 automatic 31 diskette drive 6 manual 30 error, USB Hub Power HP desktop 23 Exceeded 64 HP Instant Support 3 HP, registering computer with 21 fan duct HP software 26–27 locating 47 removing and replacing 48...
- Page 81 60 diskette drive 54 automatic 31 DVD drive 50 manual 29 Start menu 23 support from HP 3 VCR, connecting 11 system recovery, using 69 video display flickering 61 system tray 23 volume, adjusting 20 Volume buttons 36...
Need help?
Do you have a question about the Media Center,Pavilion Media Center m200 and is the answer not in the manual?
Questions and answers