Canon VB-C50i/VB-C50iR User Manual
Ptz network cameras
Hide thumbs
Also See for VB-C50i/VB-C50iR:
- Manual del usuario (247 pages) ,
- Administrator's manual (302 pages) ,
- User manual (56 pages)
Table of Contents
Advertisement
Quick Links
Advertisement
Table of Contents

Related Manuals for Canon VB-C50i/VB-C50iR


Summary of Contents for Canon VB-C50i/VB-C50iR
- Page 1 NETWORK CAMERA User’s Manual VB-C50i Please read this User’s Manual carefully before operation. Be sure to read the “a Safe Use of Equipment” section before using this equipment. Store this manual in a readily accessible location for future reference. VB-C50iR...
-
Page 2: Introduction
For the latest information, please refer to Canon Web site. If the Product is connected to a recording device (for example a VCR), Canon Inc. accepts no responsibility whatsoever for any financial losses that may be incurred as a result of the loss of recorded information or images, regardless of the internal or external cause of the loss. - Page 3 ●When videos are taken of specific buildings, interiors and the like, we install the camera only after receiving approval from the administrator. Please note that the operator of the camera site and not Canon has full responsibility regarding the disclosure of live videos and audio.
-
Page 4: Package Contents
LICENSE folder (License documents for software built into the VB-C50i/VB-C50iR) VBTools folder (Bundled software installer set)* SOUND folder (Sound sample files for Audio Playback) * For the latest information such as the bundled software and manual, please refer to Canon Web site. -
Page 5: Table Of Contents
Contents Introduction ... ii Package Contents ... iv How to Read This Manual... ix a Safe Use of Equipment... x Maintenance ... xv Chapter 1 Before Using the VB-C50i/VB-C50iR Features of the VB-C50i/VB-C50iR ... 1-2 Hardware and Software Requirements ... 1-4 Viewer Software ... - Page 6 Contents Setting Up the HTTP, Camera and Audio Servers (Server) ... 3-16 Setting User Access Privileges (Access Control) ... 3-21 Setting the Date and Time (Date and Time) ... 3-24 Setting Up Name Server Address and Mail etc. (Miscellaneous) ... 3-26 Using the Administration Tools (Administration Tools) ...
- Page 7 Log Viewer ... 4-62 Viewing the Log ... 4-63 Admin Viewer ... 4-65 Starting Up Admin Viewer ... 4-66 Operating External Devices and Motion Detection ... 4-66 Enabling/Disabling View Restrictions ... 4-68 Operating a Camera ... 4-68 Camera-Specific Functions ... 4-70 Sending and Receiving Audio ...
- Page 8 Contents Using the Still Picture Recording Function with a Predetermined Schedule ... 6-6 Sample Application Using a Timer ... 6-6 Using the Motion Detection Function with a Predetermined Schedule ... 6-8 Sample application in combination with a warning device ... 6-8 Using VBCollector ...
-
Page 9: How To Read This Manual
How to Read This Manual For information about setting up the VB-C50i/VB-C50iR Read this manual carefully before using the VB-C50i/ VB-C50iR. User’s Manual (This document) For information about using the Viewer This manual describes how to use the Viewer for Java and the Viewer for PC. -
Page 10: Safe Use Of Equipment
a Safe Use of Equipment An exclamation point, within a triangle, is intended to alert the user to the presence of important operating and maintenance (servicing) instructions in the literature accompanying the equipment. a Important Warnings a CAUTION: TO REDUCE THE RISK OF ELECTRIC SHOCK, DO NOT REMOVE COVER (OR BACK). - Page 11 If such changes or modifications should be made, you could be required to stop operation of the equipment. Canon U.S.A. Inc. One Canon Plaza, Lake Success, NY 11042, U.S.A. Tel No. (516) 328-5600 Canadian Radio Interference Regulations This Class B digital apparatus complies with Canadian ICES-003.
-
Page 12: A Important Safety Instructions
Safe Use of Equipment a IMPORTANT SAFETY INSTRUCTIONS In these safety instructions, the word “equipment” refers to the Canon Network Camera VB-C50i/VB-C50iR and all its accessories. 1. Read Instructions - All the safety and operating instructions should be read before the equipment is operated. - Page 13 19. Replacement Parts - When replacement parts are required, be sure the service technician has used replacement parts that are specified by Canon or that have the same characteristics as the original part. Unauthorized substitutions may result in fire, electric shock or other hazards.
- Page 14 22. When any of the following occurs, immediately switch OFF the equipment, unplug it from the main power supply and contact your nearest Canon supplier. Do not continue to use the equipment as this can cause a fire or electric shock.
-
Page 15: Maintenance
P.6-11) are not suited to applications where high levels of reliability are required. Therefore, we recommend that you not use these functions for monitoring or other purposes if consistently high levels of reliability are required. Canon accepts no liability whatsoever for faults resulting from the use of the Motion Detection, Automatic Tracking and VBCollector. -
Page 17: Chapter 1 Before Using The Vb-C50I/Vb-C50Ir
Chapter Before Using the VB-C50i/VB-C50iR This chapter describes the features of the VB-C50i/VB- C50iR, the hardware and software requirements, and the name and functions of the system components. -
Page 18: Features Of The Vb-C50I/Vb-C50Ir
Features of the VB-C50i/VB-C50iR The VB-C50i/VB-C50iR is a system that distributes live videos via the Internet or an intranet. It can be used in a wide range of applications, such as distributing live videos from a Web site or monitoring. The system is configured for the VB-C50i/VB-C50iR and viewer software. Please use the supplied viewer software for viewing videos distributed by the VB-C50i/VB-C50iR and controlling cameras (→... - Page 19 contrast of the darker areas to make it easier to see. Unlike backlight compensation, the shade correction feature allows image processing without adversely affecting the existing lighter regions. Camera Position Preset function If often-used camera angles (camera head aim and zoom position) and related items are saved in advance as presets, the camera can be controlled from the viewer by simply selecting a desired preset.
-
Page 20: Hardware And Software Requirements
Hardware and Software Requirements For the latest information, please refer to Canon Web site. Viewer Software (→ d Viewer Software User’s Manual) The viewer software that is supplied with the VB-C50i/VB-C50iR lets you view the video captured by the VB-C50i/VB-C50iR and control the camera. -
Page 21: Vb Administration Tools
VB Initial Setup Tool Ver. 2.1 (→ P.2-7) This tool is for performing initial settings for the VB-C50i/VB-C50iR. Operating System/ Windows 2000(SP4) / Internet Explorer 6.0(SP1) Web Browser Windows XP(SP1a) / Internet Explorer 6.0(SP1) Windows XP(SP2) / Internet Explorer 6.0(SP2) or 7.0 Windows Server 2003 Standard Edition / Internet Explorer 6.0 Windows Server 2003 Standard Edition (SP1) / Internet Explorer 6.0(SP1) or 7.0 Windows Server 2003 Standard Edition (SP2) / Internet Explorer 6.0(SP2) or 7.0... -
Page 22: Vb Initial Setup Tool
Hardware and Software Requirements Using the VB-C50i/VB-C50iR with Windows XP SP2... Note If you use the VB Initial Setup Tool or VBCollector with Windows XP SP2, you will need to change your Windows firewall settings on your PC. VB Initial Setup Tool If you installed the VB Initial Setup Tool on a PC with Windows XP SP2 and try to launch the tool, you may encounter a “Windows Security Alert”... - Page 23 Using the VB-C50i/VB-C50iR with Windows Server 2003... Note With Windows Server 2003, the default security level for the Internet or intranet sites in Internet Explorer is “High”. As a result, windows such as the settings window do not function normally unless you first register the site in the contents block dialog box that appears when you access the camera server top page (→...
-
Page 24: Multipoint Recording Software For Monitoring Use (Sold Separately)
20 GB HDD or greater, SCSI or IDE, NTFS formatted The requirements for Storage Server will vary according to the environment you will use (number of Camera Servers, setting of recording frame rate etc.). Please contact dealers that handle Canon products for further information. -
Page 25: System Components And Their Operation
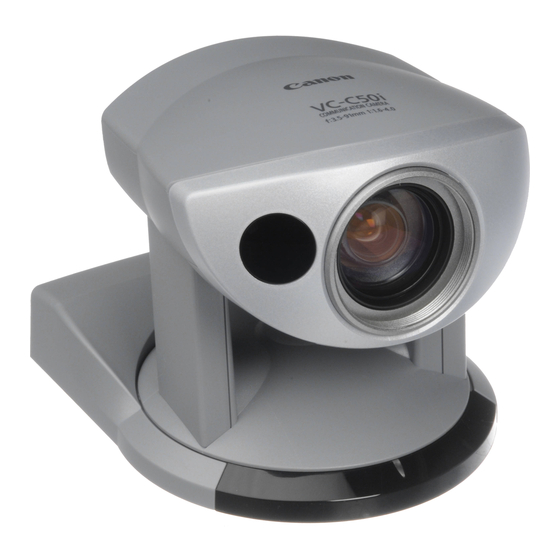
System Components and Their Operation Front Rear VB-C50i Camera head Infrared light * Cannot be used inside a dome housing. Base LAN status LED The LED blinks during communication. 100Base-TX ... Green 10Base-T ... Orange * You can set the LED to always light up even during communication. - Page 26 System Components and Their Operation Front Rear 1-10 VB-C50iR LAN status LED The LED blinks during communication. 100Base-TX ... Green Mounting plate 10Base-T ... Orange * You can set the LED to always light up even during communication. In this case, you can select from a green, orange or red light color.
- Page 27 Bottom On the bottom of the VB-C50i/VB-C50iR there are the MAC address required for network settings, a Reset switch that returns the factory default settings and the serial number. Screw hole for tripod mounting Reset switch You can revert all settings of the unit to the factory default settings by pressing this button with a thin-tipped...
-
Page 28: Multi-Terminal Module Vb-Ex50 (Sold Separately)
Multi-Terminal Module VB-EX50 (Sold Separately) Using the Multi-Terminal Module VB-EX50, you can connect external devices such as different kinds of sensors, a microphone* and speaker to the unit, and you can store image by sensor response, or send and receive* audio (→ P.7-17). Please note that the Multi-Terminal Module VB-EX50 is an optional product and is therefore sold separately. -
Page 29: Chapter 2 Setting Up
Chapter Setting Up This chapter explains how to set up the VB-C50i/VB-C50iR, run initial checks, and confirm that the camera’s images are displayed correctly. -
Page 30: Setup Workflow
Setup Workflow The flow for setting up and checking the camera’s images involves performing various settings after the device is set up and your PC and the network are connected via the hub. Then, check to see if you can display images from the camera. S e t up the c ame ra Set up the device. - Page 31 C h e c k oper ati on of the c a mer a Access the device with your PC, then display to check the image from the top page of the camera server (→ P.2-10). I ns ta ll t he sof tw a re Install the required software in advance for operating the camera (→...
-
Page 32: Set Up The Camera
WARNING: Install the camera securely. ● When installing the VB-C50iR on the ceiling, contact your Canon dealer. ● When installing the VB-C50iR on the ceiling, check that the ceiling is strong enough to bear the weight of the VB-C50iR including the mounting plate. Installation in a weak location could result in the VB-C50iR falling and causing serious injury. -
Page 33: Using The Wide Converter
Using the Wide Converter (VB-C50i) The optional Wide Converter WL-37 can be used to provide wide-angle shots (approx. 0.74× the normal focal distance). Mount the wide converter correctly so that it is level and fitted securely onto the camera. When mounted correctly, the wide converter should turn roughly 3 times before stopping. -
Page 34: Connect The Camera To The Network
2. Connect the Camera to the Network Next, connect the camera. Connect the camera to the network by connecting the camera and PC via the hub with a LAN cable . * Do not plug the AC cable power plug into the wall socket yet. AC cable Turning the Power ON and OFF The VB-C50i/VB-C50iR itself does not have a power switch. -
Page 35: Perform Initial Settings For The Camera
3. Perform Initial Settings for the Camera Once your PC and the camera are connected, perform the initial settings next. The instructions here follow on from “2. Connect the Camera to the Network”, where one camera is connected to a PC as an example. Installation Example VB-C50i LAN cable... - Page 36 3. Perform Initial Settings for the Camera 3. The camera connected to the network is automatically detected and its MAC address, IP address and model name are displayed. The factory default setting is: IP address : 192.168.100.1 The MAC address can be found on the white label attached on the bottom of the unit.
- Page 37 5. A setup progress window appears and your settings will be saved. ● Set the IP address to a value that suits your environment. ● Where the IP address has been automatically obtained from the DHCP server, you Note cannot change the IP address setting from the VB Initial Setup Tool. Change the IP address from the Network Settings page (→...
-
Page 38: Check Operation Of The Camera
4. Check Operation of the Camera When you have completed the initial setup, check that the VB-C50i/VB-C50iR works normally. Use the sample page to simplify checking. 1. Select the MAC address you want to check operation of and then click the “Open Test Page”. -
Page 39: Install The Software
5. Install the Software You must install software to display images from the camera and to manage the camera. There are 3 types of software you can install. • VB Administration Tools: Software for managing the camera (→ P.4-2). • Viewer for PC: Software for displaying images from the camera (→ P.2-12). •... -
Page 40: Viewer Software Overview
Viewer Software Overview By using the Viewer software, you can view images sent from the VB-C50i/VB-C50iR on a PC, as well as control the camera. Below is an outline of the Viewer software. For details, please refer to “Viewer Overview” (→ P.5-4) or to the Viewer Software User’s Manual (Viewer-E.pdf) on the CD- ROM. -
Page 41: Chapter 3 Basic Settings
Chapter Basic Settings This chapter describes the basic settings for the VB-C50i/ VB-C50iR such as network connection, camera control, date and time setting and mail. Be sure to perform these settings after setting up. * The VB Administration Tools (→ P.4-2) described in Chapter 4 provide a convenient way to set view restrictions as well as presets. -
Page 42: What Can I Do On Each Of The Settings Pages
What Can I Do on Each of the Settings Pages? Proceed to each of the settings pages from the Settings Title Page where you can perform various settings for the VB-C50i/VB-C50iR. The settings you can perform on each of the pages are shown below. -
Page 43: Accessing The Settings Title Page
Accessing the Settings Title Page The various settings on the VB-C50i/VB-C50iR are specified by using a browser to access Web pages on the VB-C50i/VB-C50iR. To begin with, access the Settings Title Page. This manual uses the IP address 192.168.100.1 (the factory default setting) below as an example to describe the detail settings. -
Page 44: Settings Title Page
Settings Title Page From the Settings Title Page, you can move to each settings page, confirm the settings after changing, and save the changes to the VB-C50i/VB-C50iR’s memory or restart. 1 “Back to top” button Click “Back to top” to move to the top page of the camera server. 2 “Japanese”... -
Page 45: Setting Up The Administrator Password And Ethernet Etc
Setting Up the Administrator Password and Ethernet etc. (System and Network) You can perform the following settings with System and Network. ●Root Account: For setting up passwords. ●Ethernet: For setting up IP addresses and other settings necessary for connection to the network. ●Connection Keeping: For setting up the function whereby packets are periodically transmitted and there is automatic dial-up by the router so that the connection with the network is not broken. - Page 46 Setting Up the Administrator Password and Ethernet etc. (System and Network) Ethernet 1 “Address Setting Method” Select an address setting method from “Auto Setting (DHCP)” or “Manual Setting”. If you select “Auto Setting (DHCP)”, you can use the values automatically obtained from the DHCP server for “IP Address”, “Subnet Mask”...
-
Page 47: Setting Camera Control, Image Size And Quality (Camera And Video)
Setting Camera Control, Image Size and Quality (Camera and Video) You can perform the following settings with Camera and Video. ●Video Capture: For setting image size and quality. ●Camera Control: For setting the camera shutter speed, focus, home position and view restrictions. -
Page 48: Camera Control
Setting Camera Control, Image Size and Quality (Camera and Video) if the subjects move quickly and sharply, you may encounter comb-shaped blurs in the video. “Bob” is more effective for quickly moving subjects. 4 “Use External Video Input” You can use an external video input connected to the Multi-Terminal Module VB-EX50 with the switching method (→... - Page 49 Setting Camera Control, Image Size and Quality (Camera and Video) ● The camera may have difficulty focusing automatically on subjects of the type shown below. Note Subjects with little or no contrast (a white wall, for example) Subjects that consist entirely of oblique or horizontal lines or stripes Quickly moving subjects ●...
- Page 50 Setting Camera Control, Image Size and Quality (Camera and Video) 3 “Home Position” Specify a home position for the camera. “Pan” Set the pan position of the camera. “Tilt” Set the tilt position of the camera. “Zoom” Set the value for the camera’s angle of zoom. “Brightness”...
- Page 51 Setting Camera Control, Image Size and Quality (Camera and Video) ● Controllable range and shootable range are shown below. Extent of pan control Maximum horizontal extent of the video capture range ● Pan and tilt range varies with the zoom ratio (field of view angle). When you set the view restriction, the angles of camera movement are...
- Page 52 Setting Camera Control, Image Size and Quality (Camera and Video) Camera Names 1 “Camera Name” Used in the camera selection box on the viewers. This setting is required. 3-12...
-
Page 53: Presetting Best Shot (Preset)
Presetting Best Shot (Preset) You can perform the following settings with Preset. ●Common Settings: For setting the tour schedule of present position. ●Preset 1-20: Register as many as 20 best shot angles as preset positions. When you have made changes to the settings, click the “OK” button to return to the Settings Title Page. - Page 54 Presetting Best Shot (Preset) 1 “Restrict Camera Control to Presets” Camera control by using the Viewer for PC and the Viewer for Java can be restricted to the preset angles specified in Preset 1-20. “Auto Preset Tour” Select a Preset Tour setting from the following options. “Not used”...
- Page 55 Preset 1-20 1 “Application” Use these options to specify whether this preset can be used only for picture recording or is also made available in the viewers. If it is also provided in the viewers, always specify the preset name. 2 “Preset Name”...
-
Page 56: Setting Up The Http, Camera And Audio Servers (Server)
Setting Up the HTTP, Camera and Audio Servers (Server) You can perform the following Settings with Server. ●Common Settings: For setting up the environment where users can connect to the VB-C50i/VB-C50iR. ●HTTP Server: For setting web page distribution and managing the VB-C50i/ VB-C50iR. -
Page 57: Http Server
HTTP Server 1 “HTTP Port” Set the TCP port number for the HTTP. Enter a value between 1 and 65535. The default setting is 80. 2 “Global Address for Web Pages” If a private address has been set in the VB-C50i/VB-C50iR and you want to use the router’s NAT functions to have a fixed global address for the VB-C50i/VB-C50iR (→... - Page 58 Setting Up the HTTP, Camera and Audio Servers (Server) Camera Server 1 “Video Transmission Port” Set the TCP port number for the video transmission protocol. Enter a value between 1 and 65535. The default setting is 65310. Normally, there is no need to change this setting. 2 “Camera Control Port”...
- Page 59 Audio Server 1-5, 8 are only displayed with two particular models (→ P.iii). 1 “Audio Transmission” Set “Audio Transmission” to “Used” to send audio to the Viewer for PC or Admin Viewer, that is input into the microphone connected to the Multi-Terminal Module (→ P.1-12). 2 “Input Volume”...
- Page 60 Setting Up the HTTP, Camera and Audio Servers (Server) 6 “Audio Reception” Set “Audio Reception” to “Used” to receive audio which has been sent from the Admin Viewer and output to the speaker with amp connected to the Multi-Terminal Module (→ P.1-12). 7 “Output Volume”...
-
Page 61: Setting User Access Privileges (Access Control)
Setting User Access Privileges (Access Control) You can perform the following settings with Access Control. ●Authorized User Account: Register users who may connect to the VB-C50i/VB-C50iR. ●Authorized/Restricted Host Specification: Control whether a specific host is to have access or not. When you have made changes to the settings, click the “OK”... - Page 62 Setting User Access Privileges (Access Control) Authorized/Restricted Host Specification 1 “Host List” In this Host List, you can in detail whether of how access from the hosts is permitted or denied. See the next page for the description format. 2 “Apply this list to HTTP server” When this is selected, the Host List is applied to the host that can access the HTTP server.
- Page 63 The Host Restriction function applies to hosts running client applications such as viewer. Access restrictions are imposed using a list made up of one or more entries written using the format described below. Listing Format [!] addr [-addr2] ● “addr” is written in standard IP address format. ●...
-
Page 64: Setting The Date And Time (Date And Time)
Setting the Date and Time (Date and Time) You can perform the following settings with Date and Time. ●Current Camera Time: Displays the time set up for the camera. ●New Camera Time: For setting up the time on the VB-C50i/VB-C50iR. ●Time Zone: Select the appropriate time zone from the list. -
Page 65: Time Zone
New Camera Time 1 “Synchronize with computer time” Set to the date and time of the PC currently accessing the VB-C50i/VB-C50iR via a Web browser. 2 “Set manually” Select this item when the date and time are to be manually entered. In the Date field, enter the year, month and day in yyyy-mm-dd format;... -
Page 66: Setting Up Name Server Address And Mail Etc. (Miscellaneous)
Setting Up Name Server Address and Mail etc. (Miscellaneous) You can perform the following settings with Miscellaneous. ●DNS: Register the Name Server Address and Host Name for registering host names such as Mail Server Host. ●Mail: For setting up the mail addresses which are to receive recorded pictures and log messages. - Page 67 Setting Up Name Server Address and Mail etc. (Miscellaneous) Mail 1 “Mail Server Host” Specify the SMTP server. 2 “Sender’s (From) Mail Address” Specify the mail sender. 3 “Recipient (To) Mail Address” Specify the mail recipient. 4 “POP before SMTP” Select if the mail host server requires POP user authentication.
- Page 68 Setting Up Name Server Address and Mail etc. (Miscellaneous) External Device Names 1 “External Input Device 1-2” “Device Name” To distinguish between the different external devices connected to the Multi-Terminal Module, be sure to enter a device name. Enter a device name consisting of up to 15 alphanumeric characters.
-
Page 69: Using The Administration Tools (Administration Tools)
Using the Administration Tools (Administration Tools) You can use the following items with the Administration Tools. ●On-board File System Information: Displays the status of VB-C50i/VB-C50iR’s memory. ●Recorded Picture and Audio data* Information and Manipulation: Displays the status of pictures and audio* recorded in the VB-C50i/VB-C50iR and deletes recorded pictures and audio*. - Page 70 Setting Up the Administration Tools (Administration Tools) Miscellaneous 1 “View Log Events” Click the “View” button to see the historical log files of the VB-C50i/VB-C50iR’s operation, such as connection with viewers, etc. 2 “View Current Settings” Display a list of current settings. 3 “Reboot”...
-
Page 71: Chapter 4 Vb Administration Tools
Chapter VB Administration Tools Chapter 4 describes practical ways of operating the VB-C50i/ VB-C50iR using the VB Administration Tools to create panoramas, set view restrictions, set presets and schedules, view logs and use the Admin Viewer. Review the necessary basic settings in Chapter 3 before proceeding to Chapter 4. * Although view restrictions and presets can be set by following the procedures described in Chapter 3, the VB Administration Tools provides more visual-based and easy... -
Page 72: Overview Of Vb Administration Tools
Overview of VB Administration Tools VB Administration Tools comprises “VBAdmin Startup Panel”, “Panorama Creation Tool”, “View Restriction Tool”, “Preset Setting Tool”, “Schedule Setting Tool”, “Log Viewer” and “Admin Viewer” applications. Operations such as setting the VB-C50i/VB-C50iR or viewing pictures from a remote location with special privileges, checking operating status or obtaining logs are easily performed through the Internet or an intranet. -
Page 73: Vbadmin Startup Panel
VBAdmin Startup Panel (→ P.4-5) This is the main panel of VB Administration Tools. The tools are started up from this panel. Install VB Administration Tools first from the supplied CD-ROM. Panorama Creation Tool (→ P.4-7) This tool is used to take and create panorama pictures displaying the full view of the area photographed by the VB-C50i/VB-C50iR. - Page 74 Overview of VB Administration Tools Schedule Setting Tool (→ P.4-27) With the Schedule Setting Tool you can set up the following services to perform automatically on a specified day or time. ● Timer: Records pictures and audio* into the VB-C50i/VB-C50iR and performs Audio Playback at specified times.
- Page 75 Starting Up VB Administration Tools ○ ○ ○ ○ ○ ○ To Start Up... 1. Double-click the “VB Admin Tools” desktop icon or select “VB Admin Tools” from the “Start” menu. 2. The Server Setting dialog box appears. To use VB Administration Tools, it must first be connected to the VB-C50i/VB-C50iR. Enter the required information in the fields and click the “OK”...
-
Page 76: Log Viewer
Starting Up VB Administration Tools u FTP To use the Panorama Creation Tool and the Log Viewer of the VB Administration Tools, it is necessary to connect to the VB-C50i using FTP to perform various settings. Select either “PASV mode” or “PORT mode”. •... - Page 77 Panorama Creation Tool The Panorama Creation Tool is used to take and create panorama pictures from the VB-C50i/ VB-C50iR. Once created, the panorama pictures can be viewed when accessed from the viewer. The Panorama Creation Tool is used to take and create panorama pictures and save them in the VB-C50i/VB-C50iR.
-
Page 78: Panorama Creation Tool
Panorama Creation Tool Panorama Creation Tool Display Screen An overview of the functions of the GUI displayed when the Panorama Creation Tool starts up is shown below. q “Display Connect Information” button Displays the VB-C50i/VB-C50iR’s connection information in a dialog box. w “Reload Camera Information”... -
Page 79: Capturing Panorama Pictures
Since the range that can be captured varies with the type of camera, the display ranges of the panorama pictures are different. VB-C50i panorama picture Capturing Panorama Pictures The entire panorama picture area is displayed during capturing. If the VB-C50i/ VB-C50iR is accessed from the viewer and pictures are viewed, even when view Note restrictions (→... -
Page 80: Updating/Deleting Panorama Pictures
Panorama Creation Tool 3. When capturing ends and the picture is satisfactory, click the “OK” button. Panorama creation can be discarded, or the AE lock position or backlight adjustment settings can be changed by clicking the “Cancel” button. When clicked, the captured picture is discarded and the initial screen returns (→... -
Page 81: Reconnecting
Reconnecting Reconnections are made when a connection with the VB-C50i/VB-C50iR has been cut. ○ ○ ○ ○ ○ ○ To Reconnect... 1. Choose “Reconnect” from the “File” menu bar. Opening a Panorama Picture from a Picture File/Saving a Panorama Picture as a Picture File You can open a picture file as a panorama image as well as save a panorama picture you have taken as a picture file. - Page 82 View Restriction Tool The View Restriction Setting Tool enables you more visually and easily to set limits on the video which can be seen by users. A View Restriction is set up with the mouse while referring to a panoramic preview. The View Restriction Tool lets you easily set view restrictions in cases where you want to set restrictions on...
-
Page 83: View Restriction Tool
View Restriction Tool Display Screen An overview of the functions of the GUI displayed when the View Restriction Tool starts up is shown below. q “Load Settings” button Loads the view restriction settings set in the VB-C50i/VB-C50iR. w “Save Settings” button The View Restriction setting value set and applied with this tool is saved to the VB-C50i/VB-C50iR. - Page 84 View Restriction Tool t Camera Selection box Another camera cannot be selected with the VB-C50i/VB-C50iR. y “Apply the view restriction” View restriction settings are applied when this item is selected. u View Restriction Value Input boxes and “Get Value” button The view restriction settings can be edited by entering values in the View Restriction Value Input boxes.
-
Page 85: Setting View Restrictions
Setting View Restrictions You can set up a view restriction by either entering a value in the view restriction setting input box or by using the following 2 methods. Select the way which suits your environment or according to your preference. ■... - Page 86 View Restriction Tool Retrieving Values from the Camera Angle of the Admin Viewer and Changing Settings Admin Viewer can be used to set the view restriction while confirming camera images. ○ ○ ○ ○ ○ ○ To Make Settings... 1. Select “Apply the view restriction”. 2.
- Page 87 The Panorama Preview may be slightly different from the actual picture. After the view restrictions have been set, please check to be sure that the view restrictions are Note correctly reflected in the Viewer. When checking from the Admin Viewer, choose “View Restriction”...
- Page 88 Preset Setting Tool The Preset Setting Tool enables you more visually and easily to set Presets and home position. Presets are set by operating the mouse while referring to a panoramic preview. You can also enter settings for a Preset Tour with which you can tour and monitor two or more Presets within a specified start and end time.
-
Page 89: Preset Setting Tool
Preset Setting Tool Display Screen The display screen for the Preset Setting Tool is divided into the “Preset Settings Area” and the “Preset Tour Settings Area”. A maximum of 20 Presets and home positions can be set by referring to a panoramic preview. In the “Preset Tour Settings Area”, you can enter settings for a Preset Tour with which you can tour and monitor two or more presets within a specified start and end time. - Page 90 Preset Setting Tool t Preset Selection box Select the preset to set or “Home”. “Home” is the setting for home position. y “For picture recording only” When this is checked, presets are used for picture recording only; when it is not checked, presets can be used not only for picture recording but for the viewer as well.
-
Page 91: Setting Presets
Setting Presets You can set up Presets by either entering a value in the camera parameters or by using the following 2 methods. Select the way which suits your environment or according to your preference. Changing Settings from the Preset Preview Frame The Preset Preview frame on the panorama picture can be used to set presets. - Page 92 Preset Setting Tool Retrieving Values from the Camera Angle of the Admin Viewer and Changing Settings Start up Admin Viewer and set the camera angle as a preset. ○ ○ ○ ○ ○ ○ To Make Settings... 1. From the Preset Selection box, select the preset to be set, and enter the “Preset Name”.
- Page 93 ● You can set a maximum of 20 presets. ● Changes in the preset settings are not reflected to the viewer while it is connected. ● If view restrictions are to be used, be sure that the Preset Preview Frame (yellow) does not protrude outside the View Restriction Frame (blue).
-
Page 94: Preset Tour
Preset Setting Tool Preset Tour A Preset Tour can tour and monitor two or more specified Presets. You can also set Preset Tour with “Presetting Best Shot” in Chapter 3, “Basic Settings” (→ P.3-13). Preset Tour Settings Area Display Screen q Tour Schedule list Displays a list of the presets which have Preset Tour settings. - Page 95 o Speed (Z) Sets the speed at which the camera moves when zooming, within a range of 1-8. By moving the slide bar from left to right, the numeric value becomes larger and the speed increases. !0 Pause (sec) Sets the time for which the camera pauses in the preset position, within a range of 0-120 seconds in units of five seconds.
- Page 96 Preset Setting Tool Setting Preset Tour ○ ○ ○ ○ ○ ○ To Make Settings... 1. Select an option from Auto Preset Tour. Select either “For Viewers” or “Always”. 2. Select the preset number you want to add to the Tour Schedule from the Preset setting area and click the “Add”...
- Page 97 Schedule Setting Tool With the Schedule Setting Tool, you can set up Timer, Motion Detection, Night Mode, External Device Input and External Device Output services to perform automatically on a specified day of the week or time of the day. You can set the start and end time and the content of the service on the calendar in the Schedules Setting screen.
-
Page 98: Schedule Setting Tool
Schedule Setting Tool Schedule Setting Tool Display Screen (Toolbar) There are two kinds of Schedule settings, Normal Schedule and Special Schedule. The buttons in the toolbar below can be used for both Normal and Special Schedules. With these buttons, you can load and save setting information, stop communication, select Normal schedule (→... -
Page 99: Normal Schedule
Normal Schedule With Normal Schedule, you can set up a schedule of one week from Sunday to Saturday. For example, during the weekend when there is nobody in the office from 6:00pm on Friday to 9:00am on Monday, the Motion Detection service will operate each week during the period of time you have specified and automatically monitor the office. - Page 100 Schedule Setting Tool Setting Up a Normal Schedule ○ ○ ○ ○ ○ ○ To Make Settings... 1. With the Normal Schedule displayed, select an optional schedule number. The schedule track for the number you have selected is displayed in the weekly calendar. At this stage, the correct start and end time and services are not set up in the schedule track.
- Page 101 ● On Weekly setting, if you specify the same time and the same day in start and end time, end time will be the same time in the following week, and the schedule is applied to all time periods. ● On Weekly setting, if you specify the same start and end time, the end time will be on the following day at the same time.
- Page 102 Schedule Setting Tool 6. When you have completed setting the sub- schedule tracks, click “OK” button. If you want to set two or more schedule tracks, select another number in the schedule selection checkbox, and make settings in the same way. ●...
-
Page 103: Special Schedule
Special Schedule With Special Schedule, you can set up a schedule on one specific day of the week. For example, on a public holiday when there is nobody in the office, set up a service to automatically monitor the office. Special Schedule Display Screen q Set Special Day selection box Select the special day you want to register from special days A-D or select “Erase Special... - Page 104 Schedule Setting Tool Setting Up a Special Schedule ○ ○ ○ ○ ○ ○ To Make Settings... 1. With the Special Schedule displayed, select from the Special Day selection box the Special Day you want to register in the Schedule. Click the date on which you want to register a Schedule and the Special Day you have selected is registered.
- Page 105 3. Double-click the sub-schedule track. The Special Schedule Settings dialog box appears. Enter settings for the schedule. 4. Enter the name of the Special Day Schedule. You can enter a maximum of 15 characters for the Special Day Schedule. The schedule name you enter here is the name for the Special Day schedule (A–D), which is different from the Sub-schedule name.
- Page 106 Schedule Setting Tool 7. When you have completed setting the sub- schedule tracks, click “OK” button. If you want to set two or more special days, select another special day from the Special Day selection box, and make settings in the same way. ●...
-
Page 107: Resetting Schedule Settings
8. Once all the schedules have been set, click the “Save Settings” button in the Schedule Setting screen to save the schedules. ● If you have set up a Normal Schedule (→ P.4-29) and a Special Schedule with the same start and end time, the Special Schedule will have priority over the Normal Schedule. -
Page 108: Setting Up Service
Schedule Setting Tool Setting Up Service Set up the services to be performed in the schedules. To open the settings screen for each service, in the “Service” tab in the Schedule Setting screen, select the service you want to set up, select a setting number and click “Detail”. -
Page 109: Timer Setting Tool
Timer Setting Tool The section below describes the “Picture Recording” function that takes still images and records audio* at specified times and records them in the VB-C50i/VB-C50iR. It also describes the “Audio Playback” function that plays back audio. Only available with two particular models (→ P.iii) Timer Setting Tool Display Screen q “Load Settings”... - Page 110 Schedule Setting Tool i Repetition Interval Sets the interval between repeated image recording. Repetition Interval can be set to a maximum of 23 hours, 59 minutes and 59 seconds. If you set Repetition Interval to 0, a still image is only recorded once at the start of the scheduled time.
- Page 111 Setting Up Picture Recording ○ ○ ○ ○ ○ ○ To Make Settings... 1. With the Schedule Setting Tool, open the Timer Setting Tool. In the Service tab of the Schedule Setting screen for a Normal or Special Schedule, check “Timer”, select a setting number and click the “Detail”...
-
Page 112: Motion Detection Setting Tool
Therefore, we recommend that you not use these functions for monitoring or other purposes if consistently high levels of reliability are required. Canon accepts no liability whatsoever for faults, etc. resulting from the use of the Motion Detection and automatic tracking Functions. - Page 113 t Camera Selection box For selecting a camera. y Viewer For picture display and camera control in the same way as a normal viewer. u Motion detection area frame Displays with a dotted frame the area within which motion is to be detected. The frame can be reshaped and moved by dragging the mouse.
- Page 114 Schedule Setting Tool 2. Set the camera frame rate and the camera position for detection (See the “Camera” tab → P.4-44). 3. Set the detection area (See the “Area” tab → P.4-45). 4. Set the sensitivity of the motion detection at what degree of variation in the image activates the motion detection (See the “Area”...
- Page 115 The frame rate specified in the “Maximum Frame Rate” (→ P.3-18) must be higher than the one specified using this tool. Note ● When the network traffic is high, the specified frame rate may not be achieved. ● When a slow frame rate is set, motion detection is applied to images sampled from the captured video.
- Page 116 Schedule Setting Tool r “Auto” button The “Auto” button sets sensitivity automatically. For several seconds after clicking the “Auto” button, the VB-C50i/VB-C50iR assumes that there is no motion in the image in the motion detection area and, based on this information, sets the camera at optimum sensitivity. Set when there is no motion. t Detection indicator Displays the area ratio of motion detected by the device in real time in the form of a graph (→...
- Page 117 5. Enter picture recording settings when the device detects motion (Recording tab). Enter the settings for picture recording time and recording interval when the device detects motion (ON event) or when the device no longer detects motion (OFF event). q “Recording at ON event” Check for picture recording when the device detects motion (ON event).
- Page 118 Schedule Setting Tool 6. Enter the settings for output to an external device when the device detects motion (Output tab). * The settings in this step are optional. Set output to an external device when the device has detected motion (ON event) or when the device has finished detecting motion (OFF event).
- Page 119 8. Check motion detection status in the server. To confirm the operating level of motion detection with the settings you have made, check “Display motion detection status of the server”. Motion detection status is displayed as the icon below. You cannot save the settings with “Display motion detection status of the server” checked. Remove the check to save the settings.
- Page 120 Schedule Setting Tool Motion detection status and screen display (Area ratio for motion) Set value or above Below set value Indicator color Detection results When the situation where the motion has exceeded the area ratio continues for longer than the time set in “Duration”, the VB-C50i/VB-C50iR detects motion and a peak block appears.
- Page 121 Setting the motion detection level while checking recorded images To set the level of motion detection at motion detection is activated, it is useful to make adjustments to settings while checking actual actions in the Viewer. Because with the device you can set the level of motion detection by checking in Video Mode the pictures recorded in Live Mode (→...
-
Page 122: Night Mode Setting Tool
Schedule Setting Tool Night Mode Setting Tool Below is a description of the Night Mode function with which you can take pictures in dark conditions. Night Mode Setting Display Screen q “Load Settings” button Loads the Night Mode settings currently set in the VB-C50i/VB-C50iR. w “Save Settings”... - Page 123 Setting Up Night Mode ○ ○ ○ ○ ○ ○ To Make Settings... 1. With the Schedule Setting Tool, open the Night Mode Setting Tool. In the Service tab of the Schedule Setting screen for a Normal or Special Schedule, check Night Mode, select a setting number and click the “Detail”...
-
Page 124: External Device Input Setting Tool
Schedule Setting Tool External Device Input Setting Tool Below is a description of the External Device Input function which performs video recording when a signal from an external device connected to the Multi-Terminal Module (→ P.1-12) such as a sensor is sent to the VB-C50i/VB-C50iR. External Device Input Setting Tool Display Screen q w e q “Load Settings”... - Page 125 o Pre-event Recording Time (sec.) and Interval Enter the required number of seconds, within a range of 0-10 seconds for picture recording before an ON and/or OFF event. Also enter an interval for performing picture recording, within a range of 0.1-1.0 seconds. !0 Post-event Recording Time (sec.) and Interval Enter the required number of seconds, within a range of 0-10 seconds for picture recording following an ON and/or OFF event.
- Page 126 Schedule Setting Tool 3. Specify the Audio Playback operation settings. Check “Playback at ON event” or “Playback at OFF event” and select the playback sound clip name and volume. For registering and deleting audio files, see “Audio Playback Settings dialog box” (→...
-
Page 127: External Device Output Setting Tool
External Device Output Setting Tool The section below describes the output settings to an external device connected to the Multi- Terminal Module (→ P.1-12). External Device Output Settings Tool Display Screen q w e q “Load Settings” button Loads the External Device Output settings currently set in the VB-C50i/VB-C50iR. w “Save Settings”... - Page 128 Schedule Setting Tool Setting Up External Device Output ○ ○ ○ ○ ○ ○ To Make Settings... 1. With the Schedule Setting Tool, open the External Device Output Setting Tool. In the Service tab of the Schedule Setting screen for a Normal or Special Schedule, check Output1-3 in External Device Output, select a setting number and click the “Detail”...
- Page 129 Relationship between ON and OFF events and picture/audio recording* * Only available with two particular models (→ P.iii) Picture Recording Audio recording The figures below show the methods (A-D) of picture and audio recording that use motion detection and external device input based on the timing of ON and OFF events. A: Pre-event recording for an ON event Pictures: For 0-10 seconds at intervals of 0.1-1.0 seconds Audio: For 0-10 seconds...
- Page 130 Schedule Setting Tool E-mail Notification Settings dialog box When pictures have been recorded, you can send the recorded picture and data in an e-mail. Settings for sending mail messages are performed in the E-mail Notification Settings dialog box. Select E-mail Notifications Settings from Tools in the menu bar in the Motion Detection Setting screen or External Device Input Setting screen and the dialog box appears.
- Page 131 Audio Playback Settings dialog box To play back audio, you have to register the audio file you want to play back. Settings for registering or deleting audio files are performed in the Audio Playback Setting dialog box. Select “Audio Playback Settings” from Tools in the menu bar in the Timer Settings screen, Motion Detection Setting screen or External Device Input Setting screen and the dialog box appears.
-
Page 132: Log Viewer
Log Viewer The Log Viewer is a tool for downloading log files, and viewing and managing the operating status of the device. The Log Viewer provides monitoring of illegal access and a way of dealing with errors etc. ● The Log Viewer is only for viewing logs and cannot be used to delete logs. ●... -
Page 133: Viewing The Log
Viewing the Log The following content is displayed in the log. ● Code The log displays error codes. For error codes, refer to Log Messages (→ P.7-4). Error codes are displayed with one of 4 types of icons according to level. Information level Warning level ●... - Page 134 Log Viewer Using Selection Criteria to Display Logs Logs can be filtered according to error type, code, or date and time so that only the required information is displayed. ○ ○ ○ ○ ○ ○ To Make Settings... 1. Choose “Filter” from the “View” menu bar. 2.
- Page 135 Admin Viewer Admin Viewer is a viewer which has functions for managing the VB-C50i/VB-C50iR. It has special privilege functions that the Viewer for PC and Viewer for Java do not have, such as exclusive access to camera control functions, and external device and motion detection operation. This viewer is used when setting view restrictions and presets.
-
Page 136: Admin Viewer
Admin Viewer Starting Up Admin Viewer ○ ○ ○ ○ ○ ○ To Start Up... 1. Click the “Admin Viewer” on the VBAdmin Startup Panel or double-click the “Admin Viewer” icon on the desktop. When the Admin Livescope window appears, click the File then the Connect. The “Camera server address setting”... - Page 137 Displaying and Saving the External Device Input and Motion Detection Status The external device input and motion detection status can be displayed and, when required, saved as a log. ○ ○ ○ ○ ○ ○ To Make Settings... 1. Choose External Device Input from the Privilege menu bar.
-
Page 138: Enabling/Disabling View Restrictions
Admin Viewer Enabling/Disabling View Restrictions View restrictions can be enabled or disabled when controlling the camera. ○ ○ ○ ○ ○ ○ To Make Settings... 1. Choose either “ON” or “OFF” from View Restriction in the Privilege menu bar. Operating a Camera The Admin Viewer provides camera control methods not available in the Viewer for PC or Viewer for Java. - Page 139 Clicking the Screen to Control the Camera You can control the pan, tilt and zoom operations by clicking and holding the mouse in the viewer to start and releasing the mouse to stop. ○ ○ ○ ○ ○ ○ How to Operate and Set Up 1.
-
Page 140: Camera-Specific Functions
Admin Viewer Camera-Specific Functions You can set up camera-specific features such as settings for exposure, digital zoom and night mode. ○ ○ ○ ○ ○ ○ How to Operate and Set Up 1. Click the “Camera-specific features” button on the toolbar. 2. -
Page 141: Sending And Receiving Audio
Sending and Receiving* Audio You can send and receive* audio with the VB-C50i/VB-C50iR through the speakers and microphone* installed on the optional Multi-Terminal Module on the camera. Below are settings for sending and receiving audio* by the administrator. Only available with two particular models (→ P.iii) Sending Audio Perform settings for an administrator to send audio to the VB-C50i/VB-C50iR. - Page 142 Admin Viewer ● The “Microphone setting” button will not appear in the following cases. • If Audio Reception has not been set to “Used” in the Audio Server settings page (→ P.3-19). • If “Send and receive audio data” in the “Connection Settings” tab in the Setup properties dialog box is not checked.
-
Page 143: Shade Correction
Shade Correction If the background of an image is bright, making the subject difficult to see, you can adjust the contrast of the darker areas to make it easier to see. Unlike backlight compensation, the shade correction feature allows image processing without adversely affecting the existing lighter regions. ○... -
Page 144: Restoring The Default Exposure And Focus Settings When Closing The Admin Viewer
Admin Viewer Restoring the Default Exposure and Focus Settings When Closing the Admin Viewer When you use manual exposure in the camera-specific functions (→ P.4-70) or manual focusing in the advanced camera controls (→ P.4-68), you can specify that the exposure and focus settings revert to their defaults (Auto exposure and Auto focus) when you close the Admin Viewer. -
Page 145: Chapter 5 Creating Web Pages For Video Distribution
Chapter Creating Web Pages for Video Distribution This chapter describes how to use the VB-C50i/VB-C50iR to webcast information. Picture data can be distributed in various ways, including displaying video or still pictures and displaying multiple images on a Web page. -
Page 146: Web Pages For Video Distribution
Web Pages for Video Distribution To distribute picture data by VB-C50i/VB-C50iR, you create a dedicated Web page. The viewers that can be used with the VB-C50i/VB-C50iR are “Viewer for Java (with or without camera control function)” and “Viewer for PC”, and detailed parameters can be specified for each of these. You need to determine which of these viewers is supported and create the Web page for the viewer. - Page 147 Web Pages for Video Distribution The VB-C50i/VB-C50iR includes a built-in Web server. If the content of the Web pages used for distributing videos is stored onto the flash memory in the VB-C50i/ Note VB-C50iR, the VB-C50i/VB-C50iR can be used by itself for distributing Web pages and videos over the Web.
-
Page 148: Viewer Overview
Viewer Overview There are 2 types of viewers: the Viewer for Java and the Viewer for PC. For a detailed explanation of the Viewers, please refer to “Viewer Software Overview” (→ P.2-12) or to the Viewer Software User’s Manual (Viewer-E.pdf) on the CD-ROM. Viewer for Java The Viewer for Java provides 2 types of viewers: LiveApplet containing video display and camera control functions, and Glimpse containing a video display function. -
Page 149: Viewer For Pc
Viewer for PC The Viewer for PC provides video display and camera control functions. In addition to WebView- HTTP, the VB-C50i/VB-C50iR also supports Canon’s WebView-TCP transfer protocol. Panorama picture ● Viewer Software User’s Manual is provided on the CD-ROM supplied with the VB-C50i/VB-C50iR (Viewer-E.pdf). -
Page 150: Viewing Sample Pages
Viewing Sample Pages Ready-made video distribution sample pages are provided with the VB-C50i/VB-C50iR. Follow the procedure below to view these pages. Refer to these pages when creating your own Web pages. ○ ○ ○ ○ ○ ○ Viewing the Pages 1. -
Page 151: Using The Viewer For Java To Distribute Videos
Using the Viewer for Java to Distribute Videos This section describes how to use the Viewers for Java to provide videos. Application examples are also given. Using the Viewer for Java to Create a Web Page When you use the Viewer for Java, the viewer applet to be used must be incorporated into the Web page you provide. -
Page 152: Saving Web Page Data
Using the Viewer for Java to Distribute Videos Saving Web Page Data The VB-C50i/VB-C50iR is equipped with a Flash memory where Web page data can be saved. Data is saved by transferring the data files using FTP. The data is placed as a file under /usr/html/ local. -
Page 153: Example Of Using The Viewer For Java To Create A Web Page
Example of Using the Viewer for Java to Create a Web Page This section describes an example in which the Viewer for Java is used to create a Web page. Use this example to create your own original Web page. Embed the Viewer for Java, and Display a Text in a Separate Frame Writing IP Addresses Using the Web server functions built into the VB-C50i/VB-C50iR, IP addresses can... - Page 154 Using the Viewer for Java to Distribute Videos 1 sample.htm <html> <head> <title>SampleSite LiveApplet</title> </head> <frameset rows="70,*"> <frame src="header.htm"> <frame src="lvappl.htm"> </frameset> </html> 2 header.htm <html> <head> <title>LiveApplet comment</title> </head> <body> <center><h1>LiveApplet</h1></center> </body> </html> 3 lvappl.htm <html> <head> <title>LiveApplet</title> </head> <body>...
- Page 155 Using Glimpse and LiveApplet Together This section describes how to create a Web page that allows clients to use Glimpse to download quickly and view live video at a low frame rate, and then use LiveApplet to view video at a high frame rate and control the camera when they find videos they are particularly interested in.
- Page 156 Using the Viewer for Java to Distribute Videos 1 glimps.htm <html> <head> <script language="JavaScript"> <!-- function clicked(btn) { url = btn.name window.open(url,"LiveApplet","width=490,height=400") // --> </script> <title>Glimpse</title> </head> <body> <table> <form name="form"> <tr><td><center> <applet codebase="http://<_W_E_B_S_E_R_V_E_R_>/-wvdoc-01-/Glimpse/" code="Glimpse.class" archive="Glimpse.zip" width=160 height=120> <param name=cabbase value="Glimpse.cab"> <param name=url value="http://<_W_E_B_S_E_R_V_E_R_>/">...
- Page 157 Providing “LiveApplet” with Camera Control Restricted to Presets This section describes how to create a Web page that only displays preset operations and does not show the camera control GUI. <applet ... width=320 height=240> <param name=controller_style value="preset_only"> ... 1 1 specifies the camera control user interface. “normal”: The usual style.
- Page 158 Using the Viewer for Java to Distribute Videos Certain Images Specified Startup screen If no particular image is specified, the “connecting to hostname” (when the hostname parameter is specified) or “now connecting” animation is displayed at startup and the “disconnected hostname” (when the hostname parameter is specified) or “disconnected”...
- Page 159 Displaying the Host Name, Frame Count and Other Information on the Video Screen <param name=show_fps value="on"> <param name=show_counter value="on"> <param name=hostname value="CANON"> <param name=show_hostname value="on"> <param name=comment value="VB-C50i site"> <param name=show_comment value="on"> 1 specifies whether the frame rate is displayed on the screen.
- Page 160 Using the Viewer for Java to Distribute Videos Displaying Bitmap Images on the Video Screen <param name=superimpose value="/local/logos/newlogo.gif,0,0"> * The underlined portion “x,y” specifies the display position. When x,y = 0,0, the image is displayed in the top left corner. If “x,y” is omitted, the image is displayed in the center of the frame. Specifying the Background Color <html>...
-
Page 161: Viewer For Java Parameters
Viewer for Java Parameters You can specify applet parameters to provide an applet tailored to modify the behavior or appearance of applets. Refer to the table below to ensure that you thoroughly understand the parameters. LiveApplet Parameter Name Omissible Specifies whether or not connection to the camera server should be established at the same time that the applet starts up. - Page 162 Using the Viewer for Java to Distribute Videos Parameter Name Omissible gui_type hostname image_offset no_connect_msg open_image open_image_time overlay_font_color show_capture show_comment show_counter show_fps show_hostname show_logo show_panobutton show_toolbar superimpose too_many_msg video_width 5-18 Description Specifies whether the panorama window should be pop-up displayed or embedded in the page.
- Page 163 Glimpse Parameter Name Omissible Specifies whether or not connection to the camera server should be established simultaneously with applet startup. Specify either “on” or “off”. When “on”, a connection is established simultaneously with applet startup; auto_connect when “off”, no connection is established when the applet starts up and the character string specified for no_connect_msg is displayed.
- Page 164 Using the Viewer for Java to Distribute Videos Applet Tag Descriptions Attribute Name Omissible archive code codebase height width When specifying an address included in the codebase attribute of the applet tag and a URL parameter of the LiveApplet, specify one that can be accessed from the client’s PC.
-
Page 165: Using The Viewer For Pc To Distribute Videos
Using the Viewer for PC to Distribute Videos This section describes how to use the Viewer for PC to provide videos. Application examples are also given. If a client is using the Viewer for PC to receive videos, the video sender must set up the Web server and create the necessary wvh files. -
Page 166: Creating Wvh Files
Using the Viewer for PC to Distribute Videos Creating wvh Files This section describes how to create the wvh file required for launching the Viewer for PC application. 1. Use a text editor or similar program to create a new text file and type the following type of code in the file: (Example) 192.168.100.1 65310... -
Page 167: Example Of A Web Page Using The Viewer For Pc
Viewer for PC supports WebView Livescope protocol and HTTP protocol. ● WebView Livescope protocol: Cannot be viewed through firewalls. This protocol is primarily for clients who are connected directly to the Internet. ● HTTP protocol: In general, this protocol is used with Web browsers. By using this protocol, clients inside firewalls can view video by penetrating fire walls. -
Page 168: Distributing Videos Using A Browser Only
Distributing Videos Using a Browser Only You can also use the WebView-HTTP protocol to provide videos from the VB-C50i/VB-C50iR directly to a Web browser. Some example of this are described in this section. Displaying the Live Video at Access as a Still Picture When a client accesses the Web page that provides videos, the video shot at that point can be supplied as a still picture. -
Page 169: Displaying Live Video From A Specified Angle As Still Pictures
Displaying Live Video from a Specified Angle as Still Pictures By specifying the camera angle as a parameter in the HTML code beforehand, you can display the picture from a specified camera angle. The example below displays a still picture shot with the camera panned right by 40°... -
Page 170: Example Of Video Distribution Using One Global Address
Example of Video Distribution Using One Global Address One fixed global address is required if the VB-C50i/VB-C50iR is being used to distribute live videos on the Internet. An Internet service provider (ISP) that offers a single-address fixed global address service can be used. In this case, a router with NAT function is required. Example: In this example, we use the global address 192.168.1.10 assigned by the ISP. -
Page 171: Distributing Still Images To A Mobile Phone
Distributing Still Images to a Mobile Phone You can view still images and control the camera using the Web service of a mobile phone. You can easily create still image distribution pages for mobile phones with HTML which uses the command still.jpg. -
Page 172: Camera Control By Position Specification
Example of Creating a Screen for Distribution of a Still Image to a Mobile Phone Camera Control by Position Specification If you use the sample pages contained on the CD-ROM, you will be able to control the camera with the same absolute position specifications as Presets. To use the sample pages on the CD-ROM, send the files to the VB-C50i/VB-C50iR as described below. - Page 173 Example of Creating a Screen for Distribution of a Still Image to a Mobile Phone still.jpg parameters Command Specifies the camera when you switch between cameras. 1 is this camera, and camera_id 2 is an external camera. When there is no specification, you are deemed to have specified the current camera.
- Page 174 5-30...
-
Page 175: Chapter 6 Using The Picture Recording Function
Chapter Using the Picture Recording Function This chapter describes a couple of specific examples of the Picture Recording function using the VB-C50i/VB-C50iR. Still images and audio files can be automatically recorded using input from an external device, motion detection or schedule settings. -
Page 176: Using The Still Picture Recording Function Linked To An External Device
Using the Still Picture Recording Function Linked to an External Device By combining various sensors and switches to operate according to External Device Input settings, it is possible to construct a monitoring system that responds to external events. Still pictures are recorded in the VB-C50i/VB-C50iR’s memory (→... - Page 177 Using the Still Picture Recording Function Linked to an External Device ○ ○ ○ ○ ○ ○ ○ ○ ○ Sample Still Picture Recording Settings Settings specified on the “Camera and Video” page (→ P.3-7) Specify the appropriate settings for the VB-C50iR being used. Settings specified on the “Preset”...
-
Page 178: Using The Audio Playback/Recording* Function Linked To An External Device
Using the Audio Playback/Recording* Function Linked to an External Device * The Audio Recording function is available with two particular models (→ P.iii) By using the Audio Playback and audio recording* functions in the External Device Input settings, it is possible to construct a monitoring system that issues audio alert using previously saved sounds and captures video and audio* in response to external events. - Page 179 Using the Audio Playback/Recording Function Linked to an External Device ○ ○ ○ ○ ○ ○ Sample Settings Settings specified on the “Camera and Video” page (→ P.3-7) Specify the appropriate settings for the VB-C50iR being used. Settings specified on the “Preset” page (→ P.3-13) Set a camera angle that shoots the open doorway as Preset 1.
-
Page 180: With A Predetermined Schedule
Using the Still Picture Recording Function with a Predetermined Schedule By using the “Schedule” setting, you can construct a monitoring system that records pictures according to a predetermined schedule. Recorded still pictures are stored in the VB-C50i/VB-C50iR’s memory (→ P.3-29). Sample Application Using a Timer This is a monitoring system used in art galleries and similar facilities in which the exhibits are monitored. - Page 181 Using the Still Picture Recording Function with a Predetermined Schedule ○ ○ ○ ○ ○ ○ ○ ○ ○ Sample Still Picture Recording Settings Settings specified on the “Camera and Video” page (→ P.3-7) Specify the appropriate settings for the VB-C50iR being used. Settings specified on the “Preset”...
-
Page 182: Using The Motion Detection Function With A Predetermined Schedule
Using the Motion Detection Function with a Predetermined Schedule By running the motion detection function according to a schedule, you can construct a monitoring system that records pictures in accordance with a preset schedule and that operates in response to variations in the video image from the area covered by the camera. The recorded pictures are stored in the VB-C50i/VB-C50iR’s memory (→... - Page 183 Using the Motion Detection Function with a Predetermined Schedule ○ ○ ○ ○ ○ ○ ○ ○ ○ ○ Sample Still Picture Recording Settings Settings specified on the “Camera and Video” page (→ P.3-7) Specify the appropriate settings for the VB-C50iR being used. Settings specified on the “Preset”...
- Page 184 Using the Motion Detection Function with a Predetermined Schedule ● Next, set the sensitivity, area ratio and duration. To ensure that the event is not triggered by unrelated lighting changes or small movements, set the “Duration” parameter so that picture changes lasting a second or less are ignored and then set the “Area Ratio”...
-
Page 185: Using Vbcollector
Using VBCollector All audio-related features available using the VBCollector can only be used with two particular models of the VB-C50i/VB-C50iR (→ P.iii). Note VBCollector is a tool for collecting, display and playback still images and audio recorded using the VB-C50i/VB-C50iR recording function. The images and audio are recorded in response to input from external devices, timer settings or detected motion. -
Page 186: Installing Vbcollector
Using VBCollector Installing VBCollector As described in “Install the Software” in Chapter 2 “Setting up” (→ P.2-11), select Custom Installation to install VBCollector. Select “Programs” from the Start menu, then “WebView Livescope” and a shortcut will be created. When Using Older Versions of VBCollector Note ●... -
Page 187: Starting Up Vbcollector
● To uninstall VBCollector 3.0, use the VBCollector 3.0 Installer to uninstall the currently installed copy of VBCollector 3.0 and then cancel the subsequent installation process. If you use the Windows “Add or Remove Programs” feature to uninstall VBCollector 3.0, you will no longer be able to install VBCollector version 2.1 or earlier. - Page 188 Using VBCollector 2. Enter each item in the various fields and click the “OK” button. q Server Name Assign a name for recognizing the Server (optional). w Data Directory Enter the name of the folder in which downloaded data is to be saved, or click the “Browse” button to select a folder.
- Page 189 * Set the folder access privileges so that read and write operations can be performed from the download execution account to the folder in which VBCollector is installed (the default setting is C:\Program Files\Canon\WebView\VB\VBCollector\3.0). * Only users who have Administrator privileges can be registered.
-
Page 190: Registering Tasks
Using VBCollector Registering Tasks Adding a Task Add a new task for downloading images and audio. ○ ○ ○ ○ ○ ○ To Add a New Task... 1. To add a task, choose “New Task” from the “Task” menu bar. 2. - Page 191 “Monthly” Select if the task is to be executed every month on a certain day of the month. Set this day between 1 and 31. Or a day of the week for a certain week of the month can also be specified.
-
Page 192: Executing And Canceling Tasks
Using VBCollector Editing Tasks The details of a registered task can be edited. ○ ○ ○ ○ ○ ○ To Edit a Task... 1. In the Task View, select the task to be edited by clicking on its name, then choose “Edit Task”... - Page 193 Check Task Status During the execution of any task, the download status can be checked. ○ ○ ○ ○ ○ ○ To Check Task Status... 1. During the execution of a task, choose “Status” from the “Task” menu bar. Alternatively, select and right-click the task for which you want to display the status and select “Status”...
-
Page 194: Details Displayed On The Task View
Using VBCollector Details Displayed on the Task View The execution status can be checked on the Task View. ●Task Name The names that were specified at Task Settings are displayed here. The status of each task is displayed as an icon at the left of the name. Running Waiting Disabled... -
Page 195: Automatic Downloading By Notification
Automatic Downloading by Notification You will not be able to record image and audio data if there is insufficient space on the server. The VB-C50i/VB-C50iR can receive a low server capacity notification sent from the server when available space on the server falls below the value set, and automatically downloads the data to a specified PC, thereby increasing the available space on the server. - Page 196 Using VBCollector r “Apply” button Saves a change to the reception port number in the registry. If you make a change, a dialog box is displayed. Click “Yes” and the transmission port of each server is also changed. t “Server Setting” button Displays a dialog box with information about the selected server for editing (→...
-
Page 197: Viewing Recorded Images And Playing Back Recorded Audio
Viewing Recorded Images and Playing Back Recorded Audio Playing back of recorded audio can only be used with two particular models of the VB-C50i/VB-C50iR (→ P.iii). Note Data downloaded according to the task schedule is saved in the folders specified in the “Server Information”. - Page 198 Using VBCollector r “Toggle folder tree” button Switches between displaying and hiding the folder tree display area (!2 ) . t “Toggle data list” button Switches between displaying and hiding the list display area (!4 ) . y “Toggle thumbnail image” button Switches between displaying and hiding the thumbnail image display area (!3 ) .
- Page 199 being recorded are indicated by yellow and white highlighting alternately. !2 Folder tree display area Displays the data managed in the VBCollector Image Viewer in a folder tree format. !3 Thumbnail display area Shows the thumbnail images contained in the folder selected in the folder tree area or the thumbnail images associated with the data selected in the list display area.
- Page 200 Using VBCollector Viewing Detailed Data Information You can view the data information, enlarge and reduce images, and play back audio. ○ ○ ○ ○ ○ ○ ○ To View Data Information... 1. Double-click a thumbnail or data in the list display area.
- Page 201 ● Animation Images can be consecutively displayed. [Top] button [Prev] button [Play/Pause] button [Next] button [Last] button [Audio] button When you use the “Audio” button to play an animation with sound, the animation is played according to the audio playback speed, but they are not synchronized. Also, Note you cannot use the “Playback speed”...
- Page 202 Using VBCollector ● Change window size As window size, large or normal size is available and is automatically selected depending on the initial image size. However, you can also change it manually. [Large size] button [Normal size] button Finding Data You can search for data on the camera server by date/time, camera or trigger.
- Page 203 3. A list of search results is displayed. A folder with the name you entered is created in the “Search Results” folder and the search results appear as a list in the folder. ● Filtered searches To filter the search results using yet another search criteria, select the “Search Name” folder to be searched and click the “Search data”...
- Page 204 Using VBCollector Extracting Files Downloaded images and audio are collected and saved in the proprietary format used for file management by the VBCollector Image Viewer and cannot be used by other applications. To make the data accessible by other applications, extract the files and then recover the downloaded data in the file format used for storing data on the server.
- Page 205 2. Specify the folder containing the files to be managed. 3. A folder with the specified name is created inside “Folder” in the folder tree display area and the files in the folder can then be managed. You can hide a folder selected from the folder tree by right-clicking the folder and choosing “Hide Folder”...
-
Page 206: Viewing Logs
Using VBCollector Viewing Logs VBCollector outputs logs concerning the execution of tasks. To view a log, choose “Display Log” from the “Tools” menu bar. The following information about logs is displayed: q Code Identification codes are displayed here. 4 types of icons representing the level are also displayed with these codes. - Page 207 Displaying Logs According to Selection Criteria Logs can be filtered according to error type, code, or date and time etc. so that only the required information is displayed. ○ ○ ○ ○ ○ ○ To Make Settings... 1. Choose “Filter” from the “View” menu bar. 2.
- Page 208 Using VBCollector Search Logs Logs can be searched using character strings. This function is convenient in case of searching any target log from among numbers of logs. ○ ○ ○ ○ ○ ○ To Search Logs... 1. Choose “Search” from the “Edit” menu bar. 2.
- Page 209 Selecting Log Files The initial log file of VBCollector is saved as “vbrpd.log” file in the “SYSTEM” folder within the VBCollector-installed directory. When the file exceeds the size of 10 MB, it will be renamed as “vbrpd01.log”, creating a new “vbrpd.log” file within the same folder to save the log. Log files can be created up to 11 (with names from “vbrpd.log”...
-
Page 210: Setting Retention Period And Disk Space
Using VBCollector Setting Retention Period and Disk Space You can set the file retention period and specify the action to be taken if the specified data capacity on the drive used for saving downloaded data is exceeded. ○ ○ ○ ○ ○ ○ To Make Settings... - Page 211 ● When there is no more free space on the drive on which the files are saved, Log S023 “Execution failure: Available space on the server gets low.” or D029 “Download Note is aborted because of insufficient free space.” is output. ●...
- Page 212 6-38...
-
Page 213: Chapter 7 Appendix
Chapter Appendix... -
Page 214: Troubleshooting
Troubleshooting Before you contact your Canon dealer or service outlet, check the items listed below. If a log message is displayed, refer to the log message list for the log details and the appropriate response. The VB-C50i/VB-C50iR does not start up. - Page 215 I can’t control the camera. ● Check to see if the camera angle is restricted to a preset (→ P.3-14). The viewer is disconnected ●Check that the network or PC you are using is working properly. ●Reboot the PC and try connecting again. ●All factory defaults settings can be restored by using the Reset switch (→...
-
Page 216: Log Messages
Explanation has failed to start. If rebooting does not solve this problem, there is a malfunction. Contact an Response authorized Canon service representative. ●A002 Protocol initialization failure (err) %1 protocol not installed Message Protocol type (LS/C | LS/D | LS/H) Initialization of WebView has failed. - Page 217 Error (read | write | timeout | ...) Camera control device I/O error. Explanation Response There is a malfunction if it occurs repeatedly. Contact an authorized Canon service representative. ●A012 WebView Livescope client start and stop (info) %1@%2 %3 Message...
- Page 218 Log Messages ●A015 WebView Administrator Viewer start (info) %1@%2 privilege granted Message Type of clients (LS/C | LS/D) Client host IP address Explanation The WebView Administrator Viewer has started operation. ●A016 Amount of transmitted video data (info) %1@%2 %3 frames / %4 bytes in %5 seconds Message Client type (LS/D | LS/H) Client host IP address...
- Page 219 Detection of motion (err) motion %1 Message Motion (detected | appeared | disappeared | stopped) Detection of motion started or stopped. Explanation ●A050 Access permission when restricting user access (info) user %1 access granted Message User name Explanation During user access restriction, access has been granted to a specified user. This message is output for both TCP version clients and HTTP version clients.
- Page 220 Log Messages ●B011 Audio client connected (info) [%1] %2 connected n=%3 Message Client type (send | recv) Client host IP address Total number of clients Explanation The audio client has connected. ●B012 Audio client disconnected (info) [%1] %2 closed [%3] Message Client type (send | recv) Client host IP address...
- Page 221 ●B103 Client access forced disconnection (notice) %1 access denied[%2] Message Client host IP address Denial type (41 | 42 | ...) There was a forced disconnection because access was forbidden since Explanation settings have been changed, although the access had been permitted at first (the same denial type as B102).
- Page 222 Explanation An error in the audio device has been detected. Only the audio server will restart. Response If not restored automatically, contact an authorized Canon service representative. ●B302 Reception audio device error (err) cannot use audio device for rx[%1:%2] Message...
- Page 223 Renewal of the setting values has failed. The audio server will shut down. Response If rebooting does not solve this problem, there is a malfunction. Contact an authorized Canon service representative. ■ System-related Log Messages ●S004 System start and stop (info)
-
Page 224: The Vbcollector Log Messages
Log Messages The VBCollector Log Messages The VBCollector log messages are classified into the following 3 categories. Fault Severity Level Error Fault which affects task execution Fault which does not affect task execution Warning Information on correct operation Information ■ Log messages output by Task Scheduler Service ●S100 (info) Message VBCollector Task Scheduler Service has started. - Page 225 ●S011 (err) Message Execution failure: Access to the data directory was denied. Explanation The drive for storing files does not exist or the service could not log on to the remote host specified as Data Directory. ●S015 (warning) Message The task was running longer than the execution interval. Explanation The specified task did not end before the start time of the next task.
- Page 226 Log Messages ■ Log messages while downloading ●D001 (info) Message Download has started. ●D002 (info) Message Download is completed: image=%1audio=%2 [delete:image=%3 audio=%4] No. of downloaded images No. of downloaded audio files No. of deleted images No. of deleted audio files ●D003 (warning) Message Download has aborted.
- Page 227 ●D025 (err) Message Could not perform data deletion and audio file download because login as Administrator failed. ●D029 (err) Message Download is aborted because of insufficient free space. ●D035 (info) Message The number of downloaded data has reached to the limit. Explanation Output when the download limit for a single download has been reached.
-
Page 228: Specifications
37 mm, pitch=0.75 mm TTL system, Auto Linux TCP/IP, HTTP, DHCP, FTP, WV-HTTP, WV-TCP (from Canon) Motion-JPEG compression (video quality variable), JPEG compression (for still pictures) NTSC: 0.1 fps to 30 fps (variable) PAL: 0.1 fps to 25 fps (variable) µ-law PCM 8bit (sampling frequency 8000Hz mono) -
Page 229: External Device I/O Terminals
External Device I/O Terminals You can use Input/Output external devices together with the Multi-Terminal Module VB-EX50. External Device Input Terminals (IN The external device input terminals consist of 2 terminals (IN on the inside of the main unit. By connecting 2 cables to the + and ‘–’ terminals and then electrically short-circuiting across the terminals (ON) or separating the connection (OFF), an interrupt can be generated for the internal controller. -
Page 230: System Configuration
System Configuration Example of Basic System Configuration - Viewing Videos Using a Viewer VB-C50i VB-C50iR VB-C50i This system configuration consists of the VB-C50i/VB-C50iR with Viewer Software (→ P.1-4). The Viewer Software consists of the Viewer for PC and the Viewer for Java. Viewer for PC must be installed in advance from the supplied CD-ROM. -
Page 231: Sample Network Configurations
Sample Network Configurations This section describes some typical installation modes for the VB-C50i/VB-C50iR. Be sure to assign an IP address to the VB-C50i/VB-C50iR that matches your environment. Sample LAN Environment Configuration VB-C50i VB-C50iR Viewer PC This example shows the VB-C50i/VB-C50iR connected to a LAN by Ethernet. In this configuration, videos can be seen by viewers in the same Ethernet segment as the VB-C50i/VB-C50iR and by viewers with access to that segment. -
Page 232: Upgrading The Firmware Remotely
Upgrading the Firmware Remotely Get the new firmware from Canon Web site, and upgrade in command prompt. The firmware file is called “Firmware_new.bin” and is saved on your PC in “My Documents”. 1. Open command prompt. C:\Documents and Settings\xxxx> is displayed on the screen. -
Page 233: Restoring The Factory Default Settings
Restoring the Factory Default Settings Since the VB-C50i/VB-C50iR supports a wide variety of functions, we recommend that you make a note of the settings for each function (→ P.7-23). If you want to redo the settings from the beginning because you have forgotten them or for some other reason, first restore the factory default settings. -
Page 234: Restoring The Factory Default Settings From The Reset Switch
Restoring the Factory Default Settings ● Do not turn the VB-C50i/VB-C50iR power off while the Restoring operation. Turning the power off before completion may prevent it from starting up properly. Note ● If you click the “OK” button at this point, it will not possible to abort the process to restore the default settings. -
Page 235: Initializing The Camera Head Position
Initializing the Camera Head Position If the preset position is misaligned, you can correct it by initializing the camera head position. When the camera head position is initialized, the camera head moves to face front, and then moves back to the current position. Start initializing ○... - Page 236 w Auto The camera head position is periodically initialized by selecting a specified time or intervals. • Do not initialize automatically Does not initialize periodically. • Initialize the camera head position at specified time Initializes on the days of week you have selected. You can check more than one day at a time, and set the time by one minute at minimum.
-
Page 237: Factory Default Settings
Factory Default Settings Item ● Administrator ID ● Administrator password ● Settings page path ● Ethernet Address Setting Method IP Address Subnet Mask Default Gateway Address Maximum Transmission Unit ● Connection Keeping Send packet regularly Target IP Address Interval(min.) ● Video Capture Video Capture Size Video Transmission Motion Detection... - Page 238 Factory Default Settings Item ● Server(Common Settings) Maximum Number of Clients Maximum Connection Time (sec.) Restrict Service Time ● HTTP Server HTTP Port Global Address for Web Pages IP Address Port Name ● Camera Server Video Transmission Port Camera Control Port Maximum Frame Rate (fps) Maximum Transmission Rate (Mbps) Control Queue Length...
-
Page 239: Data Capacity Of Recorded Pictures And Audio
Data Capacity of Recorded Pictures and Audio* Audio recording is only available with two particular models. This section provides information that may help you in specifying and configuring various settings using the VB-C50i/VB-C50iR. The VB-C50i/VB-C50iR can be used in a wide range of applications with its feature to temporarily store recorded pictures and audio data* in the memory. -
Page 240: Amount Of Audio Data
Data Capacity of Recorded Pictures & Audio ● If you set the Video Quality to 100, the amount of data becomes enormously large. ● The recorded pictures are saved in the VB-C50i/VB-C50iR memory in units of Note 8KB. For example, an image data of 5KB takes the memory of 8KB, and an image data of 10KB consumes the memory of 16KB. -
Page 241: Index
Index AC adapter ... iv, 2-6 AC cable ... iv, 2-6 Access Control ... 3-21 Account ... 4-5, 6-14 Adding a Server ... 6-13 Admin Viewer ... 4-65 Special Privilege ... 4-65 Starting Up ... 4-66 Operating a Camera ... 4-68 Camera-Specific Functions ... - Page 242 Index Home Position ... 3-10 Host List ... 3-22 Host Name ... 4-5 Host Specification ... 3-22 HTTP Port ... 3-17, 4-5 HTTP Server ... 3-17 Hub ... 2-2, 2-6, 2-7 Infrared Cut Filter ... 4-52 Infrared light ... 1-9, 1-10, 4-70 Initial Setup Tool ...
- Page 243 Recording between ON event and OFF event ... 4-47 Recording interval between events ... 4-47 Recording tab ... 4-47 Repetition Interval ... 4-40, 4-57 Reset switch ... 1-11, 7-22 Restore Settings ... 3-30 Restore to the previous Setting button ... 3-4 Root Account ...
- Page 244 2828, 16th Street, N.E, Calgary, Alberta T2E 7K7 CANON CANADA INC. MONTRÉAL 5990 Côte-de-Liesse, Montréal, Québec H4T 1V7 ● If you have any questions, call the CANON CANADA Customer Information Centre toll-free at 1-800-OK-CANON (652-2666) (Canada only) MEXICO CANON MEXICANA, S. DE R.L.DE C.V.
Need help?
Do you have a question about the VB-C50i/VB-C50iR and is the answer not in the manual?
Questions and answers