
Related Manuals for Estelon Extreme Mk II


Summary of Contents for Estelon Extreme Mk II
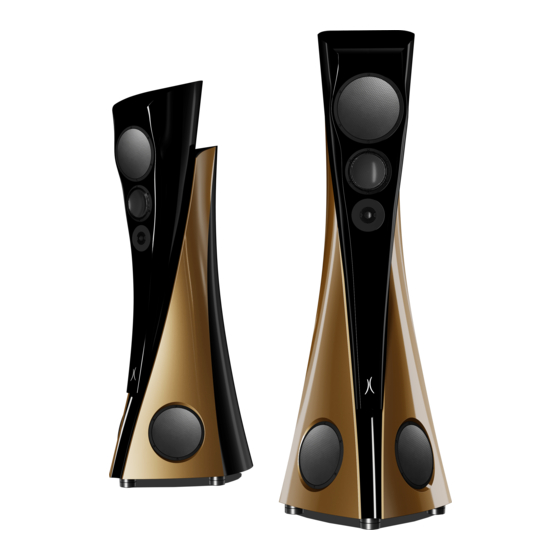
- Page 1 Alfred & Partners Designed by Alfred Vassilkov ___________________ Model Extreme Mk II Serial Number __________...
- Page 2 Your ESTELON loudspeakers have passed our quality control: – Technical test passed. Engineer, Estelon – Listening test passed. Alfred Vassilkov Head of Research and Development, Estelon...
-
Page 3: Table Of Contents
4.4. S ..26 ETUP RECOMMENDATIONS BY LFRED ASSILKOV 4.4.1. Troubleshooting ..............29 4.5. B ................31 REAK IN PERIOD 5. TAKING CARE OF YOUR ESTELON SPEAKERS ....31 6. ESTELON / ALFRED & PARTNERS OÜ – TECHNICAL SERVICES ......................32... -
Page 4: Introduction
1.1. Alfred & Partners OÜ Alfred & Partners, the Tallinn-based design studio, think-tank, and owner of Estelon, is not simply a business but a passionate dedication to a single, heartfelt idea: the development and manufacturing of instruments capable of unveiling the rich, emotional tapestry of music in a personally involving and captivating way. - Page 5 The unique cabinet shape of Estelon speakers create the ideal conditions for sound reproduction. Its curved, smooth form eliminates corner reflections.
-
Page 6: Estelon Extreme M Kii
1.2. Estelon Extreme Mk II Estelon Extreme Mk II: By elevating the act of listening to new heights, Estelon delivers an audio experience like no other. The system comprises an upper and a lower module, with the former fully adjustable to best suit a room’s acoustic attributes and the listener’s personal preferences. -
Page 7: Cabinet Design
During the final hand-assembly process each speaker is individually tuned to maintain uniformity from unit to unit. Each Extreme Mk II speaker weighs 250 kg (551.2 lbs) in order to provide stability, and is constructed with two modules (upper and lower). The upper module of each loudspeaker is adjustable. -
Page 8: Transducers
The two 250 mm (11 inches) aluminium sandwich woofers have been designed together with the Accuton engineers, especially for the Estelon flagship loudspeakers. These drivers have an extremely stiff and lightweight membrane and very long linear excursion. In combination with the Cell concept motor system, where the voice coil... - Page 9 It is like being present at a live concert where one can hear the instruments but not the speakers reproducing the sound. The Estelon Diamond loudspeakers offer a new way of relaxed listening, and you get to sense all the details that you have never heard before on your old records and digital music.
-
Page 10: Crossovers
The internal cabling is of the highest quality and from the renowned cable manufacturer Kubala-Sosna. The crossovers of the Extreme Mk II are designed to provide accurate time and frequency domain merging between drivers while preserving timbral and tonal accuracy. The crossovers are in their own isolated chamber to reduce the microphonic effects and vibration influence. -
Page 11: Connectors
Finally, the multiple coats of the lacquer finish are applied along with the final polishing to a mirror-like finish. The Estelon Extreme Mk II is... - Page 12 offered in a choice of dual tone liquid gloss finishes, or custom made premium finishes.
-
Page 13: Specifications
2. SPECIFICATIONS TYPE: 4-way passive loudspeaker, bass reflex DRIVERS: 2 x Woofer: 250 mm (11 inches) Accuton, CELL aluminum sandwich (custom design) Mid-woofer: 250 mm (11 inches) Accuton, CELL aluminum sandwich (custom design) Mid-range: 168 mm (7 inches) Accuton, CELL ceramic membrane Tweeter: 25 mm (1 inch) Accuton, diamond inverted dome... -
Page 14: Unpacking Instructions
250 kg (551.2 lbs.) of each speaker, they can be safely transported to their final position in the room with the included lift cart which is a custom design for the Estelon Extreme Mk II model. The transport cases (industrial grade custom flight-cases) are equipped with wheels to ease the transportation and setup. - Page 15 Open the cardboard box of the lift cart and take all the parts out of the packaging. 2. Screw the handles on the lift cart as shown in drawing 1 (four screws). 3. Now proceed with unlocking/opening all the locks of the speaker flight case cover while the flight case is in a horizontal position.
- Page 16 4. Carefully lift and remove the cover from the flight case. (drawing 3) 5. Remove the accessories box from the flight case. (drawing 4) 6. The three individuals can now lift gently the flight case with the use of handles on the flight case as shown in drawings 5 and 6, while...
- Page 17 the other person supports the speaker from the other side till it is in a vertical position. NB! Do not touch the drivers while supporting the speaker.
- Page 18 7. Now bring the lift cart and push it carefully under the speaker until the forks are all the way to the back, and the front part of the speaker touches the lift cart. (drawing 7) 8. Take the hand lever and insert it into the lift cart. Then turn it 90 degrees clockwise, as shown in drawing 8.
- Page 19 9. Pull the lever down so that the forks lift the speaker. (drawing 9) 10. Then make sure that the safety valves are in the notches. (drawing...
- Page 20 11. Remove the lever by turning it anti-clockwise and pulling it out. (drawing 11) 12. Transport the speaker to the desired location by moving the lift cart through the handles. One or two persons should support the speaker while moving it. 13.
- Page 21 14. Unlock the safety valves. (drawing 13) 15. Lift the lever so the lift cart forks release the speaker. (drawing 14) 16. Remove the lift cart and repeat the process for the other speaker.
-
Page 22: Set-Up
15. 4. SET-UP 4.1. Initial positioning in the room Model Extreme Mk II – Suggested room size 50-200 m² (538-2153 square feet) -
Page 23: Setting Up The Speakers
When positioning the speakers in your room, it is advised to allow enough ”free” space around the speakers to minimize sound reflections from walls, furniture, etc. This will contribute to achieving correct tonality, realistic imaging, focus, dynamics. recommended minimum distance between the speaker and the nearest reflection point is 1.2 m (3.6 ft). - Page 24 With the use of the Hex Wrench tool (size 10), loosen up the safety bolt which will allow the movement of the upper module. It will require 4-6 anti-clockwise turns. (drawing 17) Place the cover plates back into place. The next step is to connect the power supplies that you can find in the accessories box, to the DC sockets on the connectors’...
-
Page 25: Wiring
4.3. Wiring The Extreme Mk II model has the capability of using a 2-wire connector bridge, which is the default (drawing 19), and a 4-wire connector bridge for when connecting 2 amplifier channels. (drawing In order to exchange the 2-wire connector bridge, with the 4-... -
Page 26: Setup Recommendations By Alfred Vassilkov
Allen key into the connector key hole and pressing down. Then insert the cable termination and just release the connector key. (drawing 21) NB! When connecting the speaker to the amplifier please make sure that the amplifier is in the off position. Connect the speaker cable to the pole terminal on the back of the speaker: speaker terminal „+“... - Page 27 The upper module of each loudspeaker is adjustable in the range of 300 mm in height. To make the positioning process more convenient we set nine different steps in this range, so the top module of the speakers can be moved up or down. For this process, both speakers are connected to a controller box and the height of both speakers can be changed simultaneously with the dedicated remote control.
- Page 28 ranging from 0 to +/-4). The height can be adjusted with the up/down arrows of the remote control. On the bottom right side of the screen, there is a horizontal bar graph indicating the tweeters’ depth position (5 positions ranging from 0 to +/-2). The depth can be adjusted with the left/right arrows of the remote control.
-
Page 29: Troubleshooting
NB! The listener’s experience is crucial in adjusting the speakers’ upper modules and tweeters positions. In addition, each room has its own characteristics, therefore please refer to the above suggestions as general guidelines. During the final set-up, small adjustments may be made to the initial chosen position, e.g. - Page 30 If the remote control cannot connect with the speakers due to a malfunction and the height of the upper module needs adjustment, there is an alternative manual process. There is a switch inside the speaker cabinet which can be accessed through the bass port from the back of the speaker.
-
Page 31: Break-In Period
4.5. Break-in period Although all Estelon speakers have an initial “break-in” at the factory, due to shipping conditions and pressure/temperature changes that may have been incurred, the speakers will need to go through an additional “break-in” process before their final set-up. All the mechanical and electrical connections will stabilize naturally after playing a continuous music signal for approx. -
Page 32: Estelon / Alfred & Partners Oü - Technical Services
Terms and Conditions Limited Warranty – All ESTELON products purchased from authorized ESTELON dealers are covered by a limited 5-year non- transferrable warranty granted by Alfred & Partners OÜ. This warranty includes all parts and labour charges as well as return shipping charges... - Page 33 Customers should consult with their original ESTELON dealer or distributor for possible alternate repair instructions prior to contacting the ESTELON factory. Other ESTELON dealers or distributors may refuse from assisting the Customer under the limited warranty.
- Page 34 The term of the original warranty shall not be extended by the duration of any warranty repairs. Design Changes – ESTELON reserves the right to modify its products or change specifications at any time without obligation or...
- Page 35 Payments not received within 30 days of initial contact may incur storage fees. We strongly recommend that all product repairs should be conducted through the ESTELON factory or an authorized ESTELON repair facility. ESTELON products are designed and manufactured to the highest tolerances with numerous hand-picked components; for...
- Page 36 Customers should consult with their original ESTELON dealer or distributor for possible alternate repair instructions prior to contacting the ESTELON factory. BUT under any and all circumstances customers are welcome to...
- Page 37 ESTELON is a trademark of Alfred & Partners OÜ Alfred & Partners OÜ Kukermiidi 6 Tallinn, 11216 Estonia Notes...
Need help?
Do you have a question about the Extreme Mk II and is the answer not in the manual?
Questions and answers